2007 DODGE SPRINTER tires
[x] Cancel search: tiresPage 327 of 393

326 Practical hintsFlat tire
5
You can use the Premium tire sealant to
seal small punctures, particularly those in
the tire tread. Tire sealants can be used at
outside temperatures down to –22 °F
(–30 °C).
Prepare the vehicle as described
(\2page 320).\1Try to park the vehicle in such a way
that the tire puncture is close to the
ground. If the tire puncture cannot be
seen, park the vehicle in such a way
that the tire valve of the flat tire is in
horizontal alignment with the axle.
\1It is beneficial to the sealing process if
you remove the foreign body that has
pierced the tire, for example the screw
or nail.
\1Remove the Premium tire sealant, the
accompanying "max. 50 mph
(80 km/h)" sticker and the electric air
pump from the storage compartment in
the right-hand doorway (\2page 303).
\1Affix the sticker within the driver’s field
of vision.Using Premium tire sealant*Warning
G
Smoking, fire and naked flames are prohibit-
ed when handling Premium tire sealant.
Avoid creating sparks.
Warning
G
Your safety is at particular risk and the tire
sealant is unable to repair a tire in the fol-
lowing situations:
\4if there are cuts or punctures in the tire
greater than 0.23 in (6 mm)
\4if the rim is damaged
\4if you have driven with very low tire pres-
sures or with flat tires
Do not drive any further. Consult an autho-
rized Sprinter Dealer which has the neces-
sary specialist knowledge and tools to carry
out the work required.
The manufacturer recommends that you use
an authorized Sprinter Dealer for this pur-
pose. In particular, work relevant to safety
or on safety-related systems must be car-
ried out at an authorized Sprinter Dealer.
!
CAUTION
Only connect the electric air pump to
the 12 V socket (\2page 170) on the
center console (12 V, 25 A, 300 watts).
You could otherwise damage the vehi-
cle electrical system.
Page 328 of 393

327 Practical hints
Flat tire
5
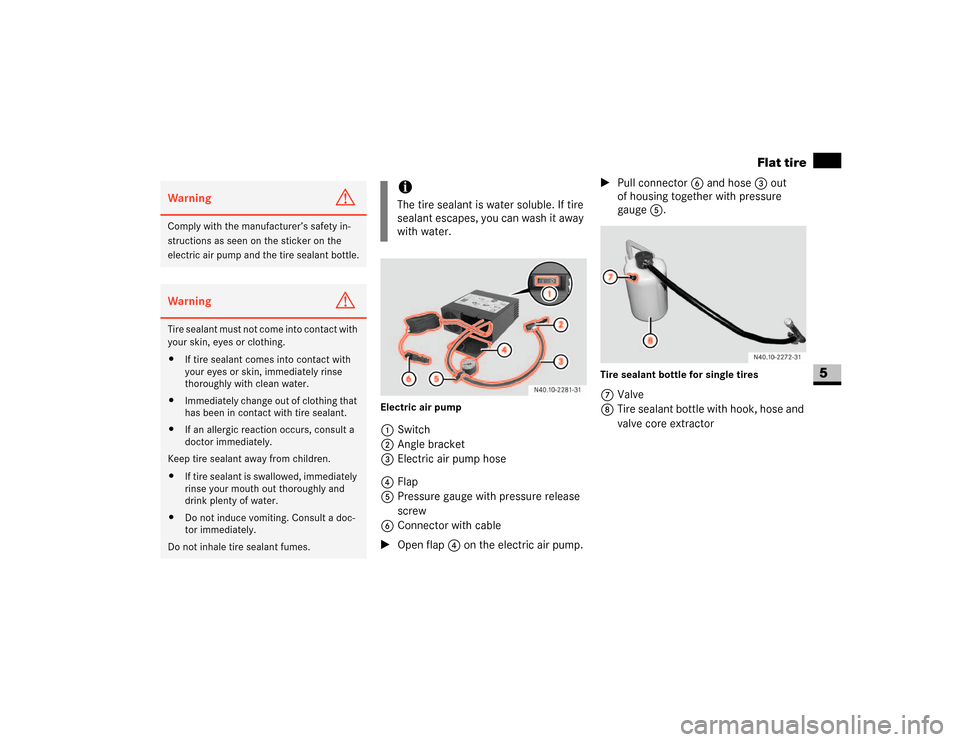
Electric air pump1Switch
2Angle bracket
3Electric air pump hose
4Flap
5Pressure gauge with pressure release
screw
6Connector with cable
\1Open flap4 on the electric air pump.\1Pull connector 6 and hose3 out
of housing together with pressure
gauge5.
Tire sealant bottle for single tires7Valve
8Tire sealant bottle with hook, hose and
valve core extractor
Warning
G
Comply with the manufacturer’s safety in-
structions as seen on the sticker on the
electric air pump and the tire sealant bottle.Warning
G
Tire sealant must not come into contact with
your skin, eyes or clothing.
\4If tire sealant comes into contact with
your eyes or skin, immediately rinse
thoroughly with clean water.
\4Immediately change out of clothing that
has been in contact with tire sealant.
\4If an allergic reaction occurs, consult a
doctor immediately.
Keep tire sealant away from children.
\4If tire sealant is swallowed, immediately
rinse your mouth out thoroughly and
drink plenty of water.
\4Do not induce vomiting. Consult a doc-
tor immediately.
Do not inhale tire sealant fumes.
iThe tire sealant is water soluble. If tire
sealant escapes, you can wash it away
with water.
Page 329 of 393

328 Practical hintsFlat tire
5
Tire sealant bottle for twin tires7Valve
8Tire sealant bottle with hook, hose and
angle brackets
\1Shake tire sealant bottle8.
\1Unscrew and remove the cap from
valve 7 on tire sealant bottle 8.
\1Press angle bracket 2 (\2page 327)
on hose 3 of the electric air pump all
the way onto valve 7 of tire sealant
bottle 8 and clamp it in place.The following steps may vary depending on
vehicle tires.
\4Single tires (\2page 328).
\4Twin tires, inner wheel (\2page 329)
\4Twin tires, outer wheel (\2page 331)
Single tire
9Hook
aKnob
bLever
cValve core extractor
dTire valve\1Pull knoba out of valve core extractor
c as far as the stop.
\1Unscrew and remove the valve cap
from tire valved on the flat tire.
\1Hook the tire sealant bottle into the up-
per vent hole in the wheel using
hook9.
\1Keep lever b pressed, connect valve
core extractorc firmly to tire valved
and release leverb.
\1Press knob a into the valve core of
tire valved, turning it gently as you do
so, until the shaft of valve core
extractorc engages.
\1Turn knoba counterclockwise until
the valve core is unscrewed.
\1Pull knoba out of valve core extractor
c as far as the stop.
\1This pulls the valve core into the valve
core extractor and seals it against the
valve core extractor stop.
\1Make sure that the pressure release
screw on pressure gauge 5 is closed.
\1Connect connector6 to the 12 V
socket (12 V, 25 A, 300 watts) on the
center console (\2page 170).
Page 330 of 393

329 Practical hints
Flat tire
5
\1Start the engine (\2page 111).
\1Press I on electric air pump switch1.
The electric air pump is switched on.
The tire sealant is then pumped into
the tire and the tire pressure is in-
creased. Allow the electric air pump to
run for at least 10 minutes until tire
sealant bottle 8 is completely empty
and a minimum tire pressure of
43.5 psi (3.0 bar) is achieved.
\1Inflate the tire using the electric air
pump until the recommended tire pres-
sure (\2page 210) is achieved.
\1Then press0 on electric air pump
switch1.
The electric air pump is switched off.
\1Slide knoba quickly to the stop in
valve core extractorc.
\1Turn knob a clockwise until the valve
core is firmly screwed into tire
valved.
\1Press leverb and remove valve core
extractorc from tire valved.
\1Screw the valve cap onto tire valved.
After filling with tire sealant (\2page 333).Twin tires, inner wheel
9Valve extension
aValve core extractor
\1Unscrew and remove the valve cap
from valve extension9 on the flat tire.
\1Screw valve core extractora clock-
wise all the way onto valve
extension9.
\1Continue to screw valve core
extractora about half a rotation to
loosen the valve extension.
\1Unscrew and remove the valve exten-
sion and valve core extractor counter-
clockwise from tire valve.
\1Unscrew and remove the valve exten-
sion from the valve core extractor.
!
CAUTION
Do not connect the electric air pump
connector to the cigarette lighter sock-
et or another 12 V socket. These are
not designed for operating the electric
air pump.
!
CAUTION
Do not run the electric air pump for
more than 20 minutes without a break,
otherwise it may overheat.
The air pump can be used again once it
has cooled down.
iDo not pull the valve core extractor
from the tire valve while the valve core
is unscrewed from the tire valve. Tire
sealant could otherwise escape onto
your hands.
The tire sealant is water soluble. If tire
sealant escapes, you can wash it away
with water.
Page 332 of 393

331 Practical hints
Flat tire
5
\1Turn knob c clockwise until the valve
core is firmly screwed into tire
valvee.
\1Pull knob c out of valve core
extractora as far as the stop.
\1Unscrew valve core extractora coun-
terclockwise and remove it from tire
valvee .
\1Screw valve extension9 onto tire
valvee and tighten.
\1Screw the valve cap onto valve
extension9.
After filling with tire sealant (\2page 333).Twin tires, outer wheel
The tire valve is on the inside of the outer
wheel and should be horizontal on the left-
hand side of the vehicle for the repair pro-
cedure.
Valve tool with handle and turning work-
piece
9Handle
aTurning workpiece
\1Unscrew and remove the valve cap
from tire valved on the flat tire.
\1Guide valve tool through the opening in
the wheel and press it onto tire
valveb.
\1Use one hand to hold handle9 on
valve tool firmly and use the other hand
to unscrew and remove the valve core
from the valve tool using turning work-
piece a.
\1Remove the valve tool carefully
through the opening in such a way that
the valve core remains engaged in the
valve tool.
iDo not unscrew the valve core extrac-
tor from the tire valve while the valve
core is unscrewed from the tire valve.
Tire sealant could otherwise escape
onto your hands.
The tire sealant is water soluble. If tire
sealant escapes, you can wash it away
with water.
\2\2
Page 352 of 393

351
6 *Technical data
Genuine Sprinter parts ......... 352
Vehicle electronics ......... 354
Service products and capacities ......... 355
Rims and tires ......... 367
Tire inflation pressure ......... 369
Lashing points and carrier systems ......... 371
Vehicle identification labels ......... 373
Page 368 of 393

367 *Technical data
Rims and tires
6
\3 Rims and tires
!
CAUTION
Only use tires which have been tested
and approved for your Sprinter vehicle
by the vehicle manufacturer. Tires ap-
proved by the vehicle manufacturer are
developed to provide the best possible
performance in conjunction with the
driving safety systems on your Sprinter
vehicle such as ABS, BAS, ASR or ESP
®.
Using tires other than those approved
by the vehicle manufacturer may result
in damage that is not covered by the
Sprinter warranty.
Using tires other than those approved
by the vehicle manufacturer can have
detrimental effects, such as
\4poor handling characteristics
\4increased noise
\4increased fuel consumption
Moreover, tires and rims not approved
by the vehicle manufacturer may, un-
der load, exhibit dimensional variations
and different tire deformation charac-
teristics that could cause them to come
into contact with the vehicle body or
axle parts. Damage to the tires or the
vehicle may be the result.
Warning
G
Loose wheel nuts or bolts could cause the
vehicle to lose a wheel while it is in motion.
This would jeopardize the operating and
road safety of the vehicle. You could lose
control of the vehicle as a result, cause an
accident an injure yourself or others.
If a wheel was replaced or new wheel nuts
are used, the wheel bolts or wheel nuts must
be retightened to the specified tightening
torque after 30 miles (50 km).
If new or repainted wheels are mounted, the
wheel bolts or wheel nuts must be retight-
ened again to the specified tightening
torque after approximately 600 to 3000
miles (about 1000 to 5000 km).
iFurther information on tires and rims is
available at any authorized Sprinter
Dealer. A placard with the recommend-
ed tire inflation pressures is located on
\4the driver’s door B-pillar for vehi-
cles with a gross weight capacity
less than 10,000 lbs (4500 kg)
(\2page 375)
\4on a label below the driver’s seat on
an outward facing position of the
mounting pillar for vehicles with a
gross weight capacity above
10,000 lbs (4500 kg) (\2page 375)
The tire inflation pressure should be
checked regularly and should only be
adjusted on cold tires.
Page 369 of 393

368 *Technical dataRims and tires
6
Vehicle Model Type
2500
3500
Rims (steel)
6.5 J x 16
5.5 J x 16
Rims (light alloy)
6.5 J x 16
–
Wheel offset
2.13 in (54 mm)
–
Half dual spacing
4.82 in (122.5 mm)
Wheel fixture
Wheel bolts
Wheel nuts
Tightening torque (steel wheel)
177 lb-ft (240 Nm)
133 lb-ft (180 Nm)
Tightening torque (light-alloy wheel)
133 lb-ft (180 Nm)
-
Summer tires
–
–
All-season tires
1
1 Radial-ply tires
LT 245/75 R16 120/116L
LT 215/85 R16 115/112N
LT 215/85 R16 115/112Q
LT 245/75 R16 120/116N
Winter tires
2
2 Radial-ply tires
LT 245/75 R16 120/116L M+S .
LT 215/85 R16 115/112N M+S .
LT 245/75 R16 120/116N M+S .