Page 317 of 504
When parking on a hill, turn the front wheels toward the
curb on a downhill grade and away from the curb on an
uphill grade.
The parking brake should always be applied whenever
the driver is not in the vehicle.
BRAKE SYSTEM
In the event power assist is lost for any reason (for
example, repeated brake applications with the engine
off), the brakes will still function. The effort required to
brake the vehicle will be much greater than that required
with the power system operating.
Your vehicle is equipped with dual hydraulic
brake systems. If either of the two hydraulic
systems lose normal capability, the remaining
system will still function. There will be some
loss of overall braking effectiveness. This may be evidentby increased pedal travel during application, greater
pedal force required to slow or stop, and potential
activation of the Brake Warning Lamp.
Anti-Lock Brake System — If Equipped
The Anti-Lock Brake System provides increased vehicle
stability and brake performance under most braking
conditions. The system automatically “pumps” the
brakes during severe braking conditions to prevent
wheel lock-up.
WARNING!
Pumping of the Anti-Lock Brakes will diminish
their effectiveness and may lead to an accident.
Pumping makes the stopping distance longer. Just
press firmly on your brake pedal when you need to
slow down or stop.
STARTING AND OPERATING 317
5
Page 318 of 504
WARNING!
•Anti-lock system (ABS) cannot prevent the natu-
ral laws of physics from acting on the vehicle, nor
can it increase braking or steering efficiency be-
yond that afforded by the condition of the vehicle
brakes and tires or the traction afforded.
•The ABS cannot prevent accidents, including
those resulting from excessive speed in turns,
following another vehicle too closely, or hydro-
planing. Only a safe, attentive, and skillful driver
can prevent accidents.
•The capabilities of an ABS equipped vehicle must
never be exploited in a reckless or dangerous
manner which could jeopardize the user’s safety
or the safety of others.
The ABS light monitors the Anti-Lock Brake
System. The light will come on when the
ignition switch is turned to the ON position
and may stay on for as long as four seconds.
If the ABS light remains on or comes on while driving, it
indicates that the Anti-Lock portion of the brake system
is not functioning and that service is required. However,
the conventional brake system will continue to operate
normally if the BRAKE warning light is not on.
If the ABS light is on, the brake system should be serviced
as soon as possible to restore the benefits of Anti-Lock
brakes. If the ABS light does not come on when the
Ignition switch is turned to the ON position, have the
bulb repaired as soon as possible.
If both the Brake Warning Light and the ABS Light
remain on, the Anti-Lock brakes (ABS) and Electronic
Brake Force Distribution (EBD) systems are not function-
ing. Immediate repair to the ABS system is required.
318 STARTING AND OPERATING
Page 319 of 504
When the vehicle is driven over approximately 7 mph (11
km/h), you may also hear a slight clicking sound as well
as some related motor noises. These noises are the system
performing its self check cycle to ensure that the ABS
system is working properly. This self check occurs each
time the vehicle is started and accelerated past approxi-
mately 7 mph (11 km/h).
ABS is activated during braking under certain road or
stopping conditions. ABS-inducing conditions can in-
clude ice, snow, gravel, bumps, railroad tracks, loose
debris, or panic stops.
You also may experience the following when the brake
system goes into Anti-lock:
•The ABS motor running (it may continue to run for a
short time after the stop),
•the clicking sound of solenoid valves,
•brake pedal pulsations,
•and a slight drop or fall away of the brake pedal at the
end of the stop.
These are all normal characteristics of ABS.
WARNING!
The Anti-Lock Brake System contains sophisticated
electronic equipment that may be susceptible to
interference caused by improperly installed or high
output radio transmitting equipment. This interfer-
ence can cause possible loss of anti-lock braking
capability. Installation of such equipment should be
performed by qualified professionals.
All vehicle wheels and tires must be the same size and
type and tires must be properly inflated to produce
accurate signals for the computer.
STARTING AND OPERATING 319
5
Page 372 of 504

WARNING!
Improper towing can lead to an injury accident.
Follow these guidelines to make your trailer towing
as safe as possible:
Make certain that the load is secured in the trailer
and will not shift during travel. When trailering
cargo that is not fully secured, dynamic load shifts
can occur that may be difficult for the driver to
control. You could lose control of your vehicle and
have an accident.
•When hauling cargo or towing a trailer, do not over-
load your vehicle or trailer. Overloading can cause a
loss of control, poor performance or damage to brakes,
axle, engine, transmission, steering, suspension, chas-
sis structure or tires.
•Safety chains must always be used between your
vehicle and trailer. Always connect the chains to the
frame or hook retainers of the vehicle hitch. Cross the
chains under the trailer tongue and allow enough
slack for turning corners.
•Vehicles with trailers should not be parked on a grade.
When parking, apply the parking brake on the tow
vehicle. Put the tow vehicle automatic transmission in
P for Park. Always, block or�chock�the trailer wheels.
•GCWR must not be exceeded.
•Total weight must be distributed between the tow
vehicle and the trailer such that the following four
ratings are not exceeded:
1. GVWR
2. GTW
3. GAWR
372 STARTING AND OPERATING
Page 383 of 504
Jacking Instructions — Stow ’n Go Seating
Preparations For Jacking
WARNING!
Carefully follow these tire changing warnings to help prevent personal
injury or damage to your vehicle:
•Do not attempt to change a tire on the side of the vehicle close to
moving traffic. Pull far enough off the road to avoid the danger of
being hit when operating the jack or changing the wheel.
•Always park on a firm, level surface before raising the vehicle.
•Block the wheel diagonally opposite the wheel to be raised.
•Apply the parking brake firmly before jacking.
•Never start the engine with the vehicle on a jack.
•Do not let anyone sit in the vehicle when it is on a jack.
•Do not get under the vehicle when it is on a jack.
•Only use the jack in the positions indicated.
•If working on or near a roadway, be extremely careful of motor
traffic.
•To assure that spare tires, flat or inflated are securely stowed, spares
must be stowed with the value stem facing the ground.
WARNING!
Do not attempt to change a tire on the side of the
vehicle close to moving traffic. Pull far enough off
the road to avoid the danger of being hit when
operating the jack or changing the wheel.
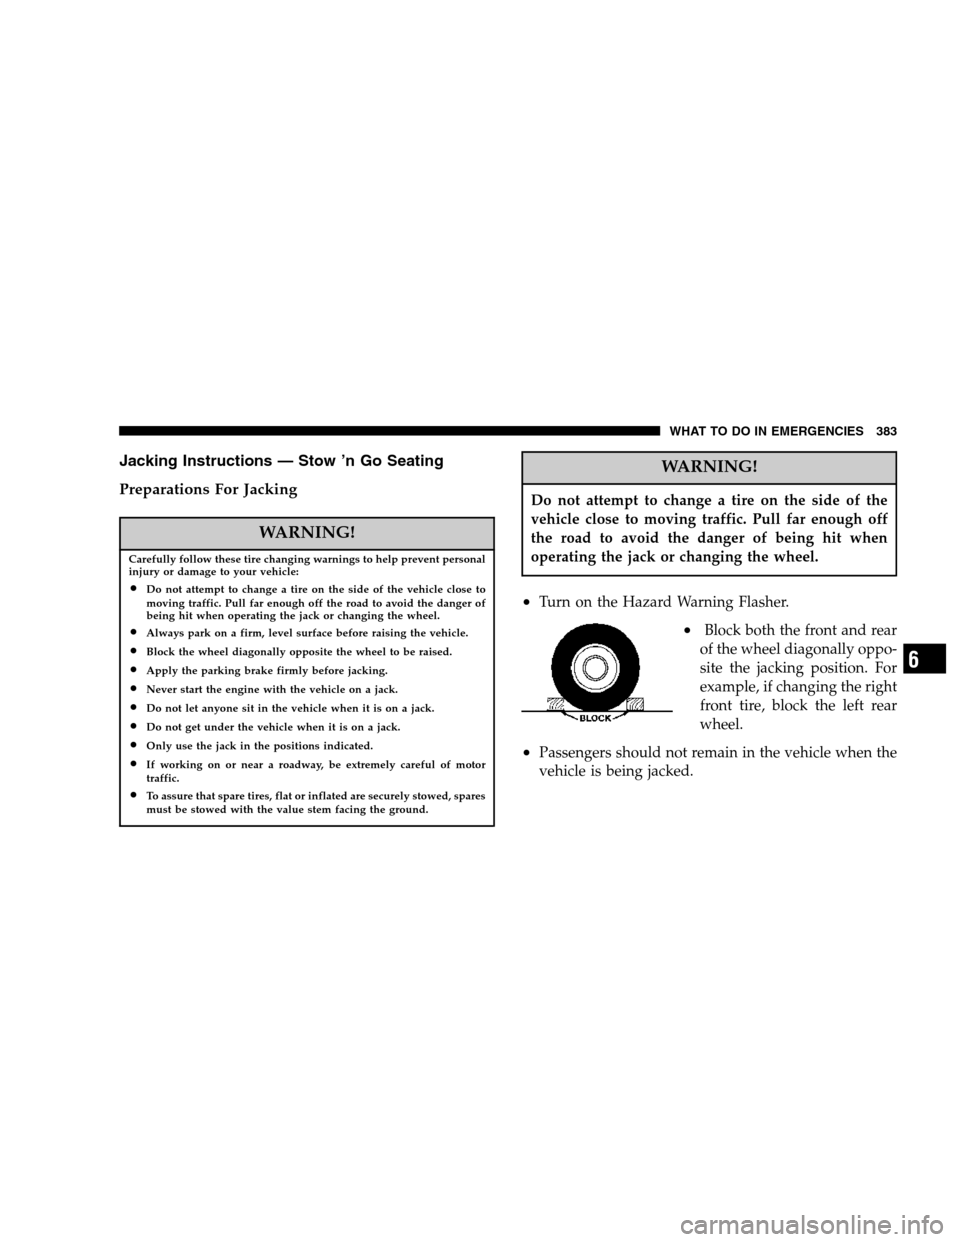
•Turn on the Hazard Warning Flasher.
•Block both the front and rear
of the wheel diagonally oppo-
site the jacking position. For
example, if changing the right
front tire, block the left rear
wheel.
•Passengers should not remain in the vehicle when the
vehicle is being jacked.
WHAT TO DO IN EMERGENCIES 383
6
Page 395 of 504
WARNING!
Do not attempt to change a tire on the side of the
vehicle close to moving traffic. Pull far enough off
the road to avoid the danger of being hit when
operating the jack or changing the wheel.
•Turn on the Hazard Warning Flasher.
•Block both the front and rear
of the wheel diagonally oppo-
site the jacking position. For
example, if changing the right
front tire, block the left rear
wheel.
•Passengers should not remain in the vehicle when the
vehicle is being jacked.
Jack Location — Non Stow ’n Go Seating
The jack, jack handle are stowed behind the rear left side
trim panel in the rear cargo area. Pull up on the lever to
release the cover.
Remove the spare wheel, scissors jack and jack handle
from stowage by rotating the wing nut to the left.
Jack Location
WHAT TO DO IN EMERGENCIES 395
6
Page 405 of 504
CAUTION!
•Do not attempt to tow this vehicle from the front
with sling type towing equipment. Damage to the
front fascia will result.
•Always use wheel lift equipment when towing
from the front. The only other approved method
of towing is with a flat bed truck.
•Do not tow the vehicle from the rear. Damage to
the rear sheet metal, liftgate and fascia will occur.
•Do not push or tow this vehicle with another
vehicle as damage to the bumper fascia and trans-
mission may result.
•If the vehicle being towed requires steering, the
ignition switch must be in the OFF position, not
in the LOCK or ACCESSORY positions.
If it is necessary to use the accessories while being towed
(wipers, defrosters, etc.), the key must be in the ON
position, not the ACCESSORY position. Make certain the
transmission remains in NEUTRAL.
Without The Ignition Key
Special care must be taken when the vehicle is towed
with the ignition in the LOCK position. The only ap-
proved method of towing with out the ignition key is
with a flat bed truck. Proper towing equipment is neces-
sary to prevent damage to the vehicle.
TOWING THIS VEHICLE BEHIND ANOTHER
VEHICLE (Flat towing with all four wheels on the
ground)
Flat towing of vehicles equipped with an automatic
transmission, is only permitted within the limitations
described in this section.
WHAT TO DO IN EMERGENCIES 405
6
Page 424 of 504

Refrigerant Recovery And Recycling
R-134a Air Conditioning Refrigerant is a hydrofluorocar-
bon (HFC) that is endorsed by the Environmental Pro-
tection Agency and is an ozone-saving product. How-
ever, the manufacturer recommends that air conditioning
service be performed by dealers or other service facilities
using recovery and recycling equipment.
NOTE:Use only manufacturer approved A/C System
Sealers, Stop Leak Products, Seal Conditioners, Compres-
sor Oil, or Refrigerants.
A/C Air Filter — If Equipped
The A/C Filter, if so equipped, is found behind the filter
access door located under the instrument panel on the
passenger side. To replace the filter slide the lock toward
the rear of the vehicle (unlock position). Remove the
access door and pull the filter downward. When install-
ing a new filter, ensure its proper orientation. Align theblack arrow on the bottom of the filter frame with the
direction of airflow (away from the blower motor and
towards the center of the car).
Refer to the “Maintenance Schedules” section of this
manual for the recommended air conditioning filter
replacement intervals.
Power Steering — Fluid Check
Checking the power steering fluid level at a defined
service interval is not required. The fluid should only be
checked if a leak is suspected, abnormal noises are
apparent, and/or the system is not functioning as antici-
pated. Coordinate inspection efforts through a certified
DaimlerChrysler Dealership.�
424 MAINTAINING YOUR VEHICLE