2007 CHEVROLET SILVERADO automatic transmission
[x] Cancel search: automatic transmissionPage 158 of 684
Shifting Out of NEUTRAL
To shift out of NEUTRAL do the following:
1. Set the parking brake and apply the regular
brake pedal.
2. Shift the transmission to NEUTRAL (N) and
turn the ignition to RUN with the engine off.
3. Turn the transfer case dial to
Two-Wheel-Drive High.
After the transfer case has shifted out of
NEUTRAL the NEUTRAL light will go out.
4. Release the parking brake prior to moving the
vehicle.
Notice:Shifting the transmission into gear
before the requested mode indicator light has
stopped �ashing could damage the transfer
case. To help avoid damaging your vehicle,
always wait for the mode indicator lights
to stop �ashing before shifting the
transmission into gear.
5. Start the engine and shift the transmission to
the desired position.Excessively shifting the transfer case into or out of
the different modes may cause the transfer
case to enter the shift protection mode. This will
protect the transfer case from possible damage
and will only allow the transfer case to respond to
one shift per 10 seconds. The transfer case
may stay in this mode for up to three minutes.
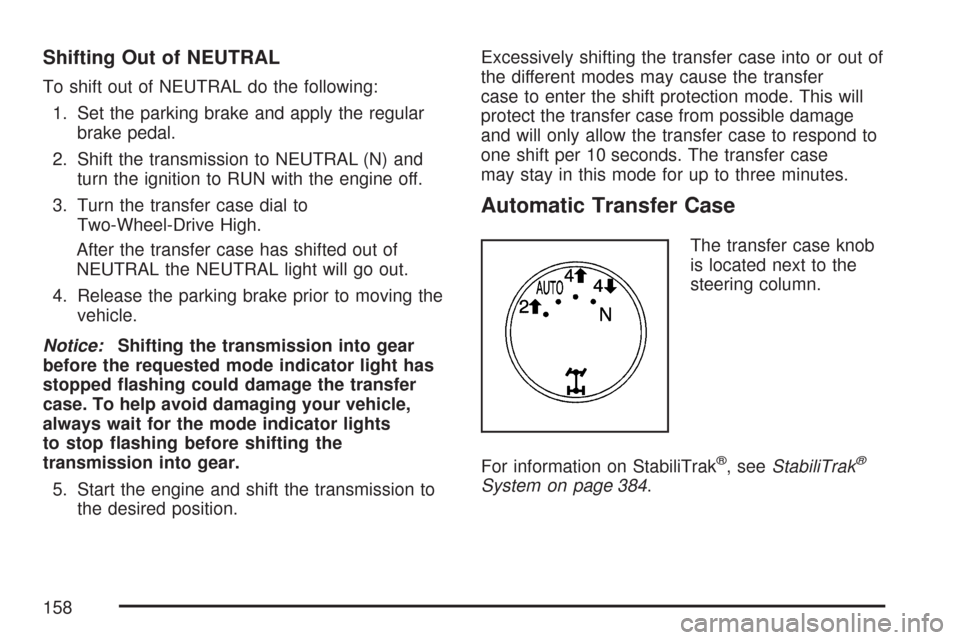
Automatic Transfer Case
The transfer case knob
is located next to the
steering column.
For information on StabiliTrak
®, seeStabiliTrak®
System on page 384.
158
Page 160 of 684
4n(Four-Wheel-Drive Low):This setting also
engages the front axle and delivers extra
torque. You may never need this setting. It sends
maximum power to all four wheels. You might
choose Four-Wheel-Drive Low if you are driving
off-road in deep sand, deep mud, deep snow, and
while climbing or descending steep hills.
StabiliTrak
®will not engage in this mode. See
StabiliTrak®System on page 384for more
information.
{CAUTION:
Shifting the transfer case to NEUTRAL
can cause your vehicle to roll even if the
transmission is in PARK (P). You or
someone else could be seriously injured.
Be sure to set the parking brake before
placing the transfer case in NEUTRAL.
SeeParking Brake on page 164.N (NEUTRAL):Shift the vehicle’s transfer case to
NEUTRAL only when towing your vehicle. See
Recreational Vehicle Towing on page 442or
Towing Your Vehicle on page 441for more
information.
If the SERVICE 4–Wheel Drive message stays on,
you should take your vehicle to your dealer for
service. See “Service 4–Wheel Drive message”
underDIC Warnings and Messages on page 281.
Shifting Into Four-Wheel-Drive High or
AUTO (Automatic Four-Wheel Drive)
Turn the knob to the Four-Wheel-Drive High or
AUTO position. This can be done at any speed,
except when shifting from Four-Wheel-Drive
Low, and the indicator light will �ash while shifting.
It will remain on when the shift is completed.
160
Page 167 of 684
Torque Lock
If you are parking on a hill and you do not shift
your transmission into PARK (P) properly,
the weight of the vehicle may put too much force
on the parking pawl in the transmission. You
may �nd it difficult to pull the shift lever out
of PARK (P). This is called torque lock. To prevent
torque lock, set the parking brake and then shift
into PARK (P) properly before you leave the
driver’s seat. To �nd out how, seeShifting Into
Park (P) on page 165.
When you are ready to drive, move the shift lever
out of PARK (P) before you release the parking
brake.
If torque lock does occur, you may need to have
another vehicle push yours a little uphill to
take some of the pressure from the parking pawl
in the transmission, then you will be able to
pull the shift lever out of PARK (P).
Shifting Out of Park (P)
Your vehicle has an automatic transmission shift
lock control system which locks the shift lever
in PARK (P) when the ignition is in the LOCK. You
have to fully apply your regular brakes before
you can shift from PARK (P) when the ignition is
in RUN. SeeAutomatic Transmission Operation on
page 140.
If you cannot shift out of PARK (P), ease pressure
on the shift lever and push the shift lever all the
way up into PARK (P) as you maintain brake
application. Move the shift lever into another gear.
167
Page 209 of 684
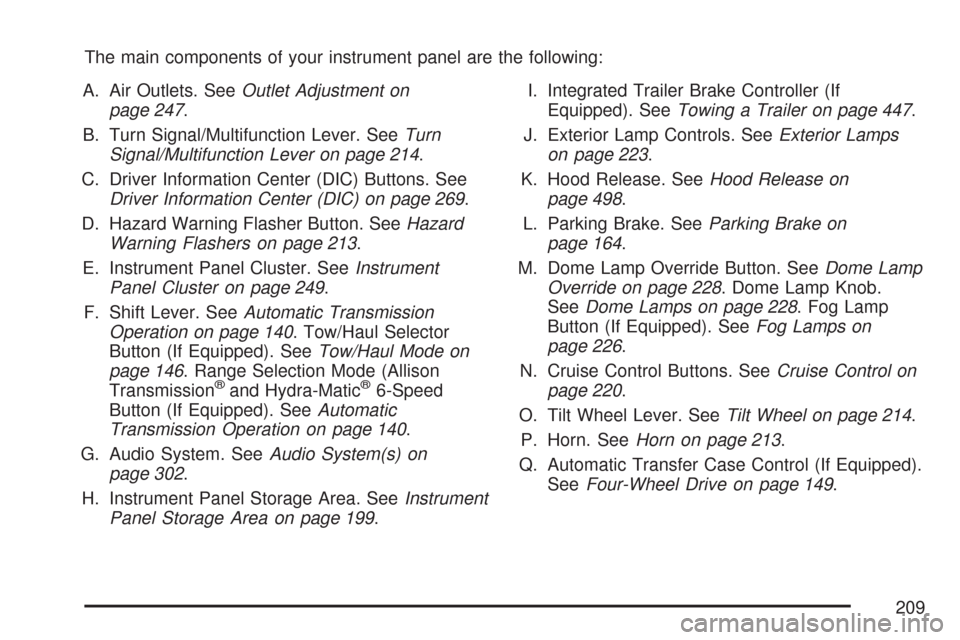
The main components of your instrument panel are the following:
A. Air Outlets. SeeOutlet Adjustment on
page 247.
B. Turn Signal/Multifunction Lever. SeeTurn
Signal/Multifunction Lever on page 214.
C. Driver Information Center (DIC) Buttons. See
Driver Information Center (DIC) on page 269.
D. Hazard Warning Flasher Button. SeeHazard
Warning Flashers on page 213.
E. Instrument Panel Cluster. SeeInstrument
Panel Cluster on page 249.
F. Shift Lever. SeeAutomatic Transmission
Operation on page 140. Tow/Haul Selector
Button (If Equipped). SeeTow/Haul Mode on
page 146. Range Selection Mode (Allison
Transmission
®and Hydra-Matic®6-Speed
Button (If Equipped). SeeAutomatic
Transmission Operation on page 140.
G. Audio System. SeeAudio System(s) on
page 302.
H. Instrument Panel Storage Area. SeeInstrument
Panel Storage Area on page 199.I. Integrated Trailer Brake Controller (If
Equipped). SeeTowing a Trailer on page 447.
J. Exterior Lamp Controls. SeeExterior Lamps
on page 223.
K. Hood Release. SeeHood Release on
page 498.
L. Parking Brake. SeeParking Brake on
page 164.
M. Dome Lamp Override Button. SeeDome Lamp
Override on page 228. Dome Lamp Knob.
SeeDome Lamps on page 228. Fog Lamp
Button (If Equipped). SeeFog Lamps on
page 226.
N. Cruise Control Buttons. SeeCruise Control on
page 220.
O. Tilt Wheel Lever. SeeTilt Wheel on page 214.
P. Horn. SeeHorn on page 213.
Q. Automatic Transfer Case Control (If Equipped).
SeeFour-Wheel Drive on page 149.
209
Page 212 of 684

E. Shift Lever. SeeAutomatic Transmission
Operation on page 140.
F. Tow/Haul Selector Button (If Equipped). See
Tow/Haul Mode on page 146.
G. Driver Information Center (DIC) Controls. See
Driver Information Center (DIC) on page 269.
H. Audio System. SeeAudio System(s) on
page 302.
I. Exterior Lamps Control. SeeExterior Lamps on
page 223.
J. Integrated Trailer Brake Controller (If
Equipped). SeeTowing a Trailer on page 447.
K. Dome Lamp Override Button. SeeDome
Lamp Override on page 228. Dome Lamp
Knob. SeeDome Lamps on page 228.
L. Automatic Transfer Case Control. (If Equipped).
SeeFour-Wheel Drive on page 149.
M. Hood Release. SeeHood Release on
page 498.
N. Parking Brake. SeeParking Brake on
page 164.
O. Cruise Control Buttons. SeeCruise Control on
page 220.
P. Tilt Wheel Lever. SeeTilt Wheel on page 214.Q. Horn. SeeHorn on page 213.
R. Audio Steering Wheel Controls. SeeAudio
Steering Wheel Controls on page 370.
S. Climate Controls. SeeClimate Control System
(With Air Conditioning ) on page 236or
Climate Control System (Heater Only) on
page 239or Dual Automatic Climate Controls
(If Equipped). SeeDual Automatic Climate
Control System on page 240.
T. Accessory Power Outlets. SeeAccessory
Power Outlet(s) on page 234. Cigarette Lighter
(If Equipped). SeeAshtray(s) and Cigarette
Lighter on page 235.
U. StabiliTrak
®Button (If Equipped). See
StabiliTrak®System on page 384. Pedal Adjust
Button (If Equipped). SeeAdjustable Throttle
and Brake Pedal on page 138. Rear Park Assist
Disable Button (If Equipped). SeeUltrasonic
Rear Parking Assist (URPA) on page 230.
Heated Windshield Washer Fluid Button
(If Equipped). SeeWindshield Washer on
page 219.
V. Passenger Airbag Off Control (If Equipped).
SeeAirbag Off Switch on page 95.
W. Glove Box. SeeGlove Box on page 198.
212
Page 220 of 684
Cruise Control
{CAUTION:
Cruise control can be dangerous where
you cannot drive safely at a steady speed.
So, do not use your cruise control on
winding roads or in heavy traffic.
Cruise control can be dangerous on
slippery roads. On such roads, fast
changes in tire traction can cause
excessive wheel slip, and you could lose
control. Do not use cruise control on
slippery roads.
With cruise control, you can maintain a speed of
about 25 mph (40 km/h) or more without
keeping your foot on the accelerator. This can
really help on long trips. Cruise control does not
work at speeds below about 25 mph (40 km/h).
When you apply your brakes, cruise control
is turned off.If your vehicle has an Allison
®automatic
transmission, see “Grade Braking and Cruise
Grade Braking (Allison Transmission
®) under
Tow/Haul Mode on page 146for an explanation of
how cruise control interacts with the Range
Selection Mode, tow/haul and grade braking
systems.
If your vehicle has the StabiliTrak
®™ system and
begins to limit wheel spin while you are using
cruise control, the cruise control will automatically
disengage. SeeStabiliTrak
®System on
page 384. When road conditions allow you to
safely use it again, you may turn the cruise control
back on.
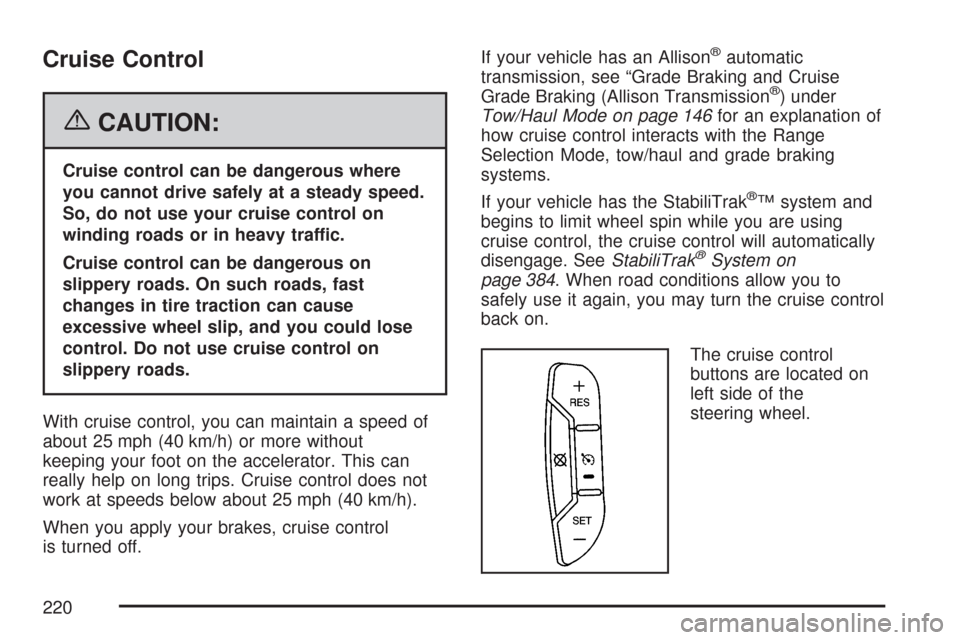
The cruise control
buttons are located on
left side of the
steering wheel.
220
Page 273 of 684
Average Economy
Press the trip/fuel button until AVG ECONOMY
displays. This display shows the approximate
average miles per gallon (mpg) or liters per
100 kilometers (L/100 km). This number is
calculated based on the number of mpg (L/100 km)
recorded since the last time this menu item was
reset. To reset AVG ECONOMY, press and
hold the set/reset button.
Fuel Used
Press the trip/fuel button until FUEL USED
displays. This display shows the number of
gallons (gal) or liters (L) of fuel used since the last
reset of this menu item. To reset the fuel used
information, press and hold the set/reset button
while FUEL USED is displayed.
Timer
Press the trip/fuel button until TIMER displays.
This display can be used as a timer.To start the timer, press the set/reset button while
TIMER is displayed. The display will show the
amount of time that has passed since the
timer was last reset, not including time the ignition
is off. Time will continue to be counted as long
as the ignition is on, even if another display
is being shown on the DIC. The timer will record
up to 99 hours, 59 minutes and
59 seconds (99:59:59) after which the display will
return to zero.
To stop the timer, press the set/reset button brie�y
while TIMER is displayed.
To reset the timer to zero, press and hold the
set/reset button while TIMER is displayed.
Transmission Temperature
Press the trip/fuel button until TRANS TEMP
displays. This display shows the temperature of
the automatic transmission �uid in either degrees
Fahrenheit (°F) or degrees Celsius (°C).
273
Page 278 of 684
Trip Odometer
Press the trip odometer reset stem until TRIP
displays. This display shows the current distance
traveled in either miles (mi) or kilometers (km)
since the last reset for the trip odometer.
The trip odometer can be reset to zero by pressing
and holding the trip odometer reset stem while
the trip odometer is displayed.
The trip odometer has a feature called the
retro-active reset. This can be used to set the trip
odometer to the number of miles (kilometers)
driven since the ignition was last turned on. This
can be used if the trip odometer is not reset at the
beginning of the trip.
To use the retro-active reset feature, press and
hold the trip odometer reset stem for at least four
seconds. The trip odometer will display the
number of miles (mi) or kilometers (km) driven
since the ignition was last turned on and the
vehicle was moving. Once the vehicle begins
moving, the trip odometer will accumulate mileage.
For example, if the vehicle was driven 5 miles
(8 km) before it is started again, and then
the retro-active reset feature is activated, thedisplay will show 5 miles (8 km). As the vehicle
begins moving, the display will then increase
to 5.1 miles (8.2 km), 5.2 miles (8.4 km), etc.
If the retro-active reset feature is activated after
the vehicle is started, but before it begins moving,
the display will show the number of miles (mi)
or kilometers (km) that were driven during the last
ignition cycle.
Transmission Temperature
Press the trip odometer reset stem until TRANS
TEMP displays. This display shows the
temperature of the automatic transmission �uid in
either degrees Fahrenheit (°F) or degrees
Celsius (°C).
Trailer Gain and Output
On vehicles with the Integrated Trailer Brake
Control (ITBC) system, the trailer brake display
appears in the DIC. Press the trip odometer reset
stem until TRAILER GAIN and OUTPUT display.
TRAILER GAIN shows the trailer gain setting. This
setting can be adjusted from 0.0 to 10.0 with
either a trailer connected or disconnected.
278