2007 CHEVROLET SILVERADO ignition
[x] Cancel search: ignitionPage 296 of 684
DELAY DOOR LOCK
On vehicles with a crew cab, this feature allows
you to select whether or not the locking of
the vehicle’s doors will be delayed. When locking
the doors with the power door lock switch or
the Remote Keyless Entry (RKE) transmitter and a
door is open, this feature will delay locking the
doors until �ve seconds after the last door
is closed. You will hear three chimes to signal that
the delayed locking feature is in use. The key
must be out of the ignition for this feature to work.
You can temporarily override delayed locking
by pressing the power door lock switch or the lock
button on the RKE transmitter a second time.
SeeDelayed Locking on page 121for more
information.
Press the customization button until DELAY
DOOR LOCK appears on the DIC display. Press
the set/reset button once to access the settings
for this feature. Then press the customization
button to scroll through the following settings:
OFF:There will be no delayed locking of
the vehicle’s doors.
ON (default):The doors will not lock until �ve
seconds after the last door is closed.NO CHANGE:No change will be made to this
feature. The current setting will remain.
Choose one of the available settings and press
the set/reset button while it is displayed on the DIC
to select it.
EXIT LIGHTING
This feature allows you to select the amount of
time you want the exterior lamps to remain
on when it is dark enough outside. This happens
after the key is turned from RUN to LOCK.
Press the customization button until EXIT
LIGHTING appears on the DIC display. Press the
set/reset button once to access the settings for
this feature. Then press the customization button
to scroll through the following settings:
OFF:The exterior lamps will not turn on.
30 SECONDS (default):The exterior lamps will
stay on for 30 seconds.
1 MINUTE:The exterior lamps will stay on for
one minute.
2 MINUTES:The exterior lamps will stay on for
two minutes.
296
Page 299 of 684
EASY EXIT SEAT
If your vehicle has this feature, it allows you to
select your preference for the automatic easy exit
seat feature. SeeMemory Seat, Mirrors, and
Pedals on page 13for more information.
Press the customization button until EASY EXIT
SEAT appears on the DIC display. Press the
set/reset button once to access the settings for this
feature. Then press the customization button to
scroll through the following settings:
OFF (default):No automatic seat exit recall
will occur.
ON:The driver’s seat will move back when the
key is removed from the ignition.
The automatic easy exit seat movement will only
occur one time after the key is removed from
the ignition. If the automatic movement has already
occurred, and you put the key back in the
ignition and remove it again, the seat will stay in
the original exit position, unless a memory
recall took place prior to removing the key again.NO CHANGE:No change will be made to this
feature. The current setting will remain.
Choose one of the available settings and press
the set/reset button while it is displayed on the DIC
to select it.
MEMORY SEAT RECALL
If your vehicle has this feature, it allows you to
select your preference for the remote memory seat
recall feature. SeeMemory Seat, Mirrors, and
Pedals on page 13for more information.
Press the customization button until MEMORY
SEAT RECALL appears on the DIC display. Press
the set/reset button once to access the settings
for this feature. Then press the customization
button to scroll through the following settings:
OFF (default):No remote memory seat recall
will occur.
299
Page 303 of 684
Set up your audio system by presetting your
favorite radio stations, setting the tone, and
adjusting the speakers. Then, when driving
conditions permit, you can tune to your favorite
radio stations using the presets and steering
wheel controls if the vehicle has them.
Notice:Before adding any sound equipment to
your vehicle, such as an audio system, CD
player, CB radio, mobile telephone, or two-way
radio, make sure that it can be added by
checking with your dealer/retailer. Also, check
federal rules covering mobile radio and
telephone units. If sound equipment can be
added, it is very important to do it properly.
Added sound equipment can interfere with the
operation of your vehicle’s engine, radio, or
other systems, and even damage them. Your
vehicle’s systems can interfere with the
operation of sound equipment that has
been added.
Your vehicle has a feature called Retained
Accessory Power (RAP). With RAP, the audio
system can be played even after the ignition
is turned off. SeeRetained Accessory Power
(RAP) on page 136for more information.Setting the Time
AM-FM Radio with Optional CD Player
If your vehicle has an AM/FM radio with an
optional CD player, it has a clock button for setting
the time. With these types of radios, the clock
can be set with either the radio turned on or off.
Set the time by following these steps:
1. Press the clock button until the hour numbers
begin �ashing on the display. Press the clock
button a second time and the minute
numbers begin �ashing on the display. Press
the clock button a third time and the 12HR
or 24HR time format begins �ashing.
2. While either the hour or the minute numbers
are �ashing, turn the tune knob, located on
the upper right side of the radio faceplate,
clockwise or counterclockwise to increase or
decrease the time. While the 12HR or
24HR time format is �ashing, turn the tune
knob clockwise or counterclockwise to select
the default time settings.
3. Press the clock button again until the clock
display stops �ashing to set the currently
displayed time; otherwise, the �ashing stops
after �ve seconds and the current time
displayed will be automatically set.
303
Page 306 of 684
AM-FM Radio
Playing the Radio
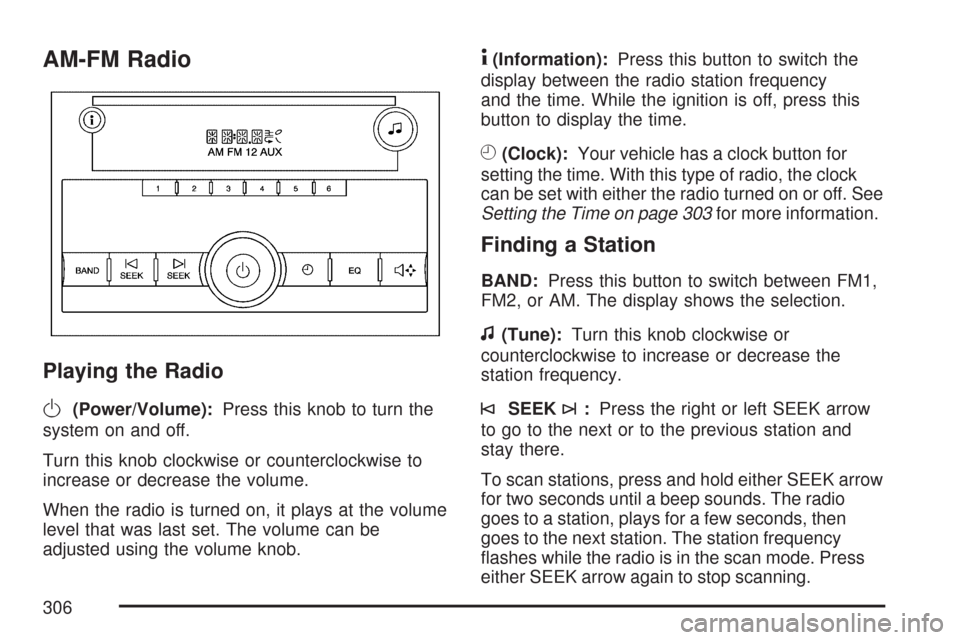
O
(Power/Volume):Press this knob to turn the
system on and off.
Turn this knob clockwise or counterclockwise to
increase or decrease the volume.
When the radio is turned on, it plays at the volume
level that was last set. The volume can be
adjusted using the volume knob.
4(Information):Press this button to switch the
display between the radio station frequency
and the time. While the ignition is off, press this
button to display the time.
H(Clock):Your vehicle has a clock button for
setting the time. With this type of radio, the clock
can be set with either the radio turned on or off. See
Setting the Time on page 303for more information.
Finding a Station
BAND:Press this button to switch between FM1,
FM2, or AM. The display shows the selection.
f(Tune):Turn this knob clockwise or
counterclockwise to increase or decrease the
station frequency.
©SEEK¨:Press the right or left SEEK arrow
to go to the next or to the previous station and
stay there.
To scan stations, press and hold either SEEK arrow
for two seconds until a beep sounds. The radio
goes to a station, plays for a few seconds, then
goes to the next station. The station frequency
�ashes while the radio is in the scan mode. Press
either SEEK arrow again to stop scanning.
306
Page 309 of 684
To scan presets within the current selected band,
press and hold either seek arrow for four seconds
until a double beep sounds. The radio goes to
a stored preset, plays for a few seconds if a strong
signal is present, then goes to the next stored
preset. The station frequency �ashes while
the radio is in the scan mode.
4(Information):Press this button to switch the
display between the radio station frequency
and the time. While the ignition is off, press this
button to display the time.
Setting Preset Stations
Up to 18 stations (six FM1, six FM2, and six AM),
can be programmed on the six numbered
pushbuttons, by performing the following steps:
1. Turn the radio on.
2. Press BAND to select FM1, FM2, or AM.
3. Tune in the desired station.
4. Press and hold one of the six numbered
pushbuttons for three seconds until a beep
sounds. Whenever that pushbutton is pressed
and released, the station that was set, returns.
5. Repeat the Steps 2 through 4 for each
pushbutton.
Setting the Tone (Bass/Treble)
BASS/TREB (Bass/Treble):To adjust the bass
or treble, press the tune knob button or the
EQ pushbutton until the desired tone control label
displays. Turn the tune knob clockwise or
counterclockwise to increase or decrease the
setting. The display shows the current bass
or treble level. If a station’s frequency is weak, or
if there is static, decrease the treble.
Unique BASS/TREB settings can be saved for
each source.
Adjusting the Speakers (Balance/Fade)
`
BAL/FADE (Balance/Fade):To adjust the
balance or fade, press this button or the tune knob
until the desired speaker control label displays.
Turn the tune knob clockwise or counterclockwise
to adjust the setting. The setting can also be
adjusted by pressing either the SEEK, FWD
(forward), or REV (reverse) buttons.
309
Page 310 of 684
Radio Messages
Loc (Locked):This message displays while the
THEFTLOCK®system has locked up the radio.
Take the vehicle to your dealer for service.
If any error occurs repeatedly or if an error cannot
be corrected, contact your dealer.
Playing a CD (Single CD Player)
Insert a CD partway into the slot, label side up.
The player pulls it in and the CD should begin
playing.
If the ignition or radio is turned off with a CD in
the player, it stays in the player. When the ignition
or radio is turned on, the CD starts playing
where it stopped, if it was the last selected audio
source.
When a CD is inserted, the CD symbol appears
on the radio display. As each new track starts
to play, the track number displays.
The CD player can play the smaller 3 inch (8 cm)
single CDs with an adapter ring. Full-size CDs
and the smaller CDs are loaded in the same
manner.If playing a CD-R, the sound quality can be
reduced due to CD-R quality, the method of
recording, the quality of the music that has been
recorded, and the way the CD-R has been
handled. There can be an increase in skipping,
difficulty in �nding tracks, and/or difficulty in loading
and ejecting. If these problems occur, check the
bottom surface of the CD. If the surface of the CD
is damaged, such as cracked, broken, or
scratched, the CD will not play properly. If the
surface of the CD is soiled, seeCare of Your CDs
and DVDs on page 372for more information.
If there is no apparent damage, try a known
good CD.
Notice:If a label is added to a CD, or more
than one CD is inserted into the slot at a time,
or an attempt is made to play scratched or
damaged CDs, the CD player could be
damaged. While using the CD player, use only
CDs in good condition without any label,
load one CD at a time, and keep the CD player
and the loading slot free of foreign materials,
liquids, and debris.
310
Page 311 of 684
Do not add any label to a CD, it could get caught
in the CD player. If a CD is recorded on a
personal computer and a description label is
needed, try labeling the top of the recorded CD
with a marking pen.
If an error displays, see “CD Messages” later in
this section.
ZEJECT:Press the CD eject button to eject
the CD. If the CD is not removed, after several
seconds, the CD automatically pulls back into
the player.
f(Tune):Turn this knob to select tracks on the
CD currently playing.
©SEEK¨:Press the left SEEK arrow to go to
the start of the current track, if more than ten
seconds have played. Press the right SEEK arrow
to go to the next track. If either SEEK arrow is held
or pressed multiple times, the player continues
moving backward or forward through the CD.
sREV (Reverse):Press and hold this button
to reverse playback quickly within a track. Sound is
heard at a reduced volume. Release this
pushbutton to resume playing the track. The
elapsed time of the track displays.
\FWD (Fast Forward):Press and hold this
pushbutton to advance playback quickly within a
track. Sound is heard at a reduced volume.
Release this pushbutton to resume playing the
track. The elapsed time of the track displays.
RDM (Random):With the random setting, the CD
tracks can be listened to in random, rather than
sequential order. To use random, do the following:
1. Press this button to play tracks from the
CD you are listening to in random order.
The random icon displays.
2. Press this button again to turn off random
play. The random icon disappears from the
display.
RPT (Repeat):With the repeat setting, one track
or an entire CD can be repeated. To repeat
the track you are listening to, press and release
the RPT button. An arrow symbol displays.
Press RPT again to turn off repeat play.
4(Information):Press this button to switch the
display between the track number, elapsed time of
the track, and the time. When the ignition is off,
press this button to display the time.
311
Page 320 of 684
Playing a CD(s) (Six-Disc CD Player)
LOAD^:Press this button to load CDs into the
CD player. This CD player holds up to six CDs.
To insert one CD, do the following:
1. Press and release the load button.
2. Wait for the message to insert the disc.
3. Load a CD. Insert the CD partway into the slot,
label side up. The player pulls the CD in.
To insert multiple CDs, do the following:
1. Press and hold the load button for two
seconds. A beep sounds and Load All
Discs displays.
2. Follow the displayed instruction on when to
insert the discs. The CD player takes up to
six CDs.
3. Press the Load button again to cancel loading
more CDs.
If the ignition or radio is turned off, with a CD in
the player, it stays in the player. While the ignition
or radio is turned on, the CD starts playing
where it stopped, if it was the last selected
audio source.When a CD is inserted, the CD symbol appears
on the CD. As each new track starts to play,
the track number displays. When more than one
CD is in the radio, the desired CD to be played can
be changed by pressing the pushbuttons located
under the displayed Disc label.
The CD player can play the smaller 3 inch (8 cm)
single CDs with an adapter ring. Full-size CDs
and the smaller CDs are loaded in the same
manner.
If playing a CD-R, the sound quality can be
reduced due to CD-R quality, the method of
recording, the quality of the music that has been
recorded, and the way the CD-R has been
handled. There can be an increase in skipping,
difficulty in �nding tracks, and/or difficulty in loading
and ejecting. If these problems occur, check the
bottom surface of the CD. If the surface of the CD
is damaged, such as cracked, broken, or
scratched, the CD will not play properly. If the
surface of the CD is soiled, seeCare of Your CDs
and DVDs on page 372for more information.
If there is no apparent damage, try a known
good CD.
320