Page 374 of 510
Cooling System
When you decide it is safe to lift the hood, here is
what you will see:
A. Electric Engine Cooling Fans
B. Engine Coolant Surge Tank
C. Pressure Cap{CAUTION:
An electric engine cooling fan under the
hood can start up even when the engine
is not running and can injure you. Keep
hands, clothing, and tools away from any
underhood electric fan.
If the coolant inside the coolant surge tank is
boiling, do not do anything else until it cools down.
The vehicle should be parked on a level surface.
3.5L V6 Engine shown, 2.2L L4 and 3.9L V6 Engines
similar
374
Page 377 of 510
{CAUTION:
Adding only plain water to your cooling
system can be dangerous. Plain water, or
some other liquid such as alcohol, can
boil before the proper coolant mixture will.
Your vehicle’s coolant warning system is
set for the proper coolant mixture. With
plain water or the wrong mixture, your
engine could get too hot but you would
not get the overheat warning. Your engine
could catch �re and you or others could
be burned. Use a 50/50 mixture of clean,
drinkable water and DEX-COOL
®coolant.
Notice:In cold weather, water can freeze and
crack the engine, radiator, heater core and
other parts. Use the recommended coolant and
the proper coolant mixture.
{CAUTION:
You can be burned if you spill coolant on
hot engine parts. Coolant contains
ethylene glycol and it will burn if the
engine parts are hot enough. Do not spill
coolant on a hot engine.
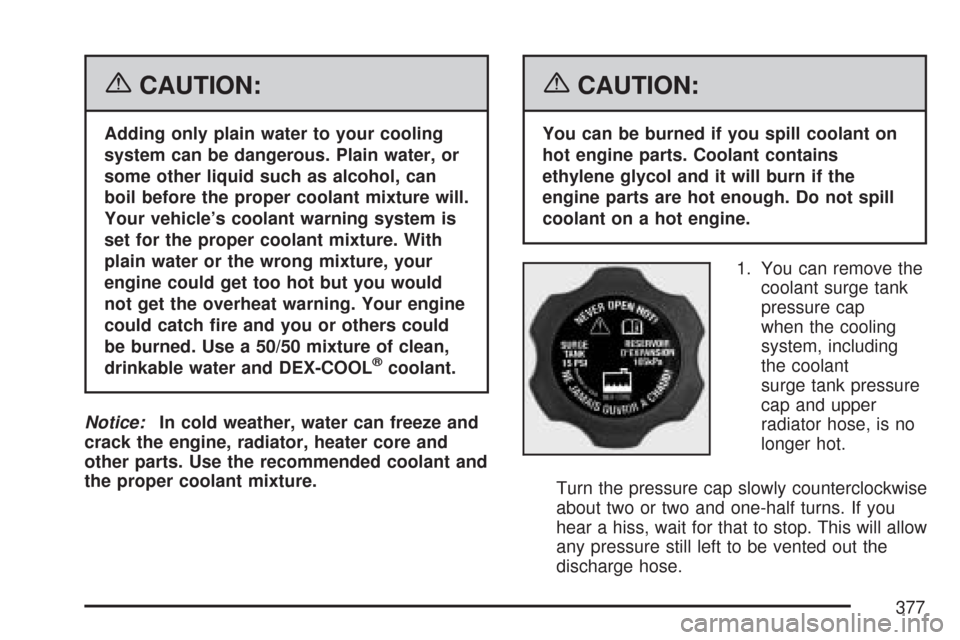
1. You can remove the
coolant surge tank
pressure cap
when the cooling
system, including
the coolant
surge tank pressure
cap and upper
radiator hose, is no
longer hot.
Turn the pressure cap slowly counterclockwise
about two or two and one-half turns. If you
hear a hiss, wait for that to stop. This will allow
any pressure still left to be vented out the
discharge hose.
377
Page 382 of 510
What to Add
When you do need brake �uid, use only DOT-3
brake �uid. Use new brake �uid from a sealed
container only. SeeRecommended Fluids
and Lubricants on page 468.
Always clean the brake �uid reservoir cap and the
area around the cap before removing it. This will
help keep dirt from entering the reservoir.
{CAUTION:
With the wrong kind of �uid in the brake
system, the brakes may not work well.
This could cause a crash. Always use the
proper brake �uid.Notice:
Using the wrong �uid can badly damage
brake system parts. For example, just a
few drops of mineral-based oil, such
as engine oil, in the brake system can
damage brake system parts so badly that
they will have to be replaced. Do not
let someone put in the wrong kind of �uid.
If you spill brake �uid on your vehicle’s
painted surfaces, the paint �nish can
be damaged. Be careful not to spill brake
�uid on your vehicle. If you do, wash it
off immediately. SeeWashing Your Vehicle
on page 439.
Brake Wear
Your vehicle has front disc brakes and could have
rear drum brakes or rear disc brakes.
Disc brake pads have built-in wear indicators that
make a high-pitched warning sound when the
brake pads are worn and new pads are needed.
The sound can come and go or be heard all
the time your vehicle is moving, except when you
are pushing on the brake pedal �rmly.
382
Page 403 of 510
Tire Terminology and De�nitions
Air Pressure:The amount of air inside the tire
pressing outward on each square inch of the
tire. Air pressure is expressed in pounds
per square inch (psi) or kilopascal (kPa).
Accessory Weight:This means the combined
weight of optional accessories. Some examples of
optional accessories are, automatic transmission,
power steering, power brakes, power windows,
power seats, and air conditioning.
Aspect Ratio:The relationship of a tire’s height
to its width.
Belt:A rubber coated layer of cords that is
located between the plies and the tread. Cords
may be made from steel or other reinforcing
materials.
Bead:The tire bead contains steel wires wrapped
by steel cords that hold the tire onto the rim.
Bias Ply Tire:A pneumatic tire in which the plies
are laid at alternate angles less than 90 degrees
to the centerline of the tread.Cold Tire Pressure:The amount of air pressure
in a tire, measured in pounds per square inch (psi)
or kilopascals (kPa) before a tire has built up heat
from driving. SeeIn�ation - Tire Pressure on
page 406.
Curb Weight:This means the weight of a motor
vehicle with standard and optional equipment
including the maximum capacity of fuel, oil, and
coolant, but without passengers and cargo.
DOT Markings:A code molded into the sidewall
of a tire signifying that the tire is in compliance
with the U.S. Department of Transportation (DOT)
motor vehicle safety standards. The DOT code
includes the Tire Identi�cation Number (TIN),
an alphanumeric designator which can also identify
the tire manufacturer, production plant, brand,
and date of production.
GVWR:Gross Vehicle Weight Rating. See
Loading Your Vehicle on page 324.
GAWR FRT:Gross Axle Weight Rating for the
front axle. SeeLoading Your Vehicle on page 324.
GAWR RR:Gross Axle Weight Rating for the
rear axle. SeeLoading Your Vehicle on page 324.
403
Page 426 of 510
12. Install the compact spare tire.
{CAUTION:
Never use oil or grease on studs or nuts.
Because the nuts might come loose. The
vehicle’s wheel could fall off, causing a
serious accident.
13. Put the wheel nuts back on with the rounded
end toward the wheel. Tighten each nut by
hand or with the wrench until the wheel is held
against the hub.14. Lower the vehicle by turning the wrench
counterclockwise. Lower the jack completely.
426
Page 435 of 510
Do not use the compact spare on other vehicles.
And do not mix the compact spare tire or
wheel with other wheels or tires. They will not �t.
Keep the spare tire and its wheel together.
Notice:Tire chains will not �t your compact
spare. Using them can damage your vehicle
and can damage the chains too. Do not use tire
chains on your compact spare.
Appearance Care
Cleaning the Inside of Your Vehicle
Your vehicle’s interior will continue to look its
best if it is cleaned often. Although not always
visible, dust and dirt can accumulate on your
upholstery. Dirt can damage carpet, fabric, leather,
and plastic surfaces. Regular vacuuming is
recommended to remove particles from your
upholstery. It is important to keep your upholstery
from becoming and remaining heavily soiled.
Soils should be removed as quickly as possible.
Your vehicle’s interior may experience extremes of
heat that could cause stains to set rapidly.Lighter colored interiors may require more frequent
cleaning. Use care because newspapers and
garments that transfer color to your home
furnishings may also transfer color to your vehicle’s
interior.
When cleaning your vehicle’s interior, only use
cleaners speci�cally designed for the surfaces
being cleaned. Permanent damage may result from
using cleaners on surfaces for which they were not
intended. Use glass cleaner only on glass. Remove
any accidental over-spray from other surfaces
immediately. To prevent over-spray, apply cleaner
directly to the cleaning cloth.
Notice:If you use abrasive cleaners when
cleaning glass surfaces on your vehicle, you
could scratch the glass and/or cause damage to
the integrated radio antenna and the rear
window defogger. When cleaning the glass on
your vehicle, use only a soft cloth and glass
cleaner.
Many cleaners contain solvents that may become
concentrated in your vehicle’s breathing space.
Before using cleaners, read and adhere to all safety
instructions on the label. While cleaning your
vehicle’s interior, maintain adequate ventilation by
opening your vehicle’s doors and windows.
435
Page 436 of 510
Dust may be removed from small buttons and
knobs using a small brush with soft bristles.
Your dealer has a product for cleaning your
vehicle’s glass. Should it become necessary, you
can also obtain a product from your dealer to
remove odors from your vehicle’s upholstery.
Do not clean your vehicle using the following
cleaners or techniques:
Never use a knife or any other sharp object to
remove a soil from any interior surface.
Never use a stiff brush. It can cause damage
to your vehicle’s interior surfaces.
Never apply heavy pressure or rub
aggressively with a cleaning cloth. Use of
heavy pressure can damage your interior and
does not improve the effectiveness of soil
removal.
Use only mild, neutral-pH soaps. Avoid
laundry detergents or dishwashing soaps with
degreasers. Using too much soap will leave
a residue that leaves streaks and attracts dirt.
For liquid cleaners, about 20 drops per
gallon (3.78 L) of water is a good guide.
Do not heavily saturate your upholstery while
cleaning.
Damage to your vehicle’s interior may result
from the use of many organic solvents such
as naptha, alcohol, etc.
Fabric/Carpet
Use a vacuum cleaner with a soft brush
attachment frequently to remove dust and loose
dirt. A canister vacuum with a beater bar in
the nozzle may only be used on �oor carpet and
carpeted �oor mats. For soils, always try to remove
them �rst with plain water or club soda. Before
cleaning, gently remove as much of the soil
as possible using one of the following techniques:
For liquids: gently blot the remaining soil
with a paper towel. Allow the soil to absorb into
the paper towel until no more can be
removed.
For solid dry soils: remove as much as
possible and then vacuum.
436
Page 437 of 510
To clean, use the following instructions:
1. Saturate a lint-free, clean white cloth with
water or club soda.
2. Wring the cloth to remove excess moisture.
3. Start on the outside edge of the soil and gently
rub toward the center. Continue cleaning,
using a clean area of the cloth each time it
becomes soiled.
4. Continue to gently rub the soiled area until the
cleaning cloth remains clean.
5. If the soil is not completely removed, use a
mild soap solution and repeat the cleaning
process that was used with plain water.
If any of the soil remains, a commercial fabric
cleaner or spot lifter may be necessary. When a
commercial upholstery cleaner or spot lifter is to be
used, test a small hidden area for colorfastness
�rst. If the locally cleaned area gives any
impression that a ring formation may result, clean
the entire surface.
After the cleaning process has been completed, a
paper towel can be used to blot excess moisture
from the fabric or carpet.Leather
A soft cloth dampened with water may be used to
remove dust. If a more thorough cleaning is
necessary, a soft cloth dampened with a mild soap
solution can be used. Allow the leather to dry
naturally. Do not use heat to dry. Never use steam
to clean leather. Never use spot lifters or spot
removers on leather. Many commercial leather
cleaners and coatings that are sold to preserve
and protect leather may permanently change
the appearance and feel of your leather and are
not recommended. Do not use silicone or
wax-based products, or those containing organic
solvents to clean your vehicle’s interior because
they can alter the appearance by increasing
the gloss in a non-uniform manner. Never use
shoe polish on your leather.
437