2007 CHEVROLET MALIBU MAXX fuel economy
[x] Cancel search: fuel economyPage 126 of 510
DRIVE (D):This position is for normal driving.
It provides the best fuel economy for your vehicle.
If you need more power for passing, and you are:
Going less than 35 mph (56 km/h), push your
accelerator pedal about halfway down.
Going about 35 mph (56 km/h) or more, push
the accelerator all the way down.
Notice:If your vehicle seems to start up
rather slowly or not shift gears when you go
faster, and you continue to drive your vehicle
that way, you could damage the transaxle.
Have your vehicle serviced right away. You can
drive in LOW (L2) when you are driving less
than 35 mph (56 km/h) and DRIVE (D) for
higher speeds until then.LOW (L):This position gives you access to
FOURTH, THIRD, SECOND and FIRST gear
ranges. This provides more engine braking
but lower fuel economy than DRIVE (D). You
can use it on very steep hills, or in deep snow
or mud. If the electronic range select is put
in LOW (L), the transaxle will not shift into lower
gears until the vehicle is going slow enough.
126
Page 127 of 510
Electronic Range Select Mode
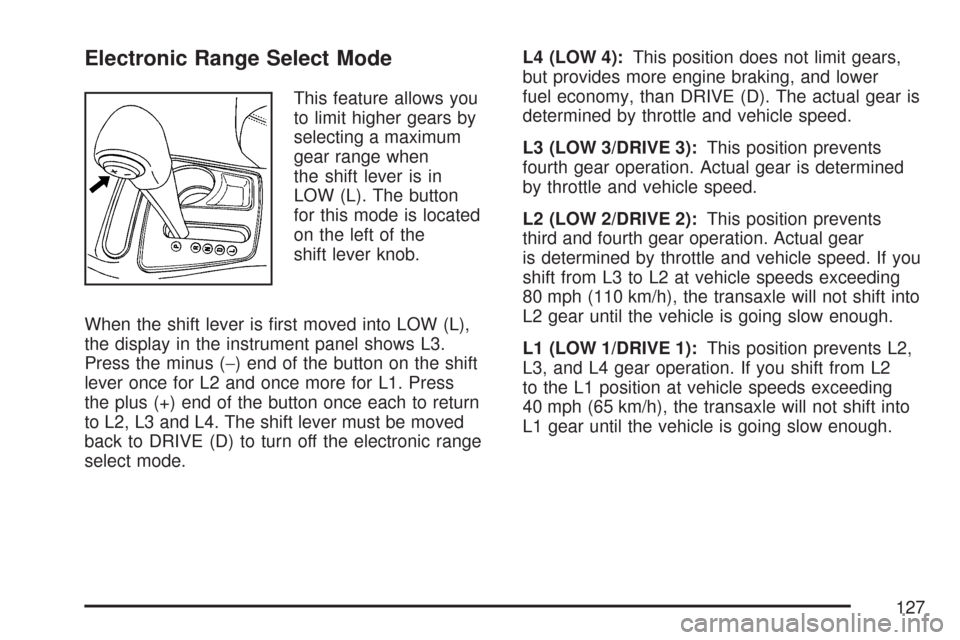
This feature allows you
to limit higher gears by
selecting a maximum
gear range when
the shift lever is in
LOW (L). The button
for this mode is located
on the left of the
shift lever knob.
When the shift lever is �rst moved into LOW (L),
the display in the instrument panel shows L3.
Press the minus (−) end of the button on the shift
lever once for L2 and once more for L1. Press
the plus (+) end of the button once each to return
to L2, L3 and L4. The shift lever must be moved
back to DRIVE (D) to turn off the electronic range
select mode.L4 (LOW 4):This position does not limit gears,
but provides more engine braking, and lower
fuel economy, than DRIVE (D). The actual gear is
determined by throttle and vehicle speed.
L3 (LOW 3/DRIVE 3):This position prevents
fourth gear operation. Actual gear is determined
by throttle and vehicle speed.
L2 (LOW 2/DRIVE 2):This position prevents
third and fourth gear operation. Actual gear
is determined by throttle and vehicle speed. If you
shift from L3 to L2 at vehicle speeds exceeding
80 mph (110 km/h), the transaxle will not shift into
L2 gear until the vehicle is going slow enough.
L1 (LOW 1/DRIVE 1):This position prevents L2,
L3, and L4 gear operation. If you shift from L2
to the L1 position at vehicle speeds exceeding
40 mph (65 km/h), the transaxle will not shift into
L1 gear until the vehicle is going slow enough.
127
Page 130 of 510
DRIVE (D):This position is for normal driving.
It provides the best fuel economy for your vehicle.
If you need more power for passing, and you are:
Going less than 35 mph (55 km/h), push your
accelerator pedal about halfway down.
Going about 35 mph (55 km/h) or more, push
the accelerator all the way down.
MANUAL MODE (M):This position, allows you
to change gears similar to a manual transaxle.
If your vehicle has this feature, see Driver
Shift Control (DSC).
Driver Shift Control (DSC)
This feature allows you to select lower or higher
driving gears when the shift lever is in MANUAL
MODE (M). The button for this mode is located
on the left side of the shift lever knob.
To use this feature, do the following:
1. Move the shift lever from DRIVE (D) rearward
into the MANUAL MODE (M). The vehicle will
be in the MANUAL MODE (M) and a gear
based on the current driving speed.
While driving in MANUAL MODE (M), the
transaxle will remain in the selected drive
gear unless:
A shift is required to protect the engine or
transaxle or,
The vehicle slows almost to a stop
(the vehicle will automatically downshift)
2. Press the plus (+) button to upshift or the
minus (−) button to downshift.
130
Page 212 of 510
Malfunction Indicator Lamp
Check Engine Light
Your vehicle has
a computer which
monitors operation
of the fuel, ignition,
and emission control
systems.
This system is called OBD II (On-Board
Diagnostics-Second Generation) and is intended
to assure that emissions are at acceptable
levels for the life of the vehicle, helping to produce
a cleaner environment. The check engine light
comes on to indicate that there is a problem and
service is required. Malfunctions often will be
indicated by the system before any problem is
apparent. This may prevent more serious damage
to your vehicle. This system is also designed
to assist your service technician in correctly
diagnosing any malfunction.Notice:If you keep driving your vehicle with
this light on, after awhile, the emission controls
might not work as well, your vehicle’s fuel
economy might not be as good, and the engine
might not run as smoothly. This could lead
to costly repairs that might not be covered by
your warranty.
Notice:Modi�cations made to the engine,
transaxle, exhaust, intake, or fuel system
of your vehicle or the replacement of the
original tires with other than those of the same
Tire Performance Criteria (TPC) can affect
your vehicle’s emission controls and may
cause this light to come on. Modi�cations to
these systems could lead to costly repairs not
covered by your warranty. This may also
result in a failure to pass a required Emission
Inspection/Maintenance test. SeeAccessories
and Modifications on page 344.
212
Page 219 of 510
Information Mode
INFO/4(Information):Press this button to scroll
through the vehicle information mode displays
in the following order:
TRIP A
TRIP B
FUEL RANGE (Fuel Range Until Empty)
ECON (Average Fuel Economy)
AV SPEED (Average Vehicle Speed)
OIL LIFE (Engine Oil Life System)
TRIP A or TRIP B:Press the information
button until TRIP A or TRIP B is displayed.
This shows the current distance traveled since
the last reset for each trip odometer in either
miles (mi) or kilometers (km). Both odometers
can be used at the same time. Each trip odometer
can be reset to zero separately by pressing and
holding the enter button for a few seconds
while the desired trip odometer is displayed.FUEL RANGE:Press the information button
until FUEL RANGE is displayed. This shows
the remaining distance you can drive without
refueling. It is based on fuel economy and
the fuel remaining in the tank.
When the fuel level is low, FUEL RANGE LOW
displays.
The fuel economy data used to determine fuel
range is an average of recent driving conditions.
As your driving conditions change, this data is
gradually updated. Fuel range cannot be reset.
ECON (Economy):Press the information
button until ECON is displayed. Average fuel
economy is how many miles per gallon (mpg) or
liters per 100 kilometers (L/100 km) your vehicle
is getting based on current and past driving
conditions.
Press and hold the enter button while ECON is
displayed to reset the average fuel economy.
Average fuel economy will then be calculated
starting from that point. If the average fuel
economy is not reset, it will be continually
updated each time you drive.
219
Page 225 of 510

DIC Vehicle Personalization
The following personalization options may appear
on your vehicle’s audio display by pressing the
MENU button:
OIL LIFE RESET:When this option is displayed,
you can reset the engine oil life system.
To reset the system, seeEngine Oil Life
System on page 362.
UNITS:When UNITS appears on the display,
press the enter button to move between METRIC
or ENGLISH. When you have made your choice,
press the MENU button to record your selection.
The initial setting from the factory is English for
the United States and metric for Canada.
If you choose English, all information will be
displayed in English units.
If you choose metric, all information will be
displayed in metric units.The unit measurement will also change the trip
odometer, temperature, and average fuel
economy displays.
REMOTE START:If your vehicle has this
feature, the remote start option can be enabled
or disabled. When REMOTE START appears
on the display, press the enter button to move
between OFF and ON. When you have made
your choice, press the MENU button to record
your selection. The initial setting from the
factory is ON.
LOCK HORN:If your vehicle has Remote
Keyless Entry (RKE), this option which allows
the vehicle’s horn to chirp every time the
lock button on the RKE transmitter is pressed,
can be enabled or disabled. When LOCK HORN
appears on the display, press the enter button
to move between ON and OFF. When you have
made your choice, press the MENU button to
record your selection. The initial setting from
the factory is OFF.
225
Page 333 of 510
Towing a Trailer
{CAUTION:
If you do not use the correct equipment
and drive properly, you can lose control
when you pull a trailer. For example, if the
trailer is too heavy, the brakes may not
work well — or even at all. You and your
passengers could be seriously injured.
You may also damage your vehicle; the
resulting repairs would not be covered by
your warranty. Pull a trailer only if you
have followed all the steps in this section.
Ask your dealer/retailer for advice and
information about towing a trailer with
your vehicle.
If you have a Malibu Sedan SS or a Maxx SS,
trailer towing is not recommended. Your vehicle
was neither designed nor intended to tow a trailer.Your vehicle can tow a trailer if it is equipped with
a 3.5L V6 engine and the proper trailer towing
equipment.
To identify the trailering capacity of your vehicle,
you should read the information in “Weight of
the Trailer” that appears later in this section.
Trailering is different than just driving your vehicle
by itself. Trailering means changes in handling,
durability and fuel economy. Successful, safe
trailering takes correct equipment, and it has to
be used properly.
That’s the reason for this part. In it are many
time-tested, important trailering tips and safety
rules. Many of these are important for your safety
and that of your passengers. So please read
this section carefully before you pull a trailer.
Load-pulling components such as the engine,
transmission, wheel assemblies and tires
are forced to work harder against the drag of the
added weight. The engine is required to operate
at relatively higher speeds and under greater
loads, generating extra heat. What’s more,
the trailer adds considerably to wind resistance,
increasing the pulling requirements.
333
Page 406 of 510
In�ation - Tire Pressure
Tires need the correct amount of air pressure to
operate effectively.
Notice:Do not let anyone tell you that
under-in�ation or over-in�ation is all right. It is
not. If your tires do not have enough air
(under-in�ation), you can get the following:
Too much �exing
Too much heat
Tire overloading
Premature or irregular wear
Poor handling
Reduced fuel economy
If your tires have too much air (over-in�ation),
you can get the following:
Unusual wear
Poor handling
Rough ride
Needless damage from road hazardsA Tire and Loading Information label is attached to
the vehicle’s center pillar (B-pillar). This label
shows your vehicle’s original equipment tires and
the correct in�ation pressures for your tires
when they are cold. The recommended cold tire
in�ation pressure, shown on the label, is the
minimum amount of air pressure needed to
support your vehicle’s maximum load carrying
capacity.
For additional information regarding how much
weight your vehicle can carry, and an example of
the Tire and Loading Information label, see
Loading Your Vehicle on page 324. How you load
your vehicle affects vehicle handling and ride
comfort. Never load your vehicle with more weight
than it was designed to carry.
When to Check
Check your tires once a month or more. Do not
forget to check the compact spare tire, it should be
at 60 psi (420 kPa). For additional information
regarding the compact spare tire, seeCompact
Spare Tire on page 434.
406