Page 331 of 510
Dinghy Towing
The Malibu Sedan SS and Maxx SS cannot be
dinghy towed.
For vehicles that can be dinghy towed, follow
these steps:
1. Position the vehicle to tow and then secure it.
2. Turn the ignition switch to OFF.
3. Set the parking brake.4. To prevent your battery from draining while
the vehicle is being towed, remove the
following fuse from the instrument panel
fuse block: IGN SENSOR. SeeInstrument
Panel Fuse Block on page 447for more
information.
5. Turn the ignition switch to ACC.
6. Shift your transmission to NEUTRAL (N).
7. Release the parking brake.
Remember to install the fuses once you reach
your destination. To reinstall a fuse, do the
following:
1. Set the parking brake.
2. Remove the key from the ignition switch.
3. Reinstall the fuse.
Notice:If you exceed 65 mph (105 km/h)
while towing your vehicle, it could be
damaged. Never exceed 65 mph (105 km/h)
while towing your vehicle.
331
Page 335 of 510
When towing a trailer on long uphill grades while
the outside temperature is above 85°F (29°C),
reduce your vehicle speed to 45 mph (72 km/h)
to avoid overheating the engine cooling system.
You can ask your dealer/retailer for our trailering
information or advice, or you can write us at
our Customer Assistance Offices. SeeCustomer
Assistance Offices on page 479for more
information.
Weight of the Trailer Tongue
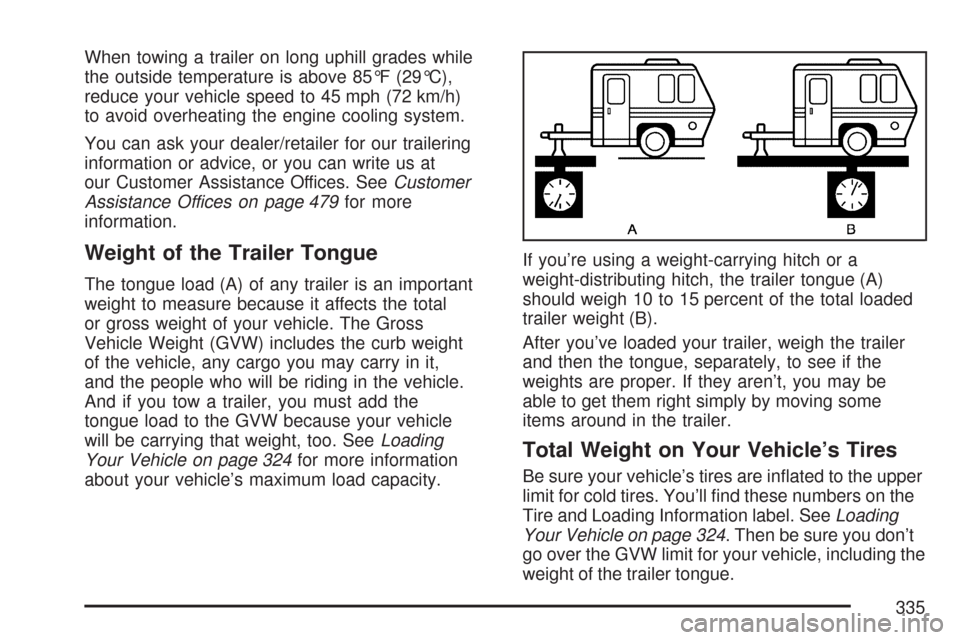
The tongue load (A) of any trailer is an important
weight to measure because it affects the total
or gross weight of your vehicle. The Gross
Vehicle Weight (GVW) includes the curb weight
of the vehicle, any cargo you may carry in it,
and the people who will be riding in the vehicle.
And if you tow a trailer, you must add the
tongue load to the GVW because your vehicle
will be carrying that weight, too. SeeLoading
Your Vehicle on page 324for more information
about your vehicle’s maximum load capacity.If you’re using a weight-carrying hitch or a
weight-distributing hitch, the trailer tongue (A)
should weigh 10 to 15 percent of the total loaded
trailer weight (B).
After you’ve loaded your trailer, weigh the trailer
and then the tongue, separately, to see if the
weights are proper. If they aren’t, you may be
able to get them right simply by moving some
items around in the trailer.
Total Weight on Your Vehicle’s Tires
Be sure your vehicle’s tires are in�ated to the upper
limit for cold tires. You’ll �nd these numbers on the
Tire and Loading Information label. SeeLoading
Your Vehicle on page 324. Then be sure you don’t
go over the GVW limit for your vehicle, including the
weight of the trailer tongue.
335
Page 337 of 510
Driving with a Trailer
Towing a trailer requires a certain amount of
experience. Before setting out for the open road,
you’ll want to get to know your rig. Acquaint
yourself with the feel of handling and braking
with the added weight of the trailer. And always
keep in mind that the vehicle you are driving
is now a good deal longer and not nearly
as responsive as your vehicle is by itself.
Before you start, check the trailer hitch and
platform (and attachments), safety chains,
electrical connector, lamps, tires and mirror
adjustment. If the trailer has electric brakes,
start your vehicle and trailer moving and then
apply the trailer brake controller by hand to be
sure the brakes are working. This lets you check
your electrical connection at the same time.
During your trip, check occasionally to be sure
that the load is secure, and that the lamps and
any trailer brakes are still working.
Following Distance
Stay at least twice as far behind the vehicle ahead
as you would when driving your vehicle without
a trailer. This can help you avoid situations
that require heavy braking and sudden turns.
Passing
You’ll need more passing distance up ahead
when you’re towing a trailer. And, because you’re
a good deal longer, you’ll need to go much
farther beyond the passed vehicle before you
can return to your lane.
Backing Up
Hold the bottom of the steering wheel with
one hand. Then, to move the trailer to the left,
just move that hand to the left. To move the
trailer to the right, move your hand to the right.
Always back up slowly and, if possible, have
someone guide you.
337
Page 371 of 510
{CAUTION:
Turning the surge tank pressure cap when
the engine and radiator are hot can allow
steam and scalding liquids to blow out
and burn you badly. Never turn the surge
tank pressure cap — even a little — when
the engine and radiator are hot.
The vehicle must be on a level surface. When the
engine is cold, the coolant level should be at
the FULL COLD mark or slightly higher.
Adding Coolant
If you need more coolant, add the proper
DEX-COOL®coolant mixture at the surge tank,
but only when the engine is cool. If the surge tank
is empty, a special �ll procedure is necessary.
SeeEngine Overheating on page 371andCooling
System on page 374.
{CAUTION:
You can be burned if you spill coolant on
hot engine parts. Coolant contains
ethylene glycol, and it will burn if the
engine parts are hot enough. Do not spill
coolant on a hot engine.
When replacing the pressure cap, make sure it is
hand-tight and fully seated.
Coolant Surge Tank Pressure Cap
Notice:If the pressure cap is not tightly
installed, coolant loss and possible engine
damage may occur. Be sure the cap is properly
and tightly secured.
Engine Overheating
You will �nd an engine coolant temperature gage as
well as an engine coolant temperature warning light
on your vehicle’s instrument panel cluster. See
Engine Coolant Temperature Gage on page 211
andEngine Coolant Temperature Warning Light on
page 211.
371
Page 388 of 510
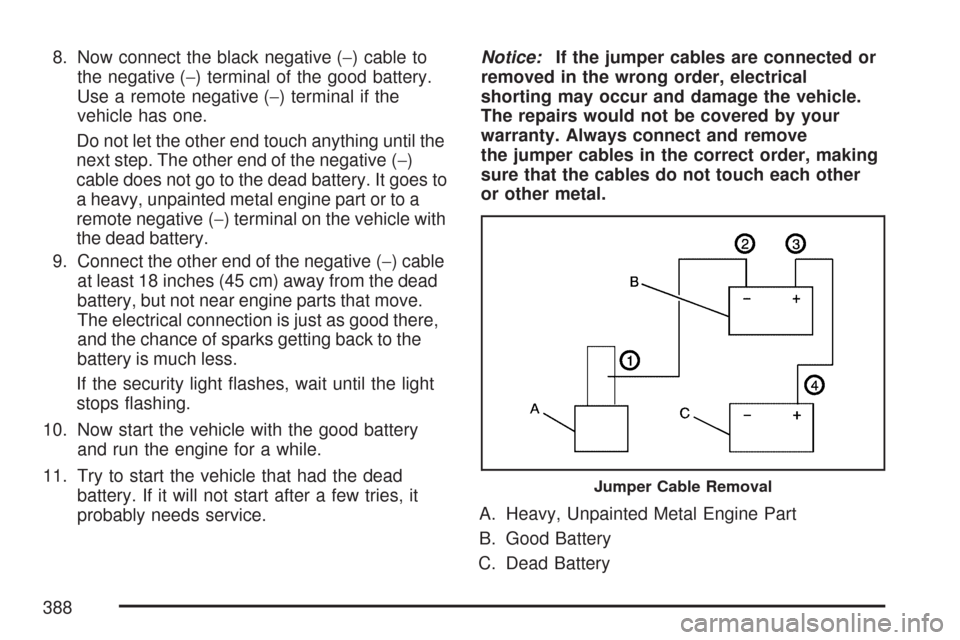
8. Now connect the black negative (−) cable to
the negative (−) terminal of the good battery.
Use a remote negative (−) terminal if the
vehicle has one.
Do not let the other end touch anything until the
next step. The other end of the negative (−)
cable does not go to the dead battery. It goes to
a heavy, unpainted metal engine part or to a
remote negative (−) terminal on the vehicle with
the dead battery.
9. Connect the other end of the negative (−) cable
at least 18 inches (45 cm) away from the dead
battery, but not near engine parts that move.
The electrical connection is just as good there,
and the chance of sparks getting back to the
battery is much less.
If the security light �ashes, wait until the light
stops �ashing.
10. Now start the vehicle with the good battery
and run the engine for a while.
11. Try to start the vehicle that had the dead
battery. If it will not start after a few tries, it
probably needs service.Notice:If the jumper cables are connected or
removed in the wrong order, electrical
shorting may occur and damage the vehicle.
The repairs would not be covered by your
warranty. Always connect and remove
the jumper cables in the correct order, making
sure that the cables do not touch each other
or other metal.
A. Heavy, Unpainted Metal Engine Part
B. Good Battery
C. Dead Battery
Jumper Cable Removal
388
Page 393 of 510
6. Pull the bulb to
remove it from the
socket. Replace
the old bulb with a
new one.
7. Reverse the steps to attach the taillamp
assembly to the vehicle.
When securing the lamp assembly back into
place, align the assembly so that the trunk
lid doesn’t contact it.License Plate Lamp
To replace the license plate lamp bulb, do the
following:
1. Remove the two screws holding the license
plate lamp assembly to the fascia.
2. Turn and pull the license plate lamp forward
through the fascia opening.
3. Turn the bulb socket counterclockwise and
pull the bulb straight out of the socket.
4. Install the new bulb.
5. Reverse Steps 1 through 3 to reinstall the
lamp assembly.
393
Page 416 of 510
Tire Chains
{CAUTION:
If your vehicle has P215/60R16,
P225/50R17, or P225/50R18 size tires, do
not use tire chains. There is not enough
clearance.
Tire chains used on a vehicle without the
proper amount of clearance can cause
damage to the brakes, suspension, or
other vehicle parts. The area damaged by
the tire chains could cause you to lose
control of your vehicle and you or others
may be injured in a crash.
Use another type of traction device only if
its manufacturer recommends it for use
on your vehicle and tire size combination
and road conditions. Follow that
CAUTION: (Continued)
CAUTION: (Continued)
manufacturer’s instructions. To help avoid
damage to your vehicle, drive slowly,
readjust or remove the device if it is
contacting your vehicle, and do not spin
your vehicle’s wheels.
If you do �nd traction devices that will �t,
install them on the front tires.
Notice:If your vehicle has P205/65R15 size
tires, use tire chains only where legal and only
when you must. Use only SAE Class S-type
chains that are the proper size for your
tires. Install them on the front tires and tighten
them as tightly as possible with the ends
securely fastened. Drive slowly and follow the
chain manufacturer’s instructions. If you
can hear the chains contacting your vehicle,
stop and retighten them. If the contact
continues, slow down until it stops. Driving
too fast or spinning the wheels with chains on
will damage your vehicle.
416
Page 429 of 510
3. Place the tire (D) in the compartment, valve
stem up, with the bolt (E) extending through
the wheel center hole.
4. Place the jack and wheel wrench (D) over the
bolt (E), inside the wheel.
5. Secure by tightening the larger wing nut (B)
onto the bolt (E).
6. Reinstall the tire cover (A).
Storing the Compact Spare Tire
The compact spare tire is for temporary use only.
Store the compact spare tire and tools as
shown in the following diagram.
A. Cover
B. Retainer
C. Spare Tire
D. Wing NutE.
Jack and Wheel
Wrench
F. Bolt
The compact spare is for temporary use only.
Replace the compact spare tire with a full-size tire
as soon as you can. SeeCompact Spare Tire
on page 434.
429