Page 266 of 510
k(Play/Pause):Press thek(play) button to
start play of a DVD or CD. Press the
k(pause)
button while a DVD or CD is playing to pause it.
Press it again to continue play of a DVD or CD.
When in menu mode, press the
kbutton to
enter a selection.
1–6 (Preset Pushbuttons):This button is
inactive when in DVD mode.
BAND:Press this button to switch between
FM1, FM2, AM, or XM1 or XM2 (if equipped).
If the front seat passengers are listening to
the DVD player, the rear seat passengers
cannot select XM1 or XM2.
SRCE (Source):Press this button to switch
between playing the radio or a CD.
xSEEKw:Press the downxSEEK arrow
to go to the beginning of the current chapter or
track if more than �ve seconds have played.
Press the up
wSEEK arrow to go to the next
chapter or track. This button might not work
when the DVD is playing the copyright information
or the previews.
xw(Volume):Press the downxor upwarrow
to increase or decrease the volume on the wired
headphones, not included. The arrows on the
left side are for the left headphone and the arrows
on the right side are for the right headphone.
Playing a Disc
To play a disc, gently insert the disc, with the
label side up, into the loading slot. The DVD
player continues loading the disc and the
player automatically starts if the vehicle is in
the CAP position, ACC, or RAP.
If a disc is already in the player, make sure that the
DVD player is on, then press the
k(play/pause)
button on the player faceplate or on the remote
control.
Some DVDs do not allow fast forwarding or
skipping of the copyright information or the
previews. Some DVDs begin playing after the
previews have �nished. If the DVD does not
begin playing at the main title, refer to the
on-screen instructions.
266
Page 268 of 510
Remote Control Buttons
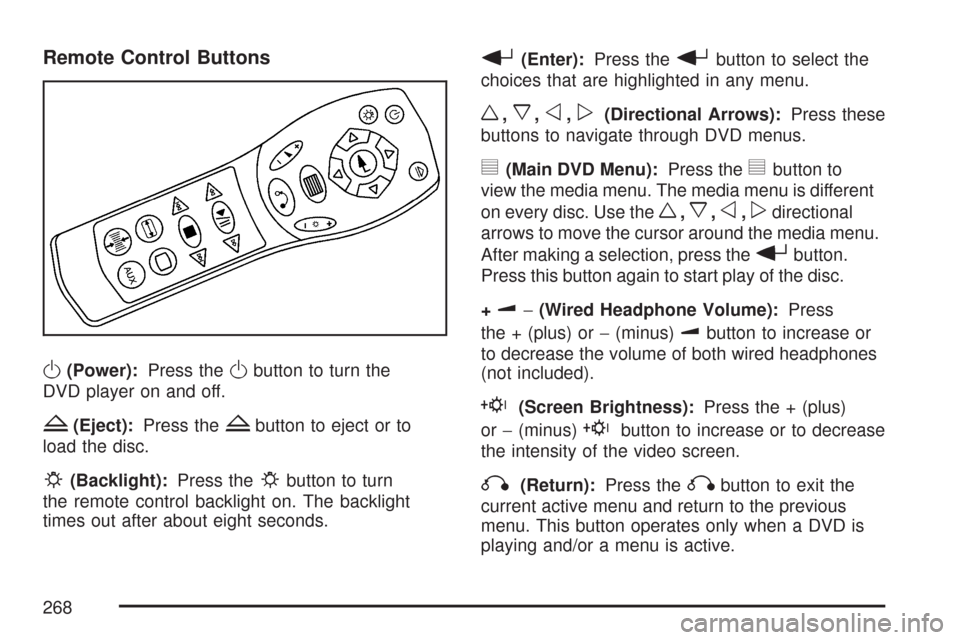
O(Power):Press theObutton to turn the
DVD player on and off.
Z(Eject):Press theZbutton to eject or to
load the disc.
P(Backlight):Press thePbutton to turn
the remote control backlight on. The backlight
times out after about eight seconds.
r(Enter):Press therbutton to select the
choices that are highlighted in any menu.
w,x,o,p(Directional Arrows):Press these
buttons to navigate through DVD menus.
y(Main DVD Menu):Press theybutton to
view the media menu. The media menu is different
on every disc. Use the
w,x,o,pdirectional
arrows to move the cursor around the media menu.
After making a selection, press the
rbutton.
Press this button again to start play of the disc.
+
u−(Wired Headphone Volume):Press
the + (plus) or−(minus)
ubutton to increase or
to decrease the volume of both wired headphones
(not included).
E(Screen Brightness):Press the + (plus)
or−(minus)
Ebutton to increase or to decrease
the intensity of the video screen.
q(Return):Press theqbutton to exit the
current active menu and return to the previous
menu. This button operates only when a DVD is
playing and/or a menu is active.
268
Page 275 of 510
Problem Recommended Action
How do I get subtitles
on or off?Press the display button
on the remote control to
go to the DVDs main
menu. Then follow the
screen prompts.
After stopping the player,
I push the play button
but sometimes the DVD
starts where I left off,
and sometimes at the
beginning.Press the stop button on
the remote control to
resume where the DVD
left off. Press the stop
button twice to start the
DVD at the beginning.
If the power is off and the
DVD is still in the player,
press the play button.
The DVD is playing but
there is no picture or
sound. The auxiliary
source is running but
there is no picture
or sound.Press and release the
AUX button on the
remote control or the
SRCE and play buttons
on the DVD player to
get to auxiliary input.
Check to make sure
that the auxiliary source
is connected to the
inputs properly.
The audio or video
skips or jumps.The DVD could be
dirty or scratched.
Try cleaning the DVD.Problem Recommended Action
When I return to the
DVD from the system
menu, sometimes it plays
from the beginning and
sometimes from where
it left off.If the stop button was
pressed once, it resumes
play from where it left off.
If the stop button was
pressed twice, it starts at
the beginning of the DVD.
However, if a change
was made to the menu
the DVD starts from
where it left off, even if
the stop button was only
pressed once.
The fast forward, reverse,
previous, and next
functions do not work.Some commands that
do one thing for DVDs
does not always work or
perform the same function
for audio CDs or games.
These functions can
also be disabled when
the DVD is playing the
copyright information
or the previews.
275
Page 388 of 510
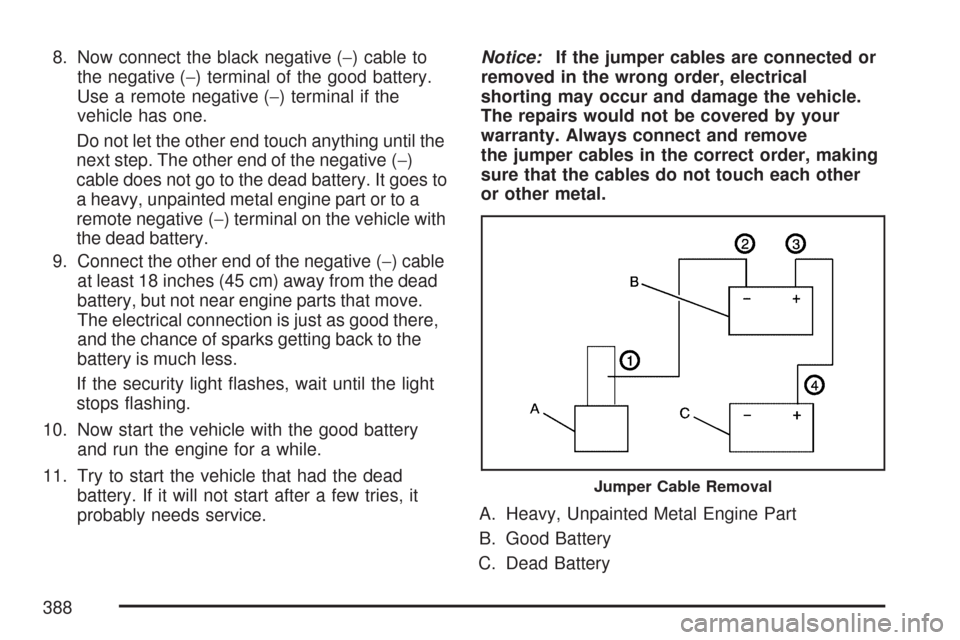
8. Now connect the black negative (−) cable to
the negative (−) terminal of the good battery.
Use a remote negative (−) terminal if the
vehicle has one.
Do not let the other end touch anything until the
next step. The other end of the negative (−)
cable does not go to the dead battery. It goes to
a heavy, unpainted metal engine part or to a
remote negative (−) terminal on the vehicle with
the dead battery.
9. Connect the other end of the negative (−) cable
at least 18 inches (45 cm) away from the dead
battery, but not near engine parts that move.
The electrical connection is just as good there,
and the chance of sparks getting back to the
battery is much less.
If the security light �ashes, wait until the light
stops �ashing.
10. Now start the vehicle with the good battery
and run the engine for a while.
11. Try to start the vehicle that had the dead
battery. If it will not start after a few tries, it
probably needs service.Notice:If the jumper cables are connected or
removed in the wrong order, electrical
shorting may occur and damage the vehicle.
The repairs would not be covered by your
warranty. Always connect and remove
the jumper cables in the correct order, making
sure that the cables do not touch each other
or other metal.
A. Heavy, Unpainted Metal Engine Part
B. Good Battery
C. Dead Battery
Jumper Cable Removal
388
Page 481 of 510
Roadside Assistance Program
In the U.S., call1-800-CHEV-USA
(1-800-243-8872).
In Canada, call1-800-268-6800.
Service is available 24 hours a day,
365 days a year.
As the owner of a new Chevrolet vehicle,
you are automatically enrolled in the
Chevrolet Roadside Assistance program.
Who is Covered?
Roadside Assistance coverage is for the vehicle
operator, regardless of ownership. In Canada,
a person driving this vehicle without the consent
of the owner is not eligible for coverage.
The following services are provided in the U.S.
during the Bumper-to-Bumper warranty period and,
in Canada, during the Base Warranty coverage
period of the New Vehicle Limited Warranty,
up to a maximum coverage of $100.
Fuel Delivery:Delivery of enough fuel for the
vehicle to get to the nearest service station
(approximately $5 in Canada). Service toprovide diesel may be restricted. For safety
reasons, propane and other alternative fuels
will not be provided through this service.
Lock-out Service:To ensure security, the
driver must present personal identi�cation
before lock-out service is provided. In Canada,
the vehicle registration is also required.
Lock-out service will be covered at no charge if
you are unable to gain entry into your vehicle.
A remote unlock may be available if you have
an active OnStar
®subscription.
Emergency Tow From a Public Roadway
or Highway:Tow to the nearest dealership
for warranty service or in the event of a
vehicle-disabling accident. Winch-out
assistance when the vehicle is mired in sand,
mud, or snow.
Flat Tire Change:Installation of a spare tire in
good condition, when equipped and properly
in�ated, is covered at no charge. The customer
is responsible for the repair or replacement of
the tire if not covered by a warrantable failure.
Jump Start:No-start occurrences which
require a battery jump start will be covered
at no charge.
481
Page:
< prev 1-8 9-16 17-24