2007 CHEVROLET MALIBU MAXX lights
[x] Cancel search: lightsPage 153 of 510
Reprogramming a Single Universal
Home Remote Button
To program a device to Universal Home Remote
using a Universal Home Remote button
previously trained, follow these steps:
1. Press and hold the desired Universal Home
Remote button. Do not release the button.
2. The indicator light will begin to �ash after
20 seconds. While still holding the Universal
Home Remote button, proceed with Step 2
under “Programming Universal Home Remote”
shown earlier in this section.
For help or information on the Universal Home
Remote System, call the customer assistance
phone number underCustomer Assistance Offices
on page 479.
Universal Home Remote System
Operation (With Three Round LED)
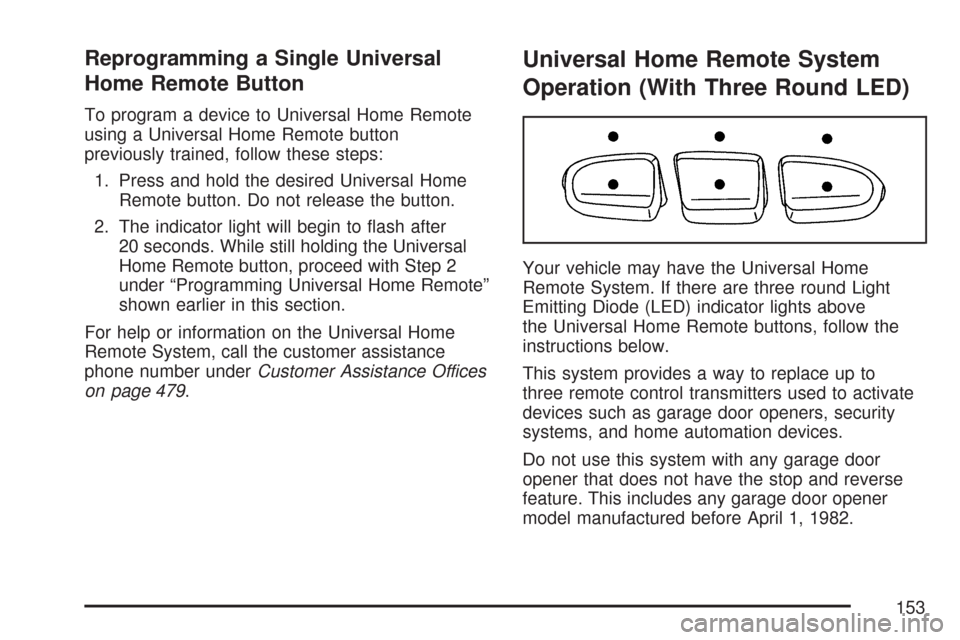
Your vehicle may have the Universal Home
Remote System. If there are three round Light
Emitting Diode (LED) indicator lights above
the Universal Home Remote buttons, follow the
instructions below.
This system provides a way to replace up to
three remote control transmitters used to activate
devices such as garage door openers, security
systems, and home automation devices.
Do not use this system with any garage door
opener that does not have the stop and reverse
feature. This includes any garage door opener
model manufactured before April 1, 1982.
153
Page 159 of 510
4. The indicator lights will blink slowly. Enter each
switch setting from Step 2 into your vehicle’s
Universal Home Remote. You will have
two and one-half minutes to complete Step 4.
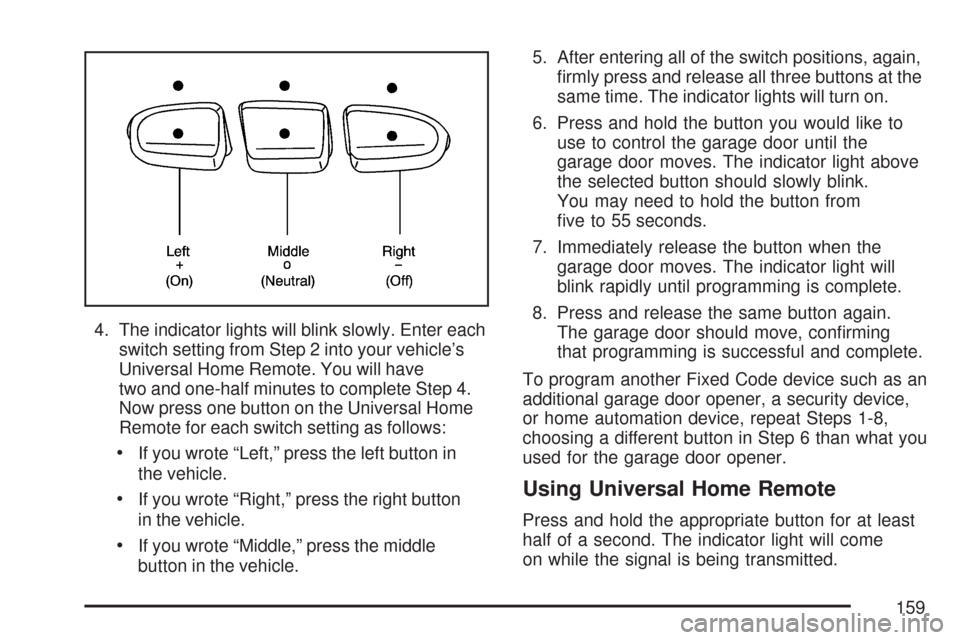
Now press one button on the Universal Home
Remote for each switch setting as follows:
If you wrote “Left,” press the left button in
the vehicle.
If you wrote “Right,” press the right button
in the vehicle.
If you wrote “Middle,” press the middle
button in the vehicle.5. After entering all of the switch positions, again,
�rmly press and release all three buttons at the
same time. The indicator lights will turn on.
6. Press and hold the button you would like to
use to control the garage door until the
garage door moves. The indicator light above
the selected button should slowly blink.
You may need to hold the button from
�ve to 55 seconds.
7. Immediately release the button when the
garage door moves. The indicator light will
blink rapidly until programming is complete.
8. Press and release the same button again.
The garage door should move, con�rming
that programming is successful and complete.
To program another Fixed Code device such as an
additional garage door opener, a security device,
or home automation device, repeat Steps 1-8,
choosing a different button in Step 6 than what you
used for the garage door opener.
Using Universal Home Remote
Press and hold the appropriate button for at least
half of a second. The indicator light will come
on while the signal is being transmitted.
159
Page 160 of 510
Reprogramming Universal Home
Remote Buttons
You can reprogram any of the three buttons
by repeating the instructions.
Erasing Universal Home Remote
Buttons
You should erase the programmed buttons
when you sell or terminate your lease.
To erase either Rolling Code or Fixed Code
on the Universal Home Remote device,
do the following:
1. Press and hold the two outside buttons at
the same time for approximately 20 seconds,
until the indicator lights, located directly
above the buttons, begin to blink rapidly.
2. Once the indicator lights begin to blink,
release both buttons. The codes from all
buttons will be erased.
For help or information on the Universal Home
Remote System, call the customer assistance
phone number underCustomer Assistance Offices
on page 479.
Storage Areas
Glove Box
To open, pull the handle down and pull the glove
box door down until it stops and is fully open.
Cupholder(s)
There is a cupholder next to the shift lever and
another, if equipped, at the rear of the shift lever.
If your vehicle has rear seat cupholders, pull
down the door on the back of the center console
to access them.
Center Console Storage Area
There is a storage compartment in the center
console area. To open the lower compartment,
pull up on the release at the front edge of
the armrest. Your vehicle may have an accessory
power outlet inside of the storage area. See
Accessory Power Outlet(s) on page 186for
more information.
160
Page 165 of 510
Instrument Panel Overview........................ 168
Hazard Warning Flashers.......................... 170
Other Warning Devices............................. 170
Horn.......................................................... 170
Tilt and Telescopic Steering Wheel............ 170
Turn Signal/Multifunction Lever.................. 171
Turn and Lane-Change Signals................. 172
Headlamp High/Low-Beam Changer.......... 172
Flash-to-Pass............................................ 173
Windshield Wipers..................................... 173
Windshield Washer.................................... 174
Rear Window Wiper/Washer
(MAXX Model)....................................... 175
Cruise Control........................................... 176
Exterior Lamps.......................................... 179
Headlamps on Reminder........................... 181
Headlamps Off in PARK (P)...................... 181
Delayed Headlamps.................................. 182
Daytime Running Lamps (DRL)................. 182
Automatic Headlamp System..................... 183
Fog Lamps................................................ 184
Instrument Panel Brightness...................... 184
Dome Lamp.............................................. 184
Entry/Exit Lighting...................................... 185Parade Dimming........................................ 185
Front Reading Lamps................................ 185
Rear Reading Lamps................................ 185
Trunk Lamp............................................... 185
Cargo Lamp.............................................. 186
Battery Run-Down Protection..................... 186
Accessory Power Outlet(s)........................ 186
Cigarette Lighter........................................ 187
Climate Controls......................................... 188
Climate Control System............................. 188
Automatic Climate Control System............. 192
Outlet Adjustment...................................... 197
Warning Lights, Gages, and Indicators..... 198
Instrument Panel Cluster........................... 198
Speedometer and Odometer...................... 200
Trip Odometer........................................... 200
Tachometer............................................... 201
Safety Belt Reminder Light........................ 201
Passenger Safety Belt Reminder Light....... 202
Airbag Readiness Light............................. 202
Passenger Airbag Status Indicator............. 203
Charging System Light.............................. 206
Brake System Warning Light..................... 206
Anti-Lock Brake System Warning Light...... 208
Section 3 Instrument Panel
165
Page 181 of 510
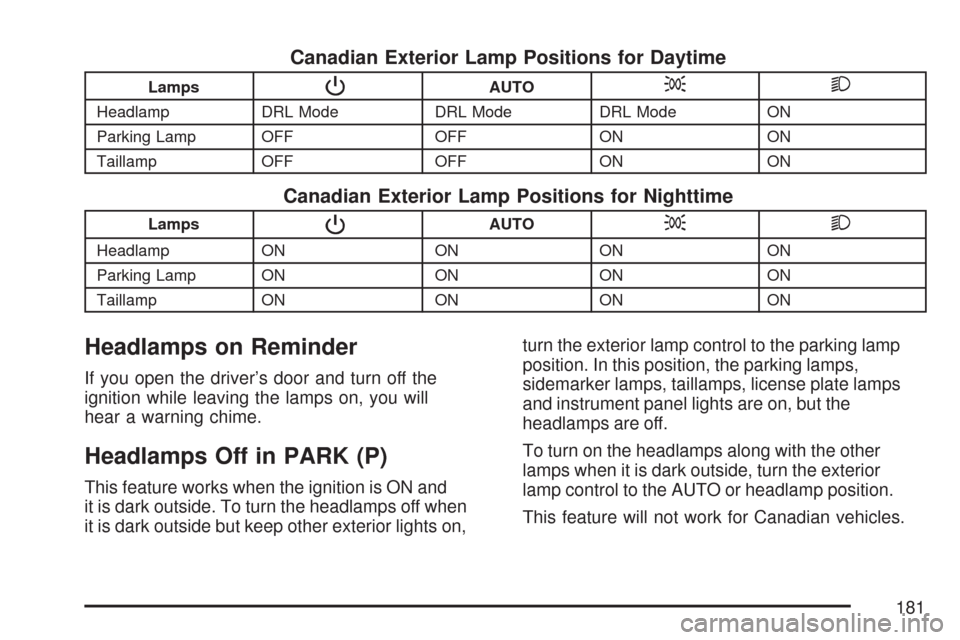
Canadian Exterior Lamp Positions for Daytime
LampsPAUTO;2
Headlamp DRL Mode DRL Mode DRL Mode ON
Parking Lamp OFF OFF ON ON
Taillamp OFF OFF ON ON
Canadian Exterior Lamp Positions for Nighttime
LampsPAUTO;2
Headlamp ON ON ON ON
Parking Lamp ON ON ON ON
Taillamp ON ON ON ON
Headlamps on Reminder
If you open the driver’s door and turn off the
ignition while leaving the lamps on, you will
hear a warning chime.
Headlamps Off in PARK (P)
This feature works when the ignition is ON and
it is dark outside. To turn the headlamps off when
it is dark outside but keep other exterior lights on,turn the exterior lamp control to the parking lamp
position. In this position, the parking lamps,
sidemarker lamps, taillamps, license plate lamps
and instrument panel lights are on, but the
headlamps are off.
To turn on the headlamps along with the other
lamps when it is dark outside, turn the exterior
lamp control to the AUTO or headlamp position.
This feature will not work for Canadian vehicles.
181
Page 182 of 510
Delayed Headlamps
The delayed headlamps feature will continue to
illuminate the headlamps for 20 seconds after the
key is turned to off at night. Then the headlamps
will automatically turn off.
To override the 20 second delayed headlamp
feature while it is active turn the switch at the
end of the turn signal/multifunction lever to
the off/on position.
Daytime Running Lamps (DRL)
Daytime Running Lamps (DRL) can make it
easier for others to see the front of your vehicle
during the day. DRL can be helpful in many
different driving conditions, but they can be
especially helpful in the short periods after
dawn and before sunset. Fully functional
daytime running lamps are required on all
vehicles �rst sold in Canada.The DRL system will turn your low-beam
headlamps on at a reduced brightness when
the following conditions are met:
The ignition is on.
The exterior lamp control is turned to
AUTO. In addition, Canadian vehicles
DRL will also turn on if you have turned
on the parking lamps.
The light sensor detects daytime light.
See the end of this section for more
information on the light sensor.
The shift lever is not in PARK (P).
While the DRL system is on, the taillamps,
sidemarker lamps, and instrument panel lights
will not be illuminated.
The DRL system will be off any time your
vehicle is in PARK (P). The DRL system on
U.S. vehicles can also be turned off by using
the off/on switch for one ignition cycle.
As with any vehicle, you should turn on the
regular headlamp system when you need it.
182
Page 183 of 510
Light Sensor
Your vehicle has a light sensor on top of the
instrument panel. Make sure it is not covered
or the headlamps may remain on when you
do not need them. The light sensor for the
DRL and Automatic Headlamp features is
located on top of the instrument panel.
The automatic headlamp system may be on
when driving through a parking garage, heavy
outcast weather, or a tunnel. This is normal.
Automatic Headlamp System
When it is dark enough outside, the automatic
headlamp system turns on the headlamps at
the normal brightness along with other lamps
such as the taillamps, sidemarker, parking lamps,
and the instrument panel lights. The radio lights
will also be dim.
Your vehicle has a light sensor on top of the
instrument panel that controls the automatic
headlamp system. Make sure it is not covered
or the automatic headlamp system will be on
when it is not needed.There is a delay in the transition between the
daytime and nighttime operation of the DRL
and the automatic headlamp systems so that
driving under bridges or bright overhead street
lights does not affect the system. The DRL
and automatic headlamp systems will only be
affected when the light sensor sees a change
in lighting lasting longer than this delay.
If you start your vehicle in a dark garage,
the automatic headlamp system comes on
immediately. Once you leave the garage, it takes
about one minute for the automatic headlamp
system to change to DRL if it is light outside.
During that delay, the instrument panel cluster may
not be as bright as usual. Make sure the instrument
panel brightness control is in the full bright position.
See “Instrument Panel Brightness Control” under
Instrument Panel Brightness on page 184.
To idle your vehicle with the automatic headlamp
system off, turn the ignition on and set the exterior
light switch to the off/on position. For Canadian
vehicles, the transaxle must stay in PARK (P) for
this function.
As with any vehicle, you should turn on the
regular headlamps when they are needed.
183
Page 184 of 510
Fog Lamps
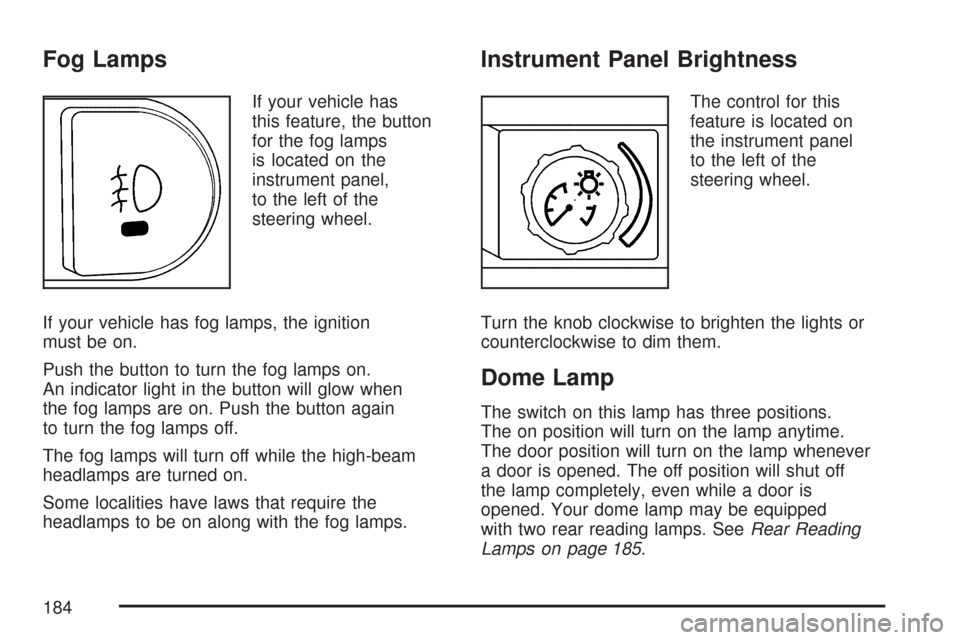
If your vehicle has
this feature, the button
for the fog lamps
is located on the
instrument panel,
to the left of the
steering wheel.
If your vehicle has fog lamps, the ignition
must be on.
Push the button to turn the fog lamps on.
An indicator light in the button will glow when
the fog lamps are on. Push the button again
to turn the fog lamps off.
The fog lamps will turn off while the high-beam
headlamps are turned on.
Some localities have laws that require the
headlamps to be on along with the fog lamps.
Instrument Panel Brightness
The control for this
feature is located on
the instrument panel
to the left of the
steering wheel.
Turn the knob clockwise to brighten the lights or
counterclockwise to dim them.
Dome Lamp
The switch on this lamp has three positions.
The on position will turn on the lamp anytime.
The door position will turn on the lamp whenever
a door is opened. The off position will shut off
the lamp completely, even while a door is
opened. Your dome lamp may be equipped
with two rear reading lamps. SeeRear Reading
Lamps on page 185.
184