2007 CHEVROLET IMPALA lock
[x] Cancel search: lockPage 224 of 460
Using the Auxiliary Input Jack
Your radio system has an auxiliary input jack
located on the lower right side of the faceplate.
This is not an audio output; do not plug the
headphone set into the front auxiliary input jack.
You can however, connect an external audio
device such as an iPod, laptop computer, MP3
player, CD changer, or cassette tape player, etc. to
the auxiliary input jack for use as another source
for audio listening.
Drivers are encouraged to set up any auxiliary
device while the vehicle is in PARK (P). See
Defensive Driving on page 248for more
information on driver distraction.
To use a portable audio player, connect a 3.5 mm
(1/8 inch) cable to the radio’s front auxiliary
input jack. When a device is connected, press the
radio CD/AUX button to begin playing audio
from the device over the vehicle speakers.
O(Power/Volume):Turn this knob clockwise or
counterclockwise to increase or decrease the
volume of the portable player. You might need to
make additional volume adjustments from the
portable device.
BAND:Press this button to listen to the radio
while a portable audio device is playing. The
portable audio device continues playing, so you
might want to stop it or turn it off.
CD/AUX (CD/Auxiliary):Press this button to play
a CD while a portable audio device is playing.
Press this button again and the system begins
playing audio from the connected portable audio
player. If a portable audio player is not
connected, No Input Device Found displays.
224
Page 226 of 460
Playing the Radio
O
(Power/Volume):Press this knob to turn the
system on and off.
Turn this knob clockwise or counterclockwise to
increase or decrease the volume.
Speed Compensated Volume (SCV):The radio
has Speed Compensated Volume (SCV). When
SCV is on, the radio volume automatically adjusts
to compensate for road and wind noise as you
speed up or slow down while driving. That way, the
volume level should sound about the same as
you drive. To activate SCV:
1. Set the radio volume to the desired level.
2. Press the MENU button to display the radio
setup menu.
3. Press the pushbutton under the AUTO VOLUM
(automatic volume) label on the radio display.
4. Press the pushbutton under the desired Speed
Compensated Volume setting (OFF, Low, Med,
or High) to select the level of radio volume
compensation. The display times out after
approximately 10 seconds. Each higher setting
allows for more radio volume compensation at
faster vehicle speeds.
Finding a Station
BAND:Press this button to switch between AM,
FM, or XM™ (if equipped). The selection displays.
f(Tune):Turn this knob to select radio
stations.
©SEEK¨:Press the SEEK arrows to go to the
previous or the next station and stay there.
To scan stations, press and hold either SEEK
arrow for a few seconds until a beep sounds. The
radio goes to a station, plays for a few seconds,
then goes to the next station. Press either
SEEK arrow again to stop scanning.
The radio seeks and scans stations only with a
strong signal that are in the selected band.
226
Page 228 of 460
The number of favorites pages can be setup using
the MENU button. To setup the number of
favorites pages, perform the following steps:
1. Press the MENU button to display the radio
setup menu.
2. Press the pushbutton located below the
FAV 1-6 label.
3. Select the desired number of favorites pages
by pressing the pushbutton located below the
displayed page numbers.
4. Press the FAV button, or let the menu time out,
to return to the original main radio screen
showing the radio station frequency labels and
to begin the process of programming your
favorites for the chosen amount of numbered
pages.
Setting the Tone
(Bass/Midrange/Treble)
BASS/MID/TREB (Bass, Midrange, or
Treble):To adjust bass, midrange, or treble,
press the
fknob until the tone control labels
display. Continue pressing to highlight the desired
label, or press the pushbutton positioned under
the desired label.Turn the
fknob clockwise or counterclockwise to
adjust the highlighted setting. The highlighted
setting can also be adjusted by pressing either
SEEK arrow,
\FWD (forward), orsREV
(reverse) button until the desired levels are
obtained. If a station’s frequency is weak,
or has static, decrease the treble.
To quickly adjust bass, midrange, or treble to the
middle position, press the pushbutton positioned
under the BASS, MID (midrange), or TREB (treble)
label for more than two seconds. A beep sounds
and the level adjusts to the middle position.
To quickly adjust all tone and speaker controls to
the middle position, press the
fknob for more than
two seconds until a beep sounds.
EQ (Equalization):Press this button to select
preset equalization settings.
To return to the manual mode, press the EQ
button until Manual displays or start to manually
adjust the bass, midrange, or treble by
pressing the
fknob.
228
Page 229 of 460
Adjusting the Speakers (Balance/Fade)
BAL/FADE (Balance/Fade):To adjust balance
or fade, press the
fknob until the speaker control
labels display. Continue pressing to highlight the
desired label, or press the pushbutton positioned
under the desired label. Turn the
fknob
clockwise or counterclockwise to adjust the
highlighted setting. The highlighted setting can
also be adjusted by pressing either SEEK arrow,
\FWD, orsREV until the desired levels
are obtained.
To quickly adjust balance or fade to the middle
position, press the pushbutton positioned under the
BAL or FADE label for more than two seconds.
A beep sounds and the level adjusts to the
middle position.
To quickly adjust all speaker and tone controls to
the middle position, press the
fknob for more
than two seconds until a beep sounds.
Finding a Category (CAT) Station
CAT (Category):The CAT button is used to �nd
XM™ stations while the radio is in the XM™
mode. To �nd XM™ channels within a desired
category, perform the following:
1. Press the BAND button until the XM™
frequency displays. Press the CAT button to
display the category labels on the radio
display. Continue pressing the CAT button
until the desired category name displays.
2. Press either of the two buttons below the
desired category label to immediately tune
to the �rst XM™ station associated with that
category.
3. Turn the
fknob, press the buttons below the
right or left arrows displayed, or press the
SEEK arrows to go to the previous or to the
next XM™ station within the selected
category.
4. To exit the category search mode, press the
FAV button or BAND button to display your
favorites again.
229
Page 230 of 460
Undesired XM™ categories can be removed
through the setup menu. To remove an undesired
category, perform the following:
1. Press the MENU button to display the radio
setup menu.
2. Press the pushbutton located below the XM
CAT label.
3. Turn the
fknob to display the category you
want removed.
4. Press the pushbutton located under the
Remove label until the category name
along with the word Removed displays.
5. Repeat the steps to remove more categories.
Removed categories can be restored by pressing
the pushbutton under the Add label when a
removed category displays or by pressing the
pushbutton under the Restore All label.
The radio does not allow you to remove or add
categories while the vehicle is moving faster than
5 mph (8 km/h).
Radio Messages
Calibration Error:The audio system has been
calibrated for your vehicle from the factory. If
Calibration Error displays, it means that the radio
has not been con�gured properly for your
vehicle and it must be returned to your
dealer/retailer for service.
Locked:This message displays when the
THEFTLOCK
®system has locked up the radio.
Take the vehicle to your dealer/retailer for service.
If any error occurs repeatedly or if an error
cannot be corrected, contact your dealer/retailer.
Radio Messages for XM Only
SeeXM Radio Messages on page 241later in this
section for further detail.
Playing a CD (Single CD Player)
Insert a CD partway into the slot, label side up.
The player pulls it in and the CD should begin
playing.
230
Page 235 of 460
Using the Auxiliary Input Jack
Your radio system has an auxiliary input jack
located on the lower right side of the faceplate.
This is not an audio output; do not plug the
headphone set into the front auxiliary input jack.
You can however, connect an external audio
device such as an iPod, laptop computer, MP3
player, CD changer, or cassette tape player, etc. to
the auxiliary input jack for use as another source
for audio listening.
Drivers are encouraged to set up any auxiliary
device while the vehicle is in PARK (P). See
Defensive Driving on page 248for more
information on driver distraction.
To use a portable audio player, connect a 3.5 mm
(1/8 inch) cable to the radio’s front auxiliary
input jack. When a device is connected, press the
radio CD/AUX button to begin playing audio
from the device over the vehicle speakers.
O(Power/Volume):Turn this knob clockwise or
counterclockwise to increase or decrease the
volume of the portable player. You might need to
make additional volume adjustments from the
portable device.
BAND:Press this button to listen to the radio
while a portable audio device is playing. The
portable audio device continues playing, so you
might want to stop it or turn it off.
CD/AUX (CD/Auxiliary):Press this button to play
a CD while a portable audio device is playing.
Press this button again and the system begins
playing audio from the connected portable
audio player. If a portable audio player is not
connected, No Aux Input Device Found displays.
235
Page 241 of 460
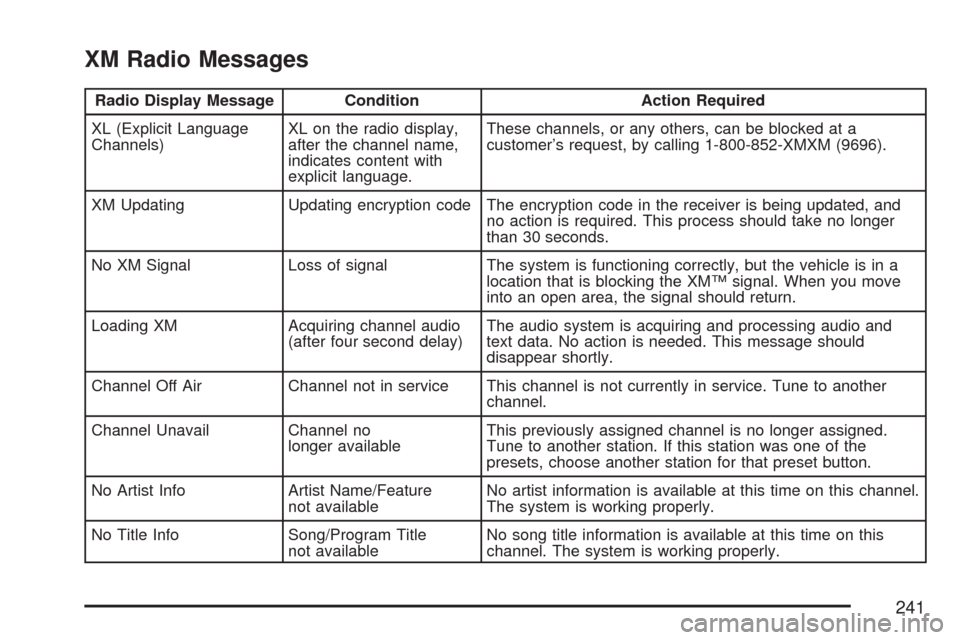
XM Radio Messages
Radio Display Message Condition Action Required
XL (Explicit Language
Channels)XL on the radio display,
after the channel name,
indicates content with
explicit language.These channels, or any others, can be blocked at a
customer’s request, by calling 1-800-852-XMXM (9696).
XM Updating Updating encryption code The encryption code in the receiver is being updated, and
no action is required. This process should take no longer
than 30 seconds.
No XM Signal Loss of signal The system is functioning correctly, but the vehicle is in a
location that is blocking the XM™ signal. When you move
into an open area, the signal should return.
Loading XM Acquiring channel audio
(after four second delay)The audio system is acquiring and processing audio and
text data. No action is needed. This message should
disappear shortly.
Channel Off Air Channel not in service This channel is not currently in service. Tune to another
channel.
Channel Unavail Channel no
longer availableThis previously assigned channel is no longer assigned.
Tune to another station. If this station was one of the
presets, choose another station for that preset button.
No Artist Info Artist Name/Feature
not availableNo artist information is available at this time on this channel.
The system is working properly.
No Title Info Song/Program Title
not availableNo song title information is available at this time on this
channel. The system is working properly.
241
Page 242 of 460
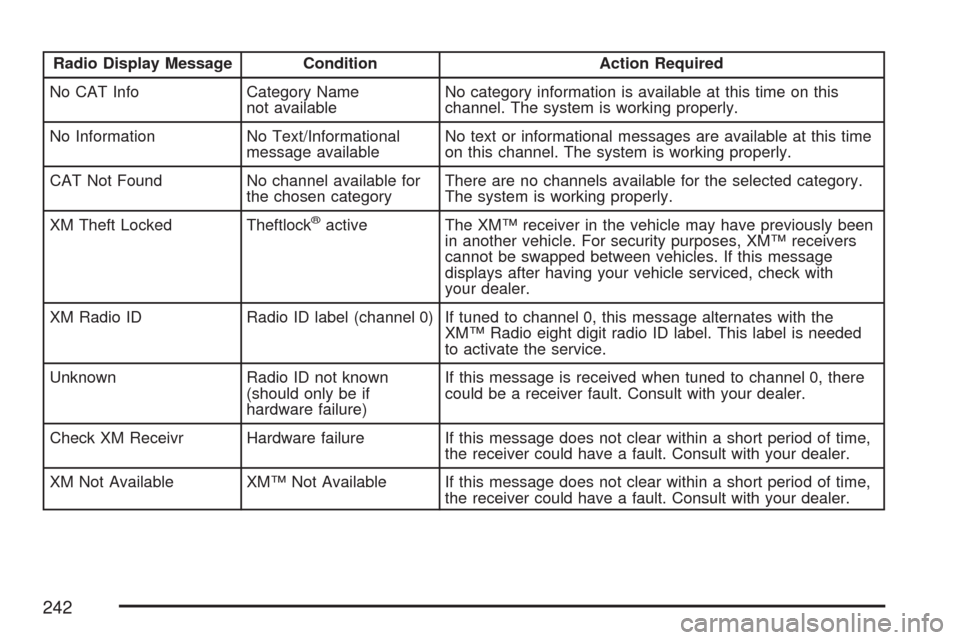
Radio Display Message Condition Action Required
No CAT Info Category Name
not availableNo category information is available at this time on this
channel. The system is working properly.
No Information No Text/Informational
message availableNo text or informational messages are available at this time
on this channel. The system is working properly.
CAT Not Found No channel available for
the chosen categoryThere are no channels available for the selected category.
The system is working properly.
XM Theft Locked Theftlock
®active The XM™ receiver in the vehicle may have previously been
in another vehicle. For security purposes, XM™ receivers
cannot be swapped between vehicles. If this message
displays after having your vehicle serviced, check with
your dealer.
XM Radio ID Radio ID label (channel 0) If tuned to channel 0, this message alternates with the
XM™ Radio eight digit radio ID label. This label is needed
to activate the service.
Unknown Radio ID not known
(should only be if
hardware failure)If this message is received when tuned to channel 0, there
could be a receiver fault. Consult with your dealer.
Check XM Receivr Hardware failure If this message does not clear within a short period of time,
the receiver could have a fault. Consult with your dealer.
XM Not Available XM™ Not Available If this message does not clear within a short period of time,
the receiver could have a fault. Consult with your dealer.
242