Page 138 of 458
Outside Power Mirrors
If the vehicle has power
mirrors, the control is
located on the driver’s
side door.
Select each mirror by turning the knob clockwise
for the passenger’s side mirror or counterclockwise
for the driver’s side mirror. The center position
is neutral.
Then, adjust the mirror angle by moving the knob
in the desired direction.
Outside Convex Mirror
Your passenger’s side mirror may be convex.
A convex mirror’s surface is curved so you can
see more from the driver’s seat.
{CAUTION:
A convex mirror can make things (like
other vehicles) look farther away than
they really are. If you cut too sharply
into the right lane, you could hit a vehicle
on your right. Check your inside mirror
or glance over your shoulder before
changing lanes.
138
Page 157 of 458
Instrument Panel Brightness
Press this knob located
next to the exterior
lamps knob to extend it,
and then turn it to
adjust the instrument
panel brightness.
Turn the knob all the way clockwise to turn on the
interior lamps. Press the knob back into its
stored position when not in use.
Dome Lamps
The dome lamps will automatically come on when
a door is opened and turn off shortly after all
doors are closed.
Dome Lamp Override
You can use the dome
lamp override button,
located below the
exterior lamp control, to
override the automatic
operation of the
dome lamps.
To turn the automatic operation of the lamps off,
press the button. The dome lamps will remain
off while a door is open. To return the lamps to
automatic operation, press the button again.
While pressed in, this will override the illuminated
entry feature unless you use your keyless entry
transmitter to unlock the vehicle.
157
Page 160 of 458

Climate Controls
Climate Control System
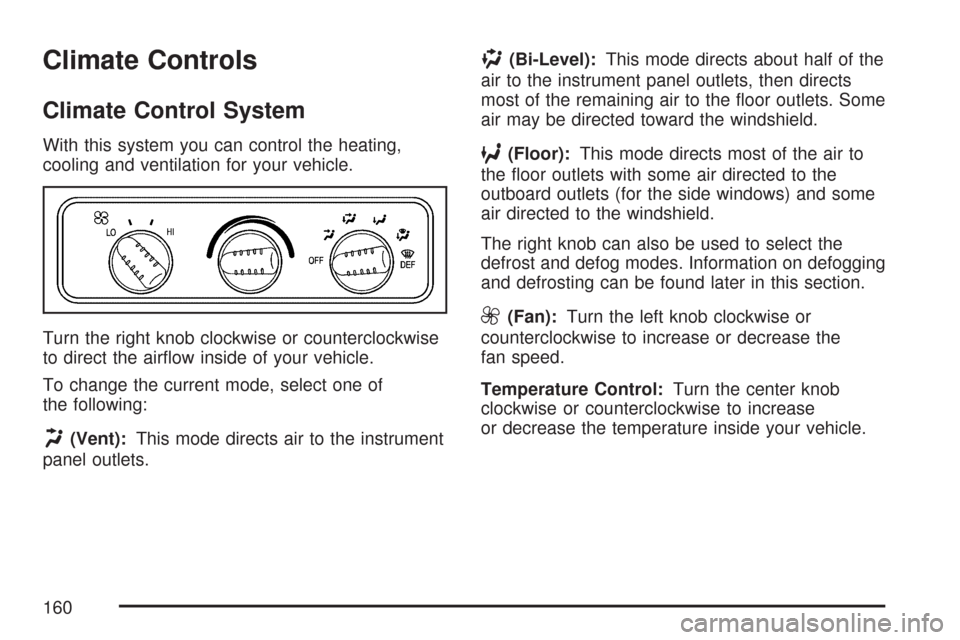
With this system you can control the heating,
cooling and ventilation for your vehicle.
Turn the right knob clockwise or counterclockwise
to direct the airflow inside of your vehicle.
To change the current mode, select one of
the following:
H(Vent):This mode directs air to the instrument
panel outlets.
)(Bi-Level):This mode directs about half of the
air to the instrument panel outlets, then directs
most of the remaining air to the floor outlets. Some
air may be directed toward the windshield.
6(Floor):This mode directs most of the air to
the floor outlets with some air directed to the
outboard outlets (for the side windows) and some
air directed to the windshield.
The right knob can also be used to select the
defrost and defog modes. Information on defogging
and defrosting can be found later in this section.
9(Fan):Turn the left knob clockwise or
counterclockwise to increase or decrease the
fan speed.
Temperature Control:Turn the center knob
clockwise or counterclockwise to increase
or decrease the temperature inside your vehicle.
160
Page 165 of 458

Turn the center knob clockwise or counterclockwise
to change the direction of the airflow in the rear
seating area.
To change the current mode, select one of the
following:
H(Vent):Use this mode to direct air to the
upper outlets, with a little air directed to the
floor outlets.
2(Floor):Use this mode to direct most of the
air to the floor outlets.
9(Fan):Turn the left knob clockwise or
counterclockwise to HIGH, MED (Medium) or
LOW to increase or decrease the fan speed in the
rear-seating area. Turn the knob to OFF to turn
off the fan.Temperature Control:To increase or decrease
the temperature for the rear of the vehicle, turn the
right knob located on the climate-control panel.
The air-conditioning system on the main climate
control panel must be turned on to direct cooled air
to the rear of the vehicle. If it is not on, then the
temperature in the rear of the vehicle will remain at
cabin temperature.
Be sure to keep the area under the front seats
clear of any objects so that the air inside of your
vehicle can circulate effectively.
For information on how to use the main climate
control system, seeClimate Control System
on page 160. For information on ventilation, see
Outlet Adjustment on page 162.
165
Page 190 of 458

AM-FM Radio
Playing the Radio
PWR (Power):Press this knob to turn the system
on and off.
VOL (Volume):Turn this knob clockwise or
counterclockwise to increase or to decrease
the volume.
RCL (Recall):Press this knob to switch the
display between the radio station frequency and
the time. When the ignition is off, press this
knob to display the time.
Finding a Station
AM FM:Press this button to switch between FM1,
FM2, or AM. The display shows the selection.
TUNE:Turn this knob to select radio stations.
oSEEKp:Press the right or the left arrow to go
to the next or to the previous station and stay there.
To scan stations, press and hold either SEEK arrow
for two seconds until you hear a beep. The radio
goes to a station, plays for a few seconds, then
goes to the next station. Press either SEEK arrow
again to stop scanning.
To scan preset stations, press and hold either
SEEK arrow for more than four seconds until you
hear two beeps. The radio goes to the first preset
station stored on your pushbuttons, plays for a few
seconds, then goes to the next preset station. Press
either SEEK arrow again to stop scanning presets.
The radio only seeks and scans stations with a
strong signal that are in the selected band.
190
Page 193 of 458

Radio with CD
Playing the Radio
PWR (Power):Press this knob to turn the system
on and off.
VOL (Volume):Turn this knob clockwise or
counterclockwise to increase or to decrease
the volume.
RCL (Recall):Press this knob to switch the
display between the radio station frequency and
the time. When the ignition is off, press this
knob to display the time.
Finding a Station
AM FM:Press this button to switch between FM1,
FM2, and AM. The display shows the selection.
TUNE:Turn this knob to select radio stations.
oSEEKp:Press the right or the left arrow to
go to the next or to the previous station and
stay there.
To scan stations, press and hold either SEEK
arrow for two seconds until you hear a beep. The
radio goes to a station, plays for a few seconds,
then goes to the next station. Press either
SEEK arrow again to stop scanning.
To scan preset stations, press and hold either
SEEK arrow for more than four seconds until you
hear two beeps. The radio goes to the first
preset station stored on the pushbuttons, plays for
a few seconds, then goes to the next preset
station. Press either SEEK arrow again to stop
scanning presets.
The radio only seeks and scans stations, with a
strong signal, that are in the selected band.
193
Page 199 of 458

With RDS, the radio can do the following:
•Seek to stations broadcasting the selected
type of programming
•Receive announcements concerning local and
national emergencies
•Display messages from radio stations
This system relies upon receiving specific
information from these stations and only works
when the information is available. In rare cases, a
radio station may broadcast incorrect information
that causes the radio features to work improperly.
If this happens, contact the radio station.
While the radio is tuned to an RDS station, the
station name or call letters appear on the display
instead of the frequency. RDS stations may
also provide the time of day, a program type (PTY)
for current programming, and the name of the
program being broadcast.
Playing the Radio
PWR (Power):Press this knob to turn the system
on and off.
oVOLp(Volume):Turn this knob clockwise or
counterclockwise to increase or to decrease the
volume.
INFO (Information):Press this knob to switch the
display between the radio station frequency and
the time. When the ignition is off, press this
knob to display the time.
For RDS, press the INFO knob to change what
appears on the display while using RDS. The
display options are station name, RDS station
frequency, PTY, and the name of the program
(if available).
To change the default on the display, press the
INFO knob until you see the desired display,
then hold the knob until you hear a beep.
The selected display is now the default.
199
Page 207 of 458

Cassette Tape Messages
CHK TAPE (Check Tape):If this message
appears on the display, the tape does not play
due to one of the following errors:
•The tape is tight and the player cannot turn
the tape hubs. Remove the tape. Hold the
tape with the open end down and try to turn
the right hub counterclockwise with a
pencil. Turn the tape over and repeat. If the
hubs do not turn easily, the tape may be
damaged and should not be used in the
player. Try a new tape to make sure your
player is working properly.
•The tape is broken. Try a new tape.
•The tape is wrapped around the tape head.
Attempt to get the cassette out. Try a new tape.
CLEAN:If this message appears on the display,
the cassette tape player needs to be cleaned.
It still plays tapes, but it should be cleaned as soon
as possible to prevent damage to the tapes and
player. SeeCare of the Cassette Tape Player
on page 224.
If the cassette tape is not playing correctly, for any
other reason, try a known good cassette.If any error occurs repeatedly or if an error cannot
be corrected, contact your dealer. If the radio
displays an error message, write it down and
provide it to your dealer when reporting the
problem.
CD Adapter Kits
It is possible to use a portable CD player with the
cassette tape player after activating the bypass
feature on your tape player.
To activate the bypass feature, perform the
following steps:
1. Turn the ignition on.
2. Turn the radio off.
3. Press and hold the TAPE DISC button for
five seconds. READY appears on the
display and the tape symbol on the display
flashes, indicating the feature is active.
4. Insert the adapter into the cassette tape slot.
It powers up the radio and begins playing.
The override feature remains active until the eject
button is pressed.
207