2007 CHEVROLET CORVETTE headlamp
[x] Cancel search: headlampPage 294 of 488
No one can see as well at night as in the daytime.
But as we get older these differences increase.
A 50-year-old driver might require at least twice as
much light to see the same thing at night as a
20-year-old.
What you do in the daytime can also affect your
night vision. For example, if you spend the
day in bright sunshine you are wise to wear
sunglasses. Your eyes will have less trouble
adjusting to night. But if you are driving, do not
wear sunglasses at night. They might cut down on
glare from headlamps, but they also make a lot
of things invisible.
You can be temporarily blinded by approaching
headlamps. It can take a second or two, or
even several seconds, for your eyes to re-adjust
to the dark. When you are faced with severe glare,
as from a driver who does not lower the high
beams, or a vehicle with misaimed headlamps,
slow down a little. Avoid staring directly into
the approaching headlamps.Keep the windshield and all the glass on your
vehicle clean — inside and out. Glare at night is
made much worse by dirt on the glass. Even
the inside of the glass can build up a �lm caused
by dust. Dirty glass makes lights dazzle and
�ash more than clean glass would, making the
pupils of your eyes contract repeatedly.
Remember that the headlamps light up far less of a
roadway when you are in a turn or curve. Keep your
eyes moving; that way, it is easier to pick out dimly
lighted objects. Just as the headlamps should be
checked regularly for proper aim, so should your
eyes be examined regularly. Some drivers suffer
from night blindness — the inability to see in dim
light — and are not even aware of it.
294
Page 308 of 488
You will need a well-charged battery to restart the
vehicle, and possibly for signaling later on with
your headlamps. Let the heater run for a while.
Then, shut the engine off and close the window
almost all the way to preserve the heat. Start
the engine again and repeat this only when you
feel really uncomfortable from the cold. But do it as
little as possible. Preserve the fuel as long as
you can. To help keep warm, you can get out of
the vehicle and do some fairly vigorous exercises
every half hour or so until help comes.
If Your Vehicle is Stuck in Sand,
Mud, Ice, or Snow
In order to free your vehicle when it is stuck, you
need to spin the wheels, but you do not want
to spin the wheels too fast. The method known
as rocking can help you get out when you
are stuck, but you must use caution.
{CAUTION:
If you let your vehicle’s tires spin at high
speed, they can explode, and you or others
could be injured. And, the transmission or
other parts of the vehicle can overheat.
That could cause an engine compartment
�re or other damage. When you are stuck,
spin the wheels as little as possible. Do not
spin the wheels above 35 mph (55 km/h)
as shown on the speedometer.
Notice:Spinning the wheels can destroy
parts of your vehicle as well as the tires.
If you spin the wheels too fast while shifting
the transmission back and forth, you can
destroy the transmission.
For information about using tire chains on your
vehicle, seeTire Chains on page 401.
308
Page 317 of 488

Service........................................................ 319
Accessories and Modi�cations................... 319
California Proposition 65 Warning.............. 320
Doing Your Own Service Work.................. 320
Adding Equipment to the Outside
of Your Vehicle...................................... 321
Fuel............................................................. 321
Gasoline Octane........................................ 321
Gasoline Speci�cations.............................. 322
California Fuel........................................... 322
Additives................................................... 323
Fuels in Foreign Countries........................ 324
Filling the Tank......................................... 324
Filling a Portable Fuel Container............... 327
Checking Things Under the Hood.............. 328
Hood Release........................................... 329
Engine Compartment Overview.................. 330
Engine Oil................................................. 333
Engine Oil Life System.............................. 340
Engine Air Cleaner/Filter............................ 342
Automatic Transmission Fluid.................... 345
Manual Transmission Fluid........................ 345
Hydraulic Clutch........................................ 346
Engine Coolant.......................................... 347
Coolant Surge Tank Pressure Cap............ 350Engine Overheating................................... 350
Overheated Engine Protection
Operating Mode..................................... 352
Cooling System......................................... 353
Power Steering Fluid................................. 358
Windshield Washer Fluid........................... 360
Brakes...................................................... 361
Battery...................................................... 364
Jump Starting............................................ 365
Rear Axle.................................................... 370
Bulb Replacement....................................... 371
High Intensity Discharge (HID) Lighting..... 371
Halogen Bulbs........................................... 372
Headlamps, Front Turn Signal, and
Parking Lamps....................................... 372
Taillamps, Turn Signal, and Stoplamps...... 374
Replacement Bulbs................................... 374
Windshield Replacement............................ 375
Windshield Wiper Blade Replacement....... 375
Tires............................................................ 378
Winter Tires.............................................. 379
Tire Sidewall Labeling............................... 380
Tire Terminology and De�nitions............... 382
Extended Mobility Tires............................. 384
In�ation - Tire Pressure............................. 386
Section 5 Service and Appearance Care
317
Page 318 of 488
High-Speed Operation............................... 388
Tire Pressure Monitor System................... 389
Tire Rotation............................................. 393
When It Is Time for New Tires.................. 393
Buying New Tires...................................... 394
Different Size Tires and Wheels................ 396
Uniform Tire Quality Grading..................... 396
Wheel Alignment and Tire Balance............ 398
Wheel Replacement.................................. 398
Tire Chains............................................... 401
Lifting Your Vehicle................................... 402
If a Tire Goes Flat.................................... 406
Appearance Care........................................ 407
Cleaning the Inside of Your Vehicle.......... 407
Fabric/Carpet............................................. 409
Coated Moldings....................................... 409
Leather...................................................... 410
Instrument Panel, Vinyl, and Other
Plastic Surfaces..................................... 410
Cargo Cover and Convenience Net........... 411
Care of Safety Belts.................................. 411
Weatherstrips............................................ 411
Washing Your Vehicle............................... 411
Cleaning Exterior Lamps/Lenses................ 412Finish Care............................................... 412
Windshield and Wiper Blades.................... 413
Removable Roof Panel.............................. 413
Convertible Top......................................... 414
Aluminum or Chrome-Plated Wheels
and Trim................................................ 414
Tires......................................................... 415
Finish Damage.......................................... 415
Underbody Maintenance............................ 416
Fiberglass Springs (Composite Springs)..... 416
Chemical Paint Spotting............................ 416
Vehicle Care/Appearance Materials............ 417
Vehicle Identi�cation.................................. 418
Vehicle Identi�cation Number (VIN)........... 418
Service Parts Identi�cation Label............... 418
Electrical System........................................ 418
Add-On Electrical Equipment..................... 418
Headlamp Wiring....................................... 419
Windshield Wiper Fuses............................ 419
Power Windows and Other Power Options ... 419
Fuses and Circuit Breakers....................... 419
Instrument Panel Fuse Block..................... 419
Engine Compartment Fuse Block............... 422
Capacities and Speci�cations.................... 426
Section 5 Service and Appearance Care
318
Page 371 of 488
What to Use
To add lubricant when the level is low, use
SAE 75W–90 Synthetic Axle Lubricant (GM
Part No. U.S. 89021677, in Canada 89021678)
meeting GM Speci�cation 9986115. To completely
re�ll after draining, add Limited-Slip Axle
Lubricant Additive (GM Part No. U.S. 1052358,
in Canada 992694). SeeRecommended
Fluids and Lubricants on page 443. Then �ll
to the bottom of the �ller plug hole with the
Synthetic Gear Lubricant.
Bulb Replacement
For the proper type of replacement bulbs,
seeReplacement Bulbs on page 374.
For any bulb changing procedure not listed
in this section, contact your dealer.
High Intensity Discharge (HID)
Lighting
{CAUTION:
The low beam high intensity discharge
lighting system operates at a very high
voltage. If you try to service any of
the system components, you could be
seriously injured. Have your dealer or
a quali�ed technician service them.
Your vehicle has HID headlamps. After your
vehicle’s HID headlamp bulb has been replaced,
you may notice that the beam is a slightly different
shade than it was originally. This is normal.
371
Page 372 of 488
Halogen Bulbs
{CAUTION:
Halogen bulbs have pressurized gas
inside and can burst if you drop or
scratch the bulb. You or others could
be injured. Be sure to read and follow
the instructions on the bulb package.
Headlamps, Front Turn Signal,
and Parking Lamps
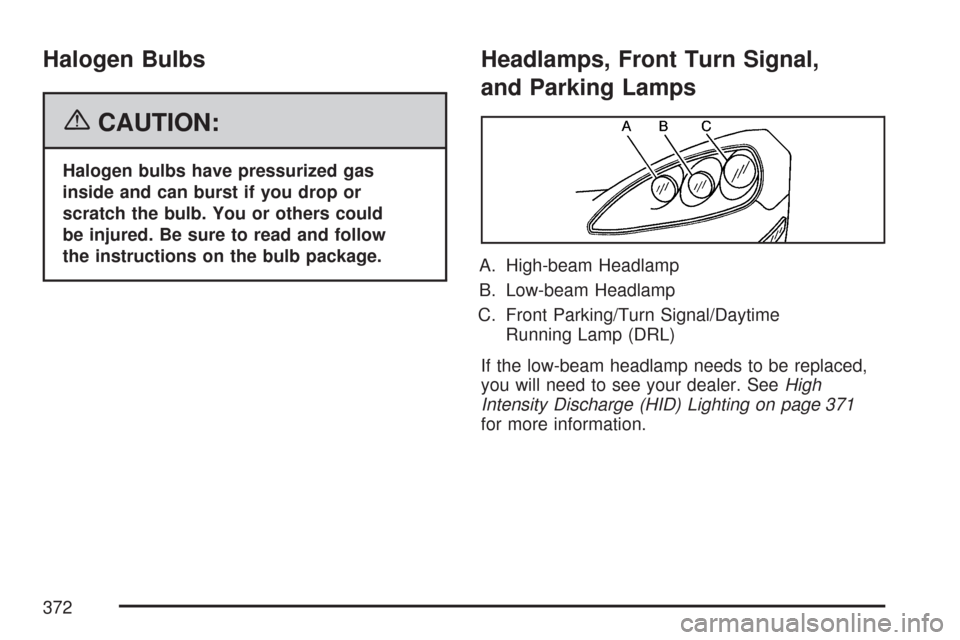
A. High-beam Headlamp
B. Low-beam Headlamp
C. Front Parking/Turn Signal/Daytime
Running Lamp (DRL)
If the low-beam headlamp needs to be replaced,
you will need to see your dealer. SeeHigh
Intensity Discharge (HID) Lighting on page 371
for more information.
372
Page 373 of 488
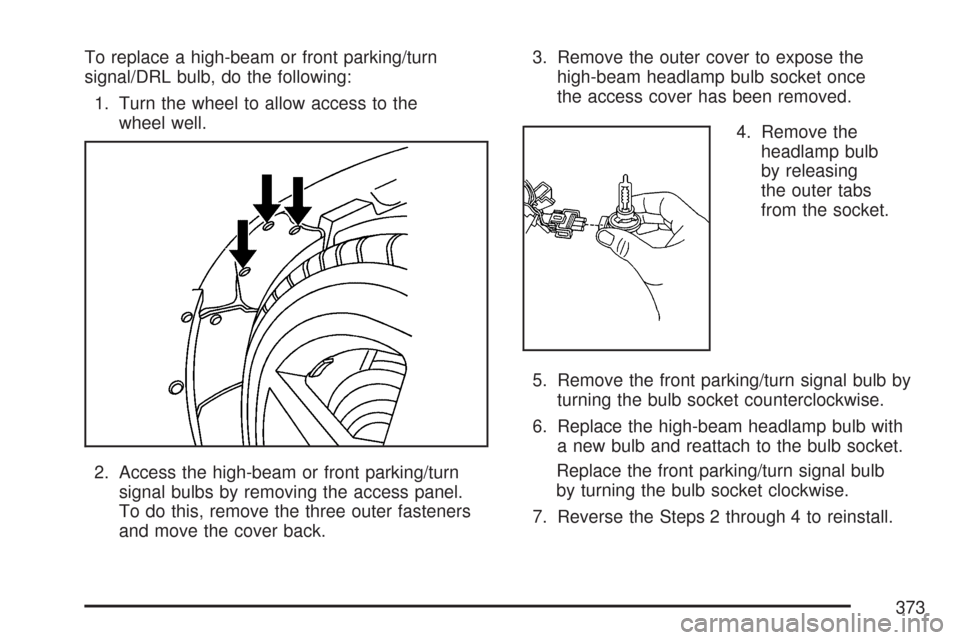
To replace a high-beam or front parking/turn
signal/DRL bulb, do the following:
1. Turn the wheel to allow access to the
wheel well.
2. Access the high-beam or front parking/turn
signal bulbs by removing the access panel.
To do this, remove the three outer fasteners
and move the cover back.3. Remove the outer cover to expose the
high-beam headlamp bulb socket once
the access cover has been removed.
4. Remove the
headlamp bulb
by releasing
the outer tabs
from the socket.
5. Remove the front parking/turn signal bulb by
turning the bulb socket counterclockwise.
6. Replace the high-beam headlamp bulb with
a new bulb and reattach to the bulb socket.
Replace the front parking/turn signal bulb
by turning the bulb socket clockwise.
7. Reverse the Steps 2 through 4 to reinstall.
373
Page 374 of 488
Taillamps, Turn Signal, and
Stoplamps
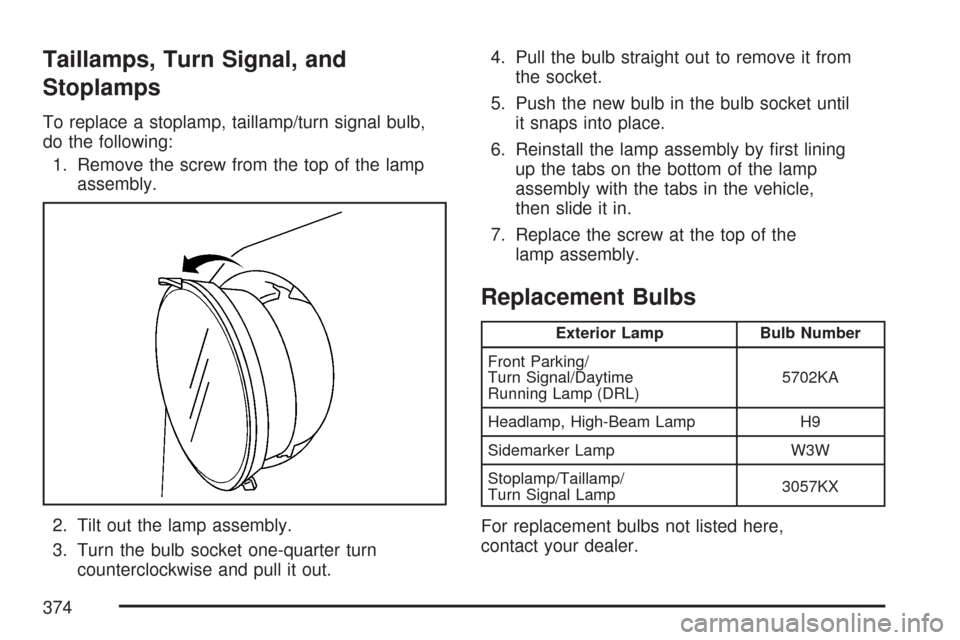
To replace a stoplamp, taillamp/turn signal bulb,
do the following:
1. Remove the screw from the top of the lamp
assembly.
2. Tilt out the lamp assembly.
3. Turn the bulb socket one-quarter turn
counterclockwise and pull it out.4. Pull the bulb straight out to remove it from
the socket.
5. Push the new bulb in the bulb socket until
it snaps into place.
6. Reinstall the lamp assembly by �rst lining
up the tabs on the bottom of the lamp
assembly with the tabs in the vehicle,
then slide it in.
7. Replace the screw at the top of the
lamp assembly.
Replacement Bulbs
Exterior Lamp Bulb Number
Front Parking/
Turn Signal/Daytime
Running Lamp (DRL)5702KA
Headlamp, High-Beam Lamp H9
Sidemarker Lamp W3W
Stoplamp/Taillamp/
Turn Signal Lamp3057KX
For replacement bulbs not listed here,
contact your dealer.
374