Page 258 of 436
Towing
Towing Your Vehicle
Consult your dealer or a professional towing
service if you need to have your disabled vehicle
towed. SeeRoadside Assistance Program on
page 408.
If you want to tow your vehicle behind another
vehicle for recreational purposes (such as behind
a motorhome), see “Recreational Vehicle
Towing” following.
Recreational Vehicle Towing
Recreational vehicle towing means towing your
vehicle behind another vehicle, such as behind a
motorhome. The two most common types of
recreational vehicle towing are known as “dinghy
towing” (towing your vehicle with all four wheels
on the ground) and “dolly towing” (towing
your vehicle with two wheels on the ground and
two wheels up on a device known as a “dolly”).
With the proper preparation and equipment, many
vehicles can be towed in these ways. See
“Dinghy Towing” and “Dolly Towing,” following.
258
Page 259 of 436
Here are some important things to consider before
you do recreational vehicle towing:
•What is the towing capacity of the towing
vehicle? Be sure you read the tow vehicle
manufacturer’s recommendations.
•How far will you tow? Some vehicles have
restrictions on how far and how long they
can tow.
•Do you have the proper towing equipment?
See your dealer or trailering professional
for additional advice and equipment
recommendations.
•Is your vehicle ready to be towed? Just as
you would prepare your vehicle for a long
trip, you will want to make sure your vehicle is
prepared to be towed. SeeBefore Leaving
on a Long Trip on page 240.
Dinghy Towing
Notice:If you tow your vehicle with all four
wheels on the ground, the drivetrain
components could be damaged. The repairs
would not be covered by your warranty. Do not
tow your vehicle with all four wheels on the
ground.
Your vehicle was not designed to be towed with
all four wheels on the ground. If your vehicle must
be towed, you should use a dolly. See “Dolly
Towing” that follows for more information.
259
Page 260 of 436
Dolly Towing
Notice:Towing your vehicle from the rear
with the front wheels on the ground could
cause transaxle damage. Do not tow the
vehicle from the rear with the front wheels on
the road.
Your vehicle can be towed using a dolly. To tow
your vehicle using a dolly, follow these steps:
1. Put the front wheels on a dolly.
2. Put an automatic transaxle in PARK (P) or a
manual transaxle in NEUTRAL (N).3. Set the parking brake and remove the key.
4. For an automatic transaxle, insert the key into
the shift-lock release slot. SeeShifting Out of
Park (P) on page 120.
5. Shift to NEUTRAL (N).
6. Clamp the steering wheel in a straight-ahead
position.
7. Release the parking brake.
Towing a Trailer
Do not use your vehicle to tow a trailer. The
vehicle is not designed or intended for such a use.
Towing a trailer can adversely affect handling,
durability and fuel economy.
260
Page 262 of 436
Turn Signal Lamps (Side).......................... 314
Center High-Mounted Stoplamp
(CHMSL) (Sedan).................................. 315
Taillamps, Turn Signal, Stoplamps
and Back-up Lamps............................... 316
License Plate Lamp................................... 317
Replacement Bulbs................................... 317
Windshield Wiper Blade Replacement....... 318
Tires............................................................ 319
Tire Sidewall Labeling............................... 320
Tire Terminology and Definitions............... 323
Inflation - Tire Pressure............................. 326
Tire Inspection and Rotation...................... 327
When It Is Time for New Tires.................. 329
Buying New Tires...................................... 330
Different Size Tires and Wheels................ 331
Uniform Tire Quality Grading..................... 332
Wheel Alignment and Tire Balance............ 333
Wheel Replacement.................................. 333
Tire Chains............................................... 335
If a Tire Goes Flat.................................... 335Changing a Flat Tire................................. 336
Removing the Spare Tire and Tools.......... 337
Removing the Flat Tire and Installing
the Spare Tire....................................... 339
Storing a Flat or Spare Tire and Tools...... 344
Compact Spare Tire.................................. 344
Appearance Care........................................ 345
Cleaning the Inside of Your Vehicle.......... 345
Fabric/Carpet............................................. 346
Leather...................................................... 347
Instrument Panel, Vinyl, and Other
Plastic Surfaces..................................... 348
Care of Safety Belts.................................. 348
Weatherstrips............................................ 348
Washing Your Vehicle............................... 349
Cleaning Exterior Lamps/Lenses................ 349
Finish Care............................................... 349
Windshield and Wiper Blades.................... 350
Aluminum Wheels...................................... 350
Tires......................................................... 351
Sheet Metal Damage................................. 351
Section 5 Service and Appearance Care
262
Page 302 of 436
Properly torqued wheel nuts are necessary to help
prevent brake pulsation. When tires are rotated,
inspect brake pads for wear and evenly tighten
wheel nuts in the proper sequence to torque
specifications inCapacities and Specifications on
page 368.
If you have rear drum brakes, they do not have
wear indicators, but if you ever hear a rear brake
rubbing noise, have the rear brake linings
inspected immediately. Also, the rear brake drums
should be removed and inspected each time
the tires are removed for rotation or changing.
When you have the front brake pads replaced,
have the rear brakes inspected, too.
Brake linings should always be replaced as
complete axle sets.
SeeBrake System Inspection on page 395.Brake Pedal Travel
See your dealer/retailer if the brake pedal does
not return to normal height, or if there is a
rapid increase in pedal travel. This could be a sign
that brake service might be required.
Brake Adjustment
Every time you make a moderate brake stop, the
disc brakes adjust for wear. If you rarely make
a moderate or heavier stop, then the brakes might
not adjust correctly. If you drive in that way,
then — very carefully — make a few moderate
brake stops about every 1,000 miles (1 600 km),
so the brakes will adjust properly.
If the brake pedal goes down farther than normal,
the rear drum brakes might need adjustment.
Adjust them by backing up and firmly applying the
brakes a few times.
302
Page 323 of 436
(D) Construction Code:A letter code is used to
indicate the type of ply construction in the tire.
The letter R means radial ply construction;
the letter D means diagonal or bias ply
construction; and the letter B means belted-bias
ply construction.
(E) Rim Diameter:Diameter of the wheel
in inches.
(F) Service Description:These characters
represent the load range and the speed rating of a
tire. The load range represents the load carry
capacity a tire is certified to carry. The speed
rating is the maximum speed a tire is certified to
carry a load. Speed ratings range from A to Z.
Tire Terminology and De�nitions
Air Pressure:The amount of air inside the tire
pressing outward on each square inch of the
tire. Air pressure is expressed in pounds
per square inch (psi) or kilopascal (kPa).
Accessory Weight:This means the combined
weight of optional accessories. Some examples of
optional accessories are, automatic transmission,
power steering, power brakes, power windows,
power seats, and air conditioning.Aspect Ratio:The relationship of a tire’s height
to its width.
Belt:A rubber coated layer of cords that is
located between the plies and the tread. Cords
may be made from steel or other reinforcing
materials.
Bead:The tire bead contains steel wires wrapped
by steel cords that hold the tire onto the rim.
Bias Ply Tire:A pneumatic tire in which the plies
are laid at alternate angles less than 90 degrees
to the centerline of the tread.
Cold Tire Pressure:The amount of air pressure
in a tire, measured in pounds per square inch (psi)
or kilopascals (kPa) before a tire has built up heat
from driving. SeeInflation - Tire Pressure on
page 326.
Curb Weight:This means the weight of a motor
vehicle with standard and optional equipment
including the maximum capacity of fuel, oil, and
coolant, but without passengers and cargo.
323
Page 327 of 436
How to Check
Use a good quality pocket-type gage to check tire
pressure. You cannot tell if your tires are
properly inflated simply by looking at them. Radial
tires may look properly inflated even when they
are under-inflated. Check the tire’s inflation
pressure when the tires are cold. Cold means your
vehicle has been sitting for at least three hours
or driven no more than 1 mile (1.6 km).
Remove the valve cap from the tire valve stem.
Press the tire gage firmly onto the valve to
get a pressure measurement. If the cold tire
inflation pressure matches the recommended
pressure on the Tire and Loading Information
label, no further adjustment is necessary. If the
inflation pressure is low, add air until you reach the
recommended amount.
If you overfill the tire, release air by pushing on
the metal stem in the center of the tire valve.
Re-check the tire pressure with the tire gage.
Be sure to put the valve caps back on the valve
stems. They help prevent leaks by keeping out dirt
and moisture.
Tire Inspection and Rotation
Tires should be rotated every 5,000 to 8,000 miles
(8 000 to 13 000 km).
Any time you notice unusual wear, rotate your
tires as soon as possible and check wheel
alignment. Also check for damaged tires or wheels.
SeeWhen It Is Time for New Tires on page 329
andWheel Replacement on page 333for
more information.
The purpose of regular rotation is to achieve
more uniform wear for all tires on the vehicle.
The first rotation is the most important. See
Part A: Scheduled Maintenance Services on
page 374.
327
Page 328 of 436
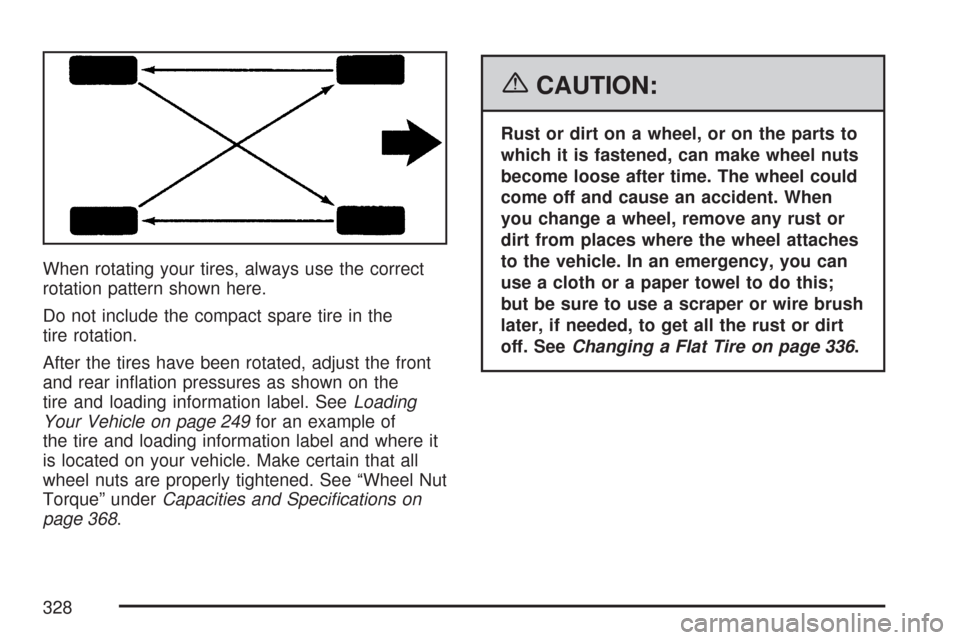
When rotating your tires, always use the correct
rotation pattern shown here.
Do not include the compact spare tire in the
tire rotation.
After the tires have been rotated, adjust the front
and rear inflation pressures as shown on the
tire and loading information label. SeeLoading
Your Vehicle on page 249for an example of
the tire and loading information label and where it
is located on your vehicle. Make certain that all
wheel nuts are properly tightened. See “Wheel Nut
Torque” underCapacities and Specifications on
page 368.
{CAUTION:
Rust or dirt on a wheel, or on the parts to
which it is fastened, can make wheel nuts
become loose after time. The wheel could
come off and cause an accident. When
you change a wheel, remove any rust or
dirt from places where the wheel attaches
to the vehicle. In an emergency, you can
use a cloth or a paper towel to do this;
but be sure to use a scraper or wire brush
later, if needed, to get all the rust or dirt
off. SeeChanging a Flat Tire on page 336.
328