Page 337 of 618

Battery Replacement
To change the batteries on the headphones,
do the following:
1. Turn the screw with a coin or screw driver
to loosen the battery door located on the
left side of the headphones. Slide the
battery door open.
2. Replace the two batteries in the compartment.
Make sure that they are installed correctly,
using the diagram on the inside of the
battery compartment.
3. Replace the battery door and tighten the
door screw.
If the headphones are to be stored for a long
period of time, remove the batteries and keep
them in a cool, dry place.
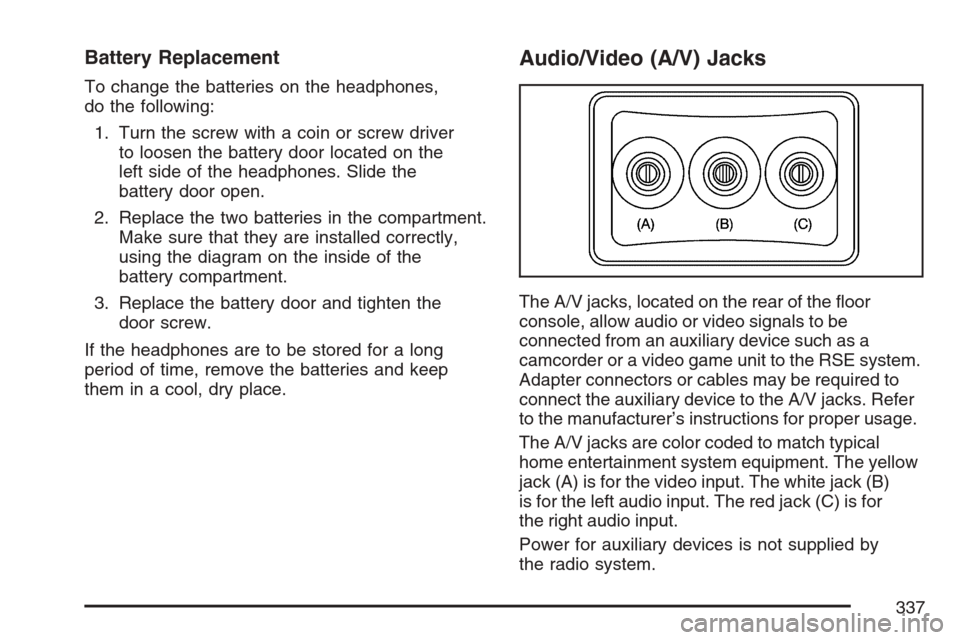
Audio/Video (A/V) Jacks
The A/V jacks, located on the rear of the �oor
console, allow audio or video signals to be
connected from an auxiliary device such as a
camcorder or a video game unit to the RSE system.
Adapter connectors or cables may be required to
connect the auxiliary device to the A/V jacks. Refer
to the manufacturer’s instructions for proper usage.
The A/V jacks are color coded to match typical
home entertainment system equipment. The yellow
jack (A) is for the video input. The white jack (B)
is for the left audio input. The red jack (C) is for
the right audio input.
Power for auxiliary devices is not supplied by
the radio system.
337
Page 342 of 618

{(Subtitles):Press this button to turn ON/OFF
subtitles and to move through subtitle options
when a DVD is playing. The format and content
of this function varies for each disc.
AUX (Auxiliary):Press this button to switch the
system between the DVD player and an auxiliary
source.
d(Camera):Press this button to change
camera angles on DVDs that have this feature
when a DVD is playing. The format and content
of this function varies for each disc.
1 through 0 (Numeric Keypad):The numeric
keypad provides the capability of direct chapter
or track number selection.
\(Clear):Press this button within three seconds
after entering a numeric selection, to clear all
numerical inputs.
}10 (Double Digit Entries):Press this button
to select chapter or track numbers greater
than nine. Press this button before entering
the number.
Battery Replacement
To change the remote control batteries, do the
following:
1. Remove the battery compartment door
located on the bottom of the remote control.
2. Replace the two batteries in the compartment.
Make sure that they are installed correctly,
using the diagram on the inside of the
battery compartment.
3. Close the battery door securely.
If the remote control is to be stored for a long
period of time, remove the batteries and keep
them in a cool, dry place.
Problem Recommended Action
No power. The ignition might not be
turned on or in accessory.
The picture does not �ll
the screen. There are
black borders on the
top and bottom or on
both sides or it looks
stretched out.Check the display mode
settings in the setup
menu by pressing the
display menu button on
the remote control.
342
Page 428 of 618

Electric Brake Control Wiring
Provisions
These wiring provisions are included with your
vehicle as part of the heavy-duty trailer wiring
package. These provisions are for an electric
brake controller. The instrument panel contains
blunt cut wires near the data link connector for
the trailer brake controller. The harness contains
the following wires:
Dark Blue: Auxiliary
Red/Black: Battery #
Light Blue: Brake Switch
White: Ground
The trailer brake controller should be installed
by your dealer or a quali�ed service center.
Trailer Recommendations
You must subtract your hitch loads from the
Cargo Weight Rating (CWR). CWR is the
maximum weight of the load your vehicle can
carry. It doesn’t include the weight of the people
inside, but you can �gure about 150 lbs. (68 kg)
for each seat. The total cargo load must not
be more than your vehicles CWR.
Weigh your vehicle with your trailer attached,
so that you won’t go over the GVWR or GAWR.
If you are using a weight-distributing hitch,
weigh the vehicle without the spring bars in place.
You’ll get the best performance if you spread
out the weight of your load the right way, and if
you choose the correct hitch and trailer brakes.
For more information seeTowing a Trailer
on page 414.
428
Page 554 of 618
Fuses Usage
30 Daytime Running Lamps
31Driver’s Side High-Beam
Headlamp
32 Not Used
33 Sunroof
34Key Ignition System,
Theft Deterrent System
35 Windshield Wiper
36 SEO B2 Up�tter Usage (Battery)
37 Electric Adjustable Pedals
38 Climate Controls (Battery)
39 Airbag System (Ignition)
40 Ampli�er
41 Audio System
42 Four-Wheel Drive
43Miscellaneous (Ignition),
Rear Vision Camera,
Cruise ControlFuses Usage
44 Liftgate Release
45OnStar
®, Rear Seat
Entertainment Display
46 Instrument Panel Cluster
47 Not Used
48 Not Used
49Auxiliary Climate Control (Ignition),
Compass-Temperature Mirror
50 Rear Defogger
51 Airbag System (Battery)
52 SEO B1 Up�tter Usage (Battery)
53Cigarette Lighter, Auxiliary
Power Outlet
54Automatic Level Control
Compressor Relay,
SEO Up�tter Usage
55 Climate Controls (Ignition)
56Engine Control Module,
Secondary Fuel Pump (Ignition)
554