Page 139 of 512

The main components of the instrument panel are the following:
A. Head-Up Display (HUD) Controls/Instrument
Panel Brightness Controls. SeeHead-Up
Display (HUD) on page 171orInstrument Panel
Brightness on page 170.
B. Turn Signal/Multifunction Lever. SeeTurn
Signal/Multifunction Lever on page 141.Cruise
Control. SeeCruise Control on page 147.
Exterior Lamps Control. SeeExterior Lamps on
page 164. Fog Lamps. SeeFog Lamps on
page 168.
C. Instrument Panel Cluster. SeeInstrument
Panel Cluster on page 186.
D. Windshield Wiper/Washer Lever. See
“Windshield Wipers” underTurn
Signal/Multifunction Lever on page 141.
E. Driver Information Center (DIC) Controls/Interior
Lamps. SeeDIC Controls and Displays on
page 204.
F. Air Outlets. SeeOutlet Adjustment on
page 184.G. Hazard Warning Flasher Button. SeeHazard
Warning Flashers on page 140.
H. Voice Commands/Audio Controls. SeeOnStar
®
System on page 107orAudio Steering
Wheel Controls on page 227.
I. Adaptive Cruise Controls (If Equipped). See
“Adaptive Cruise Control (ACC)” under
Turn Signal/Multifunction Lever on page 141.
J. Power Tilt Wheel and Telescopic Steering
Button. SeePower Tilt Wheel and Telescopic
Steering Column on page 141.
K. Horn. SeeHorn on page 140.
L. Audio Steering Wheel Controls. SeeAudio
Steering Wheel Controls on page 227.
M. Ignition Switch. SeeIgnition Positions on
page 88.
N. Shift Lever. SeeAutomatic Transmission
Operation on page 92.
O. Traction Control Button. SeeTraction Control
System (TCS) on page 329.
139
Page 140 of 512

P. Retractable Hardtop Button. SeeRetractable
Hardtop on page 124.
Q. Cupholders. SeeCupholder(s) on page 122.
R. Cigarette Lighter. SeeAshtray(s) and Cigarette
Lighter on page 178.
S. Climate Controls. SeeDual Climate Control
System on page 178.
T. Audio/Navigation System. SeeNavigation
System Overview on page 232.
U. Glove Box. SeeGlove Box on page 121.
Hazard Warning Flashers
Your hazard warning �ashers let you warn others.
They also let police know you have a problem.
Your front and rear turn signal lamps will �ash on
and off.
The hazard warning
�asher button is located
near the center of the
instrument panel.Your hazard warning �ashers work no matter what
mode the ignition is in, even if the ignition is
turned off.
Press the button to make the front and rear turn
signal lamps �ash on and off. Press the button
again to turn the �ashers off.
When the hazard warning �ashers are on, your
turn signals will not work.
Other Warning Devices
If you carry re�ective triangles, you can set them
up at the side of the road about 300 feet
(100 m) behind your vehicle.
Horn
Press near or on the horn symbols on your
steering wheel pad to sound the horn.
140
Page 141 of 512
Power Tilt Wheel and Telescopic
Steering Column
The power tilt wheel
control is located on the
outboard side of the
steering column.
To operate the power tilt feature, push the control
up and the steering wheel will tilt up. Push the
control down and the steering wheel will go down.
Push the control forward and the steering wheel
moves toward the front of the vehicle. Push
the control rearward and the steering wheel moves
toward the rear of the vehicle. To set the memory
position, seeDIC Vehicle Personalization on
page 220andMemory Seat, Mirrors and Steering
Wheel on page 10.
Turn Signal/Multifunction Lever
The lever on the left side of the steering column
includes the following:
GTurn and Lane-Change Signals. See
Turn and Lane-Change Signals on page 142.
3Headlamp High/Low-Beam Changer. See
Headlamp High/Low-Beam Changer on
page 143.
-Fog Lamps. SeeFog Lamps on page 168.
141
Page 144 of 512

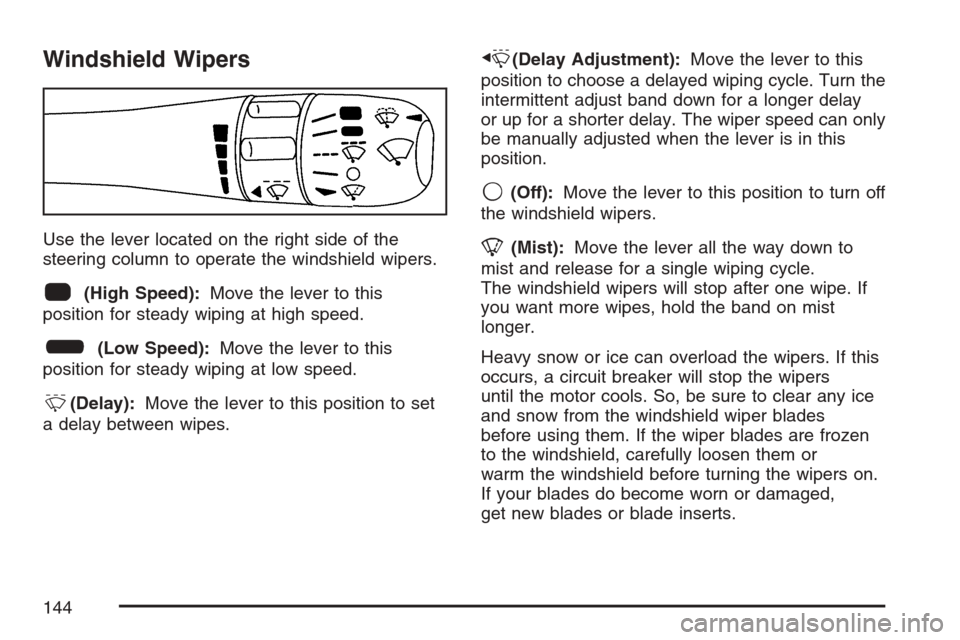
Windshield Wipers
Use the lever located on the right side of the
steering column to operate the windshield wipers.
1(High Speed):Move the lever to this
position for steady wiping at high speed.
6(Low Speed):Move the lever to this
position for steady wiping at low speed.
&(Delay):Move the lever to this position to set
a delay between wipes.
x(Delay Adjustment):Move the lever to this
position to choose a delayed wiping cycle. Turn the
intermittent adjust band down for a longer delay
or up for a shorter delay. The wiper speed can only
be manually adjusted when the lever is in this
position.
9(Off):Move the lever to this position to turn off
the windshield wipers.
8(Mist):Move the lever all the way down to
mist and release for a single wiping cycle.
The windshield wipers will stop after one wipe. If
you want more wipes, hold the band on mist
longer.
Heavy snow or ice can overload the wipers. If this
occurs, a circuit breaker will stop the wipers
until the motor cools. So, be sure to clear any ice
and snow from the windshield wiper blades
before using them. If the wiper blades are frozen
to the windshield, carefully loosen them or
warm the windshield before turning the wipers on.
If your blades do become worn or damaged,
get new blades or blade inserts.
144
Page 146 of 512

When Rainsense™ is active, the headlamps will
turn on automatically. If it is dark, they will
remain on. See “Wiper-Activated Headlamps”
underExterior Lamps on page 164for more
information.
Notice:Do not place stickers or other items
on the exterior glass surface directly in front of
the moisture sensor. Doing this could cause
the moisture sensor to malfunction.
Windshield Washer
K(Washer Fluid):The lever on the right side
of the steering column also controls the windshield
washer. There is a button at the end of the
lever. To spray washer �uid on the windshield,
press the button and hold it. The washer will spray
until you release the button. The wipers will
continue to clear the window for about six seconds
after the button is released and then stop or
return to your preset speed.
{CAUTION:
In freezing weather, do not use your
washer until the windshield is warmed.
Otherwise the washer �uid can form ice
on the windshield, blocking your vision.
If the �uid in the windshield washer �uid reservoir
is low, the message LOW WASHER FLUID will
appear on the Driver Information Center (DIC)
display. It will take 60 seconds after the bottle is
re�lled for this message to turn off. For information
on the correct washer �uid mixture to use, see
Windshield Washer Fluid on page 397and
Recommended Fluids and Lubricants on page 473.
Headlamp Washer
The headlamps washer only functions every fourth
time the washer button is depressed and if the
headlamps are on.
146
Page 155 of 512

Your vehicle will not reach the set speed until the
system determines there is not a vehicle in
front of you. At that point, your vehicle speed will
increase to the set speed.
Decreasing Set Speed While Using
Adaptive Cruise Control
Press in the set/decrease button on the end of the
lever until you reach the lower speed you want,
then release it.
To slow down in very small amounts, brie�y press
the set/decrease button. Each time you do this,
your set speed will be 1 mph (1.6 km/h) slower.
Resuming a Set Speed
Suppose you set your Adaptive Cruise Control at
a desired speed and then you apply the brake.
This will disengage the Adaptive Cruise Control.
But you do not need to reset it.
Once you are going about 25 mph (40 km/h) or
more, you can move the Adaptive Cruise Control
switch brie�y from on to resume/increase.
Adaptive Cruise Control will be engaged with the
previously chosen set speed.
Selecting the Follow Distance (GAP)
When the system detects a slower moving vehicle,
it will adjust your vehicle’s speed and maintain
the follow distance (gap) you select.
Use the GAP button on
the steering wheel to
adjust the follow
distance.
Press the top of the button to increase the
distance or the bottom of the button to decrease
the distance. The �rst button press will show
you the current follow distance setting on the HUD.
Your current follow distance setting will be
maintained until you change it.
155
Page 164 of 512
Cleaning the System
The radar can become blocked by snow, ice or
dirt. If so, you may need to turn off the engine and
clean the lens.
The lens is located on the driver’s side of the front
fascia.
Clean the surface with a 50/50 mixture of isopropyl
alcohol and water on a dampened cloth. After
cleaning the fascia lens, try to engage Adaptive
Cruise Control. If this does not �x the problem, you
may have to remove the fascia lens and clean
the inside of the fascia lens and radar lens.To clean the inside of the fascia lens and radar
lens, insert a tool into one of the small slots on the
inboard side of the lens and pop the lens out.
Clean the surface with a 50/50 mixture of isopropyl
alcohol and water on a dampened cloth. After
cleaning the lens, set the lens back in place and
press until it snaps in.
Exterior Lamps
The exterior lamp control is located to the left of
the steering wheel on the multifunction lever.
164
Page 170 of 512

Instrument Panel Brightness
The button for this feature is located on the
instrument panel to the left of the steering column.
+
!- (Brightness):Press this button to change
the brightness of the instrument panel lights.
Press the DIMMER button until PANEL DIMMING
appears on the Driver Information Center (DIC).
Then use the brightness button to adjust the
instrument panel brightness. Press the top of the
button to brighten the lights or the bottom of
the button to dim the lights. SeeHead-Up Display
(HUD) on page 171for more information.
Be sure not to have the brightness turned all the
way down with the lamps on during the day.
Your DIC may not be visible.
Courtesy Lamps
When any door or the trunk lid is opened, the
interior lamps will go on unless it is bright outside.
Press the interior lamp button on the right side
of the instrument panel, to turn the courtesy lamps
on or off.
Entry/Exit Lighting
With entry lighting, the interior lamps will come on
when entering the vehicle. The interior lamps
will come on for about 20 seconds when the
engine is turned off.
You can turn exit and entry lighting off by quickly
turning the courtesy lamps on and off.
170