2007 BMW MOTORRAD K 1200 GT bulb
[x] Cancel search: bulbPage 5 of 173
Brakes . . . . . .................. 67
Handlebars . . ................. 67
Mirrors . . . . . . ................. 68
Spring preload . . ............. 68
Damping . . . . ................. 69
Electronic Suspension Ad-
justment ESA
OE
............. 69
Tyres . ........................ 72
Headlight . . . . ................. 72
Front and rear seats . . . . ...... 73
Helmet holder . . . ............. 76
5 Riding . . . . ................ 77
Safety instructions . . . . . ...... 78
Checklist . . . . ................. 80
Starting . . . . . . ................. 80
Running in . . ................. 83
Brakes . . . . . . ................. 84
Parking your motorcycle . . . . . 85
Refuelling . . . ................. 87 6 Engineering details . . . . . 89
Brake system with BMW Mo-
torrad Integral ABS . . . . .
...... 90
Electronic engine manage-
ment with BMW Motorrad
ASC
OE
....................... 92
Tyre pressure monitoring
RDC
OE
....................... 94
7 Accessories . . . . . . . . . . . . . 97
General instructions . . . . ...... 98
Power socket . . . ............. 98
Luggage . . . . ................. 99
Case . ...................... 100
TopcaseOA
................. 102
8 Maintenance . . . . . . . . . . . 105
General instructions . . . . .... 106
Toolkit ...................... 106
Engine oil . . . ............... 107
Brake system, general . . .... 109
Brake pads . . ............... 109
Brake fluid . . . ............... 111
Clutch ...................... 113
Tyres . ...................... 113
Rims . ...................... 114
Wheels . . . . . . ............... 114 Front-wheel stand . . . . . .
.... 121
Bulbs . ...................... 123
Jump starting . . . ........... 131
Battery . . . . . . ............... 132
9 Care . . . . . . . . . . . . . . . . . . . . . 137
Care products . . . ........... 138
Washing motorcycle . . . . .... 138
Cleaning easily damaged
components . ............... 138
Paint care . . . ............... 139
Protective wax coating . .... 140
Laying up the motor-
cycle . ...................... 140
Restoring motorcycle to
use......................... 140
10 Technical data . . . . . . . 141
Troubleshooting chart . . .... 142
Threaded fasteners . . . . .... 143
Engine . . . . . . ............... 145
Fuel . . ...................... 146
Engine oil . . . ............... 146
Clutch ...................... 147
Transmission ............... 147
Rear-wheel drive ........... 148
Running gear ............... 148
Page 28 of 173
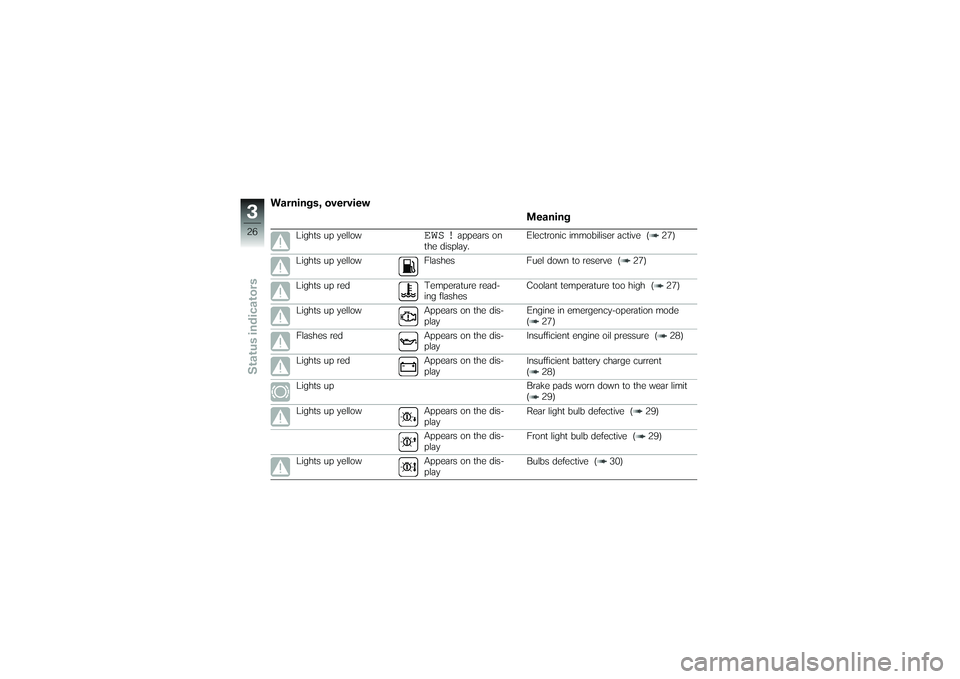
Warnings, overviewMeaning
Lights up yellow
EWS !
appears on
the display. Electronic immobiliser active ( 27)
Lights up yellow Flashes Fuel down to reserve ( 27)
Lights up red Temperature read- ing flashesCoolant temperature too high ( 27)
Lights up yellow Appears on the dis- playEngine in emergency-operation mode
( 27)
Flashes red Appears on the dis- playInsufficient engine oil pressure ( 28)
Lights up red Appears on the dis- playInsufficient battery charge current
( 28)
Lights up Brake pads worn down to the wear limit ( 29)
Lights up yellow Appears on the dis- playRear light bulb defective ( 29)
Appears on the dis-
play Front light bulb defective ( 29)
Lights up yellow Appears on the dis- playBulbs defective ( 30)
326zStatus indicators
Page 31 of 173
If the battery is not char-
ging, continuing to ride can
cause it to discharge completely,
in which case it will suffer irrepar-
able damage.
If possible, do not continue your
journey.
Battery is not being charged.
You can continue to ride until
the battery is discharged. Bear
in mind, however, that the en-
gine could cut out suddenly
and that the battery could dis-
charge until completely flat,
in which case it might have
suffered irreparable damage.
Have the fault rectified as
quickly as possible by a
specialist workshop, preferably
an authorised BMW Motorrad
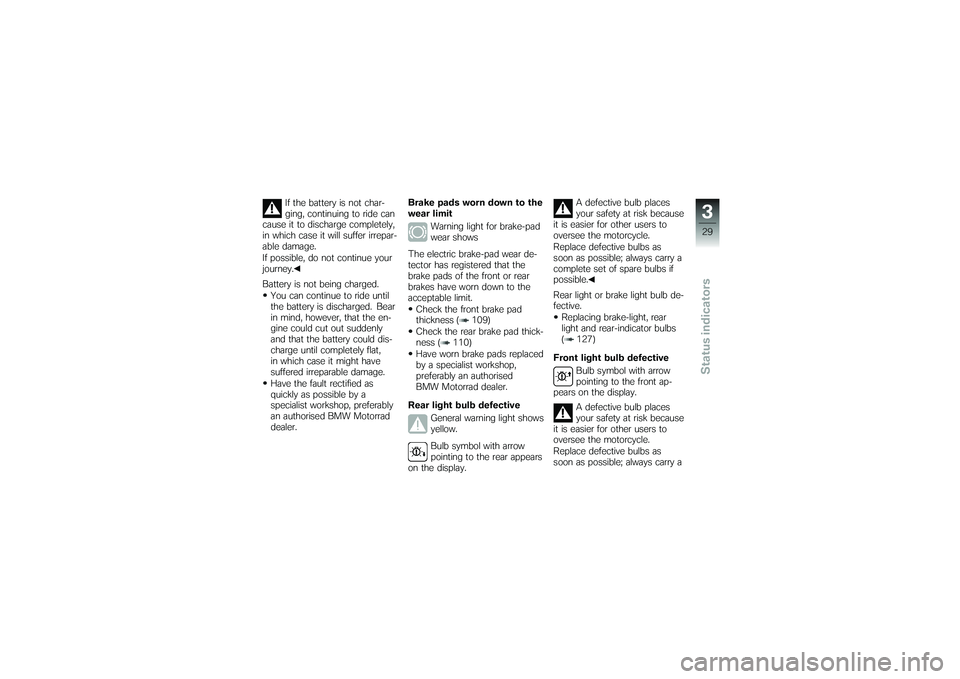
dealer. Brake pads worn down to the
wear limit
Warning light for brake-pad
wear shows
The electric brake-pad wear de-
tector has registered that the
brake pads of the front or rear
brakes have worn down to the
acceptable limit. Check the front brake pad
thickness ( 109)
Check the rear brake pad thick-
ness ( 110)
Have worn brake pads replaced
by a specialist workshop,
preferably an authorised
BMW Motorrad dealer.
Rear light bulb defective General warning light shows
yellow.
Bulb symbol with arrow
pointing to the rear appears
on the display. A defective bulb places
your safety at risk because
it is easier for other users to
oversee the motorcycle.
Replace defective bulbs as
soon as possible; always carry a
complete set of spare bulbs if
possible.
Rear light or brake light bulb de-
fective.
Replacing brake-light, rear
light and rear-indicator bulbs
( 127)
Front light bulb defective Bulb symbol with arrow
pointing to the front ap-
pears on the display.
A defective bulb places
your safety at risk because
it is easier for other users to
oversee the motorcycle.
Replace defective bulbs as
soon as possible; always carry a
329zStatus indicators
Page 32 of 173
complete set of spare bulbs if
possible.
Low-beam headlight, high-beam
headlight, side-light or turn-indic-
ator bulb defective.Replacing low-beam and high-
beam headlight bulb ( 123)
Replacing parking-light bulbs
( 126)
Replacing front turn indicator
bulbs ( 129)
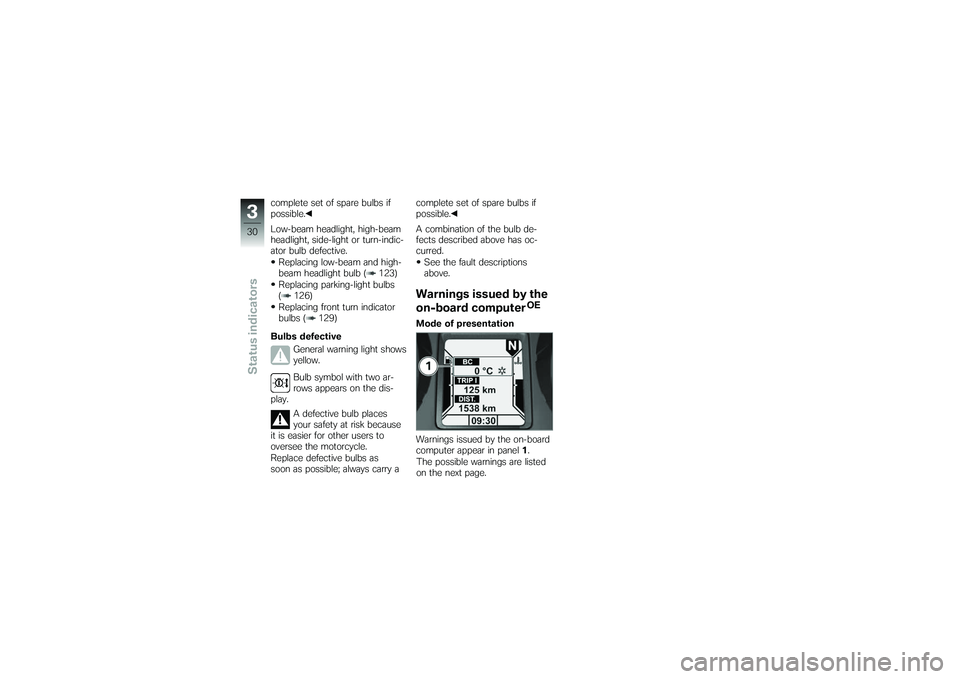
Bulbs defective General warning light shows
yellow.
Bulb symbol with two ar-
rows appears on the dis-
play.
A defective bulb places
your safety at risk because
it is easier for other users to
oversee the motorcycle.
Replace defective bulbs as
soon as possible; always carry a complete set of spare bulbs if
possible.
A combination of the bulb de-
fects described above has oc-
curred.
See the fault descriptions
above.
Warnings issued by the
on-board computer
OE
Mode of presentation
Warnings issued by the on-board
computer appear in panel 1.
The possible warnings are listed
on the next page.
330zStatus indicators
Page 107 of 173
Maintenance
Maintenance
General instructions ................ 106
Toolkit . . . .......................... 106
Engine oil .......................... 107
Brake system, general . . . .......... 109
Brake pads . . . ..................... 109
Brake fluid ......................... 111
Clutch . . . .......................... 113
Tyres .............................. 113
Rims ............................... 114
Wheels . . .......................... 114
Front-wheel stand . . ............... 121
Bulbs .............................. 123
Jump starting . ..................... 131
Battery . . . .......................... 132
8105zMaintenance
Page 108 of 173
General instructionsThe Maintenance chapter de-
scribes straightforward proced-
ures for checking and replacing
certain wear parts.
Special tightening torques are lis-
ted as applicable. The tightening
torques for the threaded fasten-
ers on your motorcycle are listed
in the section entitled "Technical
data".
You will find information on more
extensive maintenance and re-
pair work in the Repair Manual
on DVD/CD-ROM (RepROM) for
your motorcycle, which is avail-
able from your authorised BMW
Motorrad dealer.
Some of the work calls for spe-
cial tools and a thorough know-
ledge of motorcycles. If you
are in doubt consult a specialist
workshop, preferably your author-
ised BMW Motorrad dealer.
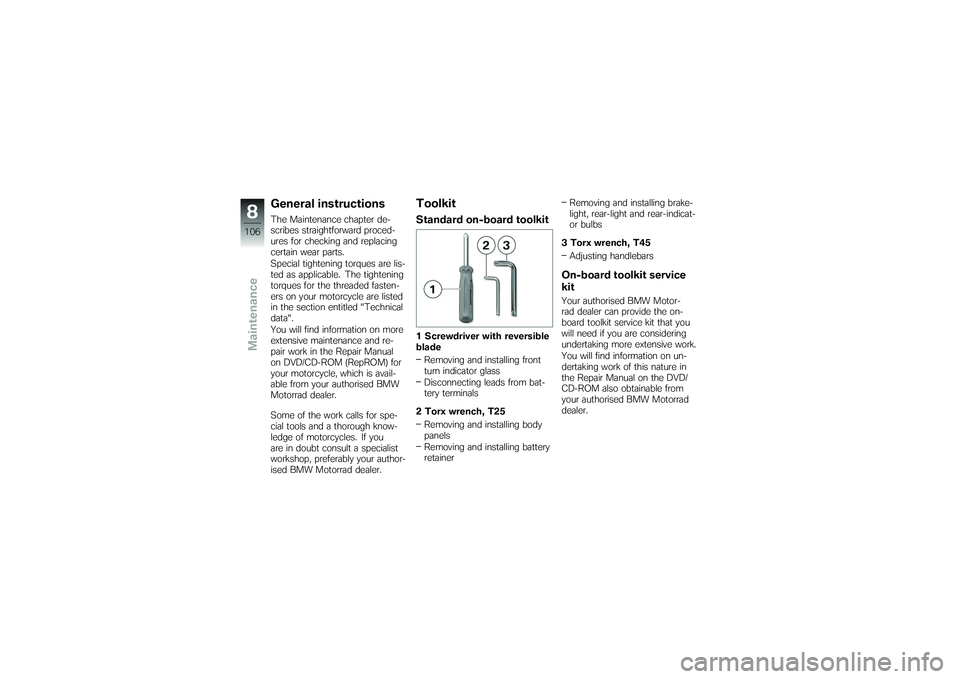
ToolkitStandard on-board toolkit1 Screwdriver with reversible
bladeRemoving and installing front
turn indicator glass
Disconnecting leads from bat-
tery terminals
2 Torx wrench, T25 Removing and installing body
panels
Removing and installing battery
retainer Removing and installing brake-
light, rear-light and rear-indicat-
or bulbs
3 Torx wrench, T45 Adjusting handlebars
On-board toolkit service
kitYour authorised BMW Motor-
rad dealer can provide the on-
board toolkit service kit that you
will need if you are considering
undertaking more extensive work.
You will find information on un-
dertaking work of this nature in
the Repair Manual on the DVD/
CD-ROM also obtainable from
your authorised BMW Motorrad
dealer.
8106zMaintenance
Page 109 of 173
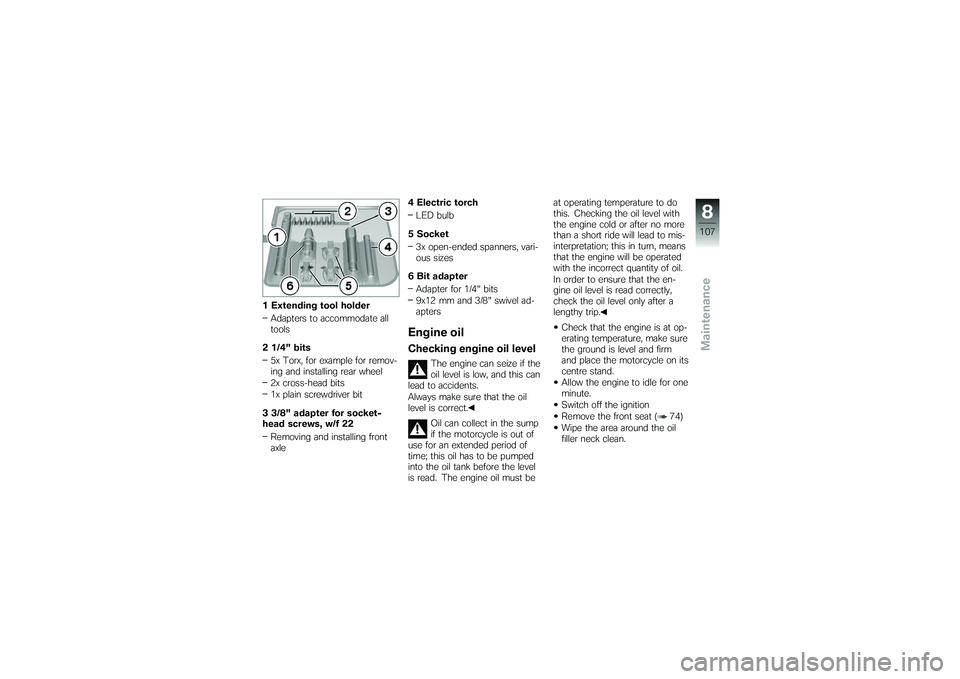
1 Extending tool holderAdapters to accommodate all
tools
2 1/4" bits 5x Torx, for example for remov-
ing and installing rear wheel
2x cross-head bits
1x plain screwdriver bit
3 3/8" adapter for socket-
head screws, w/f 22 Removing and installing front
axle 4 Electric torch
LED bulb
5 Socket 3x open-ended spanners, vari-
ous sizes
6 Bit adapter Adapter for 1/4" bits
9x12 mm and 3/8" swivel ad-
apters
Engine oilChecking engine oil level
The engine can seize if the
oil level is low, and this can
lead to accidents.
Always make sure that the oil
level is correct.
Oil can collect in the sump
if the motorcycle is out of
use for an extended period of
time; this oil has to be pumped
into the oil tank before the level
is read. The engine oil must be at operating temperature to do
this. Checking the oil level with
the engine cold or after no more
than a short ride will lead to mis-
interpretation; this in turn, means
that the engine will be operated
with the incorrect quantity of oil.
In order to ensure that the en-
gine oil level is read correctly,
check the oil level only after a
lengthy trip.
Check that the engine is at op-
erating temperature, make sure
the ground is level and firm
and place the motorcycle on its
centre stand.
Allow the engine to idle for one
minute.
Switch off the ignition
Remove the front seat ( 74)
Wipe the area around the oil
filler neck clean.
8107zMaintenance
Page 125 of 173
BulbsGeneral instructionsThe failure of a bulb is signalled
in the display by the defect-
ive lamp symbol. The bulbs for
brake light and rear light are the
same; the brightness of the light
is regulated in accordance with
the application.A defective bulb places
your safety at risk because
it is easier for other users to
oversee the motorcycle.
Replace defective bulbs as
soon as possible; always carry a
complete set of spare bulbs if
possible.
The bulb is pressurised and
can cause injury if dam-
aged.
Wear protective goggles and
gloves when changing bulbs. The types of bulb fitted to
your motorcycle are listed
in the section entitled "Technical
data".
Do not touch the glass of
new bulbs with your fingers.
Use a clean, dry cloth to hold
the bulbs when handling them.
Dirt deposits, in particular oil and
grease, interfere with heat radi-
ation from the bulb. This leads
to overheating and shortens the
bulb's operating life.
Replacing low-beam and
high-beam headlight bulb
If it is not standing firmly,
the motorcycle could topple
in the course of the operations
described below.
Always make sure that the
motorcycle is stable and firmly
supported. with OE Xenon lights:
Xenon lights operate with
high voltage; incorrect
working procedures can result in
fatalities.
Have all work on the xenon light
system, including the work in-
volved in replacing bulbs, per-
formed by a specialist work-
shop, preferably by an authorised
BMW Motorrad dealer.
For the time being, ride with
the high-beam headlight
switched on.
In order not to dazzle oncom-
ing traffic, set the headlight
beam throw adjuster to the po-
sition for riding with maximum
payload.
Have the bulb replaced as
soon as possible by a specialist
workshop, preferably an author-
ised BMW Motorrad dealer.
8123zMaintenance