2007 BMW MOTORRAD K 1200 GT Stand
[x] Cancel search: StandPage 4 of 173
Table of ContentsYou can also consult the index at
the end of this Rider's Manual if
you want to find a particular topic
or item of information.
1 General instructions . . . . . 5
Overview ...................... 6
Abbreviations and symbols . . . . 6
Equipment . . . . . . .............. 7
Technical data . . .............. 7
Currency . ..................... 7
2 General views . . . . . . . . . . . . . 9
General view, left side . . . . . . . . 11
General view, right side . . . . . . 13
Underneath the seat ......... 15
Handlebar fitting, left ......... 16
Handlebar fitting, right . . . . . . . . 17
Instrument cluster . . . ......... 18
Headlight . .................... 19 3 Status indicators . . . . . . . 21
Standard status
indicators .
.................... 22
Status indicators with on-
board computer
OE
........... 23
Status indicators with
tyre-pressure monitoring
(RDC)
OE...................... 24
Status indicators with seat
heatingOE
.................... 24
Telltale light with cruise con-
trol
OE
........................ 25
Standard warnings . . ......... 25
Warnings issued by the on-
board computer
OE
........... 30
ABS warnings . . . ............. 32
ASC warnings
OE
............. 34
RDC warnings
OE
............. 36
Anti-theft alarm
warnings
OE................... 41 4 Operation . . . . . . . . . . . . . . . . 45
Ignition switch and steering
lock . .
........................ 47
Electronic immobiliser . . . . . . . . 48
Clock . . . . . .................... 49
Odometer and tripmeters . . . . 49
Multifunction display ......... 51
On-board computer
OE
....... 51
Tyre pressure monitoring
RDC
OE
....................... 54
Lights . . . . .................... 55
Turn indicators . . ............. 56
Hazard warning flashers . . . . . . 57
Emergency off switch (kill
switch) . . . .................... 58
Grip heating
OE
............... 59
Seat heatingOE............... 60
Automatic Stability Control
ASC
OE
....................... 61
Seat height . . . . . . ............. 62
Windscreen . . . . . ............. 63
Cruise-control system
OE
..... 63
Stowage compartment . . . . . . . 66
Clutch . . . . .................... 66
Page 5 of 173
Brakes . . . . . .................. 67
Handlebars . . ................. 67
Mirrors . . . . . . ................. 68
Spring preload . . ............. 68
Damping . . . . ................. 69
Electronic Suspension Ad-
justment ESA
OE
............. 69
Tyres . ........................ 72
Headlight . . . . ................. 72
Front and rear seats . . . . ...... 73
Helmet holder . . . ............. 76
5 Riding . . . . ................ 77
Safety instructions . . . . . ...... 78
Checklist . . . . ................. 80
Starting . . . . . . ................. 80
Running in . . ................. 83
Brakes . . . . . . ................. 84
Parking your motorcycle . . . . . 85
Refuelling . . . ................. 87 6 Engineering details . . . . . 89
Brake system with BMW Mo-
torrad Integral ABS . . . . .
...... 90
Electronic engine manage-
ment with BMW Motorrad
ASC
OE
....................... 92
Tyre pressure monitoring
RDC
OE
....................... 94
7 Accessories . . . . . . . . . . . . . 97
General instructions . . . . ...... 98
Power socket . . . ............. 98
Luggage . . . . ................. 99
Case . ...................... 100
TopcaseOA
................. 102
8 Maintenance . . . . . . . . . . . 105
General instructions . . . . .... 106
Toolkit ...................... 106
Engine oil . . . ............... 107
Brake system, general . . .... 109
Brake pads . . ............... 109
Brake fluid . . . ............... 111
Clutch ...................... 113
Tyres . ...................... 113
Rims . ...................... 114
Wheels . . . . . . ............... 114 Front-wheel stand . . . . . .
.... 121
Bulbs . ...................... 123
Jump starting . . . ........... 131
Battery . . . . . . ............... 132
9 Care . . . . . . . . . . . . . . . . . . . . . 137
Care products . . . ........... 138
Washing motorcycle . . . . .... 138
Cleaning easily damaged
components . ............... 138
Paint care . . . ............... 139
Protective wax coating . .... 140
Laying up the motor-
cycle . ...................... 140
Restoring motorcycle to
use......................... 140
10 Technical data . . . . . . . 141
Troubleshooting chart . . .... 142
Threaded fasteners . . . . .... 143
Engine . . . . . . ............... 145
Fuel . . ...................... 146
Engine oil . . . ............... 146
Clutch ...................... 147
Transmission ............... 147
Rear-wheel drive ........... 148
Running gear ............... 148
Page 9 of 173
ESA Electronic SuspensionAdjustment
Electronic Suspension
Adjustment.
RDC Tyre pressure control
(ReifenDruck-Control)EquipmentWhen you ordered your BMW
motorcycle, you chose various
items of custom equipment. This
Rider's Manual describes option-
al extras (OE) offered by BMW
and selected optional accessor-
ies (OA). This explains why the
manual may also contain de-
scriptions of equipment which
you have not ordered. Please
note, too, that your motorcycle
might not be exactly as illus-
trated in this manual on account
of country-specific differences.
If your BMW was supplied with
equipment not described in
this Rider's Manual, you will find these features described in
separate manuals.
Technical dataAll dimensions, weights and
power ratings stated in the
Rider's Manual are quoted to the
standards and comply with the
tolerance requirements of the
Deutsche Institut für Normung
e.V. Versions for individual
countries may differ.CurrencyThe high safety and quality
standards of BMW motorcycles
are maintained by constant
development work on designs,
equipment and accessories.
Because of this, your motorcycle
may differ from the information
supplied in the Rider's Manual.
Nor can BMW Motorrad entirely
rule out errors and omissions.
We hope you will appreciate that
no claims can be entertained onthe basis of the data, illustrations
or descriptions in this manual.
17zGeneral instructions
Page 23 of 173
Status indicators
Status indicators
Standard status indicators........... 22
Status indicators with on-board com-
puter
OE
.............................. 23
Status indicators with tyre-pressure
monitoring (RDC)
OE
................. 24
Status indicators with seat heat-
ing
OE
................................ 24
Telltale light with cruise con-
trol
OE
................................ 25
Standard warnings . . ................. 25
Warnings issued by the on-board
computer
OE
......................... 30
ABS warnings ....................... 32
ASC warningsOE
..................... 34
RDC warnings
OE
.................... 36
Anti-theft alarm warnings
OE
......... 41
321zStatus indicators
Page 24 of 173
Standard status
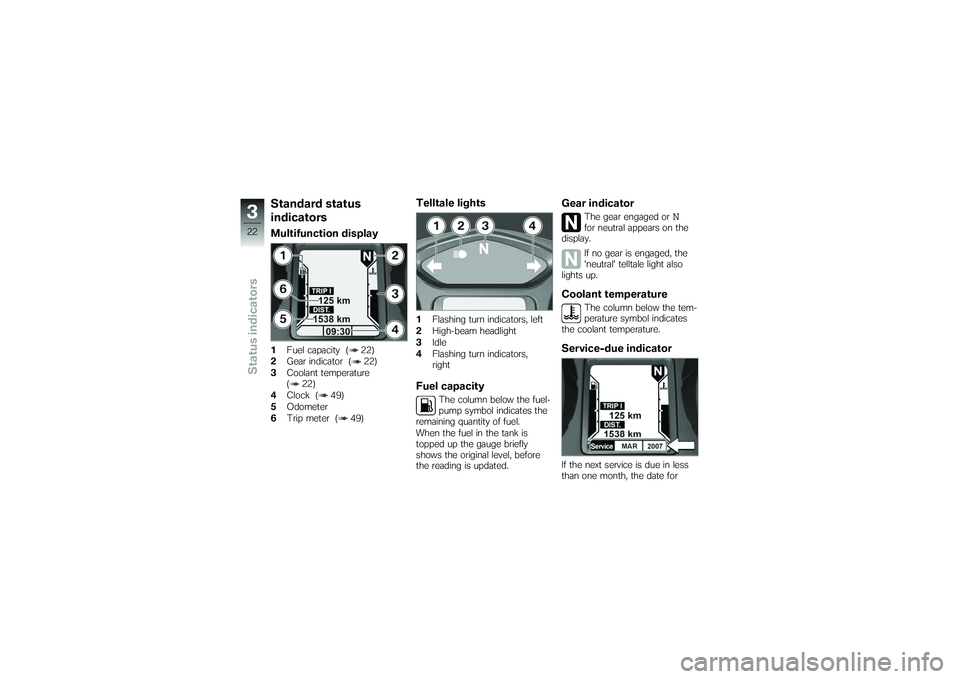
indicatorsMultifunction display1Fuel capacity ( 22)
2 Gear indicator ( 22)
3 Coolant temperature
( 22)
4 Clock ( 49)
5 Odometer
6 Trip meter ( 49)
Telltale lights1Flashing turn indicators, left
2 High-beam headlight
3 Idle
4 Flashing turn indicators,
rightFuel capacity
The column below the fuel-
pump symbol indicates the
remaining quantity of fuel.
When the fuel in the tank is
topped up the gauge briefly
shows the original level, before
the reading is updated.
Gear indicator
The gear engaged or
N
for neutral appears on the
display.
If no gear is engaged, the
'neutral' telltale light also
lights up.
Coolant temperature
The column below the tem-
perature symbol indicates
the coolant temperature.
Service-due indicatorIf the next service is due in less
than one month, the date for
322zStatus indicators
Page 27 of 173
Telltale light with cruise
control
OE
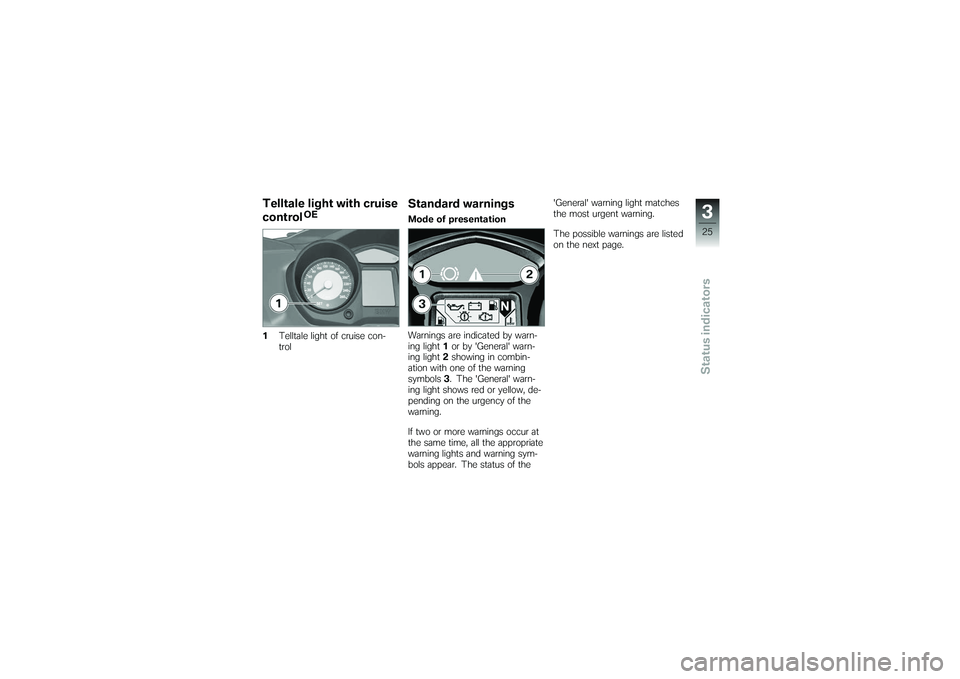
1 Telltale light of cruise con-
trol
Standard warningsMode of presentation
Warnings are indicated by warn-
ing light 1or by 'General' warn-
ing light 2showing in combin-
ation with one of the warning
symbols 3. The 'General' warn-
ing light shows red or yellow, de-
pending on the urgency of the
warning.
If two or more warnings occur at
the same time, all the appropriate
warning lights and warning sym-
bols appear. The status of the 'General' warning light matches
the most urgent warning.
The possible warnings are listed
on the next page.
325zStatus indicators
Page 50 of 173
Locking handlebars
If the motorcycle is on the
side stand, the surface of
the ground will determine wheth-
er it is better to turn the handle-
bars to the left or right. However,
the motorcycle is more stable on
a level surface with the handle-
bars turned to the left than with
the handlebars turned to the
right.
On level ground, always turn the
handlebars to the left to set the
steering lock.
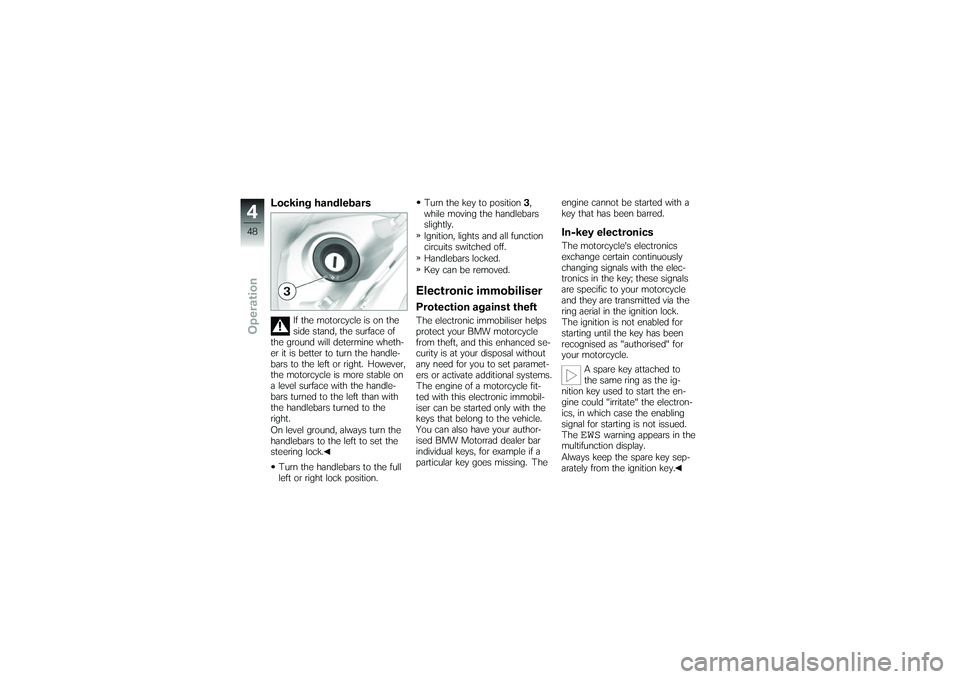
Turn the handlebars to the full
left or right lock position. Turn the key to position
3,
while moving the handlebars
slightly.
Ignition, lights and all function
circuits switched off.
Handlebars locked.
Key can be removed.
Electronic immobiliserProtection against theftThe electronic immobiliser helps
protect your BMW motorcycle
from theft, and this enhanced se-
curity is at your disposal without
any need for you to set paramet-
ers or activate additional systems.
The engine of a motorcycle fit-
ted with this electronic immobil-
iser can be started only with the
keys that belong to the vehicle.
You can also have your author-
ised BMW Motorrad dealer bar
individual keys, for example if a
particular key goes missing. The engine cannot be started with a
key that has been barred.
In-key electronicsThe motorcycle's electronics
exchange certain continuously
changing signals with the elec-
tronics in the key; these signals
are specific to your motorcycle
and they are transmitted via the
ring aerial in the ignition lock.
The ignition is not enabled for
starting until the key has been
recognised as "authorised" for
your motorcycle.
A spare key attached to
the same ring as the ig-
nition key used to start the en-
gine could "irritate" the electron-
ics, in which case the enabling
signal for starting is not issued.
The
EWS
warning appears in the
multifunction display.
Always keep the spare key sep-
arately from the ignition key.
448zOperation
Page 53 of 173
Multifunction displayAdjusting dimmer
Attempting to adjust the
dimmer while riding the
motorcycle can lead to accidents.
Do not attempt to adjust the
dimmer unless the motorcycle
is at a standstill.
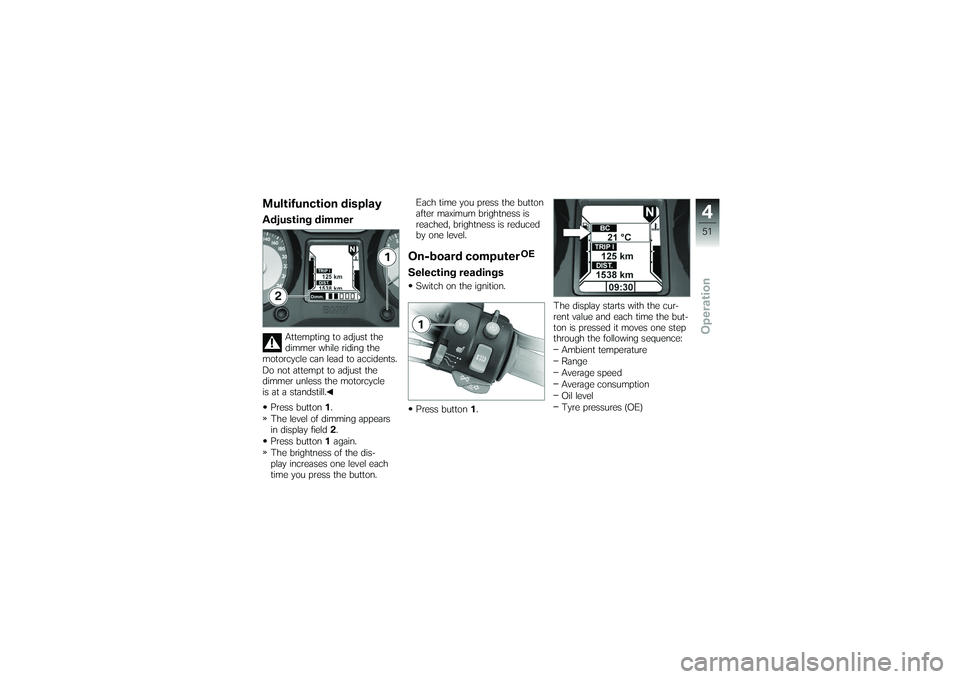
Press button 1.
The level of dimming appears
in display field 2.
Press button 1again.
The brightness of the dis-
play increases one level each
time you press the button. Each time you press the button
after maximum brightness is
reached, brightness is reduced
by one level.
On-board computer
OE
Selecting readingsSwitch on the ignition.
Press button
1. The display starts with the cur-
rent value and each time the but-
ton is pressed it moves one step
through the following sequence:
Ambient temperature
Range
Average speed
Average consumption
Oil level
Tyre pressures (OE)
451zOperation