Page 27 of 132
Self-diagnosis not completedABS warning light flashes.
The ABS function is not
available, because self-
diagnosis did not complete. The
motorcycle has to move forward
a few metres for the wheel
sensors to be tested. Pull away slowly. Bear in mind
that the ABS function is not
available until self-diagnosis has
completed.
ABS deactivated ABS warning light shows.
The rider has switched off the
ABS system.
with OE BMW Motorrad ABS: Activate the ABS function
( 33) ABS fault
ABS warning light shows.
The ABS control unit has detec-
ted a fault. The ABS function is
not available. You can continue to ride. Bear
in mind that the ABS function
is not available. Bear in mind
the more detailed information
on situations that can lead to
an ABS fault ( 53).
Have the fault rectified as
quickly as possible by a
specialist workshop, preferably
an authorised BMW Motorrad
dealer.
325zStatus indicators
Page 48 of 132

If a warning light or telltale light
did not show as specified above
or if a segment or segments of
the multifunction display failed to
light up:Some malfunctions cannot
be indicated if one of the
warning lights fails to show.
Make sure that all the warning
and telltale lights come on in the
pre-ride check.
Have the fault rectified as
quickly as possible by a
specialist workshop, preferably
an authorised BMW Motorrad
dealer.ABS self-diagnosis
OE
BMW Motorrad ABS performs
self-diagnosis to ensure its op-
erability. Self-diagnosis is per-
formed automatically when you
switch on the ignition. The mo-
torcycle has to move forward a few metres for the wheel sensors
to be tested.
Phase 1
Test of the diagnosis-compat-
ible system components with
the motorcycle at a standstill. ABS warning light flashes.
Phase 2 Test of the wheel sensors as
the motorcycle pulls away from
rest. ABS warning light flashes.
ABS self-diagnosis
completed The ABS warning light goes
out.
If an indicator showing an ABS
fault appears when ABS self-dia-
gnosis completes: You can continue to ride. Bear
in mind that the ABS function
is not available.
Have the fault rectified as
quickly as possible by a
specialist workshop, preferably
an authorised BMW Motorrad
dealer.
Running inThe first 1000 kmWhile running in the motor-
cycle, vary the throttle opening
and engine-speed range fre-
quently.
Try to do most of your rid-
ing during this initial period on
twisting, fairly hilly roads, avoid-
ing high-speed main roads and
highways if possible.
Exceeding the specified en-
gine speeds while running
in will lead to increased engine
wear.
546zRiding
Page 74 of 132

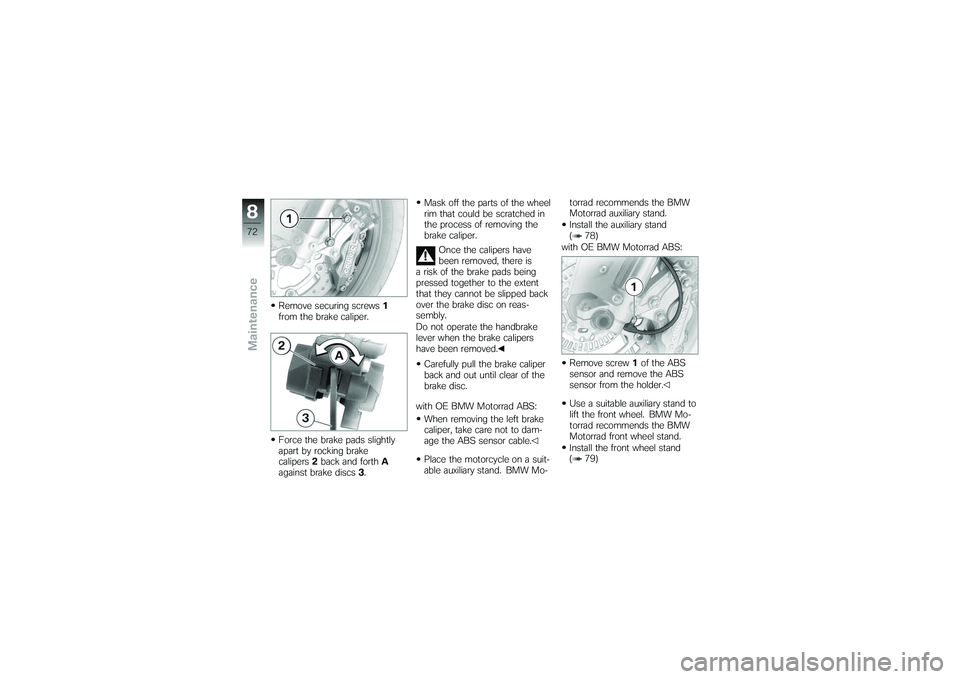
Remove securing screws1
from the brake caliper.
Force the brake pads slightly
apart by rocking brake
calipers 2back and forth A
against brake discs 3. Mask off the parts of the wheel
rim that could be scratched in
the process of removing the
brake caliper.
Once the calipers have
been removed, there is
a risk of the brake pads being
pressed together to the extent
that they cannot be slipped back
over the brake disc on reas-
sembly.
Do not operate the handbrake
lever when the brake calipers
have been removed.
Carefully pull the brake caliper
back and out until clear of the
brake disc.
with OE BMW Motorrad ABS: When removing the left brake
caliper, take care not to dam-
age the ABS sensor cable.
Place the motorcycle on a suit-
able auxiliary stand. BMW Mo- torrad recommends the BMW
Motorrad auxiliary stand.
Install the auxiliary stand
( 78)
with OE BMW Motorrad ABS:
Remove screw 1of the ABS
sensor and remove the ABS
sensor from the holder.
Use a suitable auxiliary stand to
lift the front wheel. BMW Mo-
torrad recommends the BMW
Motorrad front wheel stand.
Install the front wheel stand
( 79)
872zMaintenance
Page 77 of 132
release; repeat the procedure
several times.
Tighten left axle clamping
screws2to the specified
tightening torque.
Front-axle retainer
10 Nm
with OE BMW Motorrad ABS:
Seat the ABS sensor in the
holder and install screw 1of
the ABS sensor.
Remove the auxiliary stand. Ease the brake caliper onto the
brake disc.
Install securing screws
1and
tighten to specified torque.
Adapter plate to slider
tube
50 Nm
Remove the adhesive tape
from the wheel rim.
Operate the brake several
times until the brake pads are
bedded.
Removing rear wheelPlace the motorcycle on a suit-
able auxiliary stand. BMW Mo-
torrad recommends the BMW
Motorrad auxiliary stand.
Install the auxiliary stand
( 78)
875zMaintenance
Remove screws 1and pull cov-
er 2down slightly.
Page 78 of 132
Slacken locknuts5on left
and
right by turning them counter-
clockwise.
Back off adjusting screws 6
left and right by turning them
clockwise until adjusting
plate 7can be removed.
Remove quick-release axle 8.
Roll the rear wheel as far for-
ward as possible and disen-
gage chain 9from the sprock-
et.
Roll the rear wheel back until it
is clear of the swinging arm. The sprocket and the
spacer sleeves on left
and right are loose fits in the
wheel. Make sure that these
parts are not damaged or lost on
removal.
Installing rear wheelRoll the rear wheel into the
swinging arm, making sure that
the brake disc passes between
the brake pads.
Roll the rear wheel as far
forward as possible and loop
chain 9over the sprocket.
876zMaintenance
Remove screw 3of the speed
sensor and remove the speed
sensor from the holder.
Remove quick-release axle
nut 4.
Page 79 of 132
Install quick-release axle8
with adjusting plate 7in the
swinging arm, brake caliper and
rear wheel.
Turn the quick-release axle un-
til it fits into the recess of the
adjusting plate. Install adjusting plate
7.
Install quick-release axle nut 4,
but do not tighten it at this
point. Seat the speed sensor in the
holder and install screw
3of
the speed sensor.
Place cover 2in position.
Install 2 screws 1.
877zMaintenance