Page 8 of 132
OverviewChapter 2 of this Rider's Manu-
al will provide you with an initial
overview of your motorcycle. All
maintenance and repair work on
the motorcycle is documented in
Chapter 11. This record of the
maintenance work you have had
performed on your motorcycle is
a precondition for generous treat-
ment of goodwill claims.
When the time comes to sell
your BMW, please remember
to hand over this Rider's Manu-
al; it is an important part of the
motorcycle.Abbreviations and
symbols
Indicates warnings that you
must comply with for reas-
ons of your safety and the safety
of others, and to protect your
motorcycle against damage. Specific instructions on
how to operate, control, ad-
just or look after items of equip-
ment on the motorcycle.
Indicates the end of an
item of information.
Instruction.
Result of an activity.
Reference to a page with
more detailed informa-
tion.
Indicates the end of a
passage relating to spe-
cific accessories or items
of equipment.
Tightening torque.
Item of technical data. OE Optional extra
The motorcycles are as-
sembled complete with
all the BMW optional ex-
tras originally ordered.
OA Optional accessory You can obtain option-
al accessories through
your authorised BMW
Motorrad dealer; optional
accessories have to be
retrofitted to the motor-
cycle.
ABS Anti-lock brake system
EquipmentWhen you ordered your BMW
motorcycle, you chose various
items of custom equipment. This
Rider's Manual describes option-
al extras (OE) offered by BMW
and selected optional accessor-
ies (OA). This explains why the
manual may also contain de-
16zGeneral instructions
Page 36 of 132
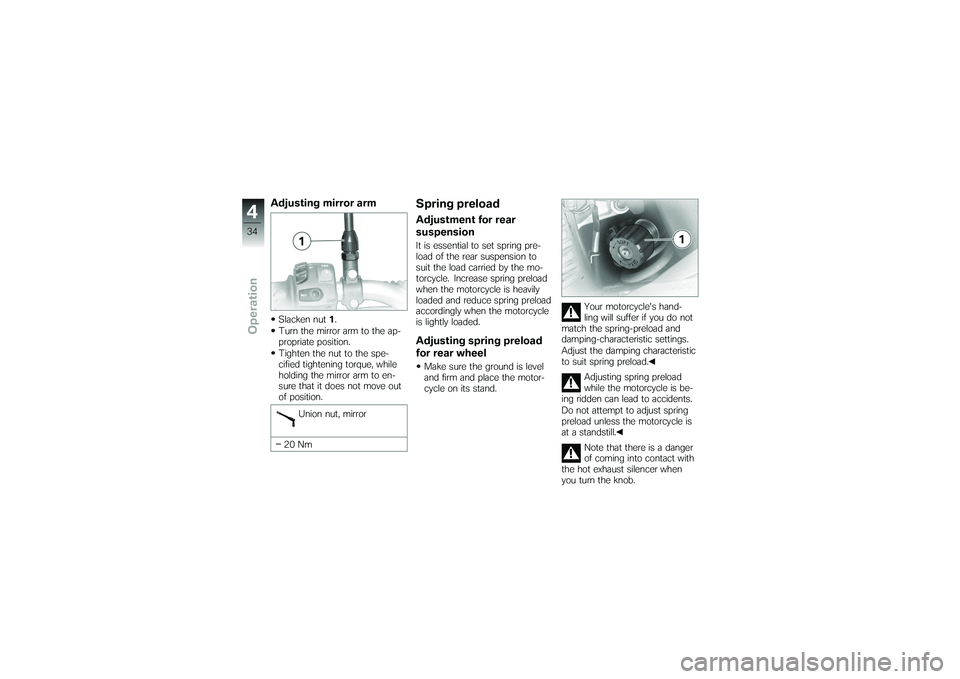
Adjusting mirror armSlacken nut1.
Turn the mirror arm to the ap-
propriate position.
Tighten the nut to the spe-
cified tightening torque, while
holding the mirror arm to en-
sure that it does not move out
of position.
Union nut, mirror
20 Nm
Spring preloadAdjustment for rear
suspensionIt is essential to set spring pre-
load of the rear suspension to
suit the load carried by the mo-
torcycle. Increase spring preload
when the motorcycle is heavily
loaded and reduce spring preload
accordingly when the motorcycle
is lightly loaded.Adjusting spring preload
for rear wheelMake sure the ground is level
and firm and place the motor-
cycle on its stand. Your motorcycle's hand-
ling will suffer if you do not
match the spring-preload and
damping-characteristic settings.
Adjust the damping characteristic
to suit spring preload.
Adjusting spring preload
while the motorcycle is be-
ing ridden can lead to accidents.
Do not attempt to adjust spring
preload unless the motorcycle is
at a standstill.
Note that there is a danger
of coming into contact with
the hot exhaust silencer when
you turn the knob.
434zOperation
Page 62 of 132
NotesThe Maintenance chapter de-
scribes straightforward proced-
ures for checking and replacing
certain wear parts.
Special tightening torques are lis-
ted as applicable. The tightening
torques for the threaded fasten-
ers on your motorcycle are listed
in the section entitled "Technical
data".
You will find information on more
extensive maintenance and re-
pair work in the Repair Manual
on DVD/CD-ROM (RepROM) for
your motorcycle, which is avail-
able from your authorised BMW
Motorrad dealer.
Some of the work calls for spe-
cial tools and a thorough know-
ledge of motorcycles. If you
are in doubt consult a specialist
workshop, preferably your author-
ised BMW Motorrad dealer.
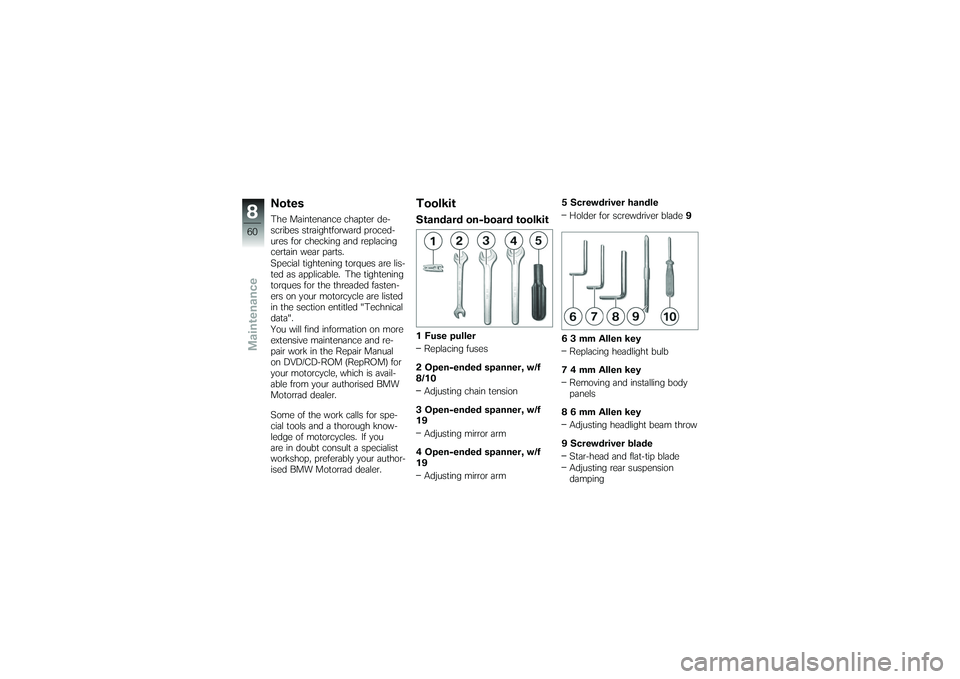
ToolkitStandard on-board toolkit1 Fuse pullerReplacing fuses
2 Open-ended spanner, w/f
8/10 Adjusting chain tension
3 Open-ended spanner, w/f
19 Adjusting mirror arm
4 Open-ended spanner, w/f
19 Adjusting mirror arm 5 Screwdriver handle
Holder for screwdriver blade 9
6 3 mm Allen key Replacing headlight bulb
7 4 mm Allen key Removing and installing body
panels
8 6 mm Allen key Adjusting headlight beam throw
9 Screwdriver blade Star-head and flat-tip blade
Adjusting rear suspension
damping
860zMaintenance
Page 73 of 132
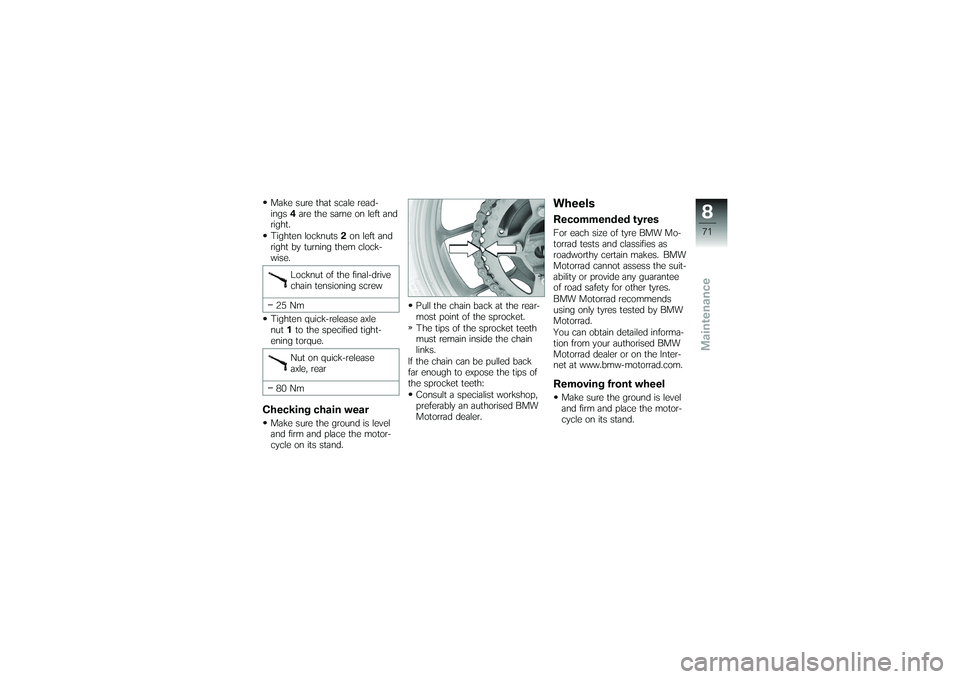
Make sure that scale read-
ings4are the same on left and
right.
Tighten locknuts 2on left and
right by turning them clock-
wise.
Locknut of the final-drive
chain tensioning screw
25 Nm
Tighten quick-release axle
nut 1to the specified tight-
ening torque.
Nut on quick-release
axle, rear
80 NmChecking chain wearMake sure the ground is level
and firm and place the motor-
cycle on its stand. Pull the chain back at the rear-
most point of the sprocket.
The tips of the sprocket teeth
must remain inside the chain
links.
If the chain can be pulled back
far enough to expose the tips of
the sprocket teeth:
Consult a specialist workshop,
preferably an authorised BMW
Motorrad dealer.
WheelsRecommended tyresFor each size of tyre BMW Mo-
torrad tests and classifies as
roadworthy certain makes. BMW
Motorrad cannot assess the suit-
ability or provide any guarantee
of road safety for other tyres.
BMW Motorrad recommends
using only tyres tested by BMW
Motorrad.
You can obtain detailed informa-
tion from your authorised BMW
Motorrad dealer or on the Inter-
net at www.bmw-motorrad.com.Removing front wheelMake sure the ground is level
and firm and place the motor-
cycle on its stand.
871zMaintenance
Page 76 of 132
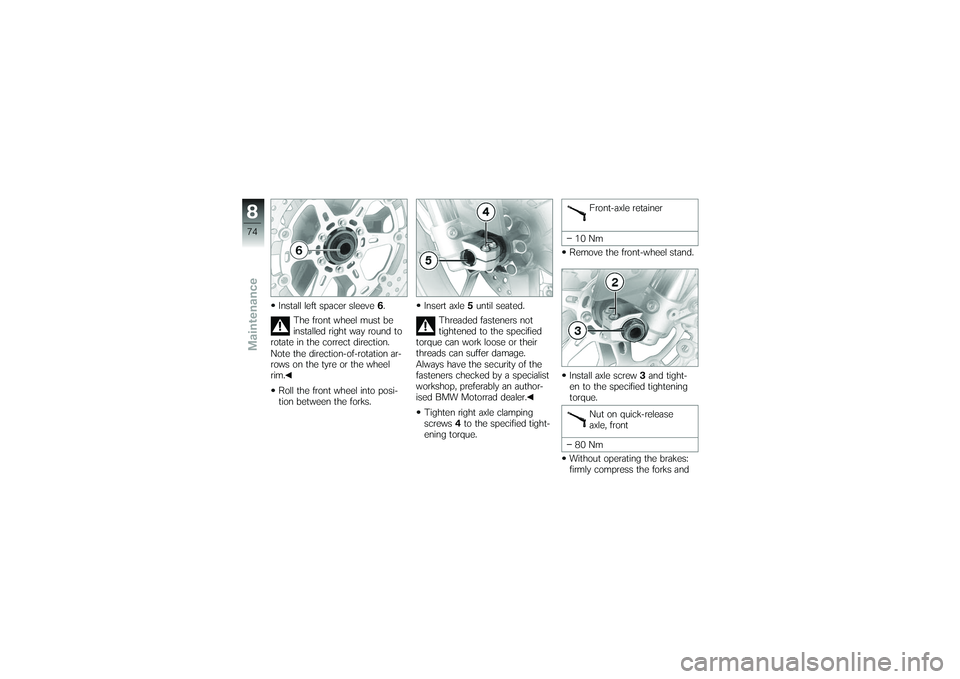
Install left spacer sleeve6.
The front wheel must be
installed right way round to
rotate in the correct direction.
Note the direction-of-rotation ar-
rows on the tyre or the wheel
rim.
Roll the front wheel into posi-
tion between the forks. Insert axle
5until seated.
Threaded fasteners not
tightened to the specified
torque can work loose or their
threads can suffer damage.
Always have the security of the
fasteners checked by a specialist
workshop, preferably an author-
ised BMW Motorrad dealer.
Tighten right axle clamping
screws 4to the specified tight-
ening torque. Front-axle retainer
10 Nm
Remove the front-wheel stand.
Install axle screw 3and tight-
en to the specified tightening
torque.
Nut on quick-release
axle, front
80 Nm
Without operating the brakes:
firmly compress the forks and
874zMaintenance
Page 77 of 132
release; repeat the procedure
several times.
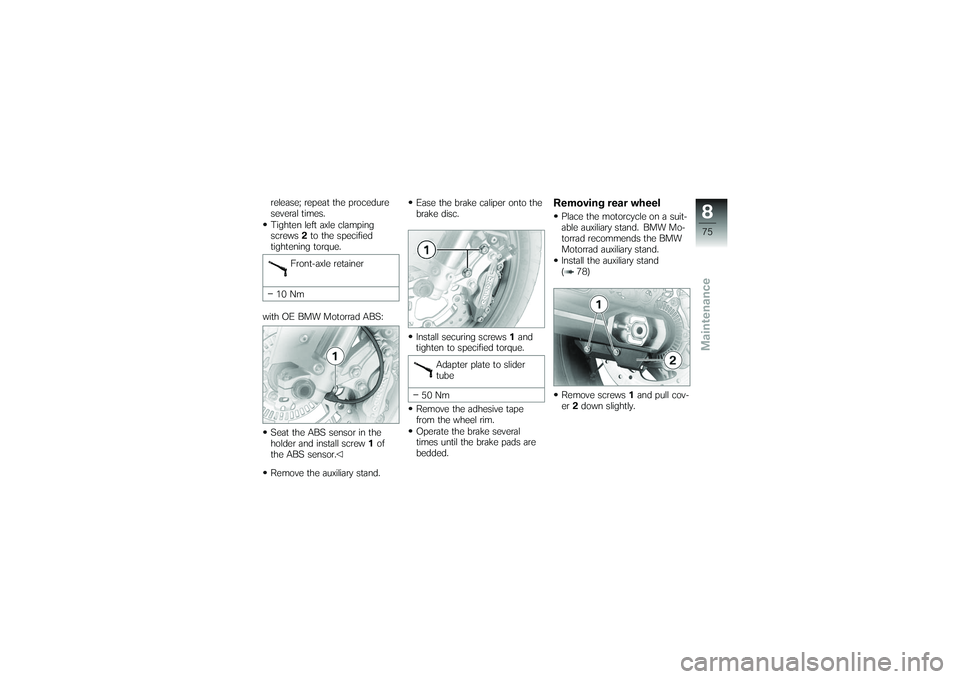
Tighten left axle clamping
screws2to the specified
tightening torque.
Front-axle retainer
10 Nm
with OE BMW Motorrad ABS:
Seat the ABS sensor in the
holder and install screw 1of
the ABS sensor.
Remove the auxiliary stand. Ease the brake caliper onto the
brake disc.
Install securing screws
1and
tighten to specified torque.
Adapter plate to slider
tube
50 Nm
Remove the adhesive tape
from the wheel rim.
Operate the brake several
times until the brake pads are
bedded.
Removing rear wheelPlace the motorcycle on a suit-
able auxiliary stand. BMW Mo-
torrad recommends the BMW
Motorrad auxiliary stand.
Install the auxiliary stand
( 78)
875zMaintenance
Remove screws 1and pull cov-
er 2down slightly.
Page 107 of 132
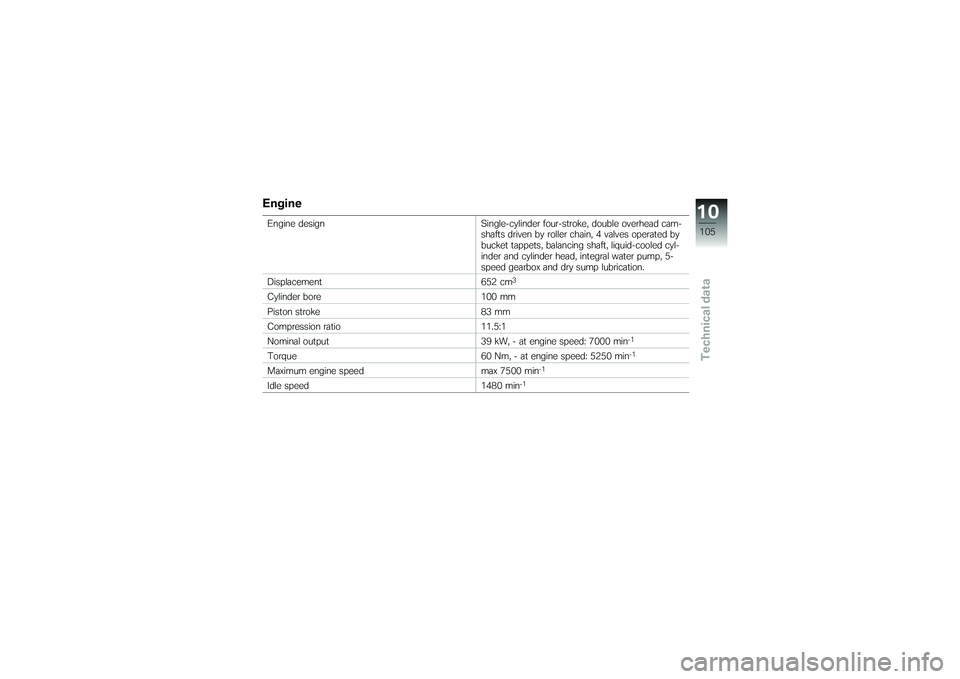
EngineEngine designSingle-cylinder four-stroke, double overhead cam-
shafts driven by roller chain, 4 valves operated by
bucket tappets, balancing shaft, liquid-cooled cyl-
inder and cylinder head, integral water pump, 5-
speed gearbox and dry sump lubrication.
Displacement 652 cm
3
Cylinder bore100 mm
Piston stroke 83 mm
Compression ratio 11.5:1
Nominal output 39 kW, - at engine speed: 7000 min
-1
Torque60 Nm, - at engine speed: 5250 min
-1
Maximum engine speed max 7500 min
-1
Idle speed1480 min
-1
10105zTechnical data
Page 130 of 132
T
Technical dataBattery, 111
Brakes, 109
Bulbs, 111
Clutch, 107
Dimensions, 112
Electrics, 110
Engine, 105
Engine oil, 106
Frame, 112
Fuel, 4, 106
Rear-wheel drive, 108
Running gear, 108
Spark plugs, 111
Standards, 7
Transmission, 107
Tyres, 109
Weights, 113
Wheels, 109
Telltale lights, 17 Overview, 20
Toolkit, 14, 60
Torques, 103 Transmission
Technical data, 107
Troubleshooting chart, 102
Turn indicators Operate, 15, 32
Replacing bulb, 87
Telltale light, 20
Tyres BMW recommendations, 71,
109
Checking tread depth, 69
Checking tyre pressures, 37
Running in, 47
Technical data, 109
W
Warnings Overview, 20
Warnings, overview, 21, 24
Weights, 113 Wheels
Checking rims, 69
Removing and installing front
wheel, 71
Removing and installing rear
wheel, 75
Technical data, 109
12128zIndex