Page 63 of 132
10 Screwdriver, smallReplacing turn indicator bulbsOn-board toolkit service
kitYour authorised BMW Motor-
rad dealer can provide the on-
board toolkit service kit that you
will need if you are considering
undertaking more extensive work.
You will find information on un-
dertaking work of this nature in
the Repair Manual on the CD or
DVD also obtainable from your
authorised BMW Motorrad deal-
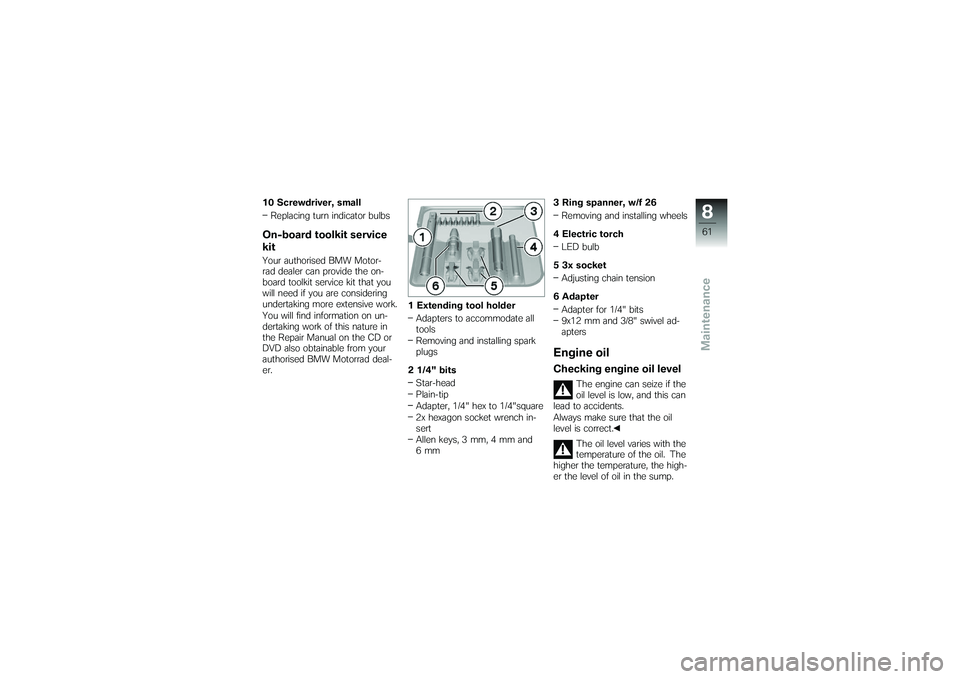
er. 1 Extending tool holder
Adapters to accommodate all
tools
Removing and installing spark
plugs
2 1/4" bits Star-head
Plain-tip
Adapter, 1/4" hex to 1/4"square
2x hexagon socket wrench in-
sert
Allen keys, 3 mm, 4 mm and
6mm 3 Ring spanner, w/f 26
Removing and installing wheels
4 Electric torch LED bulb
5 3x socket Adjusting chain tension
6 Adapter Adapter for 1/4" bits
9x12 mm and 3/8" swivel ad-
apters
Engine oilChecking engine oil level
The engine can seize if the
oil level is low, and this can
lead to accidents.
Always make sure that the oil
level is correct.
The oil level varies with the
temperature of the oil. The
higher the temperature, the high-
er the level of oil in the sump.
861zMaintenance
Page 64 of 132
Checking the oil level with the
engine cold or after no more than
a short ride will lead to misinter-
pretation; this in turn, means that
the engine will be operated with
the incorrect quantity of oil.
In order to ensure that the en-
gine oil level is read correctly,
check the oil level only after a
lengthy trip.Allow the engine to idle until
the fan starts up, then allow it
to idle one minute longer.
Make sure the ground is level
and firm and hold the motor-
cycle upright.
Switch off the engine.
Wipe the area around the oil
filler neck clean. Remove oil dipstick
1by turn-
ing it counter-clockwise.
Wipe the oil off MIN-MAX part
of dipstick 2with a clean, dry
cloth. Turn the oil dipstick clockwise
to install.
Remove the oil dipstick and
check the oil level.
Engine oil, specified level
Engine oil, 15W-40
Between MIN and MAX
marks
If the oil level is below the MIN
mark: Top up the engine oil ( 63)
862zMaintenance
Page 65 of 132
If the oil level is above the MAX
mark:Have the oil level corrected by
a specialist workshop, prefer-
ably an authorised BMW Mo-
torrad dealer.Topping up engine oil
Damage to the engine
can result if it is operated
without enough oil, but the same
also applies if the oil level is too
high.
Always make sure that the oil
level is correct.
Wipe the area around the filler
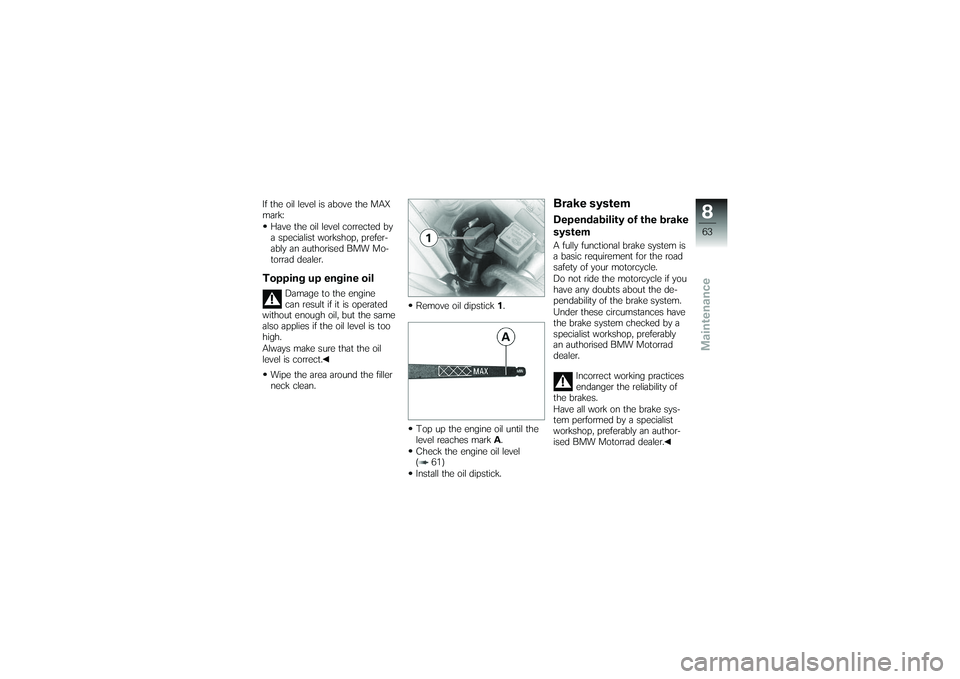
neck clean. Remove oil dipstick
1.
Top up the engine oil until the
level reaches mark A.
Check the engine oil level
( 61)
Install the oil dipstick.
Brake systemDependability of the brake
systemA fully functional brake system is
a basic requirement for the road
safety of your motorcycle.
Do not ride the motorcycle if you
have any doubts about the de-
pendability of the brake system.
Under these circumstances have
the brake system checked by a
specialist workshop, preferably
an authorised BMW Motorrad
dealer.
Incorrect working practices
endanger the reliability of
the brakes.
Have all work on the brake sys-
tem performed by a specialist
workshop, preferably an author-
ised BMW Motorrad dealer.
863zMaintenance
Page 70 of 132
Topping up coolantPull cover of radiator cap1for-
ward to remove.
Open cap of the expansion
tank for coolant 2. Top up the coolant to the spe-
cified level.
Close the cap of the expansion
tank for coolant.
Seat the cover of the radiator
cap in holders
3. In this pro-
cess, guide the top edge of the
cover behind the bottom edge
of centre trim panel 4.
ClutchChecking clutch-lever
playPull the clutch lever until resist-
ance is perceptible.
Measure clutch-lever play A.
Clutch-lever play
2...3 mm (Engine cold)
Clutch-lever play is out of toler-
ance: Adjust clutch-lever play ( 69)
868zMaintenance
Page 83 of 132
FusesRemoving fuse
Risk of fire if an attempt is
made to jumper defective
fuse.
Always replace defective fuses
with new fuses of the correct
amperage rating.
Switch off the ignition.
Remove the seat ( 38)
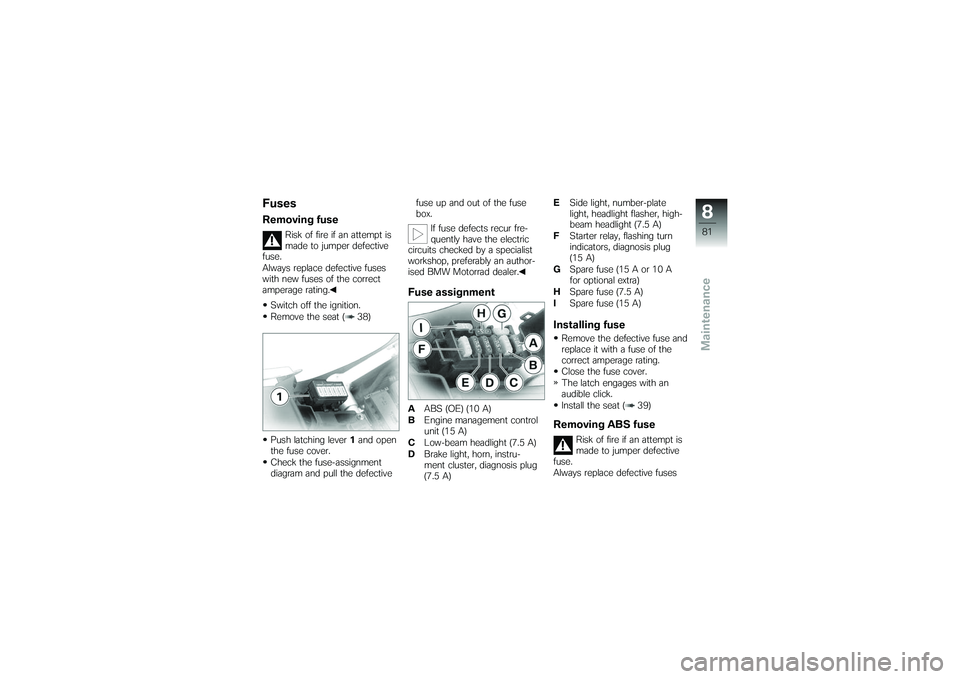
Push latching lever 1and open
the fuse cover.
Check the fuse-assignment
diagram and pull the defective fuse up and out of the fuse
box.
If fuse defects recur fre-
quently have the electric
circuits checked by a specialist
workshop, preferably an author-
ised BMW Motorrad dealer.
Fuse assignmentA ABS (OE) (10 A)
B Engine management control
unit (15 A)
C Low-beam headlight (7.5 A)
D Brake light, horn, instru-
ment cluster, diagnosis plug
(7.5 A) E
Side light, number-plate
light, headlight flasher, high-
beam headlight (7.5 A)
F Starter relay, flashing turn
indicators, diagnosis plug
(15 A)
G Spare fuse (15 A or 10 A
for optional extra)
H Spare fuse (7.5 A)
I Spare fuse (15 A)
Installing fuseRemove the defective fuse and
replace it with a fuse of the
correct amperage rating.
Close the fuse cover.
The latch engages with an
audible click.
Install the seat ( 39)Removing ABS fuse
Risk of fire if an attempt is
made to jumper defective
fuse.
Always replace defective fuses
881zMaintenance
Page 127 of 132
A
Abbreviations and symbols, 6
ABSEngineering details, 52
Fuses, 13, 81
Self-diagnosis, 46
Switching off and on, 15, 33
Warnings, 23
Accessories Notes, 56
Power socket, 56
Auxiliary stand, 78
B
Battery Charging, 92
Maintenance instructions, 91
Removing and installing, 92
Technical data, 111
Voltmeter, 20, 30
BMW Motorrad service, 116
BMW Motorrad Service Card, 116 Brake fluid
Checking level, 65
Reservoir, front, 13
Reservoir, rear, 13
Brake pads Running in, 47
Test, 64
Brakes Notes, 47
Technical data, 109
Test, 63
Bulbs Notes on replacement, 82
Replacing low-beam headlight
bulb, 83
Replacing number-plate light
bulbs, 89
Replacing rear light, 89
Replacing side-light bulb, 86
Replacing turn indicator
bulb, 87
Technical data, 111
C
Care, 97 Chain
Adjusting tension, 70
Checking tension, 70
Checking wear, 71
Lubricating, 69
Checklist, 44
Clock, 20 Adjusting, 17, 29
Clutch Adjusting play, 69
Checking play, 68
Technical data, 107
Confirmation of maintenance work, 118
Coolant Checking level, 67
Fore-and-aft tilt indicator, 11
Topping up, 68
Coolant temperature Warning, 22
D
Damping Adjusting, 11, 13, 35
Dimensions, 112
12125zIndex
Page 128 of 132
DisplayOverview, 20
Selecting readings, 17, 28
E
Electrics Technical data, 110
Emergency off switch (kill switch), 16, 32
Engine Starting, 16, 44
Technical data, 105
Engine oil Checking level, 61
Filler neck, 14
Oil dipstick, 14
Technical data, 106
Topping up, 63
Engine oil pressure Warning, 22
Equipment, 6
F
Frame Technical data, 112
Front-wheel stand, 79 Fuel
Filler neck, 13
Refuelling, 50
Technical data, 4, 106
Warning, 22
Fuses, 14, 81 ABS, 81
G
General views Display, 20
Headlight, 18
Instrument cluster, 17
Left handlebar fitting, 15
Left side, 11
Right handlebar fitting, 16
Right side, 13
Status indicators, 20
Telltale lights, 20
Underneath the seat, 14
Warnings, 20
H
Handlebar fitting, left Overview, 15 Handlebar fitting, right
Overview, 16
Headlight Beam throw, 38
Driving on right/driving on
left, 38
General views, 18
Replacing low-beam headlight
bulb, 83
Replacing side-light bulb, 86
Headlight flasher, 15, 31
High-beam headlight, 18 Switch, 15
Telltale light, 20
Horn, 15
I
Idle Telltale light, 20
Ignition Switching on and off, 28
Ignition switch, 28
Instrument cluster Overview, 17
12126zIndex
Page 130 of 132
T
Technical dataBattery, 111
Brakes, 109
Bulbs, 111
Clutch, 107
Dimensions, 112
Electrics, 110
Engine, 105
Engine oil, 106
Frame, 112
Fuel, 4, 106
Rear-wheel drive, 108
Running gear, 108
Spark plugs, 111
Standards, 7
Transmission, 107
Tyres, 109
Weights, 113
Wheels, 109
Telltale lights, 17 Overview, 20
Toolkit, 14, 60
Torques, 103 Transmission
Technical data, 107
Troubleshooting chart, 102
Turn indicators Operate, 15, 32
Replacing bulb, 87
Telltale light, 20
Tyres BMW recommendations, 71,
109
Checking tread depth, 69
Checking tyre pressures, 37
Running in, 47
Technical data, 109
W
Warnings Overview, 20
Warnings, overview, 21, 24
Weights, 113 Wheels
Checking rims, 69
Removing and installing front
wheel, 71
Removing and installing rear
wheel, 75
Technical data, 109
12128zIndex