2007 BMW 760LI SEDAN light
[x] Cancel search: lightPage 12 of 253
Cockpit
10
Cockpit
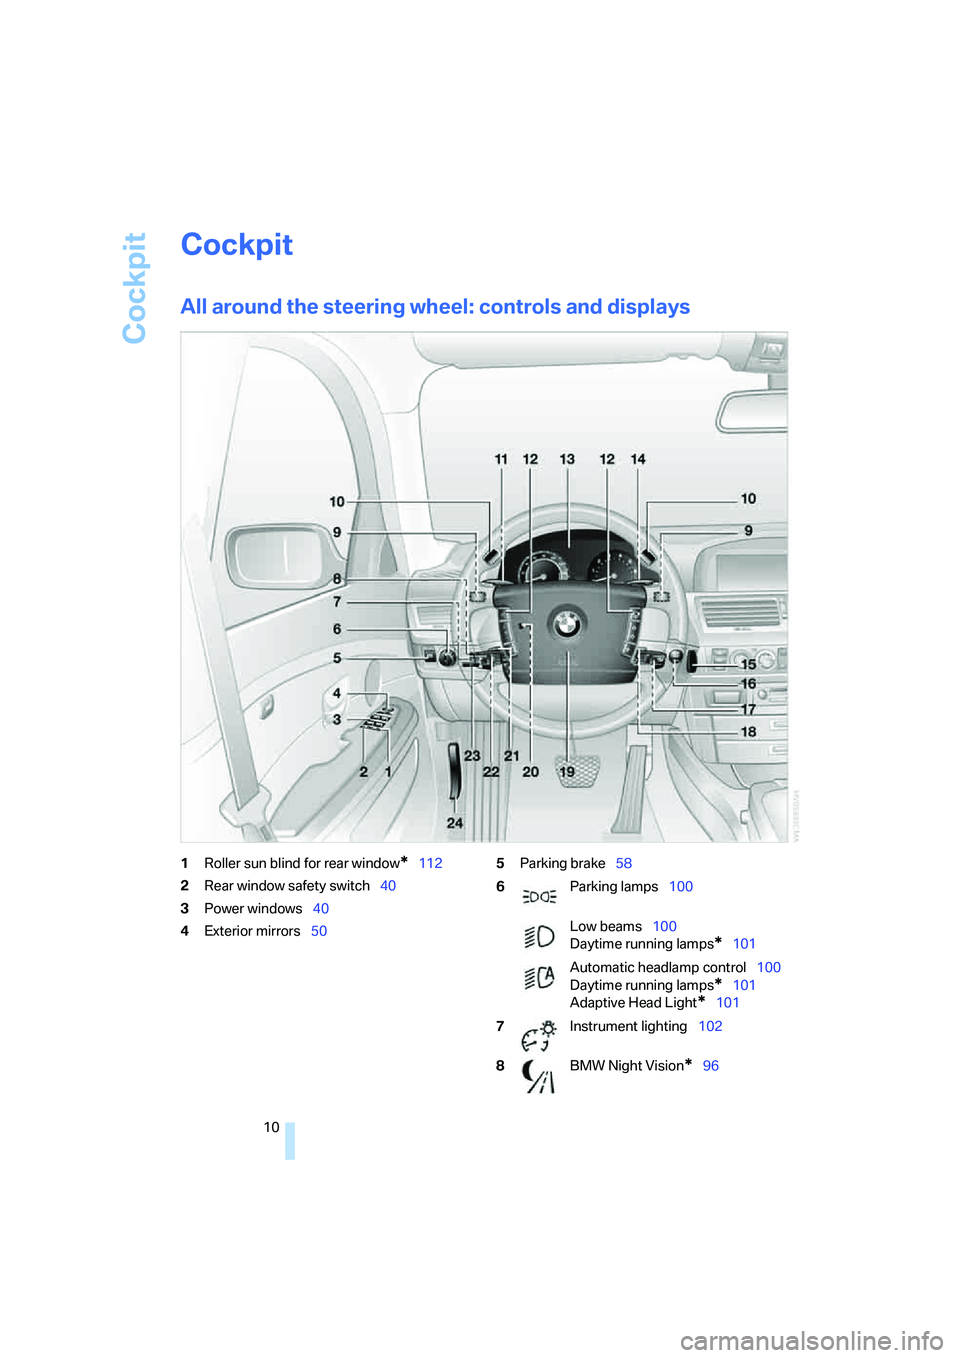
All around the steering wheel: controls and displays
1Roller sun blind for rear window*112
2Rear window safety switch40
3Power windows40
4Exterior mirrors505Parking brake58
6Parking lamps100
Low beams100
Daytime running lamps
*101
Automatic headlamp control100
Daytime running lamps
*101
Adaptive Head Light
*101
7Instrument lighting102
8BMW Night Vision
*96
Page 14 of 253
Cockpit
12
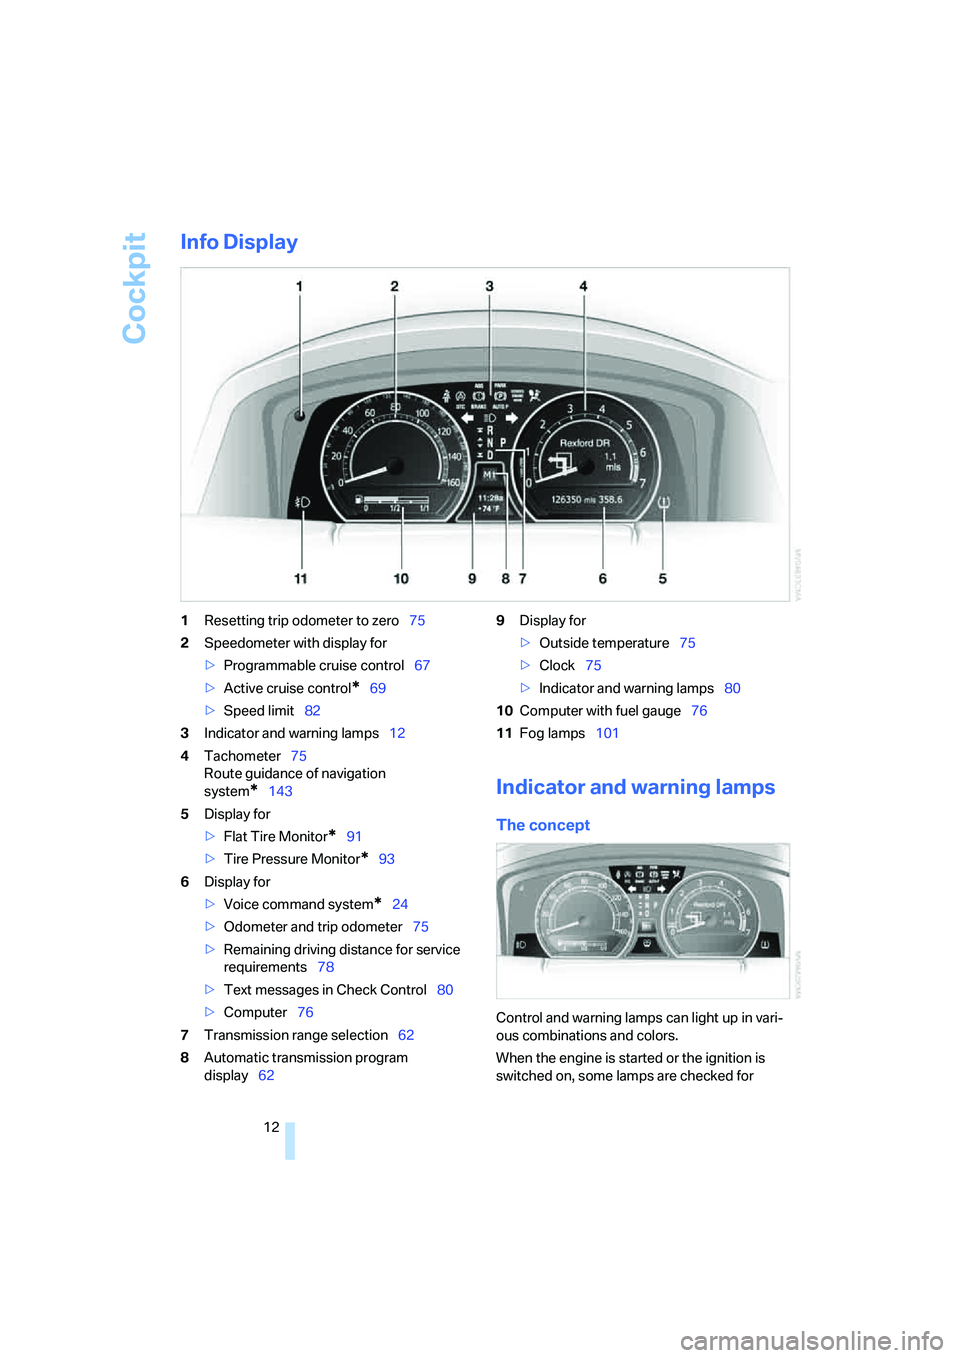
Info Display
1Resetting trip odometer to zero75
2Speedometer with display for
>Programmable cruise control67
>Active cruise control
*69
>Speed limit82
3Indicator and warning lamps12
4Tachometer75
Route guidance of navigation
system
*143
5Display for
>Flat Tire Monitor
*91
>Tire Pressure Monitor
*93
6Display for
>Voice command system
*24
>Odometer and trip odometer75
>Remaining driving distance for service
requirements78
>Text messages in Check Control80
>Computer76
7Transmission range selection62
8Automatic transmission program
display629Display for
>Outside temperature75
>Clock75
>Indicator and warning lamps80
10Computer with fuel gauge76
11Fog lamps101
Indicator and warning lamps
The concept
Control and warning lamps can light up in vari-
ous combinations and colors.
When the engine is started or the ignition is
switched on, some lamps are checked for
Page 15 of 253
At a glance
13Reference
Controls
Driving tips
Communications
Navigation
Entertainment
Mobility
proper operation and light up briefly in the pro-
cess.
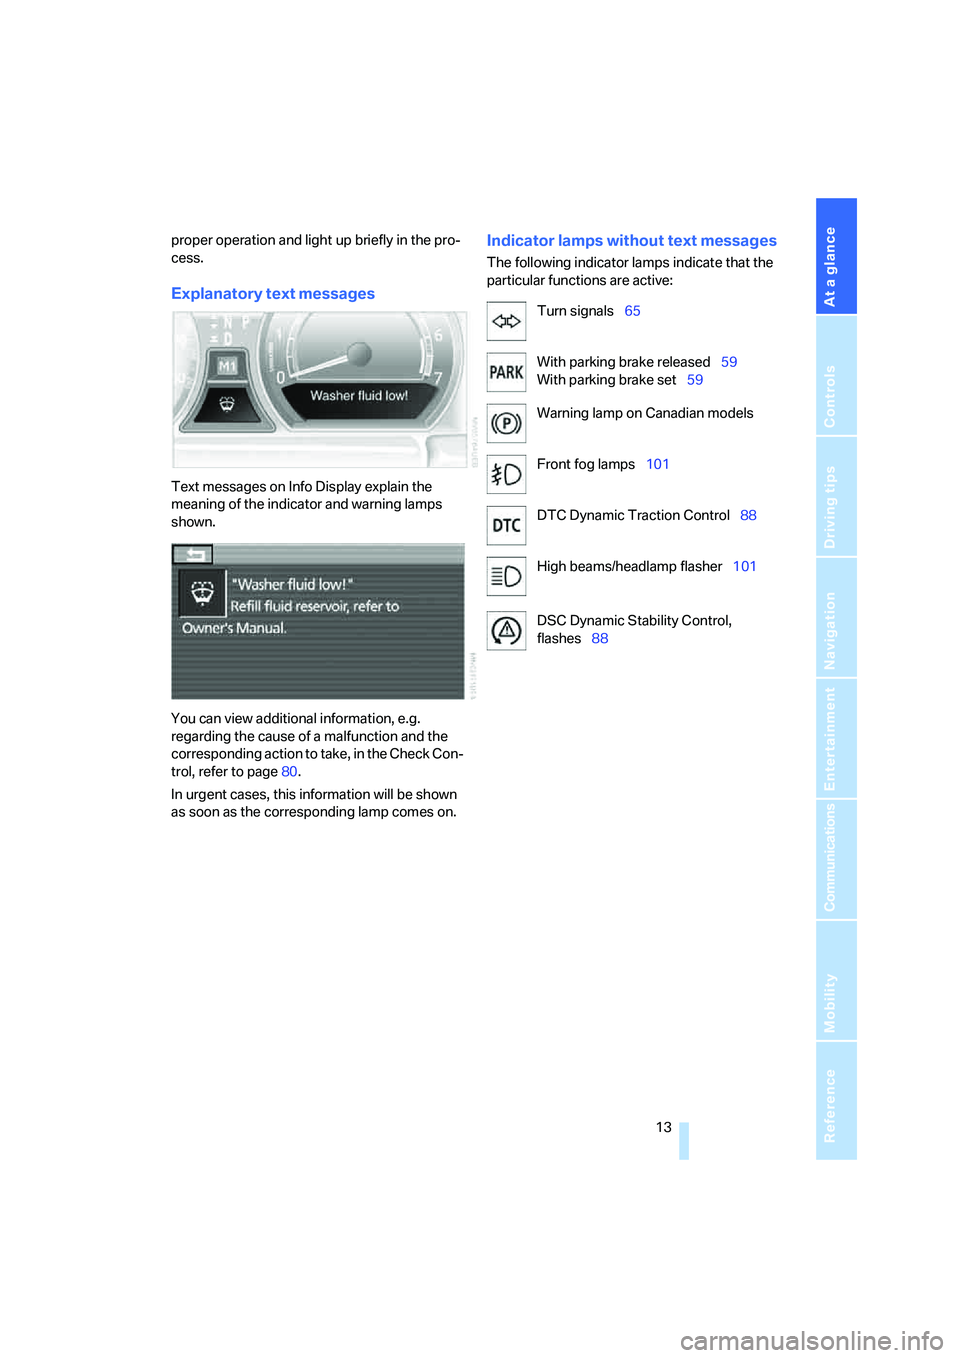
Explanatory text messages
Text messages on Info Display explain the
meaning of the indicator and warning lamps
shown.
You can view additional information, e.g.
regarding the cause of a malfunction and the
corresponding action to take, in the Check Con-
trol, refer to page80.
In urgent cases, this information will be shown
as soon as the corresponding lamp comes on.
Indicator lamps without text messages
The following indicator lamps indicate that the
particular functions are active:
Turn signals65
With parking brake released59
With parking brake set59
Warning lamp on Canadian models
Front fog lamps101
DTC Dynamic Traction Control88
High beams/headlamp flasher101
DSC Dynamic Stability Control,
flashes88
Page 21 of 253
At a glance
19Reference
Controls
Driving tips
Communications
Navigation
Entertainment
Mobility
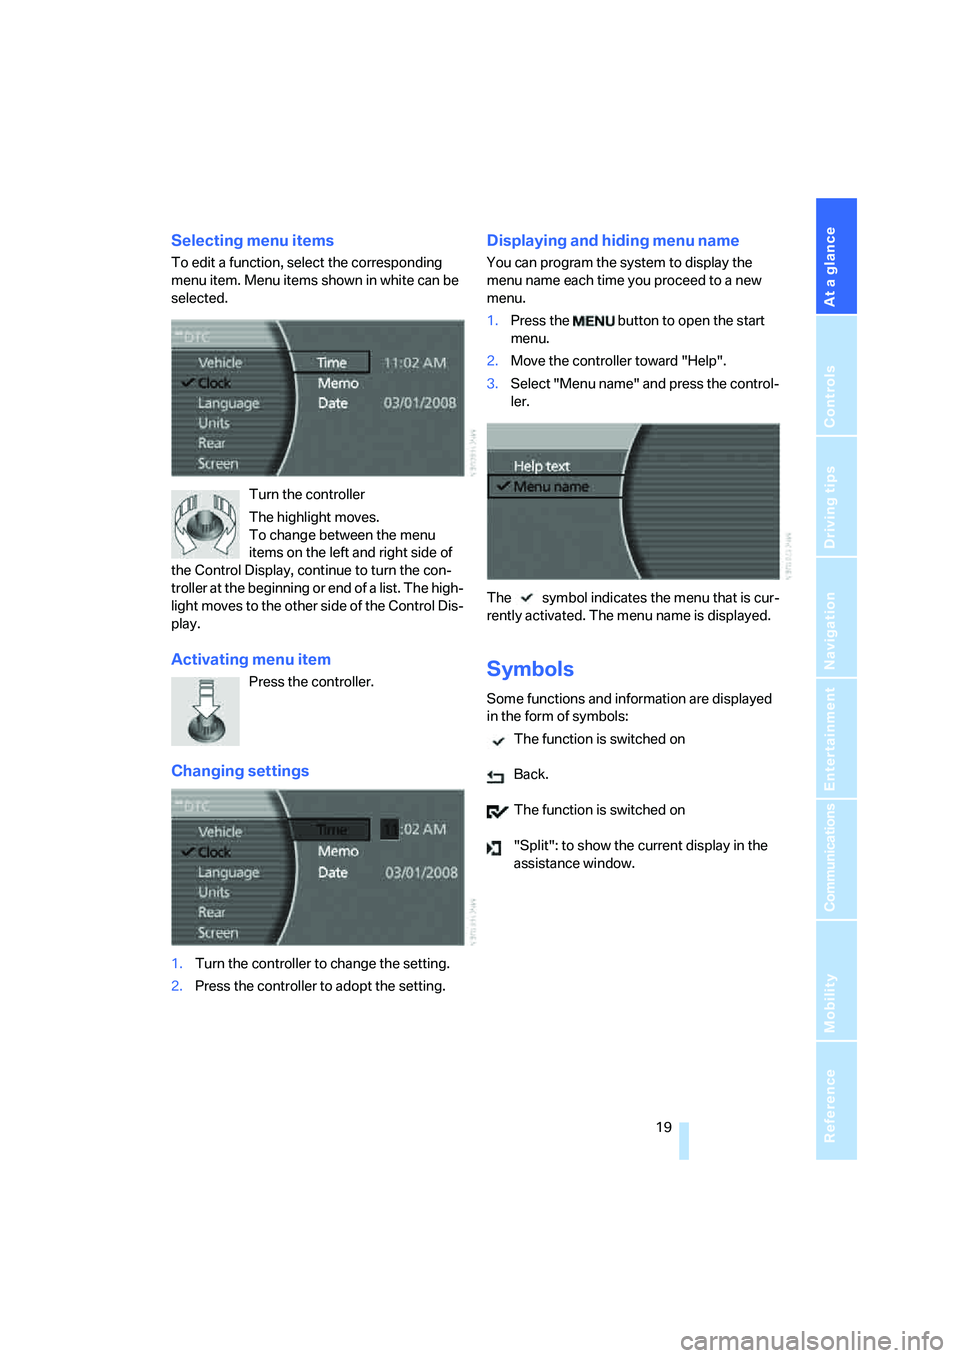
Selecting menu items
To edit a function, select the corresponding
menu item. Menu items shown in white can be
selected.
Turn the controller
The highlight moves.
To change between the menu
items on the left and right side of
the Control Display, continue to turn the con-
troller at the beginning or end of a list. The high-
light moves to the other side of the Control Dis-
play.
Activating menu item
Press the controller.
Changing settings
1.Turn the controller to change the setting.
2.Press the controller to adopt the setting.
Displaying and hiding menu name
You can program the system to display the
menu name each time you proceed to a new
menu.
1.Press the button to open the start
menu.
2.Move the controller toward "Help".
3.Select "Menu name" and press the control-
ler.
The symbol indicates the menu that is cur-
rently activated. The menu name is displayed.
Symbols
Some functions and information are displayed
in the form of symbols:
The function is switched on
Back.
The function is switched on
"Split": to show the current display in the
assistance window.
Page 34 of 253
Opening and closing
32 The central locking system can be operated
from the outside:
>via the remote control
>via the driver's door lock
>with Comfort Access
* via the door handles
and from inside via the button for the central
locking system.
When the system is locked from inside, the fuel
filler door remains unlocked. Refer to page34.
Each time the central locking system is locked
or unlocked from outside the vehicle, this simul-
taneously engages or disengages the anti-theft
system. The alarm system is also armed or dis-
armed. The remote control also switches the
interior lamps on and off.
For additional details on alarm system
refer to
page37.
In an accident of corresponding severity, the
central locking system automatically unlocks
the vehicle. In addition, the hazard warning
flashers and interior lamps switch on.
Opening and closing: from
outside
Using remote control
Persons or animals left unattended in a
parked vehicle can lock the doors from
the inside. For this reason, bring the remote
control with you whenever you leave the vehicle
so that you will always be able to unlock the
vehicle from outside.<
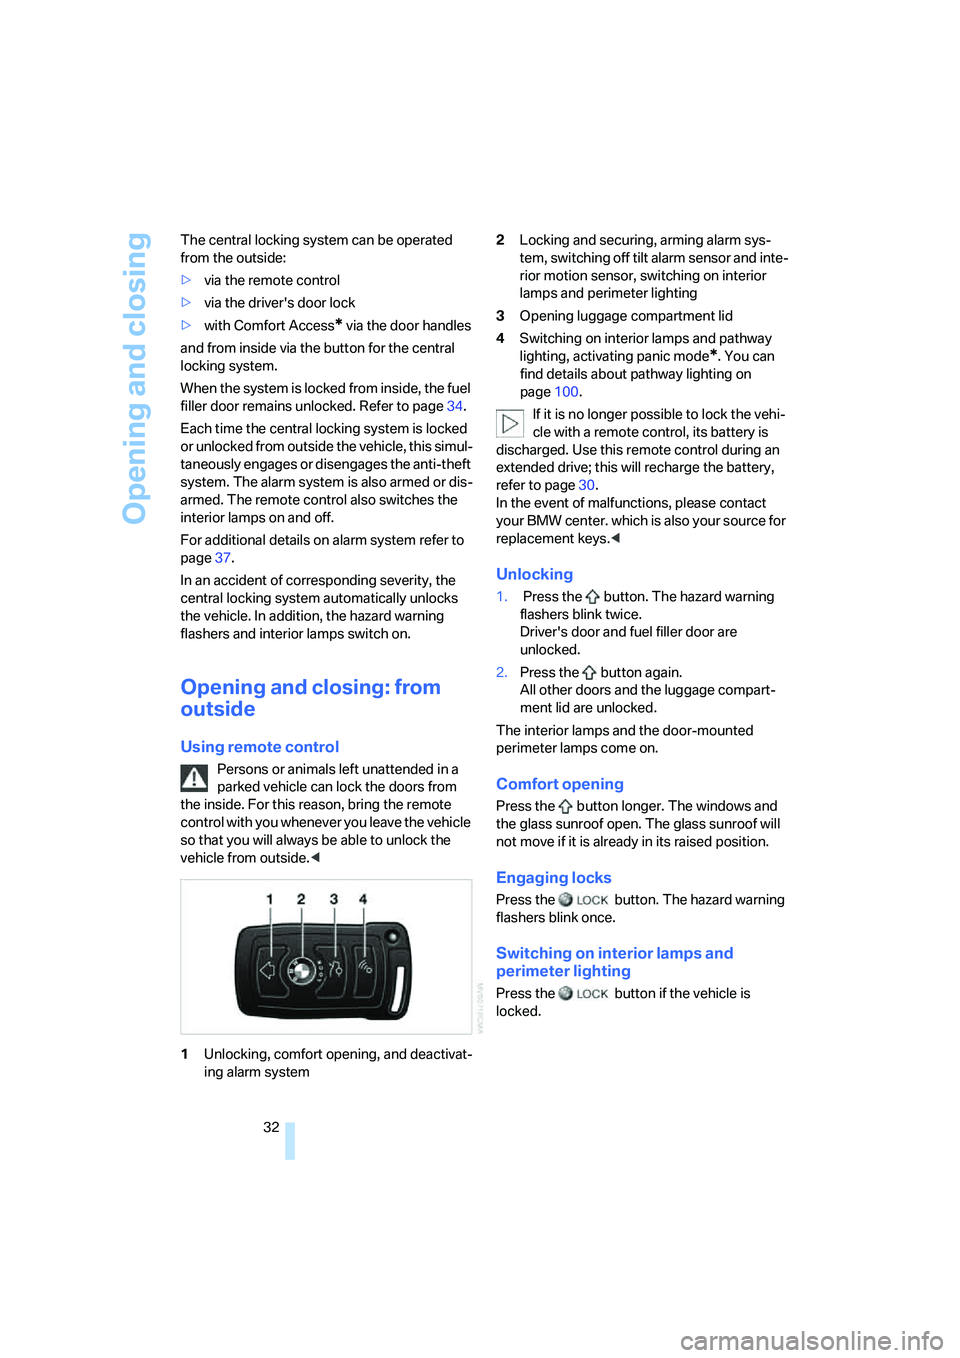
1Unlocking, comfort opening, and deactivat-
ing alarm system2Locking and securing, arming alarm sys-
tem, switching off tilt alarm sensor and inte-
rior motion sensor, switching on interior
lamps and perimeter lighting
3Opening luggage compartment lid
4Switching on interior lamps and pathway
lighting, activating panic mode
*. You can
find details about pathway lighting on
page100.
If it is no longer possible to lock the vehi-
cle with a remote control, its battery is
discharged. Use this remote control during an
extended drive; this will recharge the battery,
refer to page30.
In the event of malfunctions, please contact
your BMW center. which is also your source for
replacement keys.<
Unlocking
1. Press the button. The hazard warning
flashers blink twice.
Driver's door and fuel filler door are
unlocked.
2.Press the button again.
All other doors and the luggage compart-
ment lid are unlocked.
The interior lamps and the door-mounted
perimeter lamps come on.
Comfort opening
Press the button longer. The windows and
the glass sunroof open. The glass sunroof will
not move if it is already in its raised position.
Engaging locks
Press the button. The hazard warning
flashers blink once.
Switching on interior lamps and
perimeter lighting
Press the button if the vehicle is
locked.
Page 36 of 253
Opening and closing
34
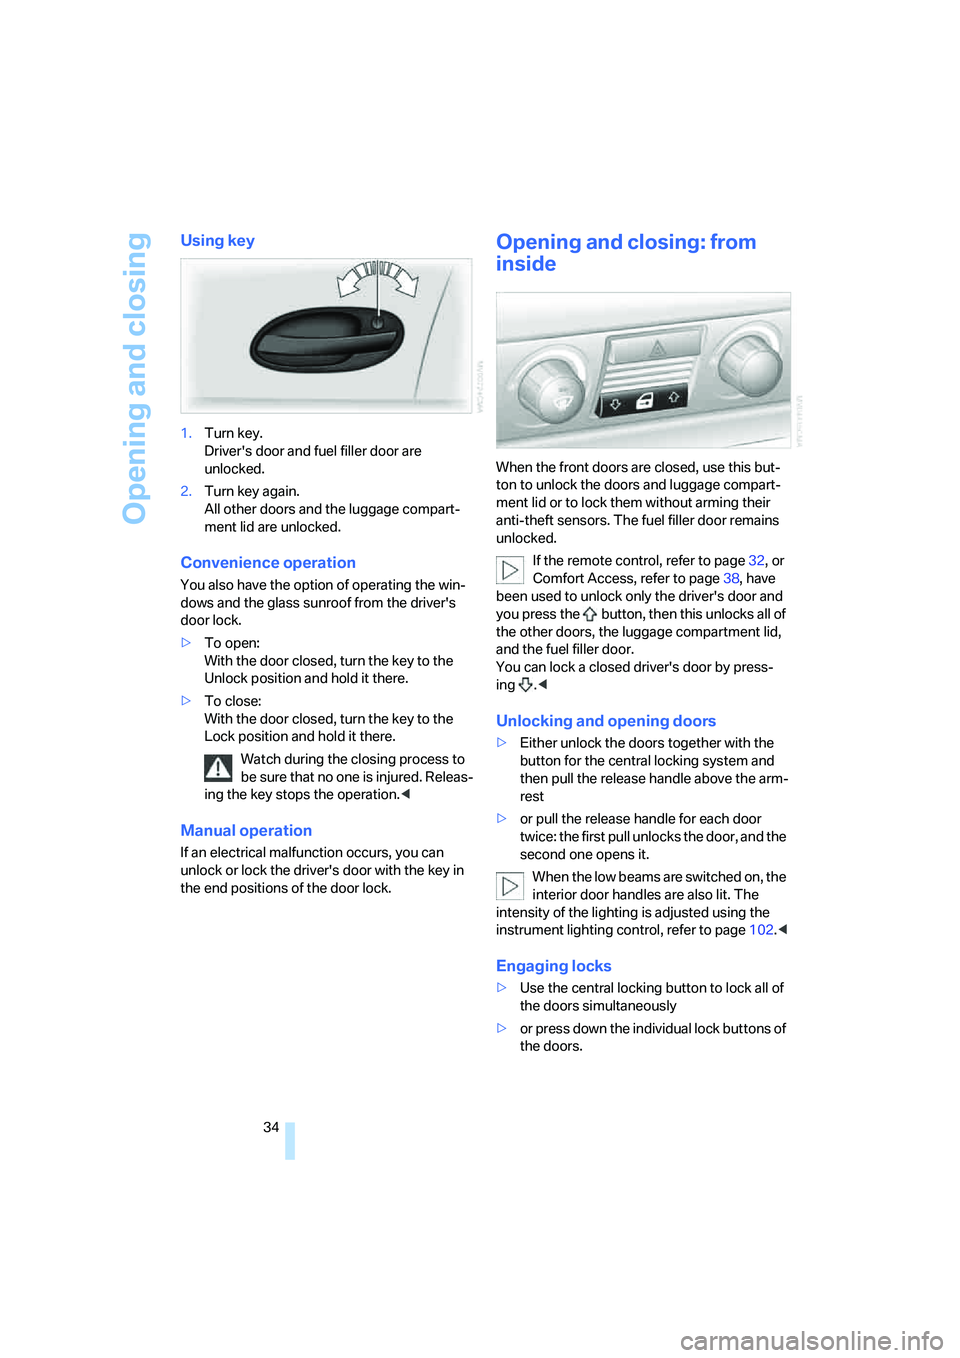
Using key
1.Turn key.
Driver's door and fuel filler door are
unlocked.
2.Turn key again.
All other doors and the luggage compart-
ment lid are unlocked.
Convenience operation
You also have the option of operating the win-
dows and the glass sunroof from the driver's
door lock.
>To open:
With the door closed, turn the key to the
Unlock position and hold it there.
>To close:
With the door closed, turn the key to the
Lock position and hold it there.
Watch during the closing process to
be sure that no one is injured. Releas-
ing the key stops the operation.<
Manual operation
If an electrical malfunction occurs, you can
unlock or lock the driver's door with the key in
the end positions of the door lock.
Opening and closing: from
inside
When the front doors are closed, use this but-
ton to unlock the doors and luggage compart-
ment lid or to lock them without arming their
anti-theft sensors. The fuel filler door remains
unlocked.
If the remote control, refer to page32, or
Comfort Access, refer to page38, have
been used to unlock only the driver's door and
you press the button, then this unlocks all of
the other doors, the luggage compartment lid,
and the fuel filler door.
You can lock a closed driver's door by press-
ing .<
Unlocking and opening doors
>Either unlock the doors together with the
button for the central locking system and
then pull the release handle above the arm-
rest
>or pull the release handle for each door
twice: the first pull unlocks the door, and the
second one opens it.
When the low beams are switched on, the
interior door handles are also lit. The
intensity of the lighting is adjusted using the
instrument lighting control, refer to page102.<
Engaging locks
>Use the central locking button to lock all of
the doors simultaneously
>or press down the individual lock buttons of
the doors.
Page 40 of 253
Opening and closing
38
Tilt alarm sensor
The tilt of the vehicle is monitored. The alarm
system reacts, e.g. in case of an attempted
wheel theft or towing.
Interior motion sensor
In order for the interior motion sensor to func-
tion properly, the windows and glass sunroof
must be completely closed.
Avoiding unintentional alarms
The tilt alarm sensor and interior motion sensor
may be switched off at the same time. This pre-
vents unintentional alarms, e.g. in the following
situations:
>In duplex garages
>During transport on car-carrying trains,
boats/ships or on a trailer
>When animals are to remain in the vehicle
Switching off tilt alarm sensor and
interior motion sensor
Press the button on the remote control
again as soon as the vehicle is locked.
The indicator lamp lights up briefly and then
flashes continuously. The tilt alarm sensor and
the interior motion sensor are switched off until
the next time the vehicle is unlocked and subse-
quently locked again.
Comfort Access*
With Comfort Access, you can have access to
your vehicle without having to hold the remote
control in your hand. It is sufficient to carry the
remote control on your person, e.g. in a jacket
pocket. The vehicle automatically detects the
associated remote control inside the vehicle or
in its immediate vicinity.
Comfort Access supports the following func-
tions:
>Locking/unlocking the vehicle
>Unlocking the luggage compartment lid
separately
>Starting the engine
Functional requirements
>The vehicle can only be locked if the remote
control is outside the vehicle.
>The next unlocking and locking cycle is not
possible until after approx. 2 seconds.
>The engine can only be started if the remote
control is inside the vehicle.
Comparison to conventional remote
control
You can control the functions mentioned previ-
ously with the Comfort Access or by pressing
the buttons on the remote control. Therefore
please first familiarize yourself with the instruc-
tions for opening and closing, starting on
page32.
The specific features involved in the use of
Comfort Access are described below.
If a short delay occurs when opening or
closing the windows and the glass sun-
roof, then this indicates that the system is
checking whether a remote control is located in
the vehicle. Please repeat opening or closing if
necessary.<
Unlocking
Pull a door handle. This corresponds to press-
ing the button.
Only the door of the door handle you have
pulled is unlocked.
You unlock the other doors from the inside,
using the central locking system button, refer to
page34.<
Locking
Push a door handle. This corresponds to press-
ing the button.
Before locking, make sure that the igni-
tion and all current-consuming devices
are switched off in order to minimized the drain
on the battery.<
If a remote control is detected in the inte-
rior, the vehicle is unlocked again or not
locked in the first place.<
Page 42 of 253
Opening and closing
40
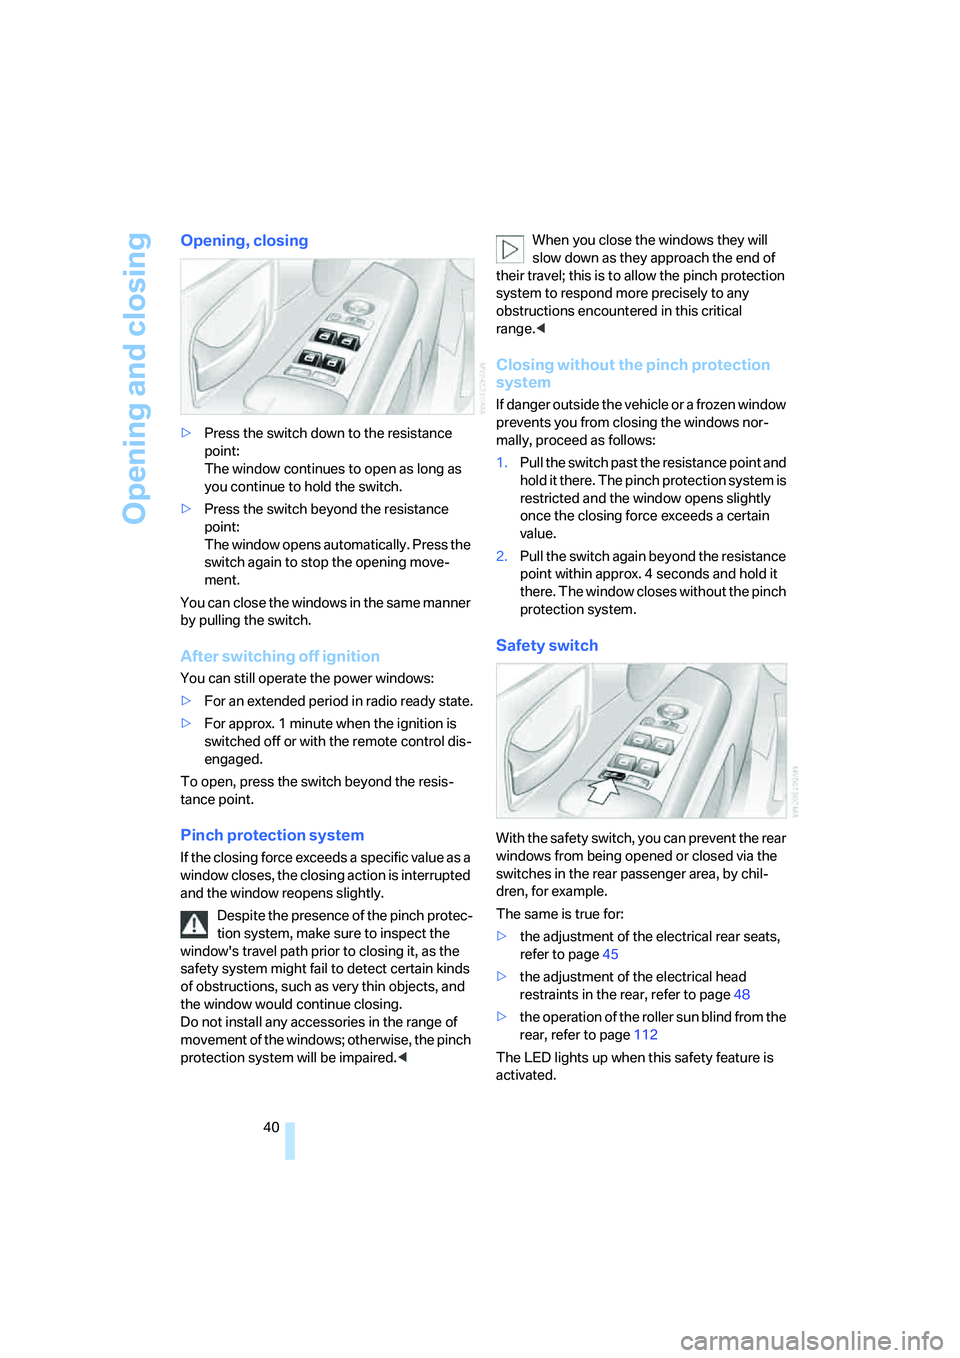
Opening, closing
>Press the switch down to the resistance
point:
The window continues to open as long as
you continue to hold the switch.
>Press the switch beyond the resistance
point:
The window opens automatically. Press the
switch again to stop the opening move-
ment.
You can close the windows in the same manner
by pulling the switch.
After switching off ignition
You can still operate the power windows:
>For an extended period in radio ready state.
>For approx. 1 minute when the ignition is
switched off or with the remote control dis-
engaged.
To open, press the switch beyond the resis-
tance point.
Pinch protection system
If the closing force exceeds a specific value as a
window closes, the closing action is interrupted
and the window reopens slightly.
Despite the presence of the pinch protec-
tion system, make sure to inspect the
window's travel path prior to closing it, as the
safety system might fail to detect certain kinds
of obstructions, such as very thin objects, and
the window would continue closing.
Do not install any accessories in the range of
movement of the windows; otherwise, the pinch
protection system will be impaired.
their travel; this is to allow the pinch protection
system to respond more precisely to any
obstructions encountered in this critical
range.<
Closing without the pinch protection
system
If danger outside the vehicle or a frozen window
prevents you from closing the windows nor-
mally, proceed as follows:
1.Pull the switch past the resistance point and
hold it there. The pinch protection system is
restricted and the window opens slightly
once the closing force exceeds a certain
value.
2.Pull the switch again beyond the resistance
point within approx. 4 seconds and hold it
there. The window closes without the pinch
protection system.
Safety switch
With the safety switch, you can prevent the rear
windows from being opened or closed via the
switches in the rear passenger area, by chil-
dren, for example.
The same is true for:
>the adjustment of the electrical rear seats,
refer to page45
>the adjustment of the electrical head
restraints in the rear, refer to page48
>the operation of the roller sun blind from the
rear, refer to page112
The LED lights up when this safety feature is
activated.