2007 BMW 760LI SEDAN light
[x] Cancel search: lightPage 43 of 253
Controls
41Reference
At a glance
Driving tips
Communications
Navigation
Entertainment
Mobility
Press the safety switch when children
ride in the rear; otherwise, unsupervised
closing of the windows could lead to injuries.<
In order to deactivate the function again,
you must insert the remote control into
the ignition lock or, with Comfort Access, you
must switch into radio ready state.<
Glass sunroof, electric*
To prevent bodily injuries, watch the
glass sunroof as it closes.
Always take along the remote control when you
leave the vehicle; otherwise, children could, for
example, operate the roof and injure them-
selves.<
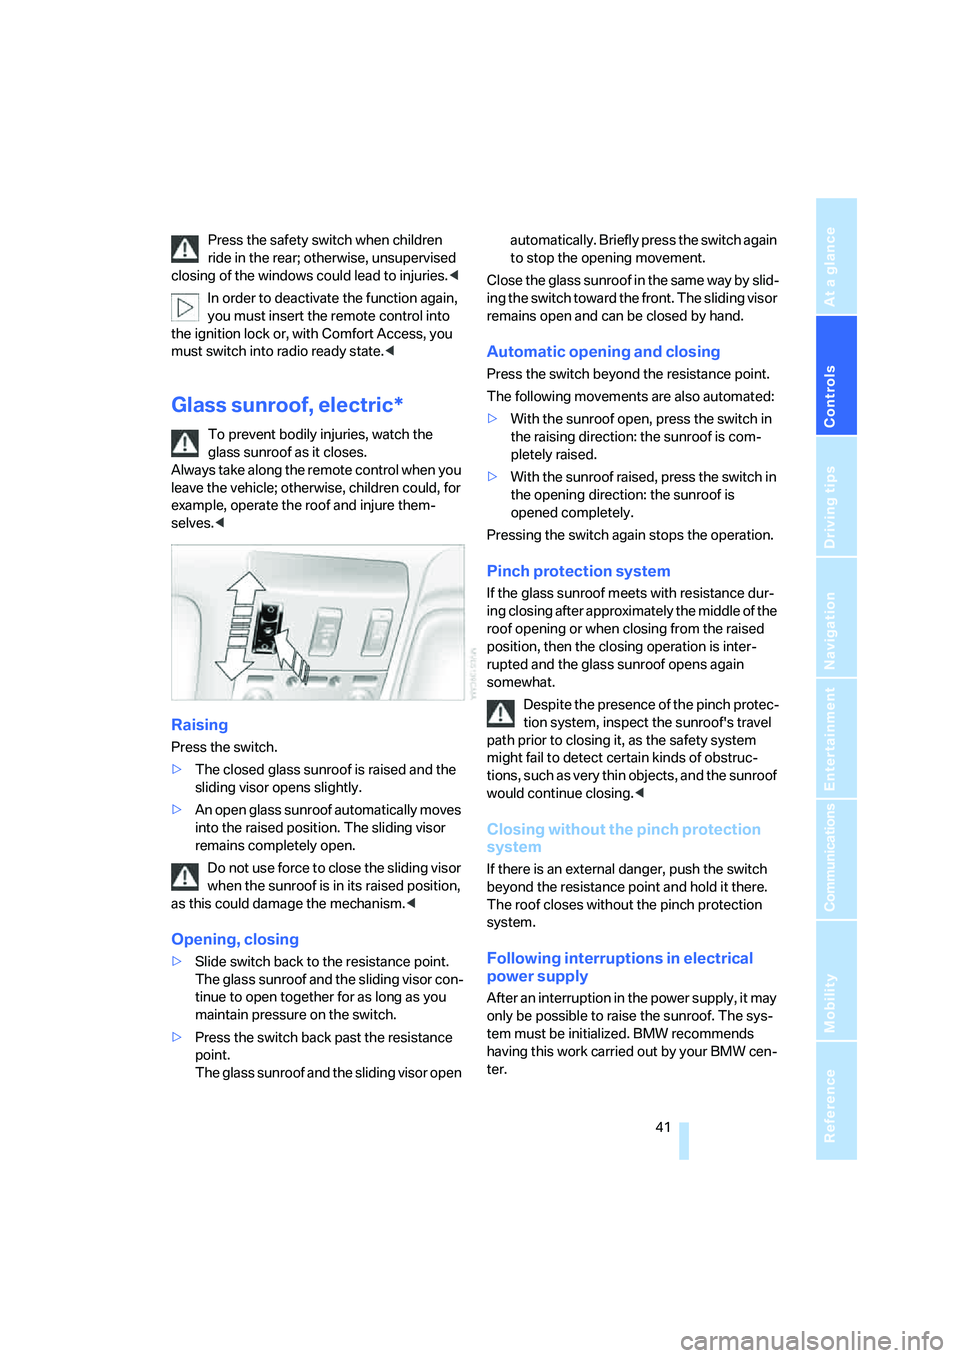
Raising
Press the switch.
>The closed glass sunroof is raised and the
sliding visor opens slightly.
>An open glass sunroof automatically moves
into the raised position. The sliding visor
remains completely open.
Do not use force to close the sliding visor
when the sunroof is in its raised position,
as this could damage the mechanism.<
Opening, closing
>Slide switch back to the resistance point.
The glass sunroof and the sliding visor con-
tinue to open together for as long as you
maintain pressure on the switch.
>Press the switch back past the resistance
point.
The glass sunroof and the sliding visor open automatically. Briefly press the switch again
to stop the opening movement.
Close the glass sunroof in the same way by slid-
ing the switch toward the front. The sliding visor
remains open and can be closed by hand.
Automatic opening and closing
Press the switch beyond the resistance point.
The following movements are also automated:
>With the sunroof open, press the switch in
the raising direction: the sunroof is com-
pletely raised.
>With the sunroof raised, press the switch in
the opening direction: the sunroof is
opened completely.
Pressing the switch again stops the operation.
Pinch protection system
If the glass sunroof meets with resistance dur-
ing closing after approximately the middle of the
roof opening or when closing from the raised
position, then the closing operation is inter-
rupted and the glass sunroof opens again
somewhat.
Despite the presence of the pinch protec-
tion system, inspect the sunroof's travel
path prior to closing it, as the safety system
might fail to detect certain kinds of obstruc-
tions, such as very thin objects, and the sunroof
would continue closing.<
Closing without the pinch protection
system
If there is an external danger, push the switch
beyond the resistance point and hold it there.
The roof closes without the pinch protection
system.
Following interruptions in electrical
power supply
After an interruption in the power supply, it may
only be possible to raise the sunroof. The sys-
tem must be initialized. BMW recommends
having this work carried out by your BMW cen-
ter.
Page 46 of 253
Adjusting
44
Seats
Note before adjusting
Never attempt to adjust your seat while
operating the vehicle. The seat could
respond with unexpected movement and the
ensuing loss of vehicle control could lead to an
accident.
Also on the passenger side, do not recline the
backrest too far to the rear while the vehicle is
being driven; otherwise, there is a danger in the
event of an accident of 'sliding under' the safety
belt, eliminating the protection normally pro-
vided by the belt.<
Please note the information on damage to
safety belts provided on page49 and the infor-
mation on the active head restraints on
page47.
The concept
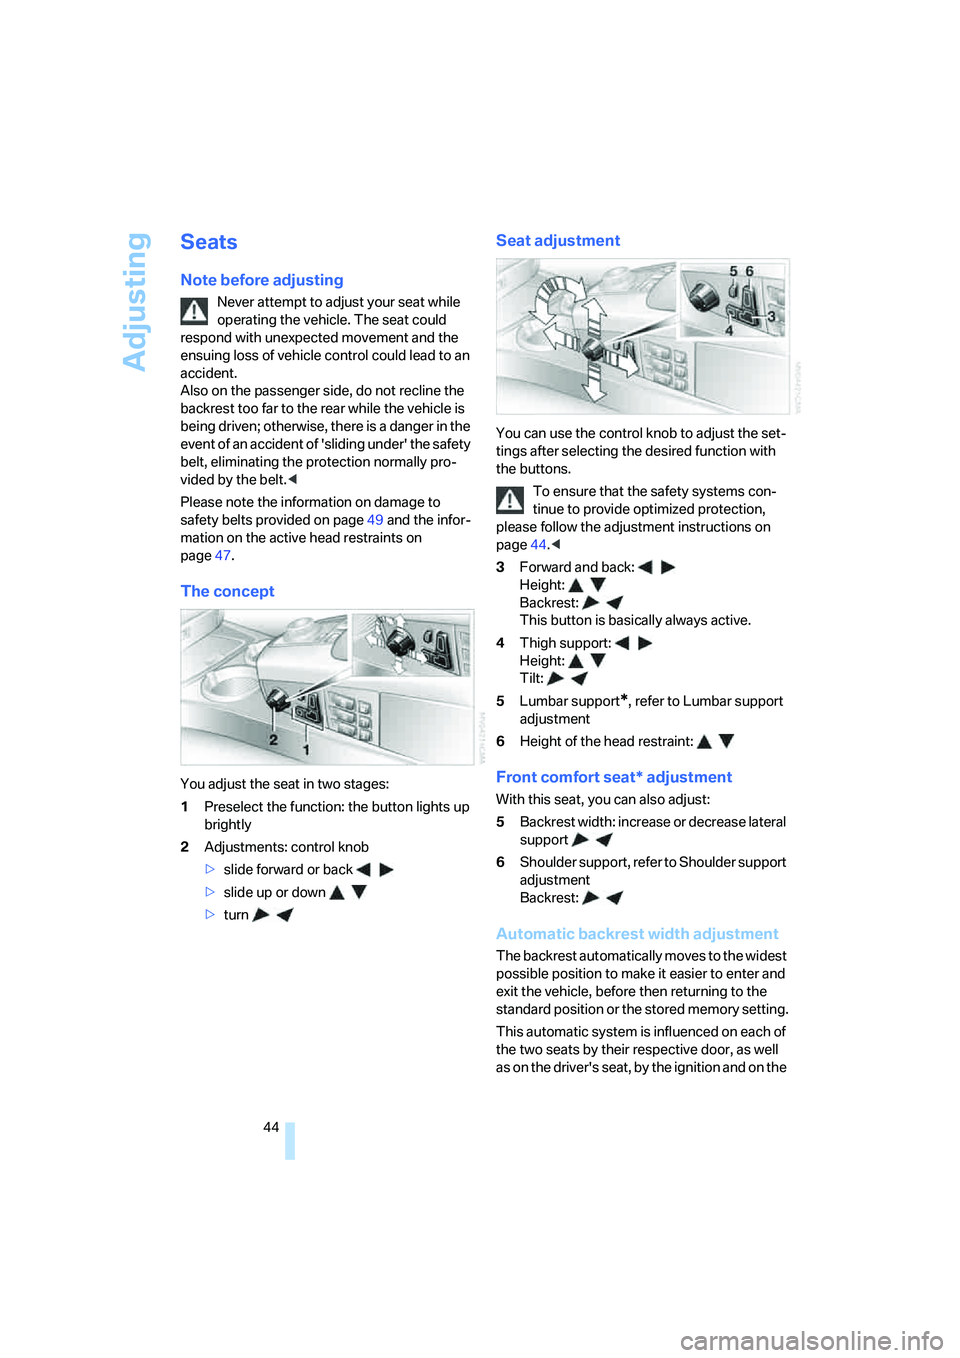
You adjust the seat in two stages:
1Preselect the function: the button lights up
brightly
2Adjustments: control knob
>slide forward or back
>slide up or down
>turn
Seat adjustment
You can use the control knob to adjust the set-
tings after selecting the desired function with
the buttons.
To ensure that the safety systems con-
tinue to provide optimized protection,
please follow the adjustment instructions on
page44.<
3Forward and back:
Height:
Backrest:
This button is basically always active.
4Thigh support:
Height:
Tilt:
5Lumbar support
*, refer to Lumbar support
adjustment
6Height of the head restraint:
Front comfort seat* adjustment
With this seat, you can also adjust:
5Backrest width: increase or decrease lateral
support
6Shoulder support, refer to Shoulder support
adjustment
Backrest:
Automatic backrest width adjustment
The backrest automatically moves to the widest
possible position to make it easier to enter and
exit the vehicle, before then returning to the
standard position or the stored memory setting.
This automatic system is influenced on each of
the two seats by their respective door, as well
as on the driver's seat, by the ignition and on the
Page 48 of 253
Adjusting
46 It will be necessary to return the rear seats
to their standard position before using a
child restraint system, for instance, refer to
page54.<
Seat, mirror and steering
wheel memory
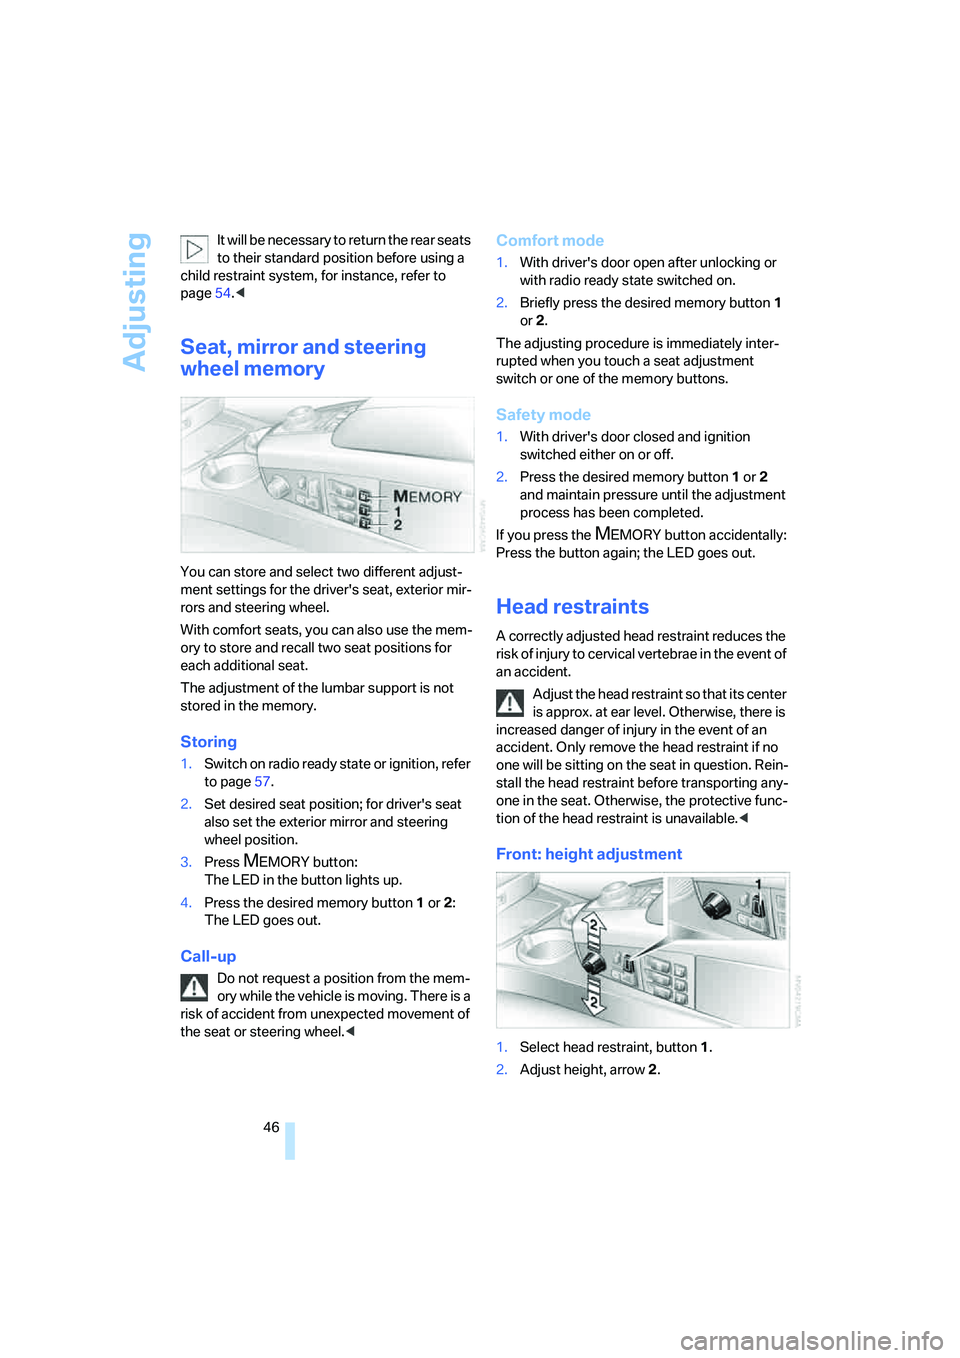
You can store and select two different adjust-
ment settings for the driver's seat, exterior mir-
rors and steering wheel.
With comfort seats, you can also use the mem-
ory to store and recall two seat positions for
each additional seat.
The adjustment of the lumbar support is not
stored in the memory.
Storing
1.Switch on radio ready state or ignition, refer
to page57.
2.Set desired seat position; for driver's seat
also set the exterior mirror and steering
wheel position.
3.Press
MEMORY button:
The LED in the button lights up.
4.Press the desired memory button1 or2:
The LED goes out.
Call-up
Do not request a position from the mem-
ory while the vehicle is moving. There is a
risk of accident from unexpected movement of
the seat or steering wheel.<
Comfort mode
1.With driver's door open after unlocking or
with radio ready state switched on.
2.Briefly press the desired memory button 1
or2.
The adjusting procedure is immediately inter-
rupted when you touch a seat adjustment
switch or one of the memory buttons.
Safety mode
1.With driver's door closed and ignition
switched either on or off.
2.Press the desired memory button 1or2
and maintain pressure until the adjustment
process has been completed.
If you press the
MEMORY button accidentally:
Press the button again; the LED goes out.
Head restraints
A correctly adjusted head restraint reduces the
risk of injury to cervical vertebrae in the event of
an accident.
Adjust the head restraint so that its center
is approx. at ear level. Otherwise, there is
increased danger of injury in the event of an
accident. Only remove the head restraint if no
one will be sitting on the seat in question. Rein-
stall the head restraint before transporting any-
one in the seat. Otherwise, the protective func-
tion of the head restraint is unavailable.<
Front: height adjustment
1.Select head restraint, button1.
2.Adjust height, arrow2.
Page 51 of 253
Controls
49Reference
At a glance
Driving tips
Communications
Navigation
Entertainment
Mobility
Safety belt reminder for front seats
The indicator lamp flashes or lights up.
In addition, a signal sounds. Please
make sure that the safety belts are
positioned correctly.
The safety belt reminder is active at speeds
above approx. 5 mph/8 km/h. It can also be acti-
vated if objects are placed on the passenger's
seat.
Damage to safety belts
In case of strain due to an accident or
damage, replace the belt system includ-
ing the safety belt tensioners and have the belt
anchor points checked. Have this work done
only by your BMW center or at a workshop that
works according to BMW repair procedures
with correspondingly trained personnel. Other-
wise, there can be no guarantee that the safety
devices will function properly.<
Heated seats*
Front
The temperature setting progresses one step
through its control sequence each time you
press the button.
The maximum temperature is supplied when
three lights are lit.
To switch off:
Press and hold the button.
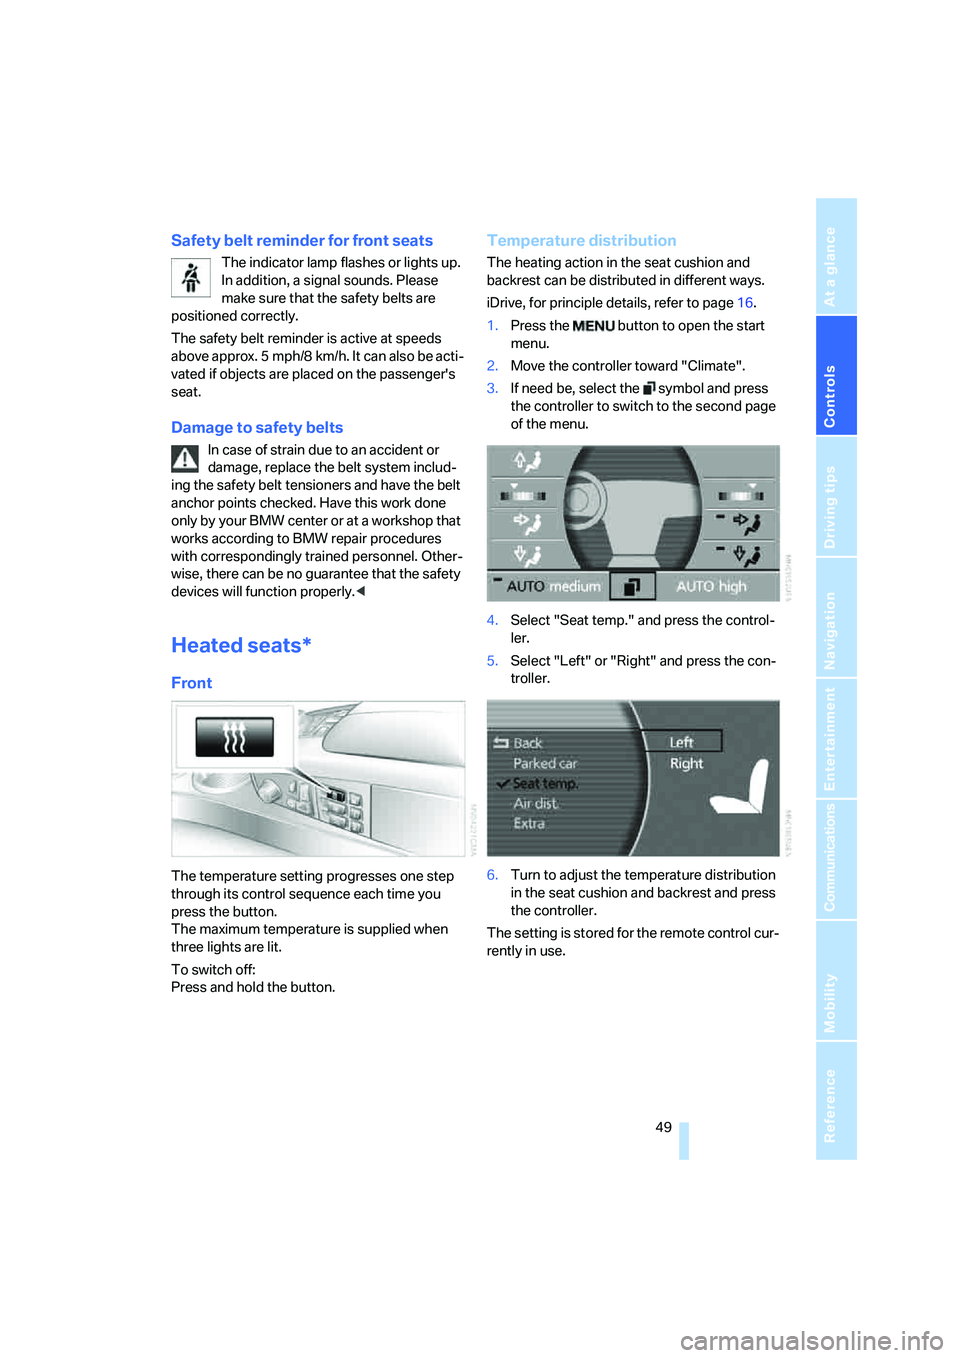
Temperature distribution
The heating action in the seat cushion and
backrest can be distributed in different ways.
iDrive, for principle details, refer to page16.
1.Press the button to open the start
menu.
2.Move the controller toward "Climate".
3.If need be, select the symbol and press
the controller to switch to the second page
of the menu.
4.Select "Seat temp." and press the control-
ler.
5.Select "Left" or "Right" and press the con-
troller.
6.Turn to adjust the temperature distribution
in the seat cushion and backrest and press
the controller.
The setting is stored for the remote control cur-
rently in use.
Page 52 of 253
Adjusting
50
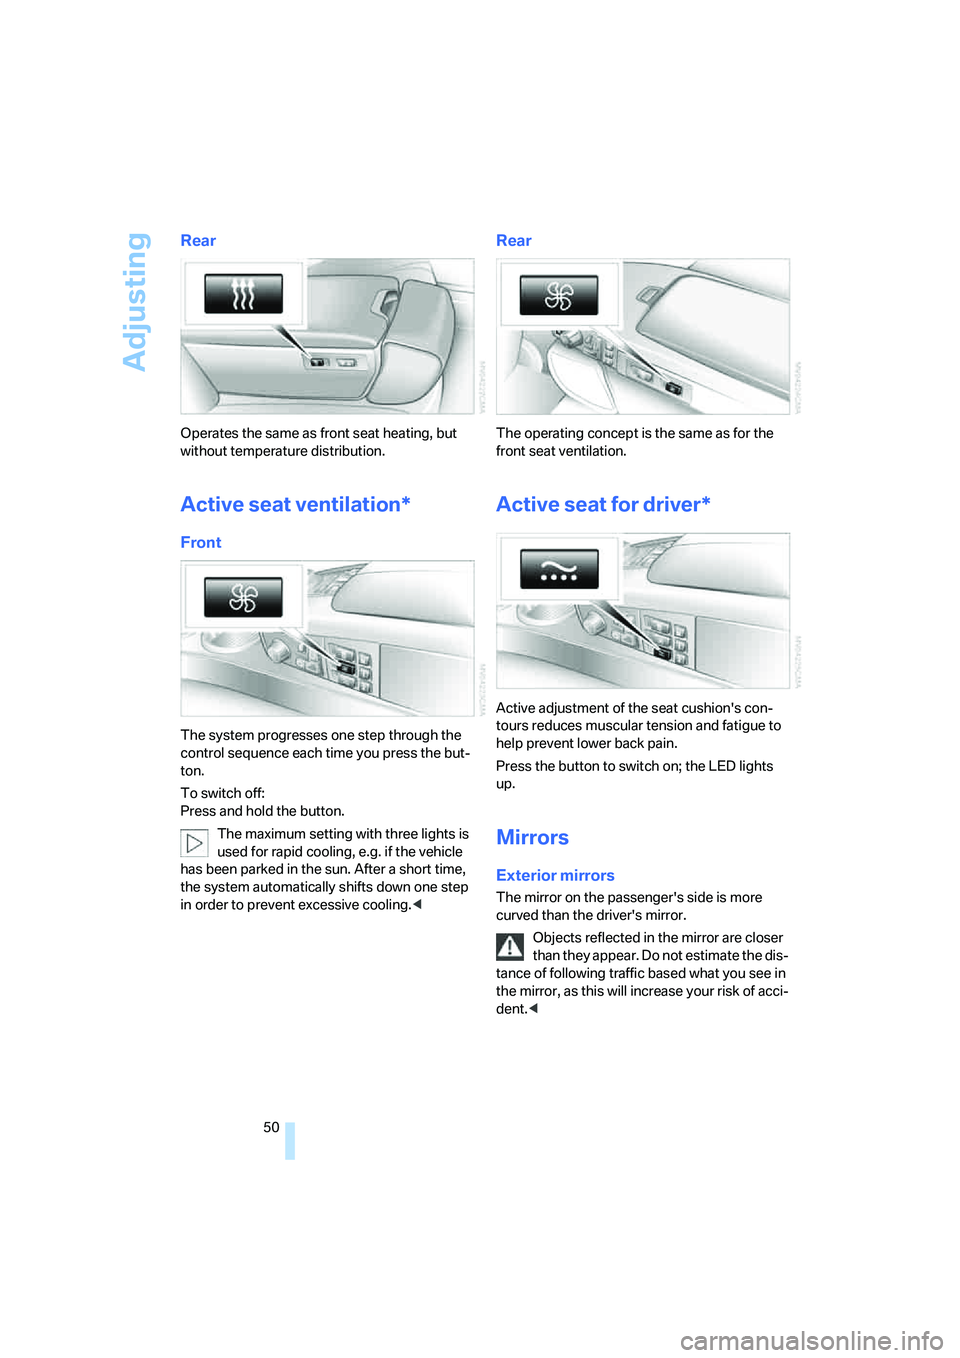
Rear
Operates the same as front seat heating, but
without temperature distribution.
Active seat ventilation*
Front
The system progresses one step through the
control sequence each time you press the but-
ton.
To switch off:
Press and hold the button.
The maximum setting with three lights is
used for rapid cooling, e.g. if the vehicle
has been parked in the sun. After a short time,
the system automatically shifts down one step
in order to prevent excessive cooling.<
Rear
The operating concept is the same as for the
front seat ventilation.
Active seat for driver*
Active adjustment of the seat cushion's con-
tours reduces muscular tension and fatigue to
help prevent lower back pain.
Press the button to switch on; the LED lights
up.
Mirrors
Exterior mirrors
The mirror on the passenger's side is more
curved than the driver's mirror.
Objects reflected in the mirror are closer
than they appear. Do not estimate the dis-
tance of following traffic based what you see in
the mirror, as this will increase your risk of acci-
dent.<
Page 54 of 253
Adjusting
52
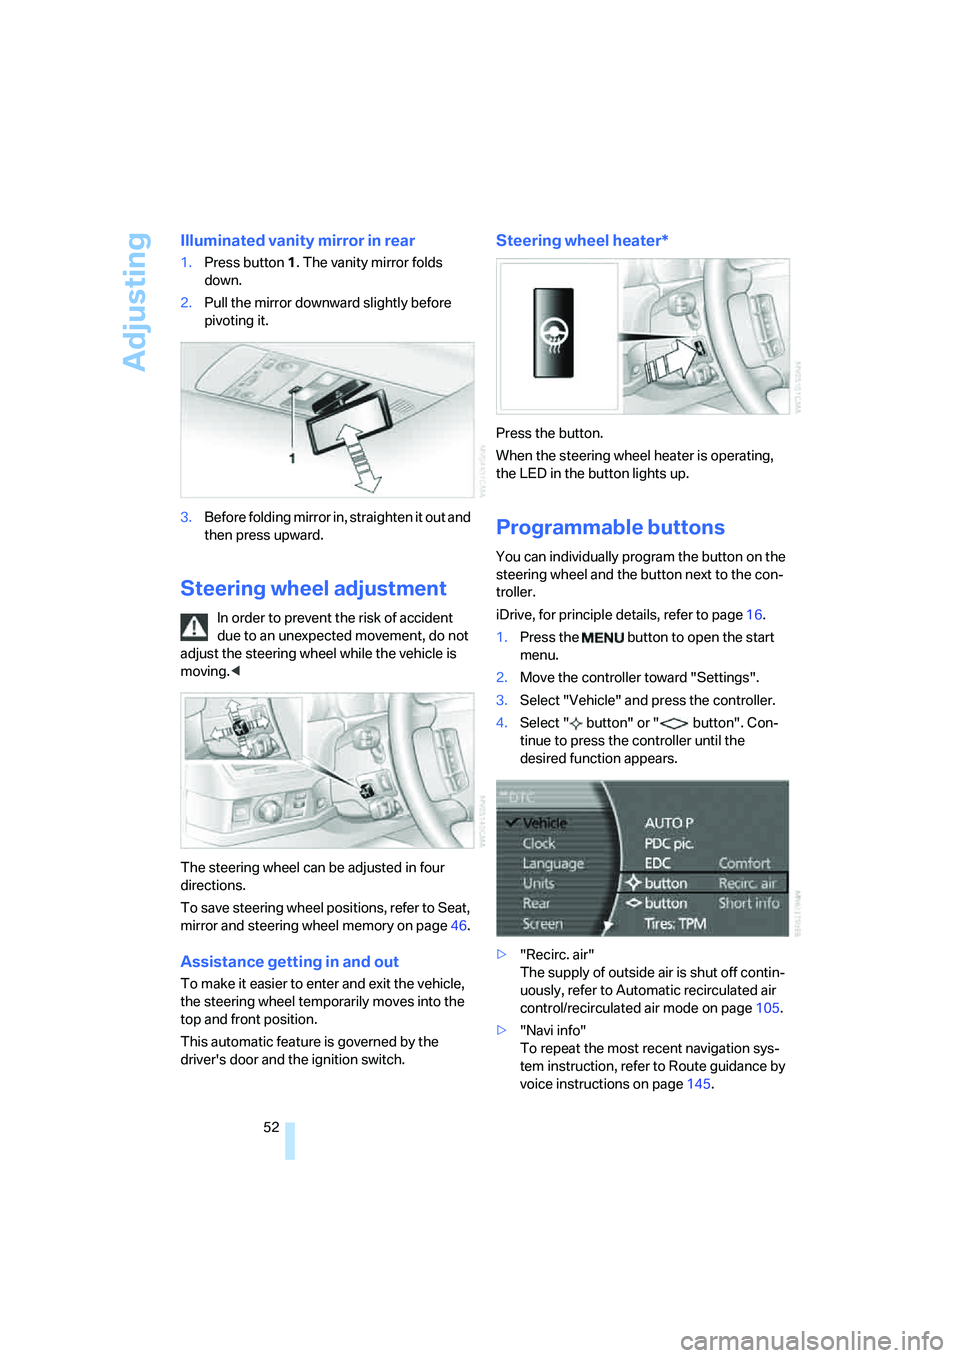
Illuminated vanity mirror in rear
1.Press button1. The vanity mirror folds
down.
2.Pull the mirror downward slightly before
pivoting it.
3.Before folding mirror in, straighten it out and
then press upward.
Steering wheel adjustment
In order to prevent the risk of accident
due to an unexpected movement, do not
adjust the steering wheel while the vehicle is
moving.<
The steering wheel can be adjusted in four
directions.
To save steering wheel positions, refer to Seat,
mirror and steering wheel memory on page46.
Assistance getting in and out
To make it easier to enter and exit the vehicle,
the steering wheel temporarily moves into the
top and front position.
This automatic feature is governed by the
driver's door and the ignition switch.
Steering wheel heater*
Press the button.
When the steering wheel heater is operating,
the LED in the button lights up.
Programmable buttons
You can individually program the button on the
steering wheel and the button next to the con-
troller.
iDrive, for principle details, refer to page16.
1.Press the button to open the start
menu.
2.Move the controller toward "Settings".
3.Select "Vehicle" and press the controller.
4.Select " button" or " button". Con-
tinue to press the controller until the
desired function appears.
>"Recirc. air"
The supply of outside air is shut off contin-
uously, refer to Automatic recirculated air
control/recirculated air mode on page105.
>"Navi info"
To repeat the most recent navigation sys-
tem instruction, refer to Route guidance by
voice instructions on page145.
Page 60 of 253
Driving
58
Special starting conditions
In the following situations, press the gas pedal
halfway down when starting:
>The engine fails to start on the first attempt,
for instance if it is very hot or cold.
>The engine is being started at extremely low
temperatures below + 57/– 156, or at
high altitudes above 3,281 ft/1,000 m.
Avoid frequent starts in rapid succession
or repeated starting attempts in which the
engine does not start. Otherwise, the fuel is
either left unspent or is insufficiently burned
and there is a risk of overheating and damaging
the catalytic converter.<
Switching off engine
When leaving the vehicle, always take the
remote control with you.<
With the vehicle stationary, briefly press the
Start/Stop button. Radio ready state is switched
on.
The transmission automatically shifts to posi-
tion P: interlock.
Before driving into a car wash
The transmission remains in position N and the
vehicle can roll when you perform the following
sequence:
1.With Comfort Access: insert remote control
into ignition lock.
2.With the engine running, shift transmission
into position N.
3.Switch engine off.
4.Leave the remote control in the ignition
lock.
The transmission will shift into position P:
>automatically after approx. 30 minutes
>if you remove the remote control from the
ignition lock
Pay attention to the messages on the Info Dis-
play.
Removing remote control from ignition
lock
Press in the remote control briefly; it pops part-
way out. This procedure will also switch off the
ignition if it is on.
Comfort function
To switch off the engine when the vehicle is sta-
tionary, press the Start/Stop button for longer
than approx. 2 seconds. The remote control
pops partway out.
Parking brake
The concept
Your BMW is equipped with an electromechan-
ical parking brake.
The parking brake is primarily intended to pre-
vent the vehicle from rolling while parked.
You can use the parking brake in two ways:
>Manually, by briefly pressing the button
>Automatically, by activating the Automatic
Hold mode, refer to page59
An electrohydraulic mechanism then engages
the parking brake to prevent the rear wheels
from turning whenever you switch off the
engine.
When the engine is running, parking brake
engagement is controlled by the brake sys-
tem's hydraulic circuits, which act on the disc
brakes in the front and rear wheels.
Brake pedal feel
The hydraulic brake system can produce a
slightly different braking feel. Engagement may
also be accompanied by activation noise – this
is normal.
Page 61 of 253
Controls
59Reference
At a glance
Driving tips
Communications
Navigation
Entertainment
Mobility
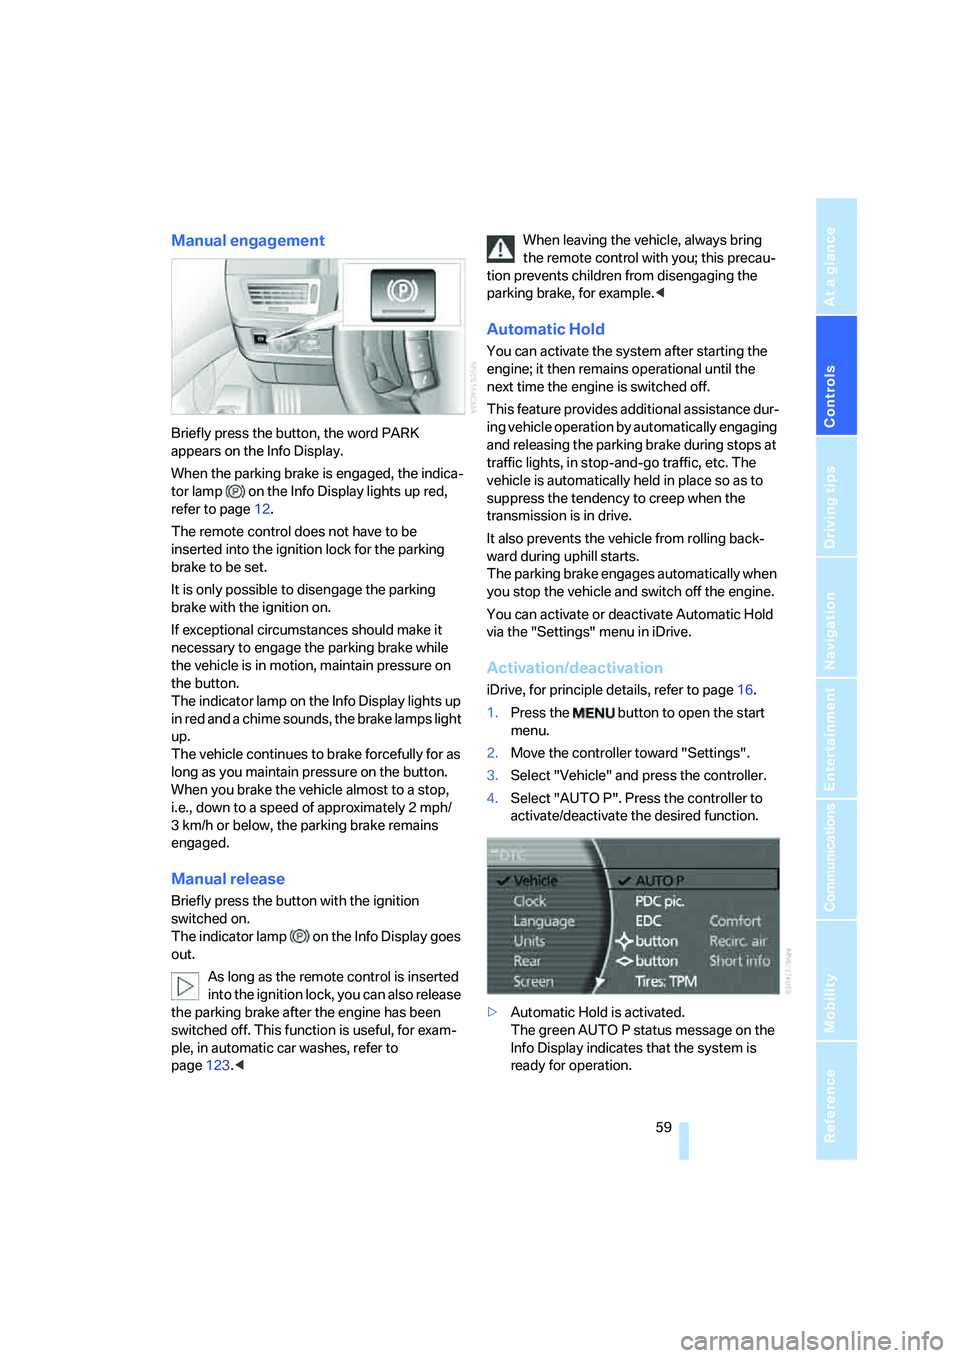
Manual engagement
Briefly press the button, the word PARK
appears on the Info Display.
When the parking brake is engaged, the indica-
tor lamp on the Info Display lights up red,
refer to page12.
The remote control does not have to be
inserted into the ignition lock for the parking
brake to be set.
It is only possible to disengage the parking
brake with the ignition on.
If exceptional circumstances should make it
necessary to engage the parking brake while
the vehicle is in motion, maintain pressure on
the button.
The indicator lamp on the Info Display lights up
in red and a chime sounds, the brake lamps light
up.
The vehicle continues to brake forcefully for as
long as you maintain pressure on the button.
When you brake the vehicle almost to a stop,
i.e., down to a speed of approximately 2 mph/
3 km/h or below, the parking brake remains
engaged.
Manual release
Briefly press the button with the ignition
switched on.
The indicator lamp on the Info Display goes
out.
As long as the remote control is inserted
into the ignition lock, you can also release
the parking brake after the engine has been
switched off. This function is useful, for exam-
ple, in automatic car washes, refer to
page123.
tion prevents children from disengaging the
parking brake, for example.<
Automatic Hold
You can activate the system after starting the
engine; it then remains operational until the
next time the engine is switched off.
This feature provides additional assistance dur-
ing vehicle operation by automatically engaging
and releasing the parking brake during stops at
traffic lights, in stop-and-go traffic, etc. The
vehicle is automatically held in place so as to
suppress the tendency to creep when the
transmission is in drive.
It also prevents the vehicle from rolling back-
ward during uphill starts.
The parking brake engages automatically when
you stop the vehicle and switch off the engine.
You can activate or deactivate Automatic Hold
via the "Settings" menu in iDrive.
Activation/deactivation
iDrive, for principle details, refer to page16.
1.Press the button to open the start
menu.
2.Move the controller toward "Settings".
3.Select "Vehicle" and press the controller.
4.Select "AUTO P". Press the controller to
activate/deactivate the desired function.
>Automatic Hold is activated.
The green AUTO P status message on the
Info Display indicates that the system is
ready for operation.