2007 BMW 760LI SEDAN fog light
[x] Cancel search: fog lightPage 14 of 253
Cockpit
12
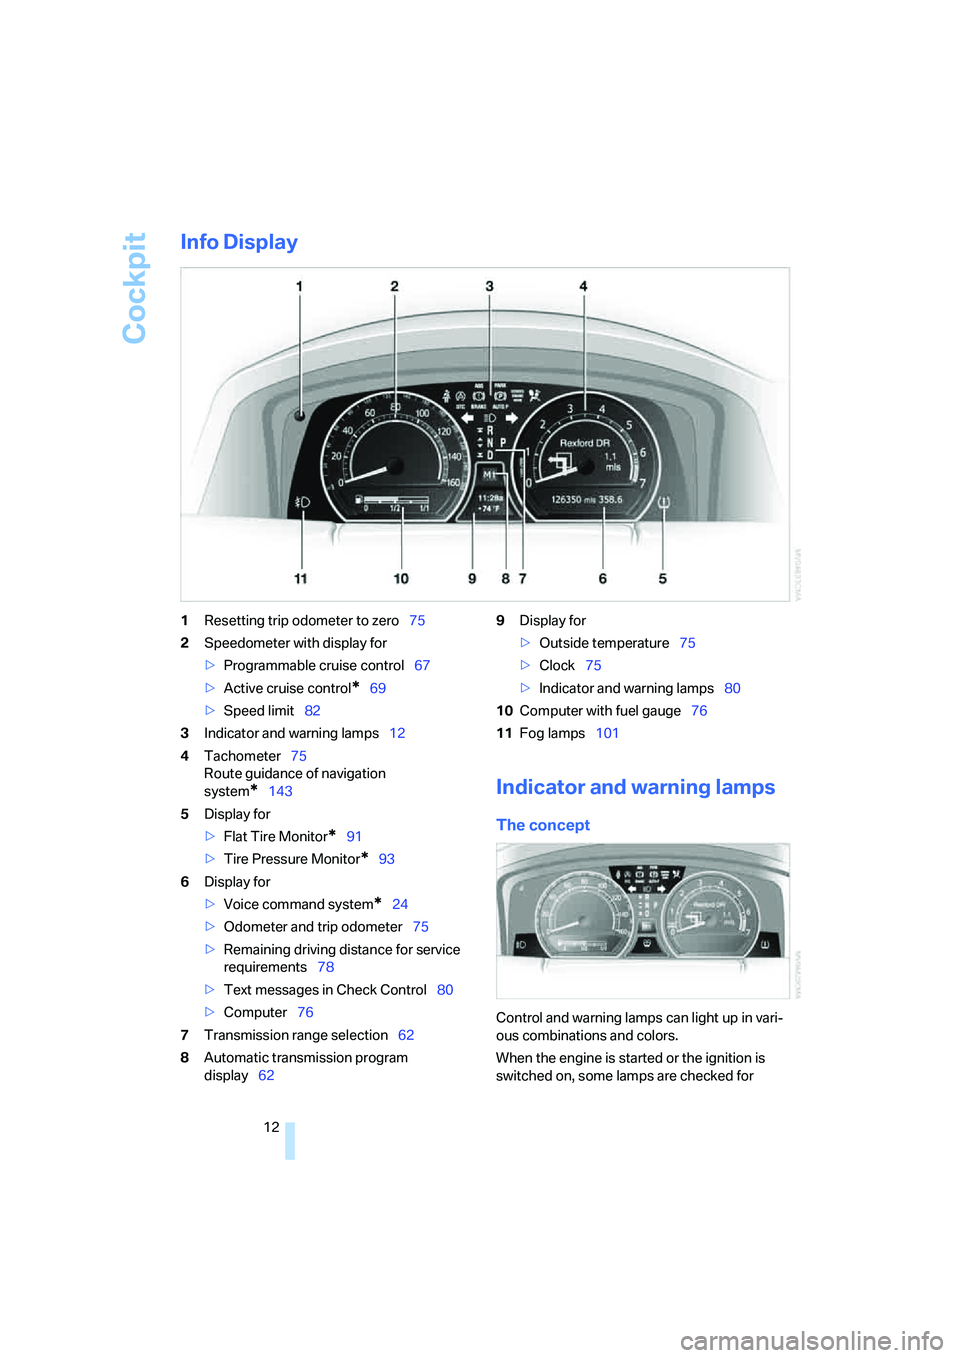
Info Display
1Resetting trip odometer to zero75
2Speedometer with display for
>Programmable cruise control67
>Active cruise control
*69
>Speed limit82
3Indicator and warning lamps12
4Tachometer75
Route guidance of navigation
system
*143
5Display for
>Flat Tire Monitor
*91
>Tire Pressure Monitor
*93
6Display for
>Voice command system
*24
>Odometer and trip odometer75
>Remaining driving distance for service
requirements78
>Text messages in Check Control80
>Computer76
7Transmission range selection62
8Automatic transmission program
display629Display for
>Outside temperature75
>Clock75
>Indicator and warning lamps80
10Computer with fuel gauge76
11Fog lamps101
Indicator and warning lamps
The concept
Control and warning lamps can light up in vari-
ous combinations and colors.
When the engine is started or the ignition is
switched on, some lamps are checked for
Page 15 of 253
At a glance
13Reference
Controls
Driving tips
Communications
Navigation
Entertainment
Mobility
proper operation and light up briefly in the pro-
cess.
Explanatory text messages
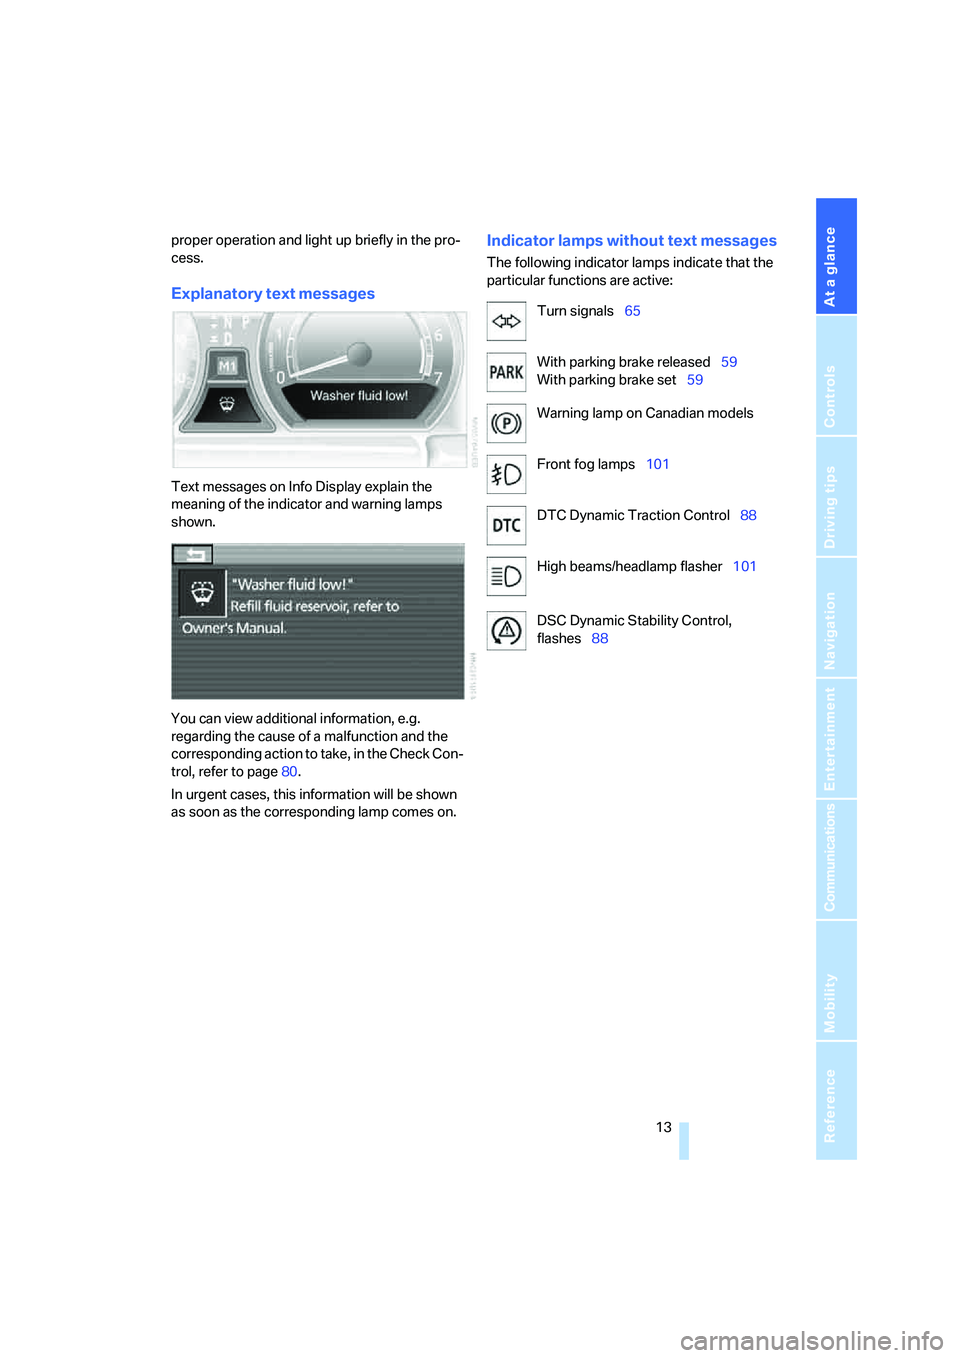
Text messages on Info Display explain the
meaning of the indicator and warning lamps
shown.
You can view additional information, e.g.
regarding the cause of a malfunction and the
corresponding action to take, in the Check Con-
trol, refer to page80.
In urgent cases, this information will be shown
as soon as the corresponding lamp comes on.
Indicator lamps without text messages
The following indicator lamps indicate that the
particular functions are active:
Turn signals65
With parking brake released59
With parking brake set59
Warning lamp on Canadian models
Front fog lamps101
DTC Dynamic Traction Control88
High beams/headlamp flasher101
DSC Dynamic Stability Control,
flashes88
Page 71 of 253
Controls
69Reference
At a glance
Driving tips
Communications
Navigation
Entertainment
Mobility
Deactivating system
>Press the lever up or down, arrow3 for
approx. 3 seconds
>or switch off the ignition.
The stored speed5 is deleted, however the
stored marks6 are retained.
Active cruise control*
The concept
With active cruise control you can select a
desired speed which is not only automatically
maintained when driving on open roadways, but
also varied to maintain a selected distance set-
ting as slower traffic is encountered.
Active cruise control represents a technological
advance over the familiar cruise control and is a
welcome relief from the constant adjustment of
speed that can accompany driving in traffic on
highways or other high-speed thoroughfares.
Especially on longer trips, the system can
reduce fatigue and tension, while increasing
your enjoyment of driving. Please use it safely
and responsibly.
In addition to holding a steady cruising speed,
if you encounter slower vehicles ahead, active
cruise control will, within the scope of given
possibilities, adjust your vehicle's speed auto-
matically so that you can flow with the traffic
without having to make constant adjustments.
If, for example, while cruising at the selected
speed, you begin to approach a slower vehicle
ahead of you in the same lane, the system will
reduce your vehicle's speed to the same as that
of the vehicle ahead to maintain your selected
distance setting between your vehicle and the
vehicle ahead. You can vary the distance, which
is additionally speed-dependent. Based on
your selected distance setting, the system
automatically decreases the throttle setting and
lightly applies the brakes if necessary. The vehi-
cle brake lamps will automatically illuminate to
signal a following driver to take action. In addi-
tion, it may be necessary for the vehicle to
downshift to maintain the distance setting
selected. If the vehicle ahead speeds up or when the lane ahead becomes clear, your vehi-
cle will accelerate to the speed you have
selected by increasing the throttle setting and
shifting gears as needed. This setting is also
maintained on steep stretches, but the vehicle
speed can fall below this on uphill grades if the
engine output is insufficient to maintain speed.
Active cruise control is not and must not
be used as a collision avoidance/warning
system.<
Since this active cruise control system is
a new technology and operates differ-
ently from conventional cruise control systems
to which you may be accustomed, you are
strongly urged to read all of the pages relating
to this system before use. Pay special attention
to the information contained in the Things to
know about active cruise control section begin-
ning on page72.<
Brake pedal feel
>When the system brakes and you also
depress the brake pedal, a somewhat differ-
ent braking feeling results.
>Any noises produced during automatic
braking are normal.
Applications
As with conventional cruise control systems,
active cruise control in no way diminishes or
substitutes for the driver's own personal
responsibility, alertness and awareness in
adjusting speed, braking or otherwise control-
ling the vehicle. The driver should decide when
to use the system on the basis of road, traffic,
visibility, and weather conditions. Active cruise
control is intended for use on highway-type
roadways where traffic is moving relatively
smoothly. Do not use this system in city driving;
heavy traffic such as during rush hour; on curvy,
winding roads, slippery roads or roads with
sharp curves such as highway off-ramps; during
inclement weather such as snow, strong rain or
fog; or when entering interchanges, service/
parking areas or toll booths. It is also important
to regulate your vehicle's speed and distance
setting within applicable legal limits. Adapt the
Page 74 of 253
Driving
72
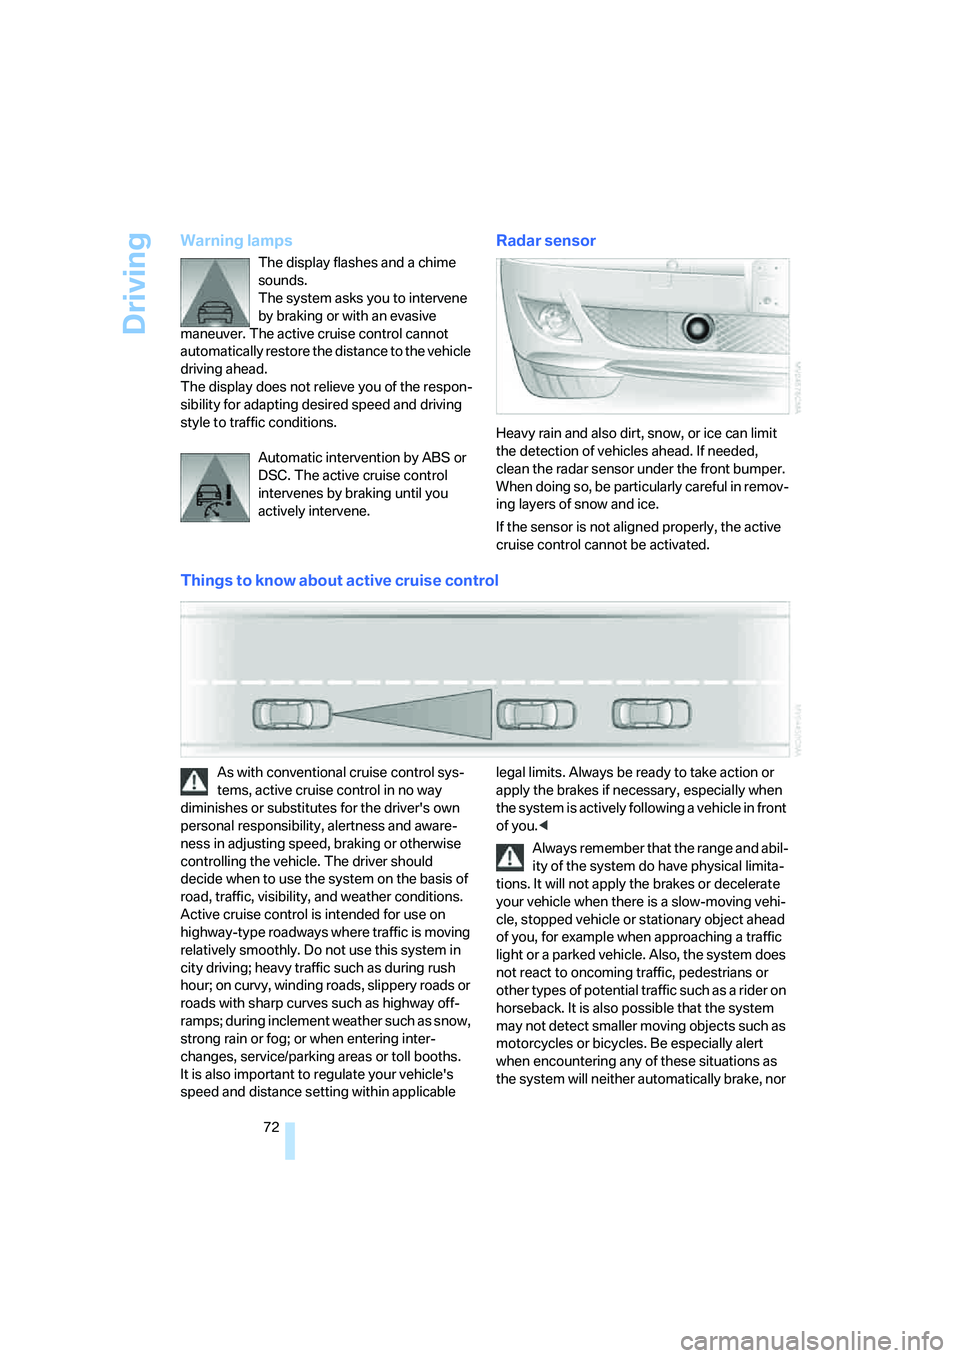
Warning lamps
The display flashes and a chime
sounds.
The system asks you to intervene
by braking or with an evasive
maneuver. The active cruise control cannot
automatically restore the distance to the vehicle
driving ahead.
The display does not relieve you of the respon-
sibility for adapting desired speed and driving
style to traffic conditions.
Automatic intervention by ABS or
DSC. The active cruise control
intervenes by braking until you
actively intervene.
Radar sensor
Heavy rain and also dirt, snow, or ice can limit
the detection of vehicles ahead. If needed,
clean the radar sensor under the front bumper.
When doing so, be particularly careful in remov-
ing layers of snow and ice.
If the sensor is not aligned properly, the active
cruise control cannot be activated.
Things to know about active cruise control
As with conventional cruise control sys-
tems, active cruise control in no way
diminishes or substitutes for the driver's own
personal responsibility, alertness and aware-
ness in adjusting speed, braking or otherwise
controlling the vehicle. The driver should
decide when to use the system on the basis of
road, traffic, visibility, and weather conditions.
Active cruise control is intended for use on
highway-type roadways where traffic is moving
relatively smoothly. Do not use this system in
city driving; heavy traffic such as during rush
hour; on curvy, winding roads, slippery roads or
roads with sharp curves such as highway off-
ramps; during inclement weather such as snow,
strong rain or fog; or when entering inter-
changes, service/parking areas or toll booths.
It is also important to regulate your vehicle's
speed and distance setting within applicable legal limits. Always be ready to take action or
apply the brakes if necessary, especially when
the system is actively following a vehicle in front
of you.<
Always remember that the range and abil-
ity of the system do have physical limita-
tions. It will not apply the brakes or decelerate
your vehicle when there is a slow-moving vehi-
cle, stopped vehicle or stationary object ahead
of you, for example when approaching a traffic
light or a parked vehicle. Also, the system does
not react to oncoming traffic, pedestrians or
other types of potential traffic such as a rider on
horseback. It is also possible that the system
may not detect smaller moving objects such as
motorcycles or bicycles. Be especially alert
when encountering any of these situations as
the system will neither automatically brake, nor
Page 102 of 253
Lamps
100
Lamps
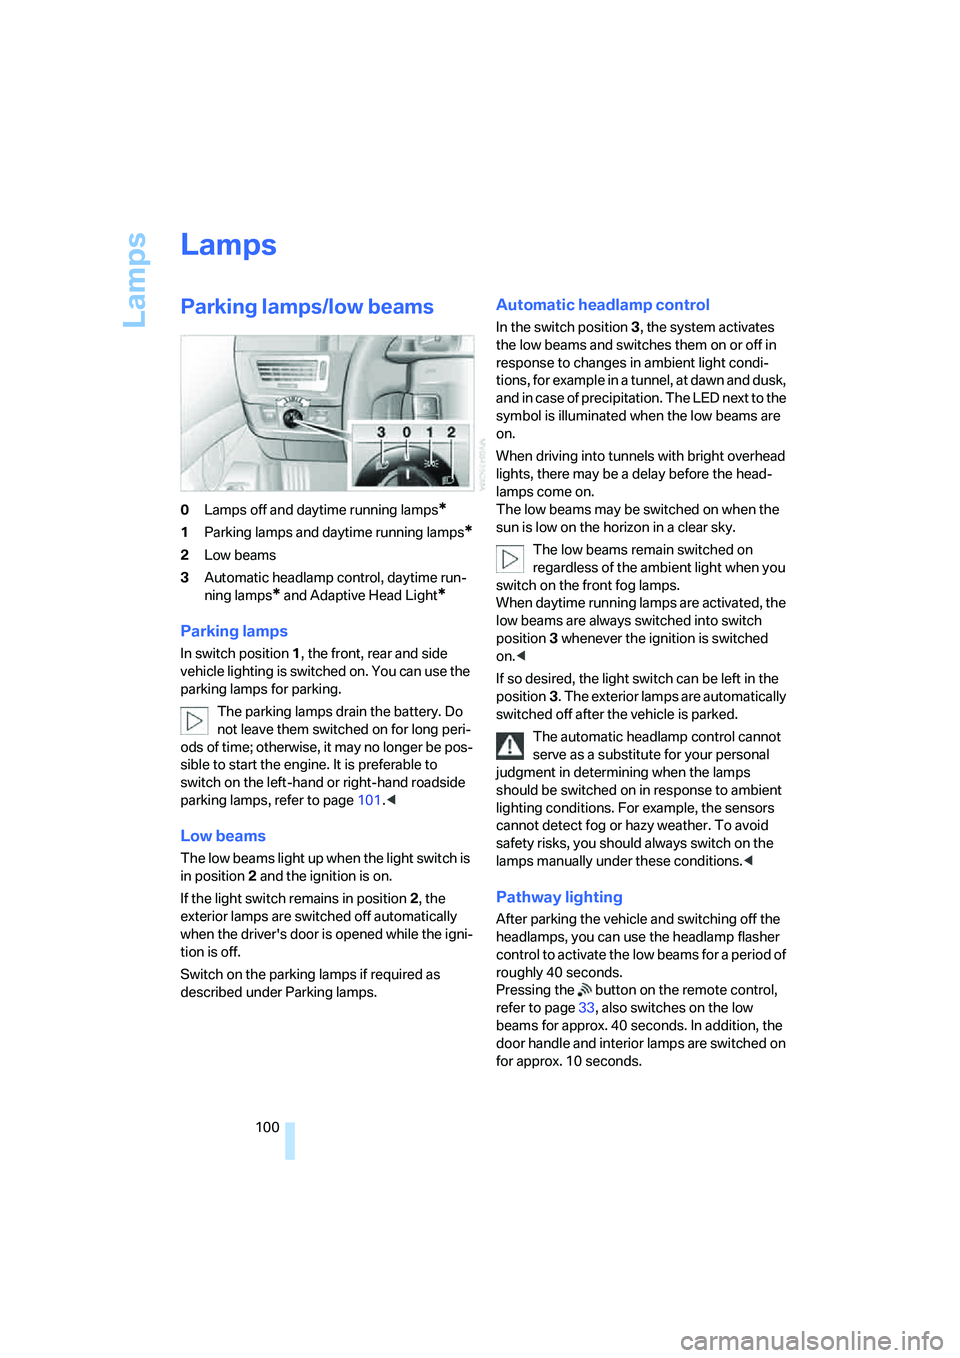
Parking lamps/low beams
0Lamps off and daytime running lamps*
1Parking lamps and daytime running lamps*
2Low beams
3Automatic headlamp control, daytime run-
ning lamps
* and Adaptive Head Light*
Parking lamps
In switch position1, the front, rear and side
vehicle lighting is switched on. You can use the
parking lamps for parking.
The parking lamps drain the battery. Do
not leave them switched on for long peri-
ods of time; otherwise, it may no longer be pos-
sible to start the engine. It is preferable to
switch on the left-hand or right-hand roadside
parking lamps, refer to page101.<
Low beams
The low beams light up when the light switch is
in position 2 and the ignition is on.
If the light switch remains in position 2, the
exterior lamps are switched off automatically
when the driver's door is opened while the igni-
tion is off.
Switch on the parking lamps if required as
described under Parking lamps.
Automatic headlamp control
In the switch position3, the system activates
the low beams and switches them on or off in
response to changes in ambient light condi-
tions, for example in a tunnel, at dawn and dusk,
and in case of precipitation. The LED next to the
symbol is illuminated when the low beams are
on.
When driving into tunnels with bright overhead
lights, there may be a delay before the head-
lamps come on.
The low beams may be switched on when the
sun is low on the horizon in a clear sky.
The low beams remain switched on
regardless of the ambient light when you
switch on the front fog lamps.
When daytime running lamps are activated, the
low beams are always switched into switch
position3 whenever the ignition is switched
on.<
If so desired, the light switch can be left in the
position3. The exterior lamps are automatically
switched off after the vehicle is parked.
The automatic headlamp control cannot
serve as a substitute for your personal
judgment in determining when the lamps
should be switched on in response to ambient
lighting conditions. For example, the sensors
cannot detect fog or hazy weather. To avoid
safety risks, you should always switch on the
lamps manually under these conditions.<
Pathway lighting
After parking the vehicle and switching off the
headlamps, you can use the headlamp flasher
control to activate the low beams for a period of
roughly 40 seconds.
Pressing the button on the remote control,
refer to page33, also switches on the low
beams for approx. 40 seconds. In addition, the
door handle and interior lamps are switched on
for approx. 10 seconds.
Page 103 of 253
Controls
101Reference
At a glance
Driving tips
Communications
Navigation
Entertainment
Mobility
Daytime running lamps*
The daytime running lamps light up in posi-
tion0, 1 or3. The light output is lower than with
the low-beam headlamps.
If so desired, the light switch can be left in posi-
tion3. The exterior lamps are automatically
switched off after the vehicle is parked.
If the light switch remains in position1, then the
parking lamps are lit after the ignition is
switched off.
Adaptive Head Light*
The concept
Adaptive Head Light is a variable headlamp
control system that enables dynamic illumina-
tion of the road surface. Depending on the
steering angle and other parameters, the light
from the headlamp follows the course of the
road.
Activating Adaptive Head Light
In switch position3, the Adaptive Head Light is
activated and Automatic headlamp control is
switched on.
In order not to blind oncoming traffic, the Adap-
tive Head Light is not active when driving in
reverse and only points toward the passenger
side when the vehicle is stationary.
Malfunction
The LED above the symbol for automatic head-
lamp control flashes. Adaptive Head Light is
malfunctioning or has failed. Have the system
checked as soon as possible.
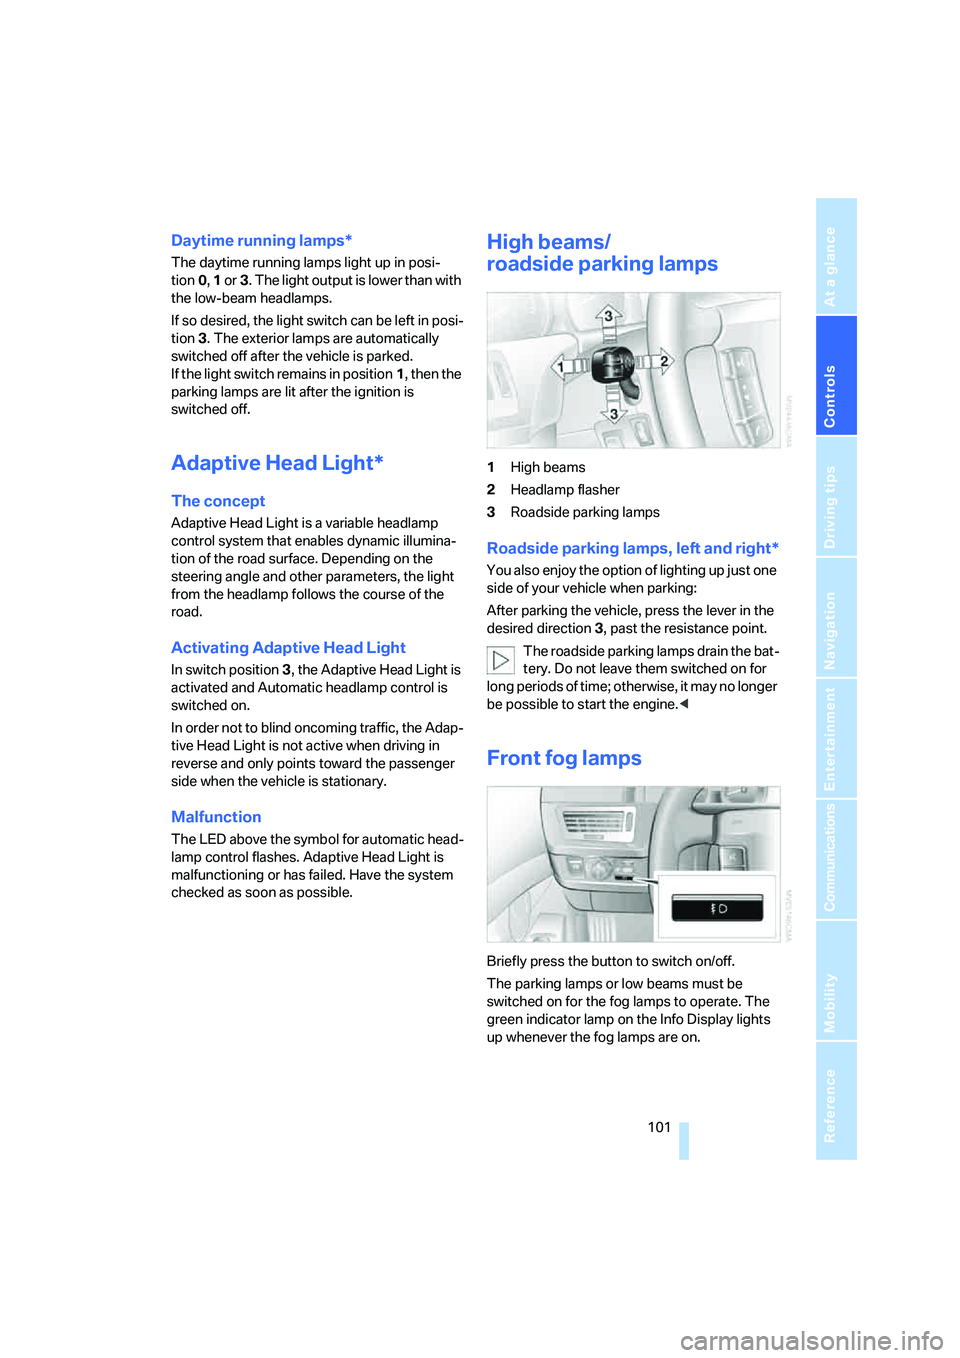
High beams/
roadside parking lamps
1High beams
2Headlamp flasher
3Roadside parking lamps
Roadside parking lamps, left and right*
You also enjoy the option of lighting up just one
side of your vehicle when parking:
After parking the vehicle, press the lever in the
desired direction3, past the resistance point.
The roadside parking lamps drain the bat-
tery. Do not leave them switched on for
long periods of time; otherwise, it may no longer
be possible to start the engine.<
Front fog lamps
Briefly press the button to switch on/off.
The parking lamps or low beams must be
switched on for the fog lamps to operate. The
green indicator lamp on the Info Display lights
up whenever the fog lamps are on.
Page 104 of 253
Lamps
102 If the automatic headlamp control is acti-
vated, the low beams will come on auto-
matically when you switch on the fog lamps.<
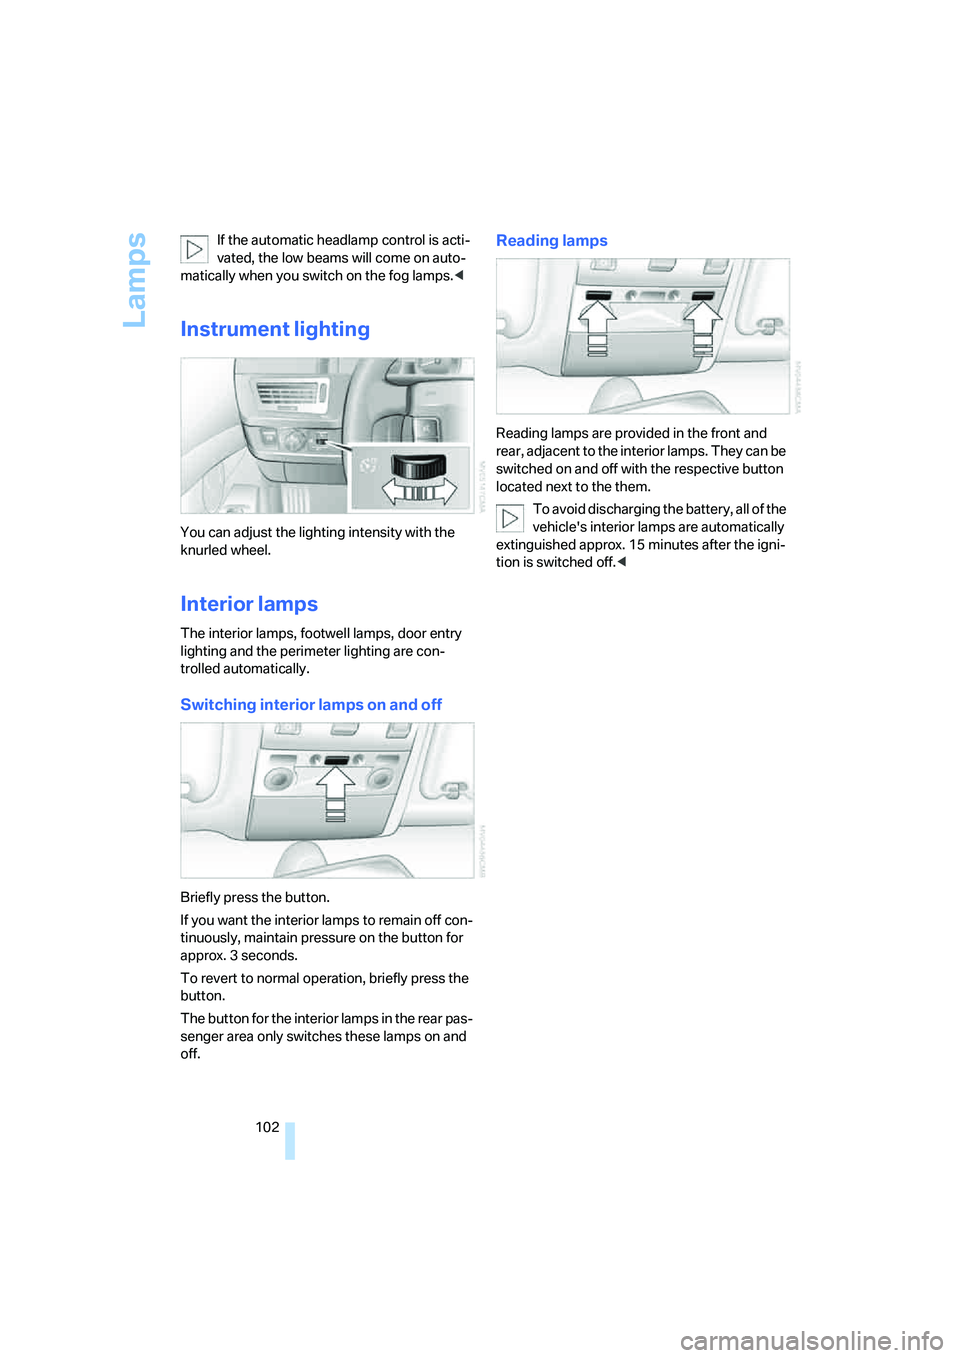
Instrument lighting
You can adjust the lighting intensity with the
knurled wheel.
Interior lamps
The interior lamps, footwell lamps, door entry
lighting and the perimeter lighting are con-
trolled automatically.
Switching interior lamps on and off
Briefly press the button.
If you want the interior lamps to remain off con-
tinuously, maintain pressure on the button for
approx. 3 seconds.
To revert to normal operation, briefly press the
button.
The button for the interior lamps in the rear pas-
senger area only switches these lamps on and
off.
Reading lamps
Reading lamps are provided in the front and
rear, adjacent to the interior lamps. They can be
switched on and off with the respective button
located next to the them.
To avoid discharging the battery, all of the
vehicle's interior lamps are automatically
extinguished approx. 15 minutes after the igni-
tion is switched off.<
Page 166 of 253
CD player
164
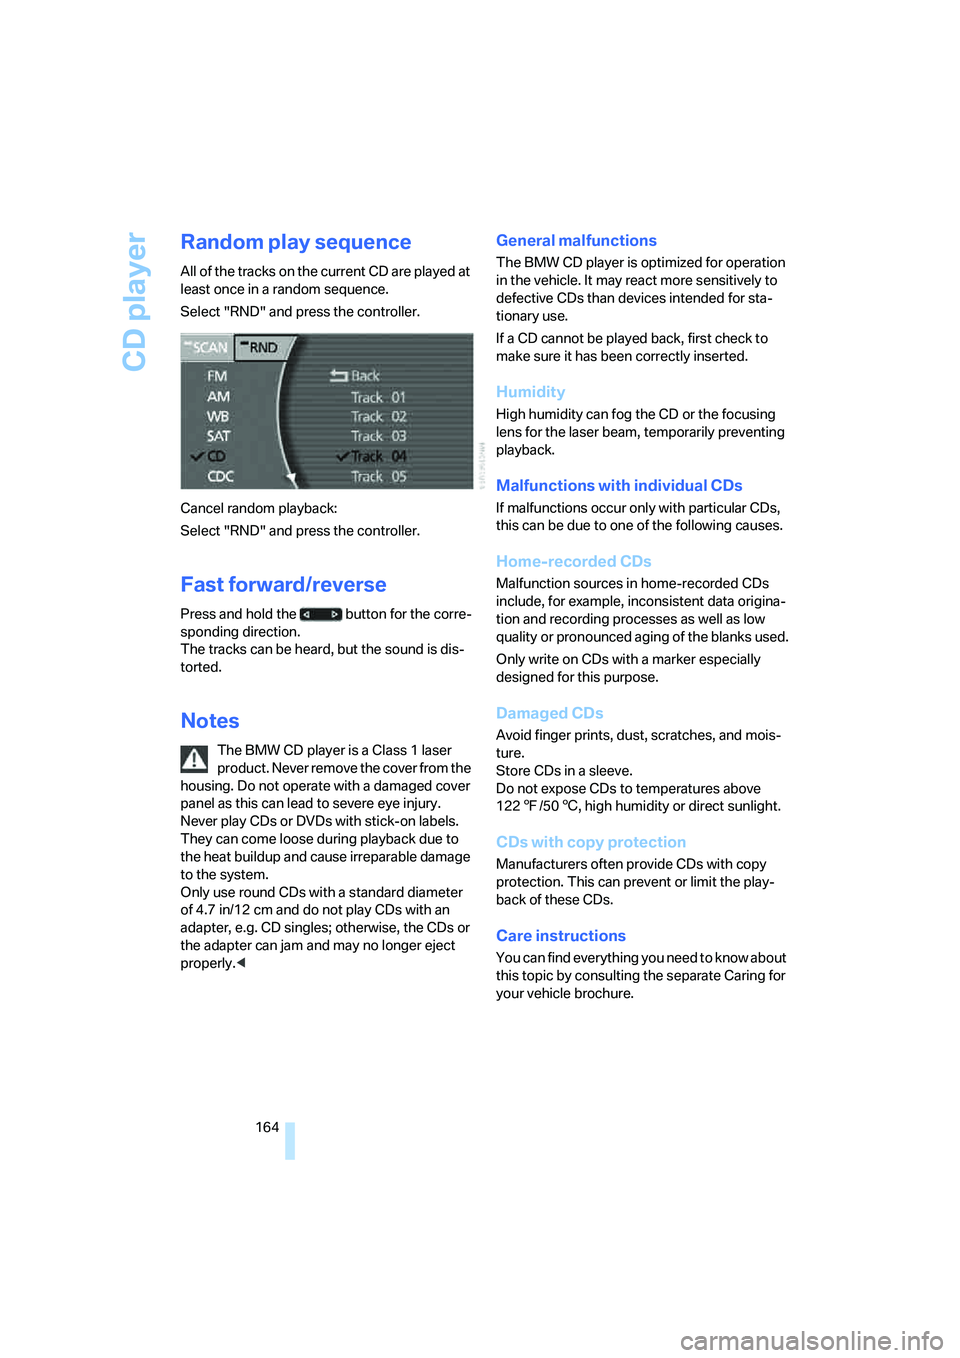
Random play sequence
All of the tracks on the current CD are played at
least once in a random sequence.
Select "RND" and press the controller.
Cancel random playback:
Select "RND" and press the controller.
Fast forward/reverse
Press and hold the button for the corre-
sponding direction.
The tracks can be heard, but the sound is dis-
torted.
Notes
The BMW CD player is a Class 1 laser
product. Never remove the cover from the
housing. Do not operate with a damaged cover
panel as this can lead to severe eye injury.
Never play CDs or DVDs with stick-on labels.
They can come loose during playback due to
the heat buildup and cause irreparable damage
to the system.
Only use round CDs with a standard diameter
of 4.7 in/12 cm and do not play CDs with an
adapter, e.g. CD singles; otherwise, the CDs or
the adapter can jam and may no longer eject
properly.<
General malfunctions
The BMW CD player is optimized for operation
in the vehicle. It may react more sensitively to
defective CDs than devices intended for sta-
tionary use.
If a CD cannot be played back, first check to
make sure it has been correctly inserted.
Humidity
High humidity can fog the CD or the focusing
lens for the laser beam, temporarily preventing
playback.
Malfunctions with individual CDs
If malfunctions occur only with particular CDs,
this can be due to one of the following causes.
Home-recorded CDs
Malfunction sources in home-recorded CDs
include, for example, inconsistent data origina-
tion and recording processes as well as low
quality or pronounced aging of the blanks used.
Only write on CDs with a marker especially
designed for this purpose.
Damaged CDs
Avoid finger prints, dust, scratches, and mois-
ture.
Store CDs in a sleeve.
Do not expose CDs to temperatures above
1227/506, high humidity or direct sunlight.
CDs with copy protection
Manufacturers often provide CDs with copy
protection. This can prevent or limit the play-
back of these CDs.
Care instructions
You can find everything you need to know about
this topic by consulting the separate Caring for
your vehicle brochure.