2007 BMW 760LI SEDAN engine
[x] Cancel search: enginePage 212 of 253
Maintenance
210
Maintenance
BMW Maintenance System
The BMW Maintenance System serves to
retain the operating and road safety of your
BMW. The service schedule also includes oper-
ations related to the vehicle's comfort and con-
venience features, such as replacement of the
filters for the inside air. The aim is to optimize
maintenance procedures with a view to reduc-
ing the cost of running the vehicle.
Should the day come when you decide to sell
your BMW, you will find that a complete dealer
service history is an asset of inestimable value.
CBS Condition Based Service
Sensors and special algorithms take the differ-
ent driving conditions of your BMW into
account. As a result, Condition Based Service
determines the current and future maintenance
requirements. By letting you define a service
and maintenance regimen that reflects your
own individual requirements, the system forms
the basis for trouble-free driving.
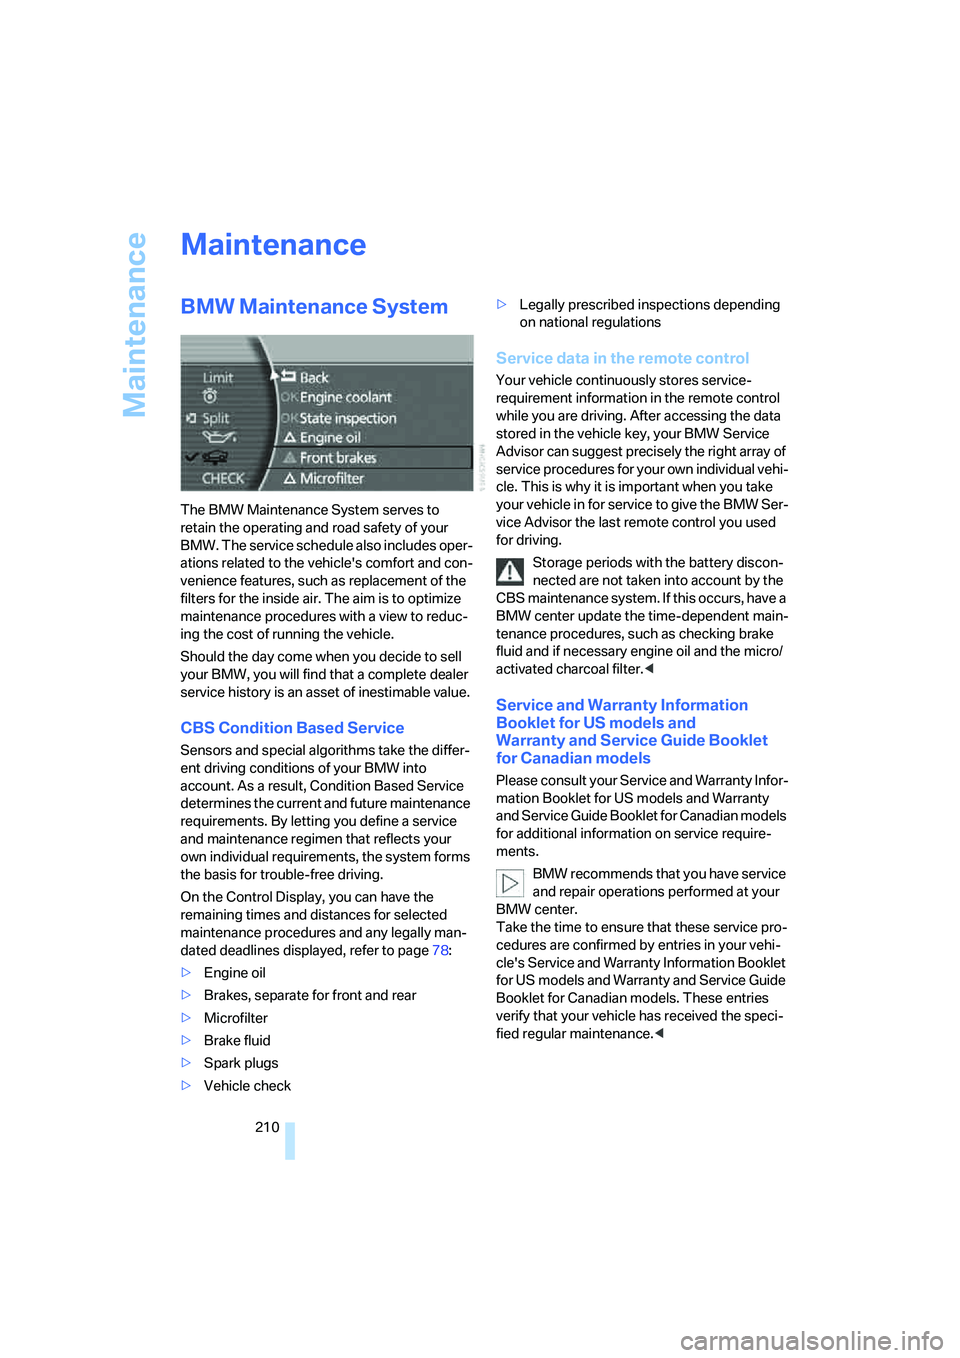
On the Control Display, you can have the
remaining times and distances for selected
maintenance procedures and any legally man-
dated deadlines displayed, refer to page78:
>Engine oil
>Brakes, separate for front and rear
>Microfilter
>Brake fluid
>Spark plugs
>Vehicle check>Legally prescribed inspections depending
on national regulations
Service data in the remote control
Your vehicle continuously stores service-
requirement information in the remote control
while you are driving. After accessing the data
stored in the vehicle key, your BMW Service
Advisor can suggest precisely the right array of
service procedures for your own individual vehi-
cle. This is why it is important when you take
your vehicle in for service to give the BMW Ser-
vice Advisor the last remote control you used
for driving.
Storage periods with the battery discon-
nected are not taken into account by the
CBS maintenance system. If this occurs, have a
BMW center update the time-dependent main-
tenance procedures, such as checking brake
fluid and if necessary engine oil and the micro/
activated charcoal filter.<
Service and Warranty Information
Booklet for US models and
Warranty and Service Guide Booklet
for Canadian models
Please consult your Service and Warranty Infor-
mation Booklet for US models and Warranty
and Service Guide Booklet for Canadian models
for additional information on service require-
ments.
BMW recommends that you have service
and repair operations performed at your
BMW center.
Take the time to ensure that these service pro-
cedures are confirmed by entries in your vehi-
cle's Service and Warranty Information Booklet
for US models and Warranty and Service Guide
Booklet for Canadian models. These entries
verify that your vehicle has received the speci-
fied regular maintenance.<
Page 213 of 253
Mobility
211Reference
At a glance
Controls
Driving tips
Communications
Navigation
Entertainment
Socket for OBD Onboard
Diagnostics
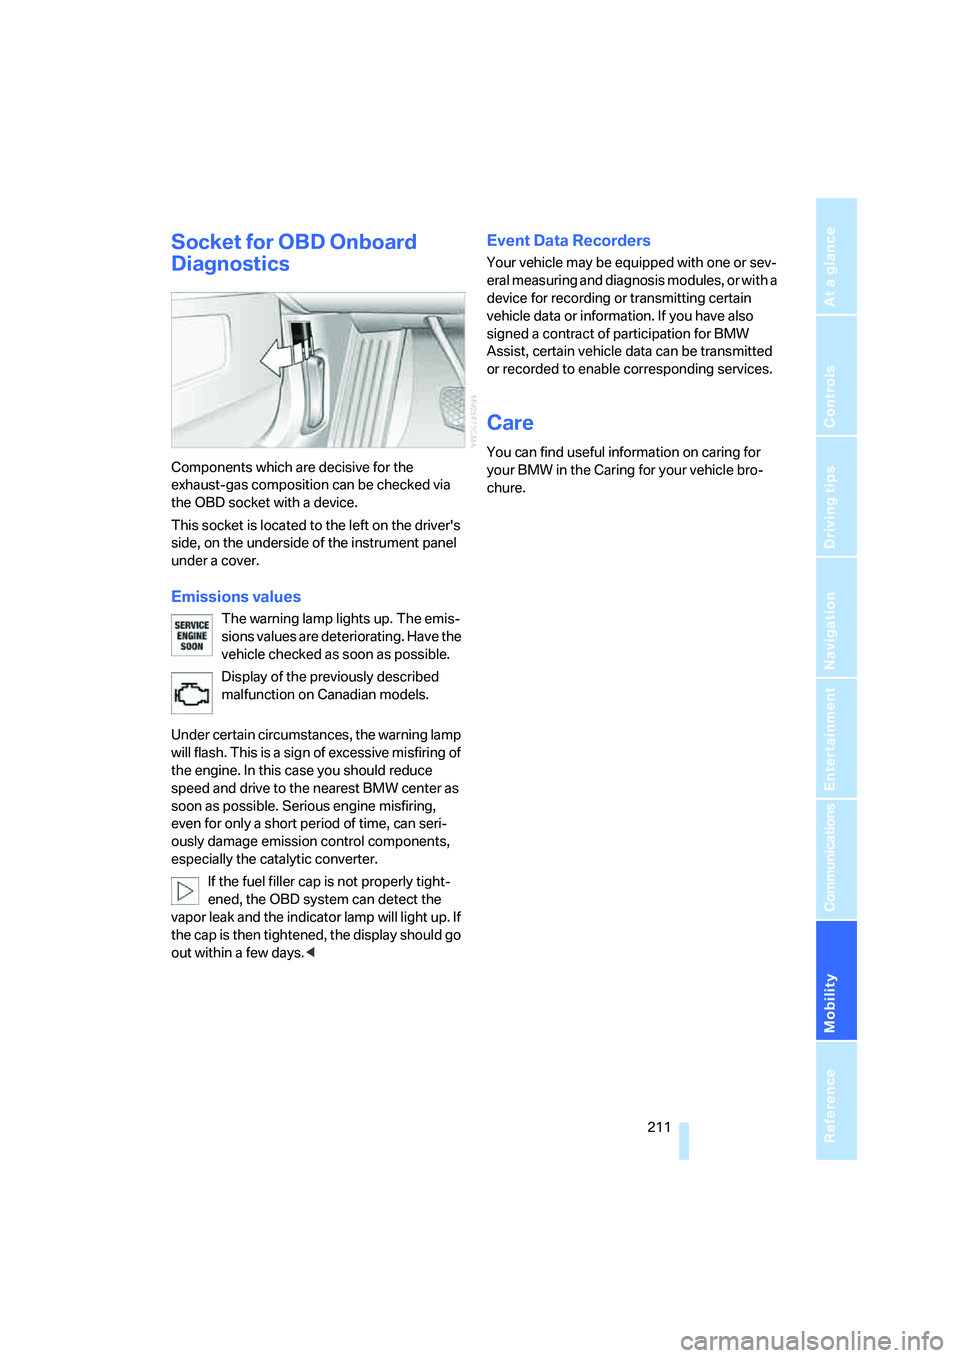
Components which are decisive for the
exhaust-gas composition can be checked via
the OBD socket with a device.
This socket is located to the left on the driver's
side, on the underside of the instrument panel
under a cover.
Emissions values
The warning lamp lights up. The emis-
sions values are deteriorating. Have the
vehicle checked as soon as possible.
Display of the previously described
malfunction on Canadian models.
Under certain circumstances, the warning lamp
will flash. This is a sign of excessive misfiring of
the engine. In this case you should reduce
speed and drive to the nearest BMW center as
soon as possible. Serious engine misfiring,
even for only a short period of time, can seri-
ously damage emission control components,
especially the catalytic converter.
If the fuel filler cap is not properly tight-
ened, the OBD system can detect the
vapor leak and the indicator lamp will light up. If
the cap is then tightened, the display should go
out within a few days.<
Event Data Recorders
Your vehicle may be equipped with one or sev-
eral measuring and diagnosis modules, or with a
device for recording or transmitting certain
vehicle data or information. If you have also
signed a contract of participation for BMW
Assist, certain vehicle data can be transmitted
or recorded to enable corresponding services.
Care
You can find useful information on caring for
your BMW in the Caring for your vehicle bro-
chure.
Page 215 of 253
Mobility
213Reference
At a glance
Controls
Driving tips
Communications
Navigation
Entertainment
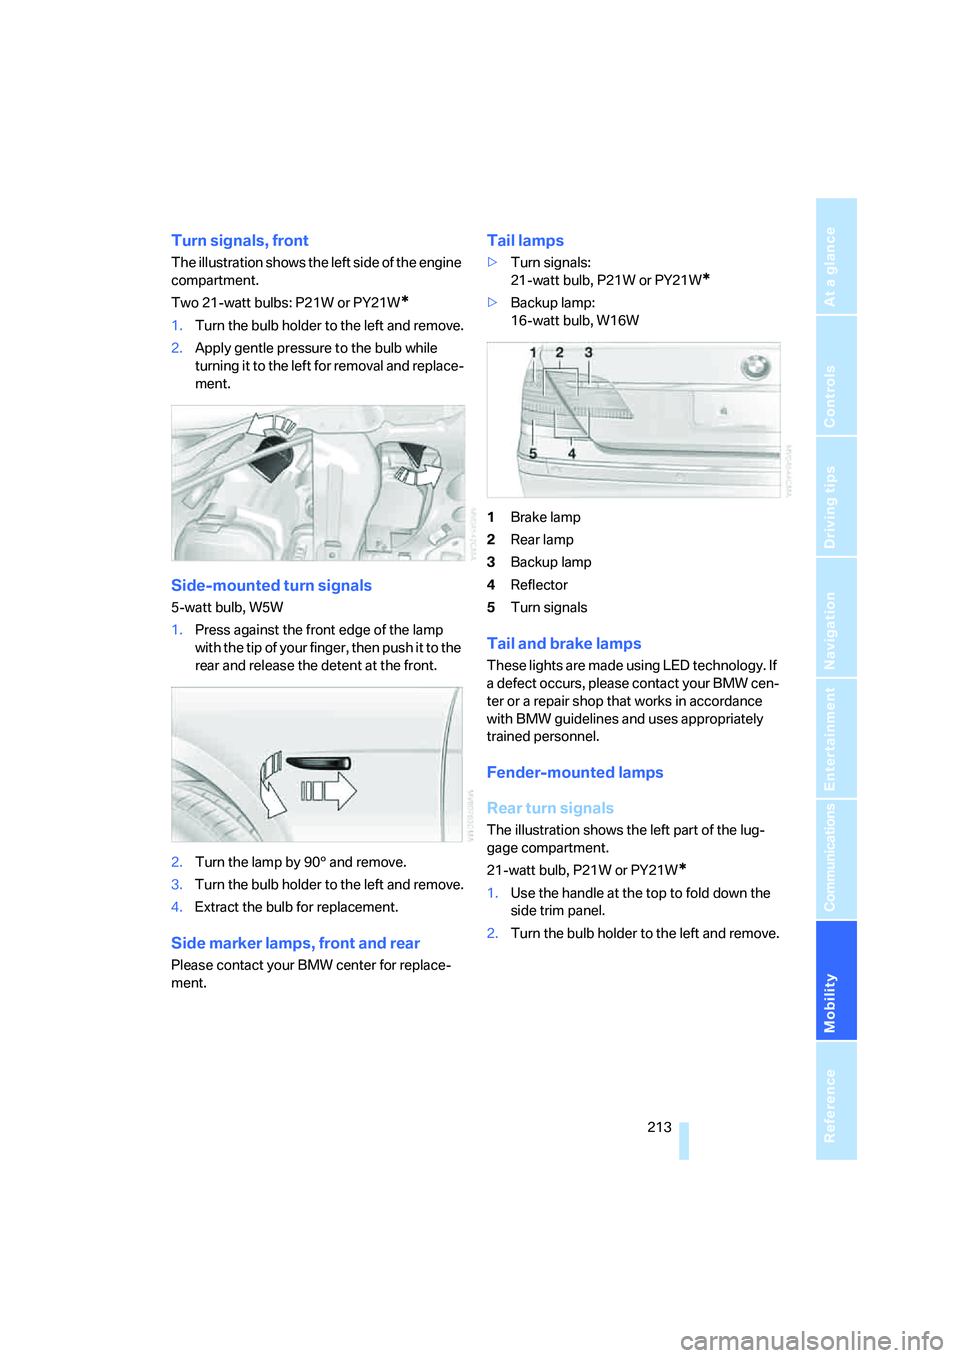
Turn signals, front
The illustration shows the left side of the engine
compartment.
Two 21-watt bulbs: P21W or PY21W
*
1.Turn the bulb holder to the left and remove.
2.Apply gentle pressure to the bulb while
turning it to the left for removal and replace-
ment.
Side-mounted turn signals
5-watt bulb, W5W
1.Press against the front edge of the lamp
with the tip of your finger, then push it to the
rear and release the detent at the front.
2.Turn the lamp by 903 and remove.
3.Turn the bulb holder to the left and remove.
4.Extract the bulb for replacement.
Side marker lamps, front and rear
Please contact your BMW center for replace-
ment.
Tail lamps
>Turn signals:
21-watt bulb, P21W or PY21W
*
>Backup lamp:
16-watt bulb, W16W
1Brake lamp
2Rear lamp
3Backup lamp
4Reflector
5Turn signals
Tail and brake lamps
These lights are made using LED technology. If
a defect occurs, please contact your BMW cen-
ter or a repair shop that works in accordance
with BMW guidelines and uses appropriately
trained personnel.
Fender-mounted lamps
Rear turn signals
The illustration shows the left part of the lug-
gage compartment.
21-watt bulb, P21W or PY21W
*
1.Use the handle at the top to fold down the
side trim panel.
2.Turn the bulb holder to the left and remove.
Page 216 of 253
Replacing components
214 3.Apply gentle pressure to the bulb while
turning it to the left for removal and replace-
ment.
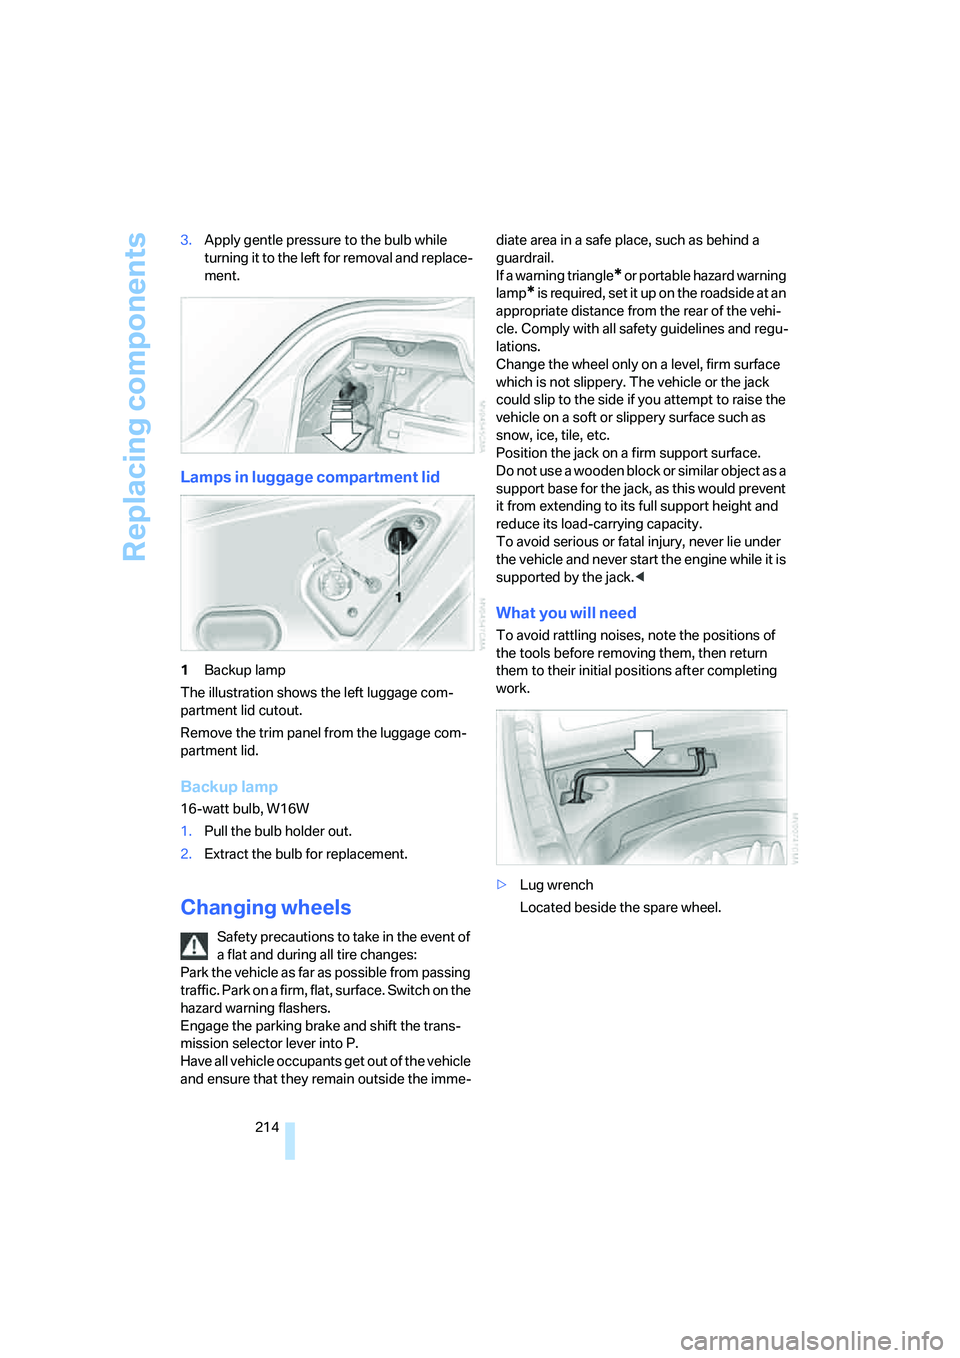
Lamps in luggage compartment lid
1Backup lamp
The illustration shows the left luggage com-
partment lid cutout.
Remove the trim panel from the luggage com-
partment lid.
Backup lamp
16-watt bulb, W16W
1.Pull the bulb holder out.
2.Extract the bulb for replacement.
Changing wheels
Safety precautions to take in the event of
a flat and during all tire changes:
Park the vehicle as far as possible from passing
traffic. Park on a firm, flat, surface. Switch on the
hazard warning flashers.
Engage the parking brake and shift the trans-
mission selector lever into P.
Have all vehicle occupants get out of the vehicle
and ensure that they remain outside the imme-diate area in a safe place, such as behind a
guardrail.
If a warning triangle
* or portable hazard warning
lamp
* is required, set it up on the roadside at an
appropriate distance from the rear of the vehi-
cle. Comply with all safety guidelines and regu-
lations.
Change the wheel only on a level, firm surface
which is not slippery. The vehicle or the jack
could slip to the side if you attempt to raise the
vehicle on a soft or slippery surface such as
snow, ice, tile, etc.
Position the jack on a firm support surface.
Do not use a wooden block or similar object as a
support base for the jack, as this would prevent
it from extending to its full support height and
reduce its load-carrying capacity.
To avoid serious or fatal injury, never lie under
the vehicle and never start the engine while it is
supported by the jack.<
What you will need
To avoid rattling noises, note the positions of
the tools before removing them, then return
them to their initial positions after completing
work.
>Lug wrench
Located beside the spare wheel.
Page 218 of 253
Replacing components
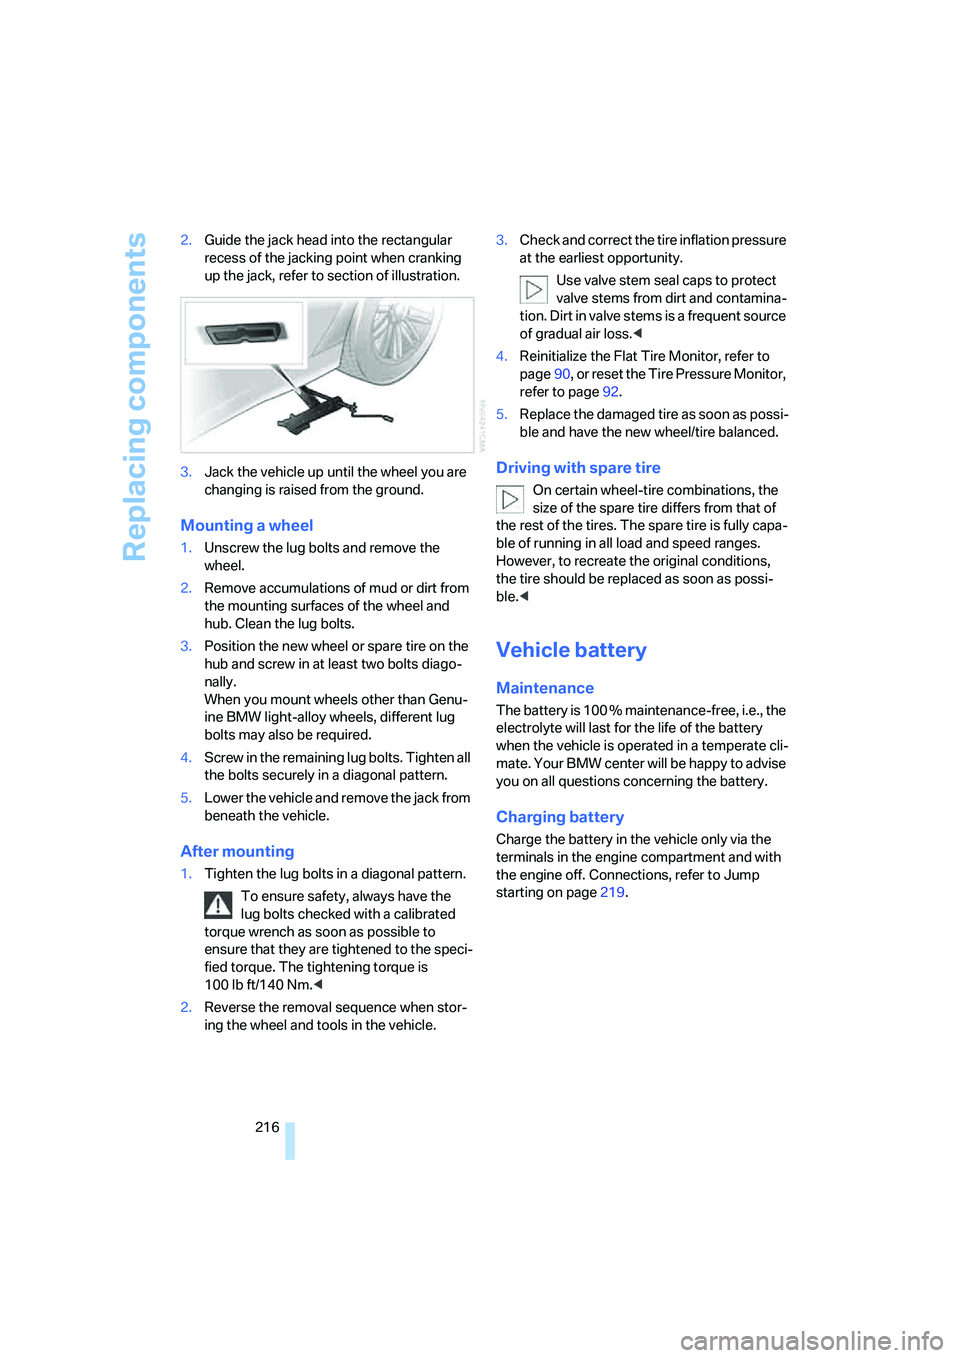
216 2.Guide the jack head into the rectangular
recess of the jacking point when cranking
up the jack, refer to section of illustration.
3.Jack the vehicle up until the wheel you are
changing is raised from the ground.
Mounting a wheel
1.Unscrew the lug bolts and remove the
wheel.
2.Remove accumulations of mud or dirt from
the mounting surfaces of the wheel and
hub. Clean the lug bolts.
3.Position the new wheel or spare tire on the
hub and screw in at least two bolts diago-
nally.
When you mount wheels other than Genu-
ine BMW light-alloy wheels, different lug
bolts may also be required.
4.Screw in the remaining lug bolts. Tighten all
the bolts securely in a diagonal pattern.
5.Lower the vehicle and remove the jack from
beneath the vehicle.
After mounting
1.Tighten the lug bolts in a diagonal pattern.
To ensure safety, always have the
lug bolts checked with a calibrated
torque wrench as soon as possible to
ensure that they are tightened to the speci-
fied torque. The tightening torque is
100 lb ft/140 Nm.<
2.Reverse the removal sequence when stor-
ing the wheel and tools in the vehicle.3.Check and correct the tire inflation pressure
at the earliest opportunity.
Use valve stem seal caps to protect
valve stems from dirt and contamina-
tion. Dirt in valve stems is a frequent source
of gradual air loss.<
4.Reinitialize the Flat Tire Monitor, refer to
page90, or reset the Tire Pressure Monitor,
refer to page92.
5.Replace the damaged tire as soon as possi-
ble and have the new wheel/tire balanced.
Driving with spare tire
On certain wheel-tire combinations, the
size of the spare tire differs from that of
the rest of the tires. The spare tire is fully capa-
ble of running in all load and speed ranges.
However, to recreate the original conditions,
the tire should be replaced as soon as possi-
ble.<
Vehicle battery
Maintenance
The battery is 100 % maintenance-free, i.e., the
electrolyte will last for the life of the battery
when the vehicle is operated in a temperate cli-
mate. Your BMW center will be happy to advise
you on all questions concerning the battery.
Charging battery
Charge the battery in the vehicle only via the
terminals in the engine compartment and with
the engine off. Connections, refer to Jump
starting on page219.
Page 221 of 253
Mobility
219Reference
At a glance
Controls
Driving tips
Communications
Navigation
Entertainment
Warning triangle*
The warning triangle is conveniently stored in
the onboard tool kit mounted on the inside of
the luggage compartment lid.
First-aid kit*
The first-aid kit is also located in the container
of the onboard tool kit.
Some of the articles contained in the first-aid kit
have a limited service life. Check the expiration
dates of the contents regularly and replace the
contents concerned in a timely fashion as
needed.
Jump starting
When your battery is discharged, you can use
two jumper cables to start your vehicle with
power from the battery in a second vehicle. You
can also use the same method to help start
another vehicle. Use only jumper cables with
fully-insulated terminal clamps.
To avoid the risk of potentially fatal injury,
always avoid all contact with electrical
components while the engine is running. Care-
fully adhere to the following sequence, both to
prevent damage to one or both vehicles, and to
guard against possible personal injury.<
Preparing
1.Check whether the battery of the other
vehicle has a voltage of 12 Volts and
approximately the same capacitance in Ah.
This information is listed on the battery.2.Switch off the engine of the assisting vehi-
cle.
3.Switch off any electrical systems and com-
ponents in both vehicles.
Make sure that there is no contact
between the bodywork of the two vehi-
cles; otherwise, there is a danger of short cir-
cuits.<
Connecting jumper cables
To avoid personal injury from sparks, fol-
low this sequence when connecting jum-
per cables.<
In your BMW, the so-called jump starting termi-
nal in the engine compartment functions as the
positive battery terminal. The symbol + is
embossed on the cover.
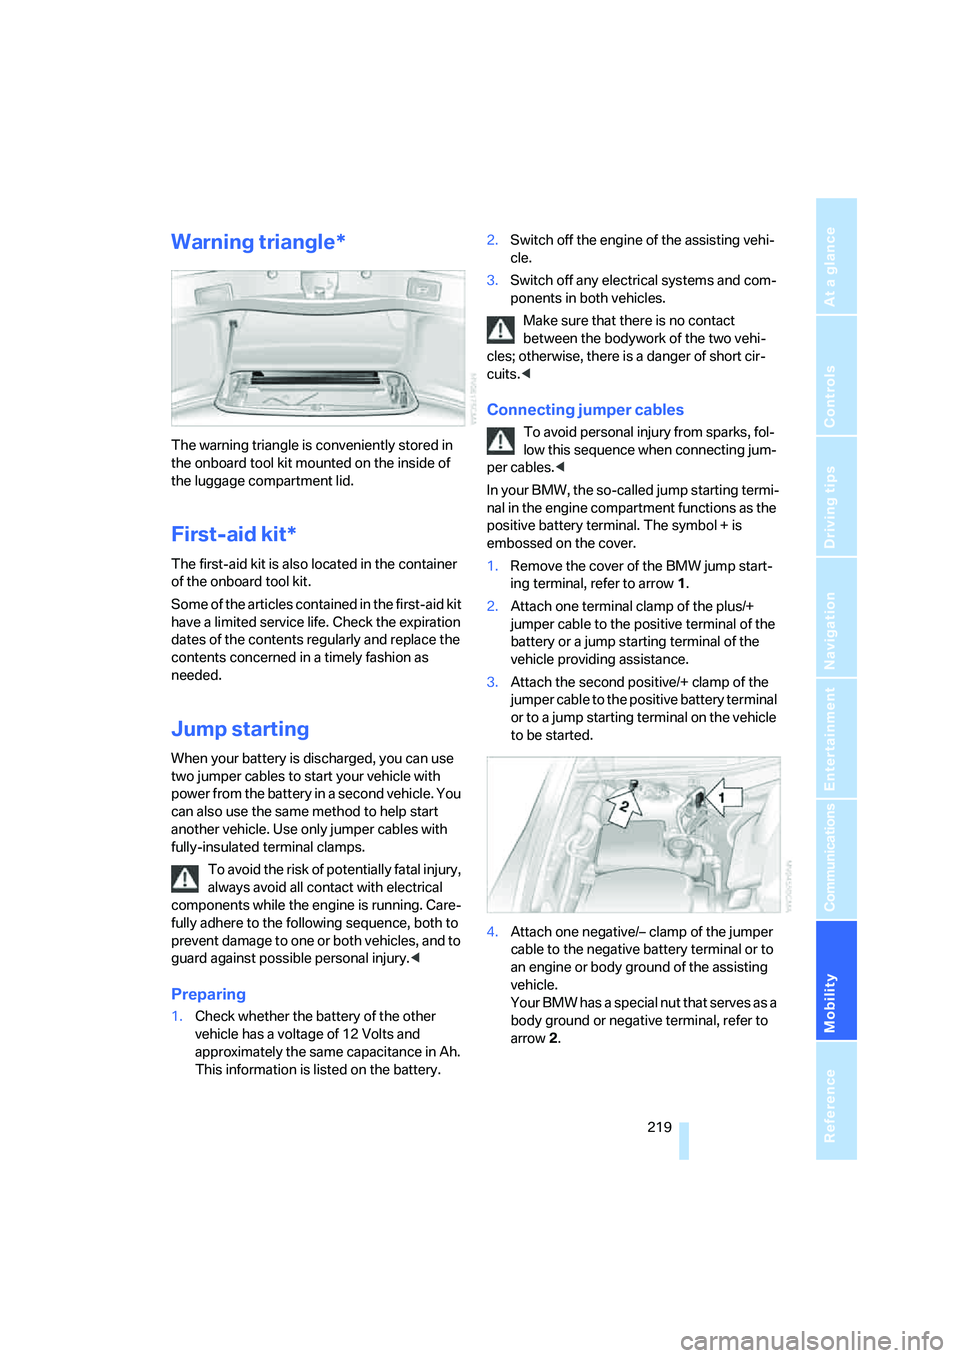
1.Remove the cover of the BMW jump start-
ing terminal, refer to arrow1.
2.Attach one terminal clamp of the plus/+
jumper cable to the positive terminal of the
battery or a jump starting terminal of the
vehicle providing assistance.
3.Attach the second positive/+ clamp of the
jumper cable to the positive battery terminal
or to a jump starting terminal on the vehicle
to be started.
4.Attach one negative/– clamp of the jumper
cable to the negative battery terminal or to
an engine or body ground of the assisting
vehicle.
Your BMW has a special nut that serves as a
body ground or negative terminal, refer to
arrow2.
Page 222 of 253
Giving and receiving assistance
220 5.Attach the second negative/– clamp of the
jumper cable to the negative battery termi-
nal or to an engine or body ground on the
vehicle to be started.
Starting engine
1.Start the engine of the assisting vehicle and
allow it to run for several minutes at a fast
idle.
2.Start the engine on the other vehicle in the
usual way.
If the first start attempt is not successful,
wait a few minutes before another attempt
in order to allow the discharged battery to
recharge.
3.Allow the engines to run for several min-
utes.
4.Disconnect the jumper cables again in the
reverse sequence.
If need be, have the battery checked and
recharged.
Never use spray fluids to start the
engine.<
Towing and tow starting
Observe applicable laws and regulations
for tow-starting and towing.<
Do not transport any passengers other
than the driver in a vehicle that is being
towed.<
Using tow fitting
The threaded tow fitting is stored in the
onboard tool kit and must always remain in the
vehicle. It can be screwed in at the front or rear
of the BMW.
Only use the tow fitting that comes with
the vehicle and screw it in as far as it will
go. Use the tow fitting for towing only on roads.
Avoid lateral loading of the tow fitting, e.g. do
not lift the vehicle by the tow fitting. Otherwise,
damage to the tow fitting and the vehicle can
occur.<
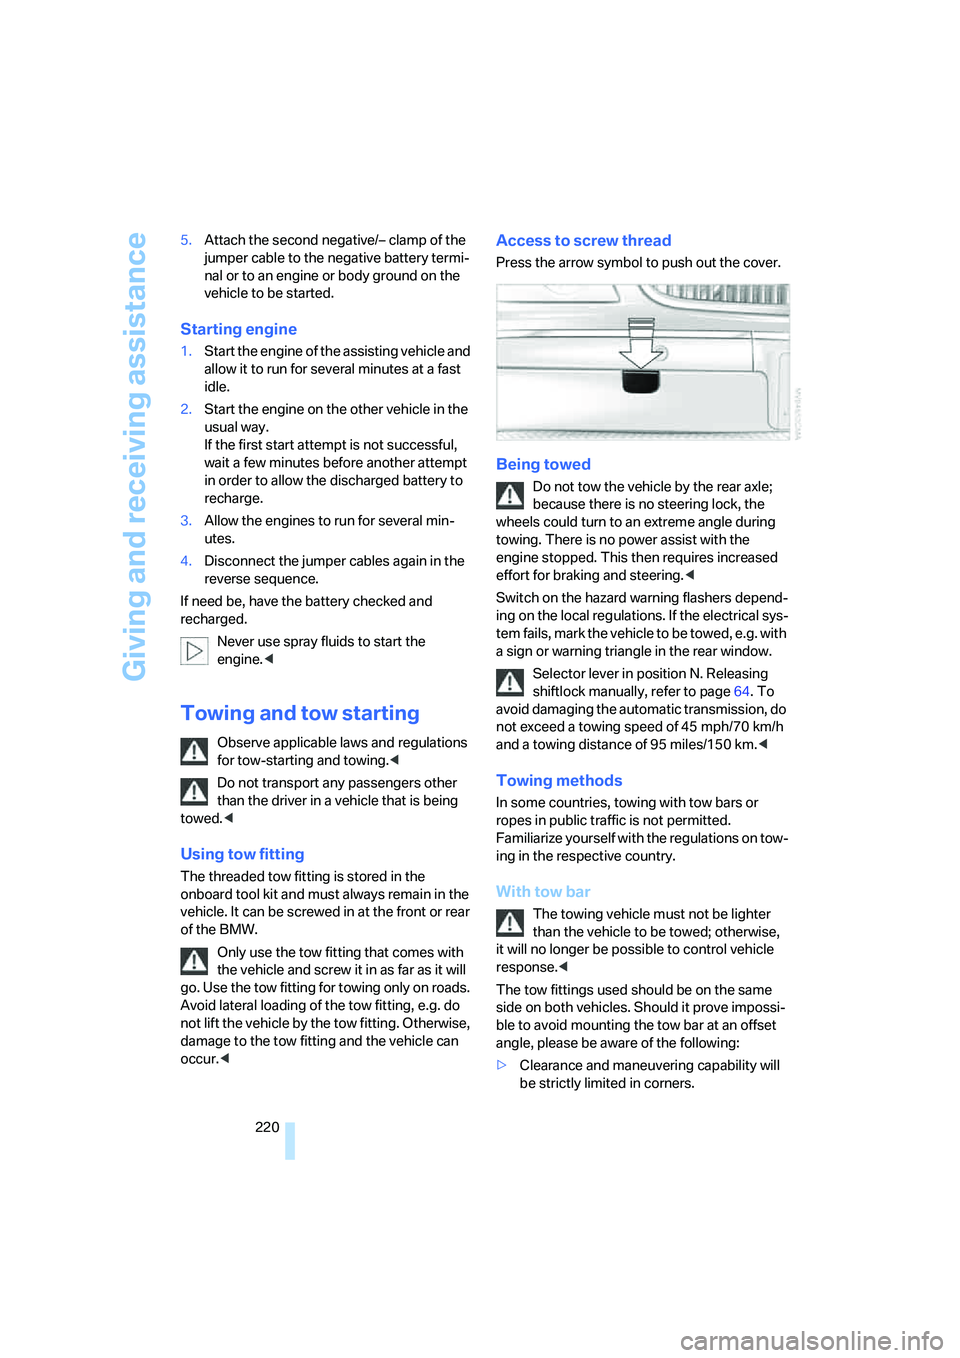
Access to screw thread
Press the arrow symbol to push out the cover.
Being towed
Do not tow the vehicle by the rear axle;
because there is no steering lock, the
wheels could turn to an extreme angle during
towing. There is no power assist with the
engine stopped. This then requires increased
effort for braking and steering.<
Switch on the hazard warning flashers depend-
ing on the local regulations. If the electrical sys-
tem fails, mark the vehicle to be towed, e.g. with
a sign or warning triangle in the rear window.
Selector lever in position N. Releasing
shiftlock manually, refer to page64. To
avoid damaging the automatic transmission, do
not exceed a towing speed of 45 mph/70 km/h
and a towing distance of 95 miles/150 km.<
Towing methods
In some countries, towing with tow bars or
ropes in public traffic is not permitted.
Familiarize yourself with the regulations on tow-
ing in the respective country.
With tow bar
The towing vehicle must not be lighter
than the vehicle to be towed; otherwise,
it will no longer be possible to control vehicle
response.<
The tow fittings used should be on the same
side on both vehicles. Should it prove impossi-
ble to avoid mounting the tow bar at an offset
angle, please be aware of the following:
>Clearance and maneuvering capability will
be strictly limited in corners.
Page 226 of 253
Technical data
224
Technical data
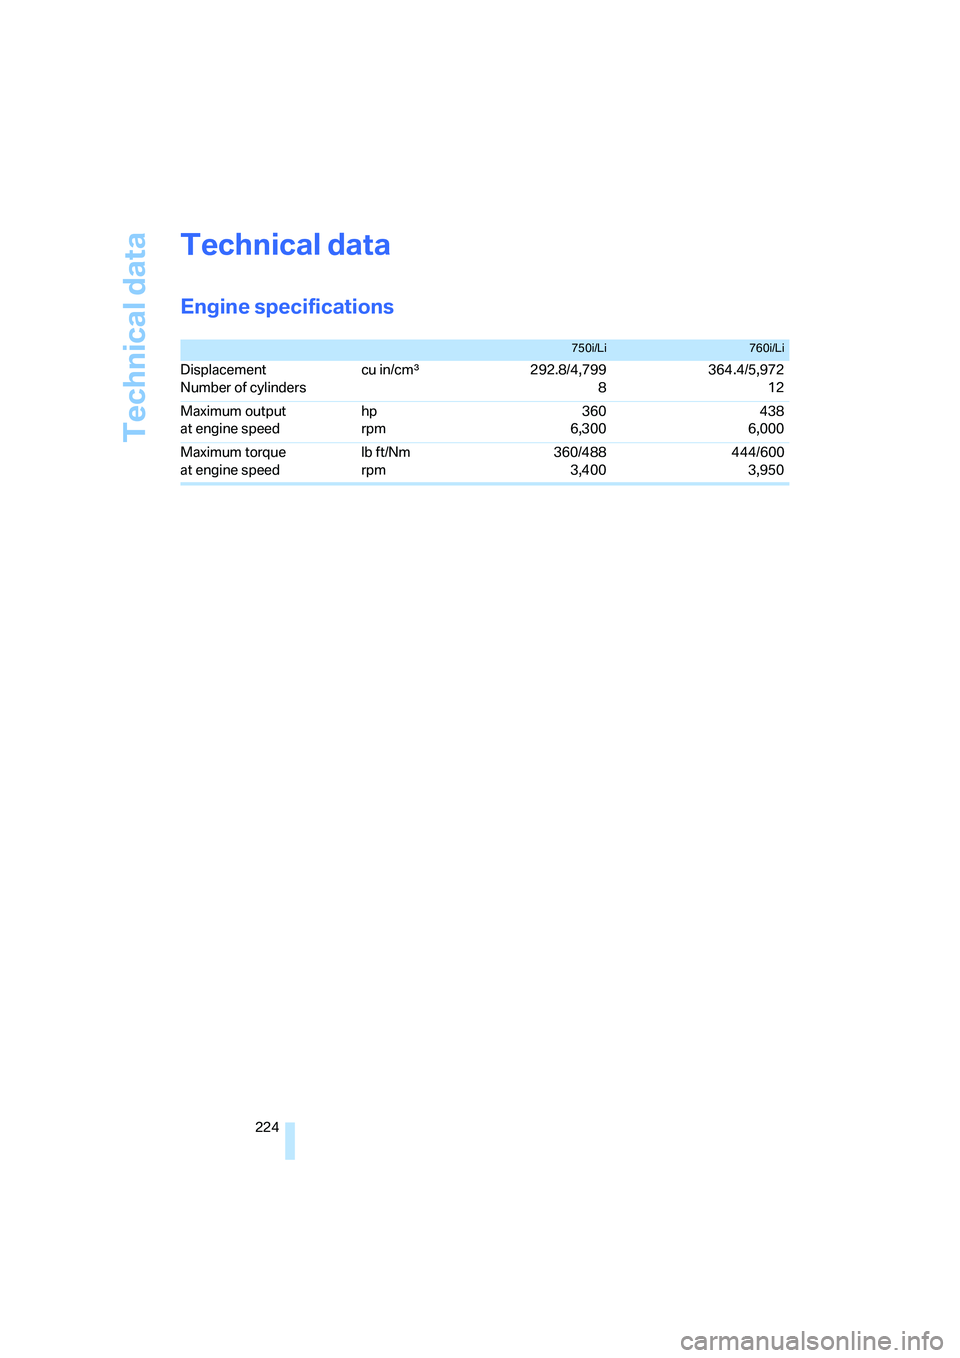
Engine specifications
750i/Li760i/Li
Displacement
Number of cylinders cu in/cmµ292.8/4,799
8364.4/5,972
12
Maximum output
at engine speed hp
rpm 360
6,300438
6,000
Maximum torque
at engine speed lb ft/Nm
rpm 360/488
3,400444/600
3,950