2007 BMW 650I COUPE&CONVERTIBLE high beam
[x] Cancel search: high beamPage 12 of 256
Cockpit
10
Cockpit
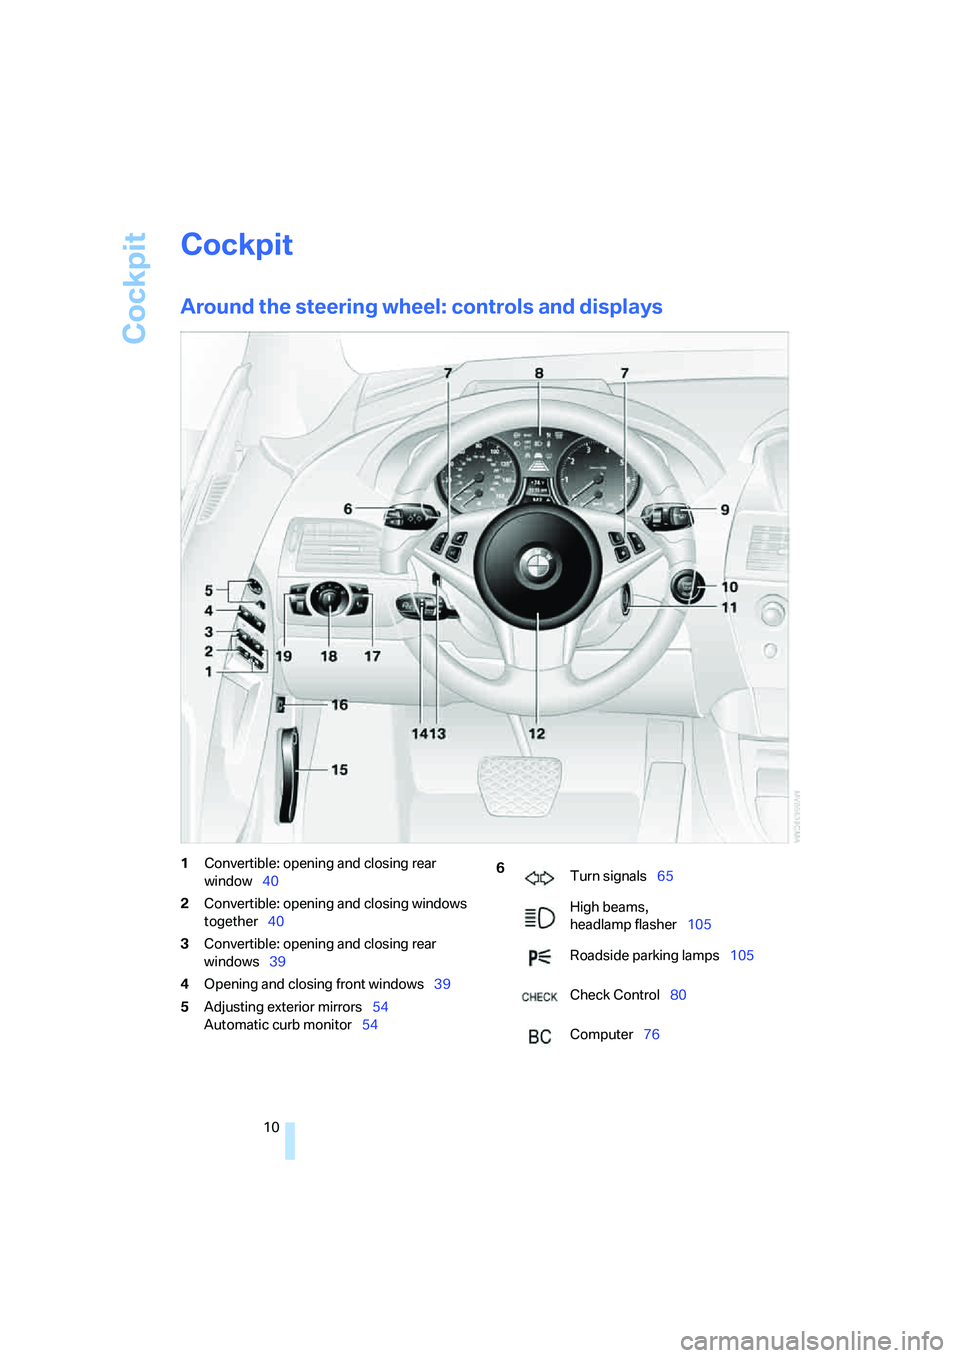
Around the steering wheel: controls and displays
1Convertible: opening and closing rear
window40
2Convertible: opening and closing windows
together40
3Convertible: opening and closing rear
windows39
4Opening and closing front windows39
5Adjusting exterior mirrors54
Automatic curb monitor546
Turn signals65
High beams,
headlamp flasher105
Roadside parking lamps105
Check Control80
Computer76
Page 15 of 256
At a glance
13Reference
Controls
Driving tips
Communications
Navigation
Entertainment
Mobility
Indicator and warning lamps
The concept
The indicator and warning lamps can light up in
different combinations and colors.
When the engine is started or the ignition is
switched on, some lamps are checked for
proper operation and light up briefly in the pro-
cess.
Explanatory text messages
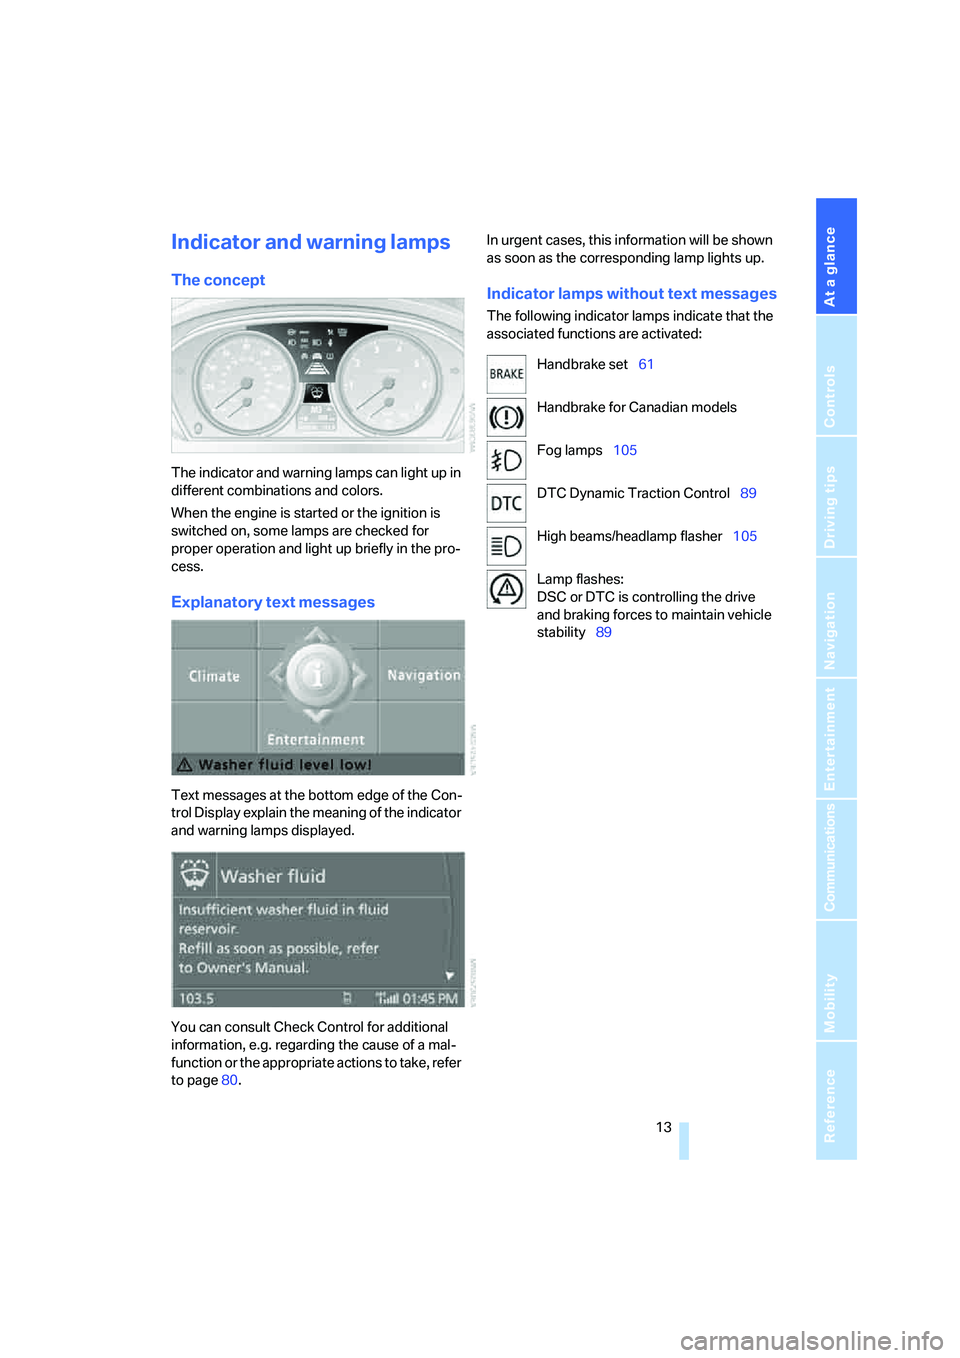
Text messages at the bottom edge of the Con-
trol Display explain the meaning of the indicator
and warning lamps displayed.
You can consult Check Control for additional
information, e.g. regarding the cause of a mal-
function or the appropriate actions to take, refer
to page80.In urgent cases, this information will be shown
as soon as the corresponding lamp lights up.
Indicator lamps without text messages
The following indicator lamps indicate that the
associated functions are activated:
Handbrake set61
Handbrake for Canadian models
Fog lamps105
DTC Dynamic Traction Control89
High beams/headlamp flasher105
Lamp flashes:
DSC or DTC is controlling the drive
and braking forces to maintain vehicle
stability89
Page 38 of 256
Opening and closing
36
Alarm system
The concept
The vehicle alarm system responds:
>To the opening of a door, the hood, or the
luggage compartment lid
>To movements in the vehicle interior: inte-
rior motion sensor, refer to page36
>To changes in the vehicle's tilt if someone
attempts to steal the wheels or tow the
vehicle
>To interruptions in battery voltage
Unauthorized operations are briefly signaled by
the alarm system:
>by triggering an acoustic alarm
>by switching on
the hazard warning flashers
>by flashing the high beams
Arming and disarming alarm system
When you lock or unlock the vehicle, either with
the remote control or at the door lock, the alarm
system is armed or disarmed at the same time.
You can open the luggage compartment lid,
even with the system armed, by using the
button of the remote control, refer to page31.
When the luggage compartment lid is closed,
it is once again locked and monitored.
Switching off alarm
>Unlock the vehicle using the remote control,
refer to page30, or
>insert the remote control all the way into the
ignition lock.
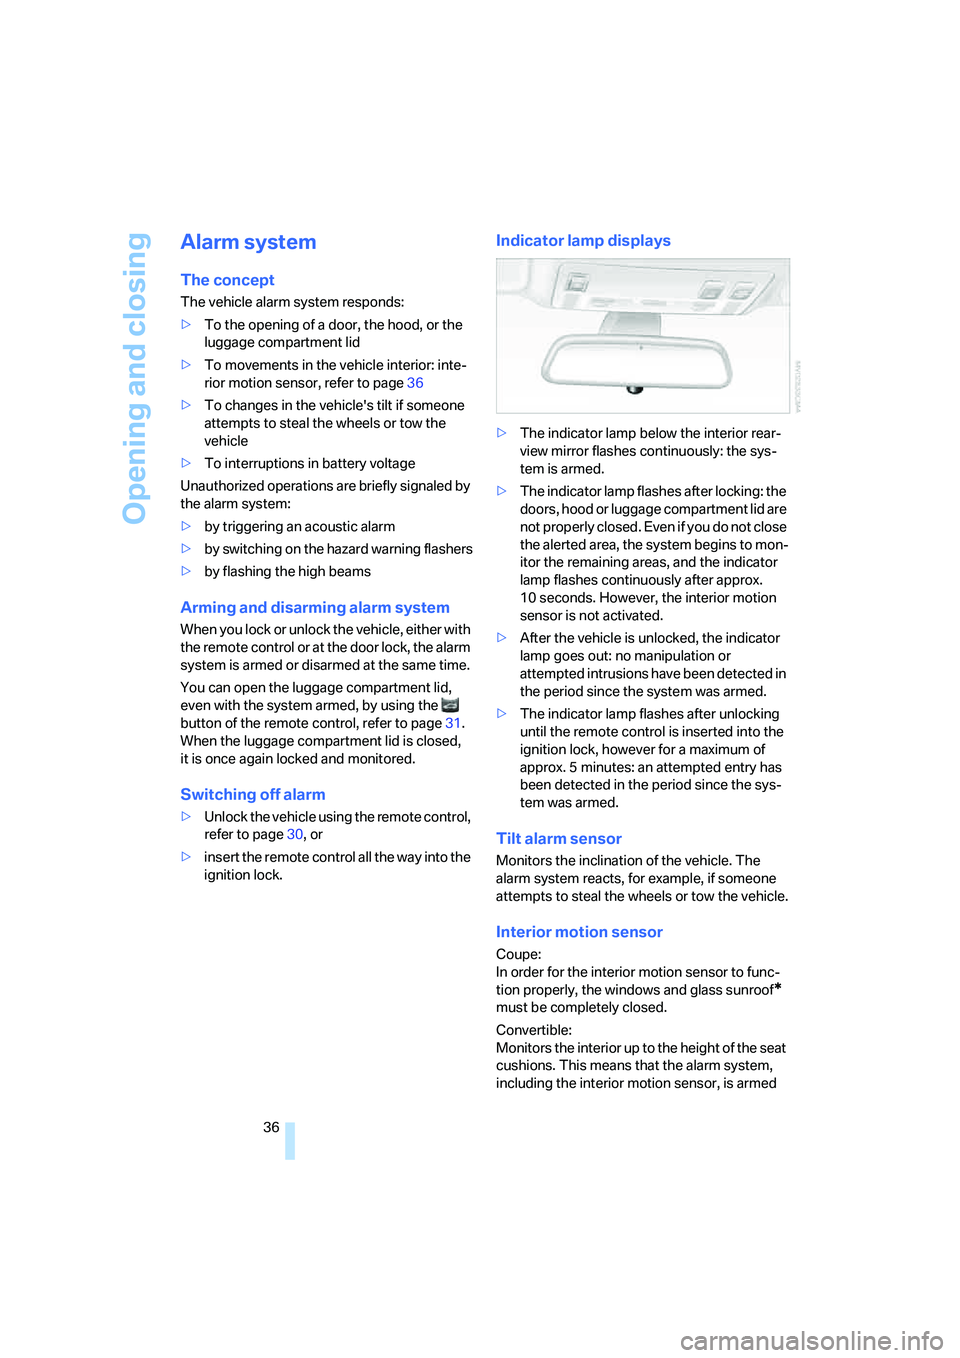
Indicator lamp displays
>The indicator lamp below the interior rear-
view mirror flashes continuously: the sys-
tem is armed.
>The indicator lamp flashes after locking: the
doors, hood or luggage compartment lid are
not properly closed. Even if you do not close
the alerted area, the system begins to mon-
itor the remaining areas, and the indicator
lamp flashes continuously after approx.
10 seconds. However, the interior motion
sensor is not activated.
>After the vehicle is unlocked, the indicator
lamp goes out: no manipulation or
attempted intrusions have been detected in
the period since the system was armed.
>The indicator lamp flashes after unlocking
until the remote control is inserted into the
ignition lock, however for a maximum of
approx. 5 minutes: an attempted entry has
been detected in the period since the sys-
tem was armed.
Tilt alarm sensor
Monitors the inclination of the vehicle. The
alarm system reacts, for example, if someone
attempts to steal the wheels or tow the vehicle.
Interior motion sensor
Coupe:
In order for the interior motion sensor to func-
tion properly, the windows and glass sunroof
*
must be completely closed.
Convertible:
Monitors the interior up to the height of the seat
cushions. This means that the alarm system,
including the interior motion sensor, is armed
Page 67 of 256
Controls
65Reference
At a glance
Driving tips
Communications
Navigation
Entertainment
Mobility
3.Using the screwdriver from the onboard
toolkit, refer to page214, press the lever at
the point marked in red and move the selec-
tor lever into the desired position.
Dynamic Driving Control
The Dynamic Driving Control makes it possible
for your BMW to react in an even more perfor-
mance-oriented manner at the push of a button:
>The engine responds more spontaneously
to accelerator pedal movements.
>Cruise control:
The stored speed is reached more quickly
when requested.
Additionally with SMG:
>Gearshifts are faster.
>The engine speed range is used optimally in
the Drive mode.
With automatic transmission:
>The Sport program is activated.
Activating system
With the ignition switched on, press the SPORT
button.The LED in the button lights up and SPORT is
displayed in the instrument cluster.
Deactivating system
>Press the SPORT button again or
>shift into reverse or
>switch off the engine.
The LED in the button and SPORT in the instru-
ment cluster go out.
Acceleration assistant with SMG
The acceleration assistant enables optimized
vehicle acceleration at race car level on road
surfaces with good adhesion when starting off.
Do not use the acceleration assistant too
often; otherwise, components will wear
prematurely.<
1.Activate the Dynamic Driving Control.
2.Deactivate DSC, refer to page89.
3.Press the accelerator pedal down fully:
kick-down. The ideal starting-off engine
speed is set.
To maintain vehicle stability, reactivate
DSC afterward.<
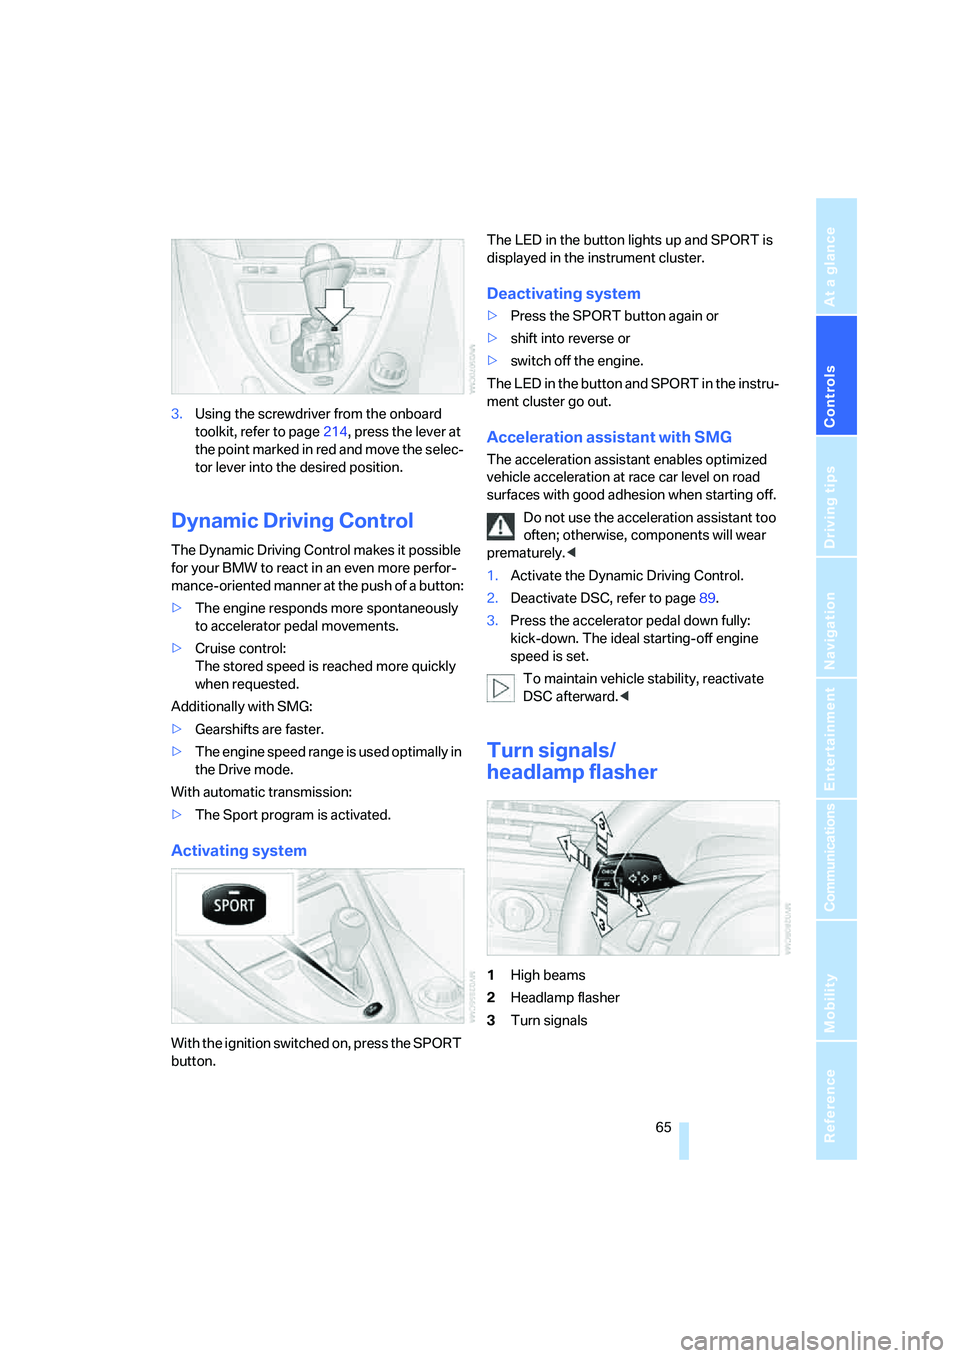
Turn signals/
headlamp flasher
1High beams
2Headlamp flasher
3Turn signals
Page 104 of 256
Technology for comfort, convenience and safety
102 when dark, the thermal image on the Control
Display is only shown when the low beams are
on.
Deactivating BMW Night Vision
>Press the button.
>Press the button on the steering wheel.
>Press the button.
>Via iDrive, refer to Selecting settings.
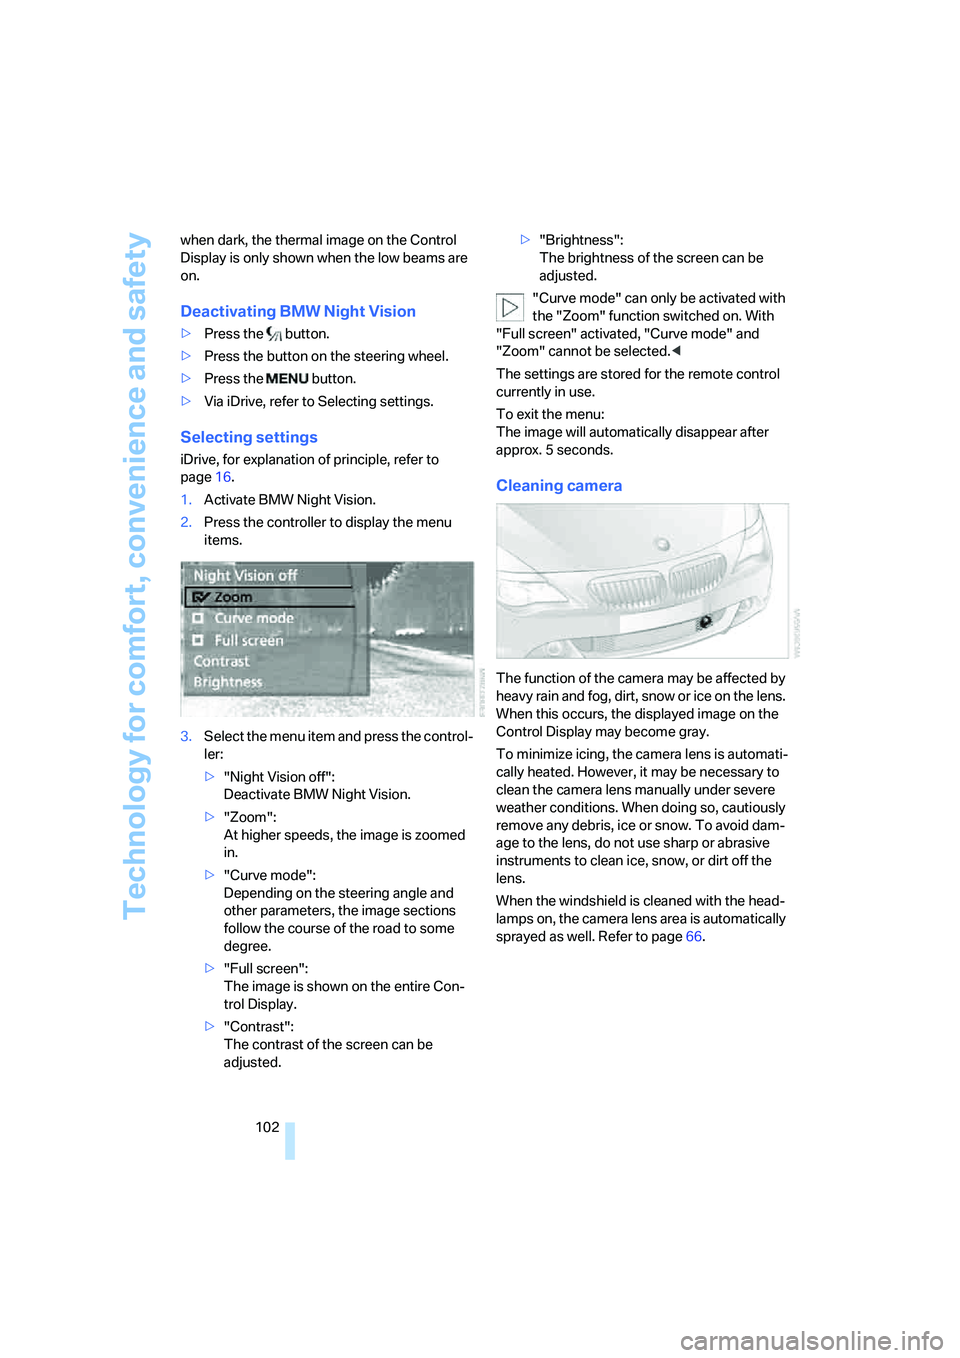
Selecting settings
iDrive, for explanation of principle, refer to
page16.
1.Activate BMW Night Vision.
2.Press the controller to display the menu
items.
3.Select the menu item and press the control-
ler:
>"Night Vision off":
Deactivate BMW Night Vision.
>"Zoom":
At higher speeds, the image is zoomed
in.
>"Curve mode":
Depending on the steering angle and
other parameters, the image sections
follow the course of the road to some
degree.
>"Full screen":
The image is shown on the entire Con-
trol Display.
>"Contrast":
The contrast of the screen can be
adjusted.>"Brightness":
The brightness of the screen can be
adjusted.
"Curve mode" can only be activated with
the "Zoom" function switched on. With
"Full screen" activated, "Curve mode" and
"Zoom" cannot be selected.<
The settings are stored for the remote control
currently in use.
To exit the menu:
The image will automatically disappear after
approx. 5 seconds.
Cleaning camera
The function of the camera may be affected by
heavy rain and fog, dirt, snow or ice on the lens.
When this occurs, the displayed image on the
Control Display may become gray.
To minimize icing, the camera lens is automati-
cally heated. However, it may be necessary to
clean the camera lens manually under severe
weather conditions. When doing so, cautiously
remove any debris, ice or snow. To avoid dam-
age to the lens, do not use sharp or abrasive
instruments to clean ice, snow, or dirt off the
lens.
When the windshield is cleaned with the head-
lamps on, the camera lens area is automatically
sprayed as well. Refer to page66.
Page 107 of 256
Controls
105Reference
At a glance
Driving tips
Communications
Navigation
Entertainment
Mobility
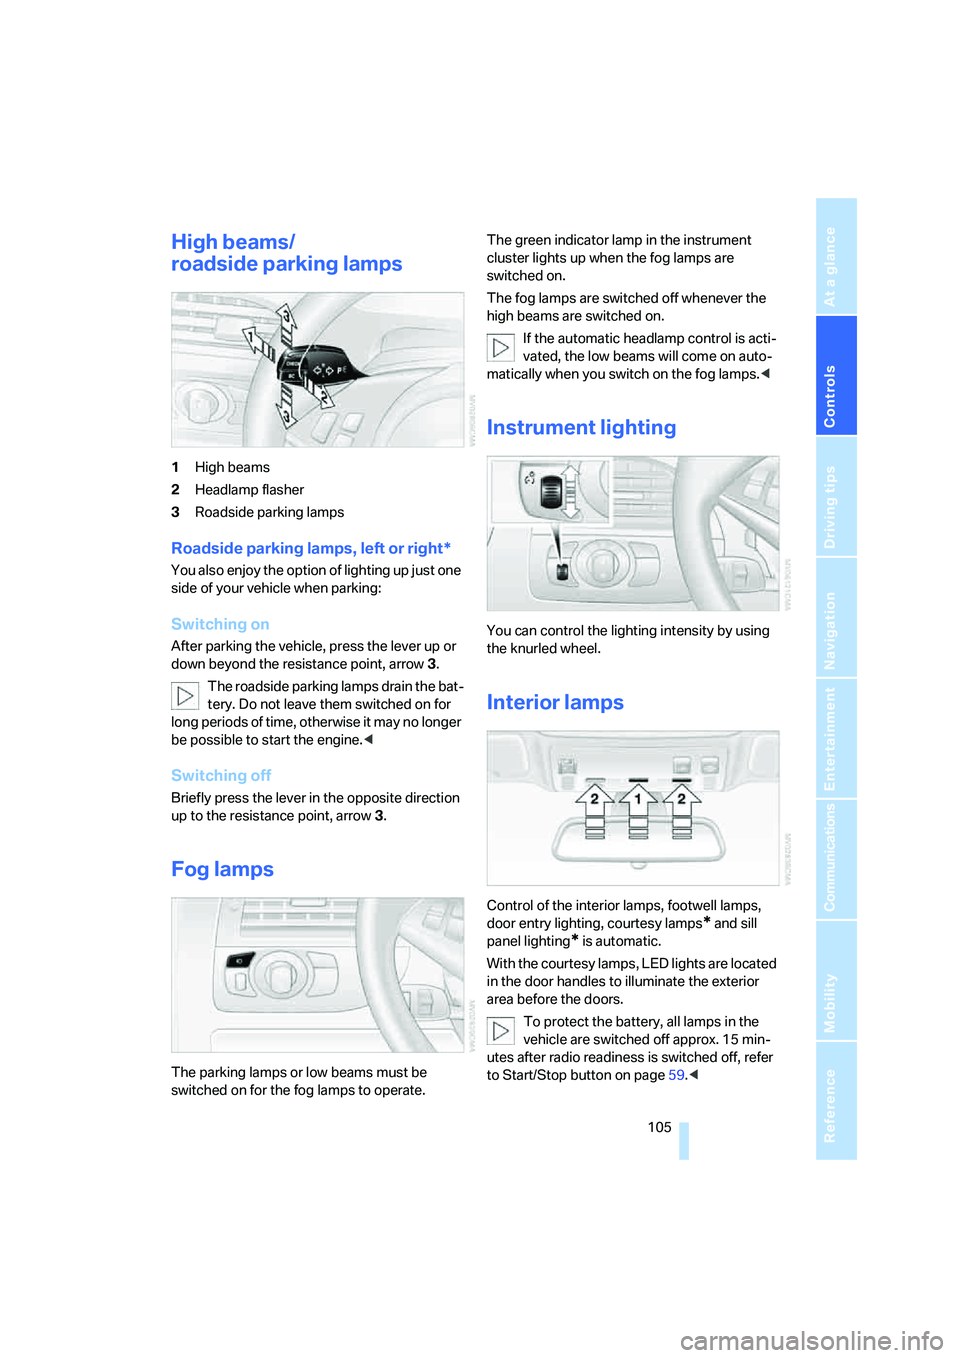
High beams/
roadside parking lamps
1High beams
2Headlamp flasher
3Roadside parking lamps
Roadside parking lamps, left or right*
You also enjoy the option of lighting up just one
side of your vehicle when parking:
Switching on
After parking the vehicle, press the lever up or
down beyond the resistance point, arrow 3.
The roadside parking lamps drain the bat-
tery. Do not leave them switched on for
long periods of time, otherwise it may no longer
be possible to start the engine.<
Switching off
Briefly press the lever in the opposite direction
up to the resistance point, arrow3.
Fog lamps
The parking lamps or low beams must be
switched on for the fog lamps to operate. The green indicator lamp in the instrument
cluster lights up when the fog lamps are
switched on.
The fog lamps are switched off whenever the
high beams are switched on.
If the automatic headlamp control is acti-
vated, the low beams will come on auto-
matically when you switch on the fog lamps.<
Instrument lighting
You can control the lighting intensity by using
the knurled wheel.
Interior lamps
Control of the interior lamps, footwell lamps,
door entry lighting, courtesy lamps
* and sill
panel lighting
* is automatic.
With the courtesy lamps, LED lights are located
in the door handles to illuminate the exterior
area before the doors.
To protect the battery, all lamps in the
vehicle are switched off approx. 15 min-
utes after radio readiness is switched off, refer
to Start/Stop button on page59.<
Page 217 of 256
Mobility
215Reference
At a glance
Controls
Driving tips
Communications
Navigation
Entertainment
Have work on the xenon lighting system
performed only by your BMW center or a
workshop that works according to BMW repair
procedures with correspondingly trained per-
sonnel. Due to the high voltage involved, there
is a danger to life and limb when work is carried
out improperly.<
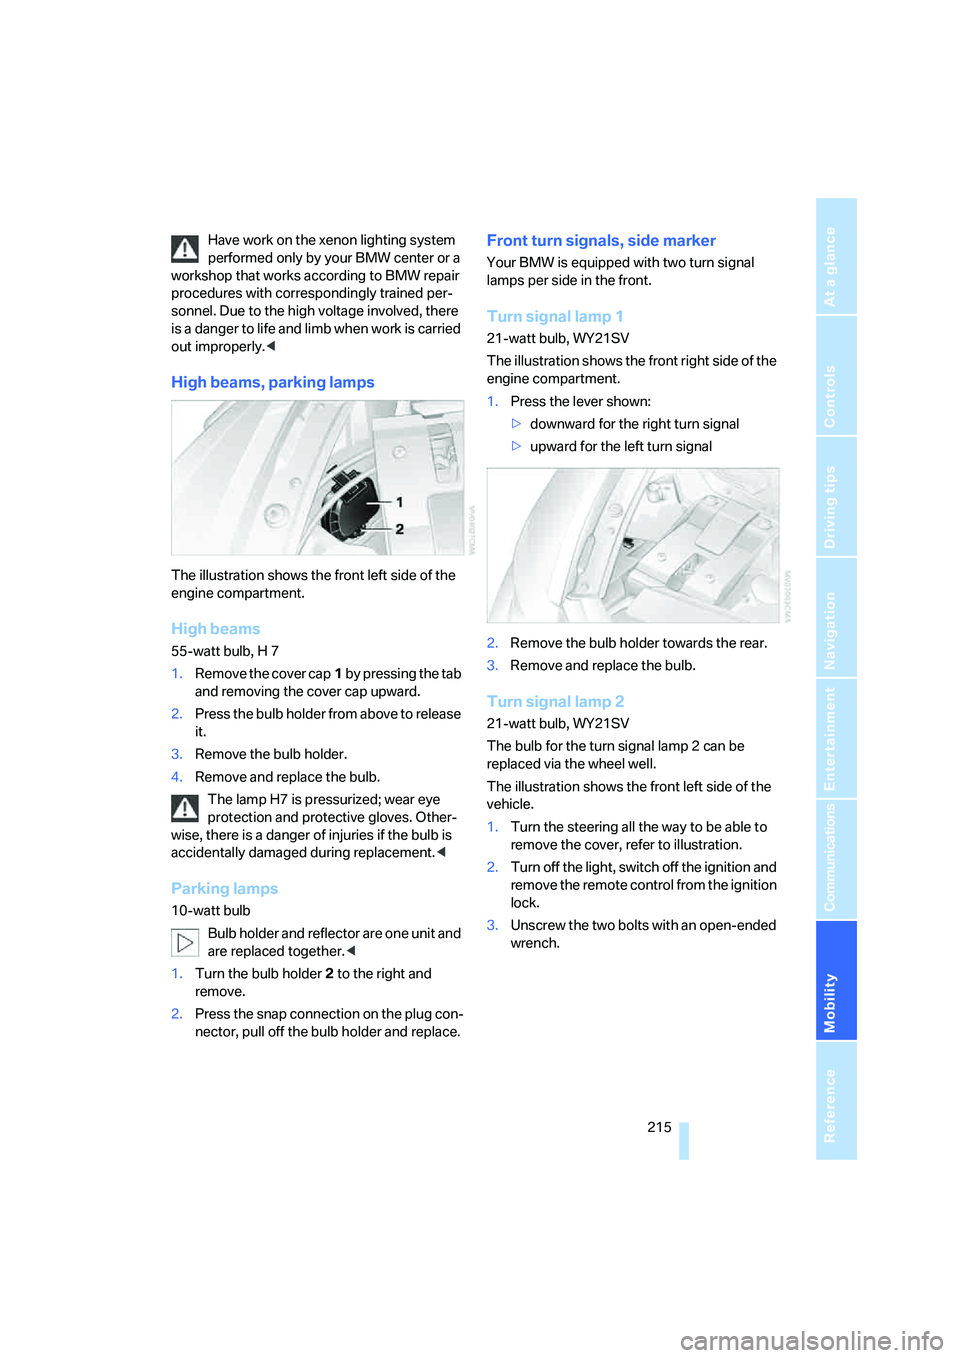
High beams, parking lamps
The illustration shows the front left side of the
engine compartment.
High beams
55-watt bulb, H 7
1.Remove the cover cap1 by pressing the tab
and removing the cover cap upward.
2.Press the bulb holder from above to release
it.
3.Remove the bulb holder.
4.Remove and replace the bulb.
The lamp H7 is pressurized; wear eye
protection and protective gloves. Other-
wise, there is a danger of injuries if the bulb is
accidentally damaged during replacement.<
Parking lamps
10-watt bulb
Bulb holder and reflector are one unit and
are replaced together.<
1.Turn the bulb holder2 to the right and
remove.
2.Press the snap connection on the plug con-
nector, pull off the bulb holder and replace.
Front turn signals, side marker
Your BMW is equipped with two turn signal
lamps per side in the front.
Turn signal lamp 1
21-watt bulb, WY21SV
The illustration shows the front right side of the
engine compartment.
1.Press the lever shown:
>downward for the right turn signal
>upward for the left turn signal
2.Remove the bulb holder towards the rear.
3.Remove and replace the bulb.
Turn signal lamp 2
21-watt bulb, WY21SV
The bulb for the turn signal lamp 2 can be
replaced via the wheel well.
The illustration shows the front left side of the
vehicle.
1.Turn the steering all the way to be able to
remove the cover, refer to illustration.
2.Turn off the light, switch off the ignition and
remove the remote control from the ignition
lock.
3.Unscrew the two bolts with an open-ended
wrench.
Page 244 of 256

Everything from A to Z
242 Heating with engine switched
off, refer to Residual
heat110
Heavy cargo, refer to Securing
cargo125
Height, refer to
Dimensions227
Height adjustment
– seats49
– steering wheel55
High beams105
– headlamp flasher105
– indicator lamp13
– replacing bulbs215
High Definition Radio162
High water, refer to Driving
through water123
Hills123
Holder for cups116
"Home address" in
navigation138
Homepage of BMW4
Hood208
Horn10
Hotel function33
– unlocking manually34
Hot exhaust system122
"Hour memo"84
"House number" for
destination entry132
Hydraulic brake assistant,
refer to DBC Dynamic Brake
Control88
Hydroplaning123
– also refer to Minimum tread
depth205
I
IBOC, refer to High Definition
Radio162
Ice, refer to Outside
temperature warning75
ID3-Tag, refer to Information
about track169
Identification mark
– recommended tire
brands206
Identification marks
– run-flat tires206
– tire coding204
iDrive16
– adjusting brightness85
– assistance window20
– changing date and time83
– changing language85
– changing menu page19
– changing settings83
– changing units of measure
and display form85
– controller16
– controls16
– displays, menus17
– operating principle17
– selecting menu item19
– selecting or confirming
entry19
– start menu17
– status information20
– symbols18
Ignition59
– switched off59
– switched on59
Ignition key, refer to Keys/
remote control28
Ignition key position 1, refer to
Radio readiness59
Ignition key position 2, refer to
Ignition on59
Ignition lock59
– starting engine with comfort
access38
i menu17
Imprint2Indicator/warning lamps
– ABS Antilock Brake
System90
– active steering95
– airbags97
– brake system90
– DSC13,89
– DTC13,89
– Flat Tire Monitor91
– fog lamps13,
105
– handbrake13,61
– safety belt warning53
– TPM Tire Pressure
Monitor93
Indicator and warning lamps
– overview13
Inflation pressure, refer to Tire
inflation pressure202
Inflation pressure monitoring,
refer to Flat Tire Monitor90
Inflation pressure monitoring,
refer to Tire Pressure
Monitor92
Info menu17
Information
– on another location135
– on current position135
– on destination location135
"Information" for
navigation135
Information menu, refer to
imenu17
"Information on
destination"136
Information service193
"Info sources"78
Initializing
– Flat Tire Monitor91
– radio, refer to Storing
stations160
– refer to Power failure217
– seat, mirror and steering
wheel memory50
– time and date83
"Input map"134
Installation location
– CD changer171
– drive for navigation DVD128