2007 BMW 525XI light
[x] Cancel search: lightPage 119 of 273
Controls
117Reference
At a glance
Driving tips
Communications
Navigation
Entertainment
Mobility
Front ashtray
Opening
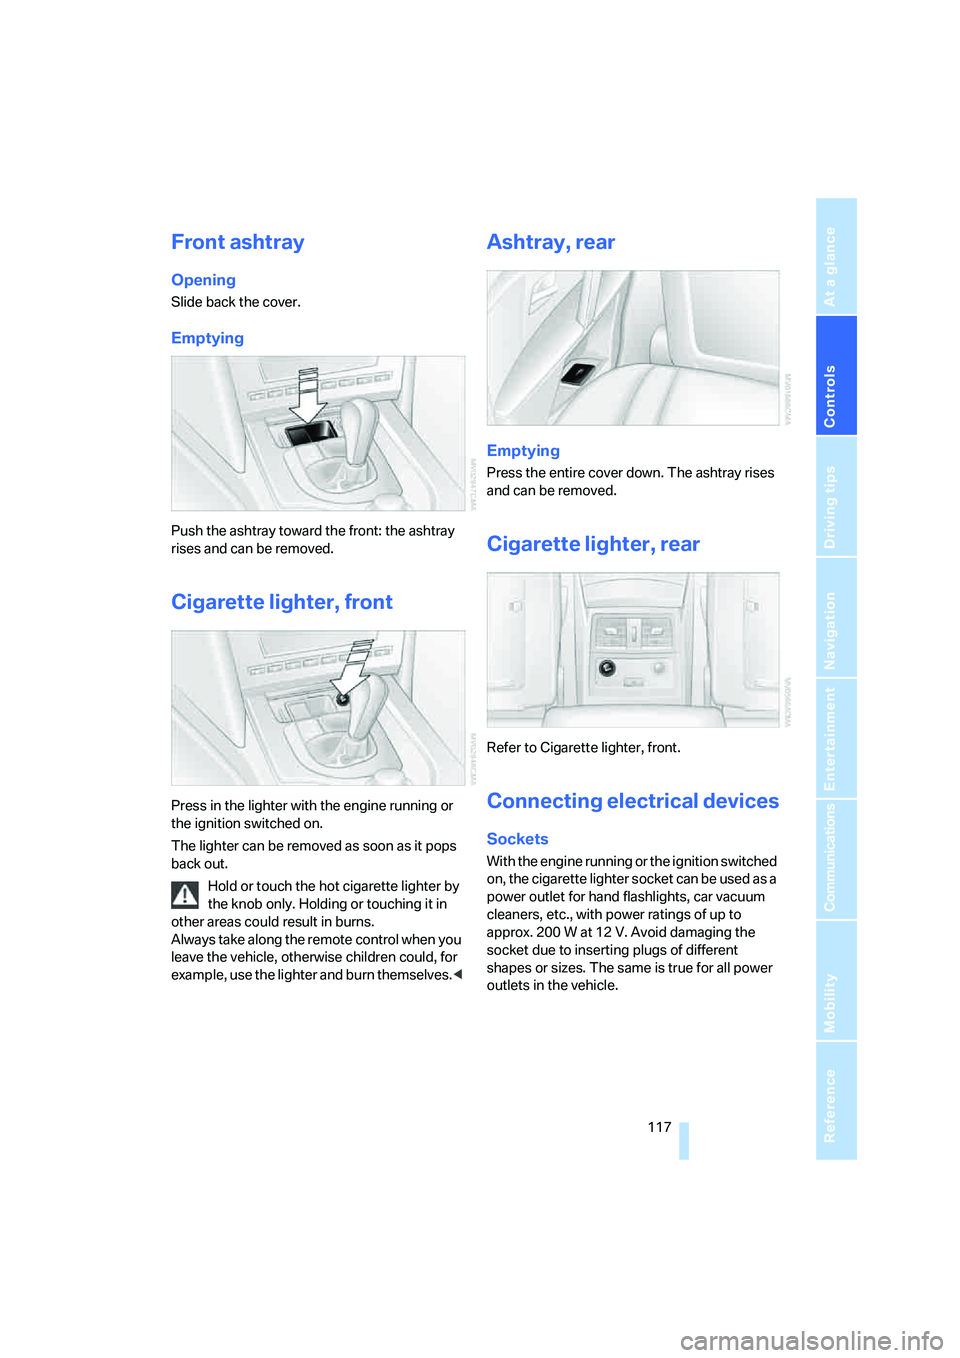
Slide back the cover.
Emptying
Push the ashtray toward the front: the ashtray
rises and can be removed.
Cigarette lighter, front
Press in the lighter with the engine running or
the ignition switched on.
The lighter can be removed as soon as it pops
back out.
Hold or touch the hot cigarette lighter by
the knob only. Holding or touching it in
other areas could result in burns.
Always take along the remote control when you
leave the vehicle, otherwise children could, for
example, use the lighter and burn themselves.<
Ashtray, rear
Emptying
Press the entire cover down. The ashtray rises
and can be removed.
Cigarette lighter, rear
Refer to Cigarette lighter, front.
Connecting electrical devices
Sockets
With the engine running or the ignition switched
on, the cigarette lighter socket can be used as a
power outlet for hand flashlights, car vacuum
cleaners, etc., with power ratings of up to
approx. 200 W at 12 V. Avoid damaging the
socket due to inserting plugs of different
shapes or sizes. The same is true for all power
outlets in the vehicle.
Page 120 of 273
Practical interior accessories
118
In front passenger footwell
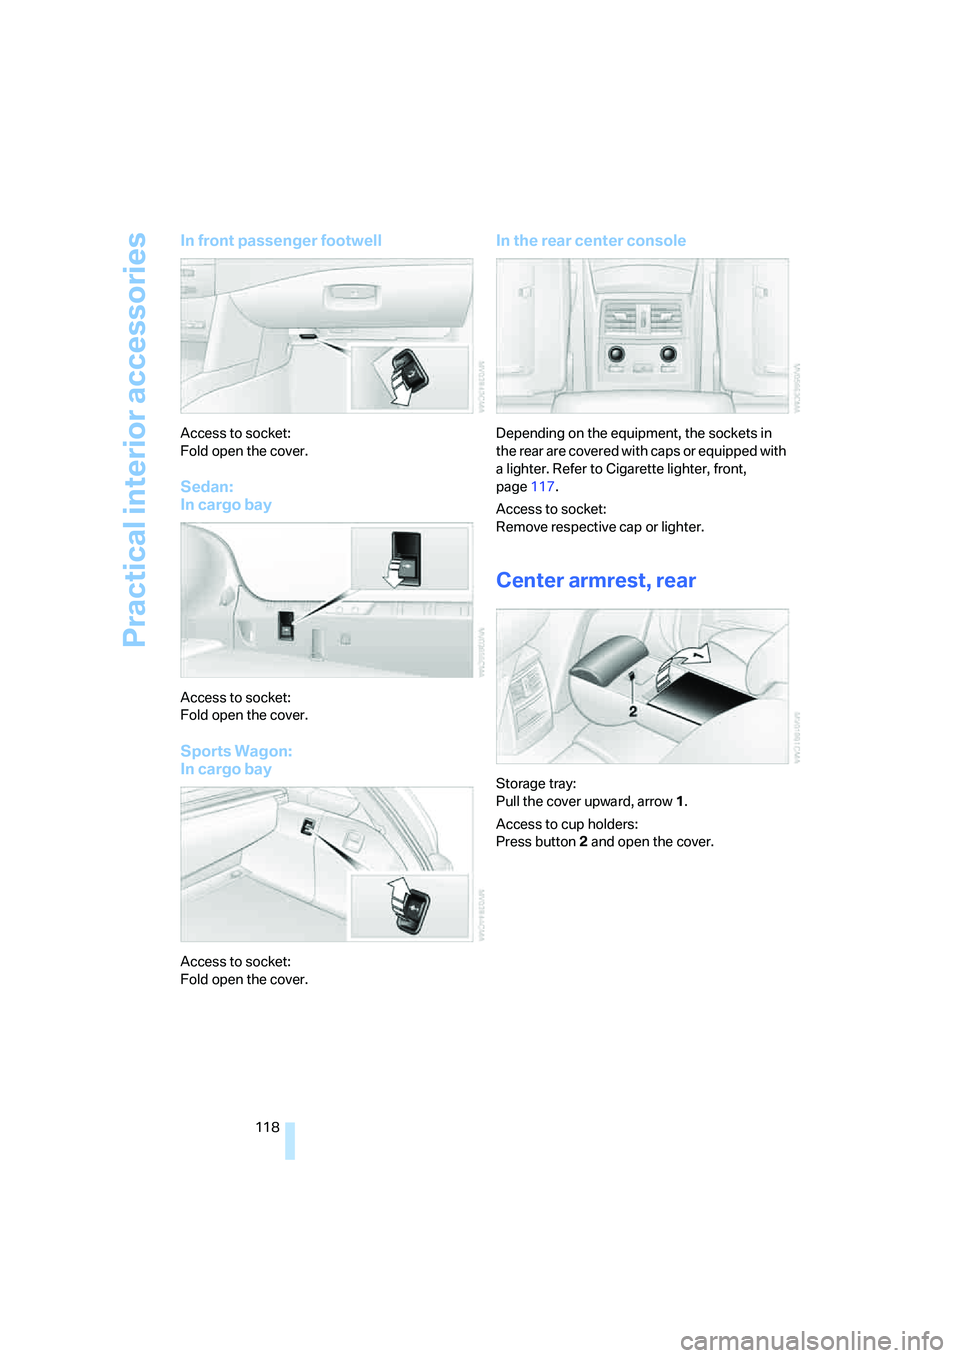
Access to socket:
Fold open the cover.
Sedan:
In cargo bay
Access to socket:
Fold open the cover.
Sports Wagon:
In cargo bay
Access to socket:
Fold open the cover.
In the rear center console
Depending on the equipment, the sockets in
the rear are covered with caps or equipped with
a lighter. Refer to Cigarette lighter, front,
page117.
Access to socket:
Remove respective cap or lighter.
Center armrest, rear
Storage tray:
Pull the cover upward, arrow1.
Access to cup holders:
Press button2 and open the cover.
Page 121 of 273
Controls
119Reference
At a glance
Driving tips
Communications
Navigation
Entertainment
Mobility
Sedan:
Through-loading system*
Opening
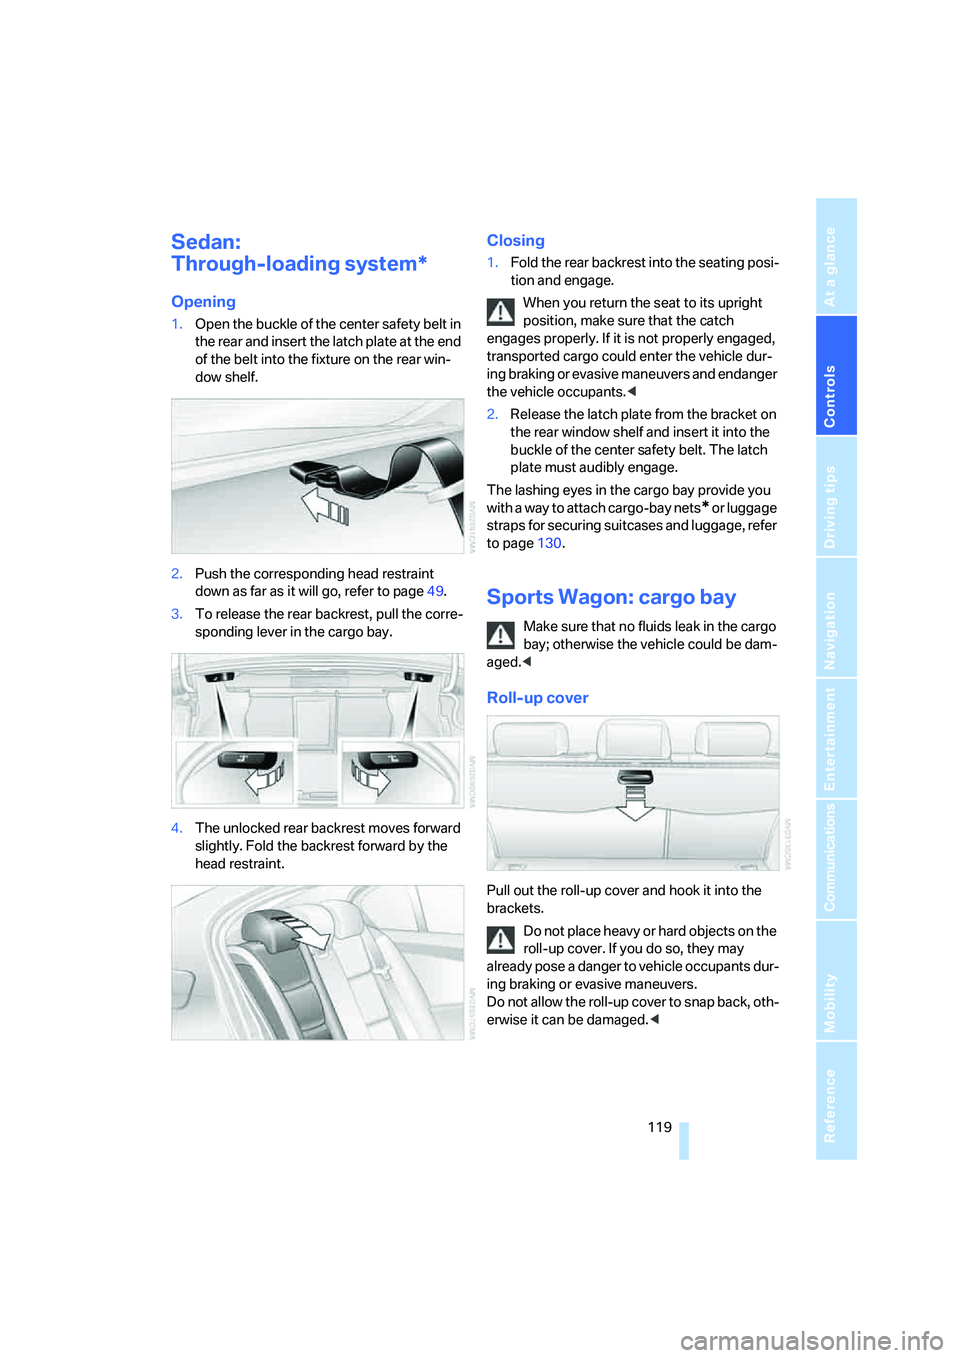
1.Open the buckle of the center safety belt in
the rear and insert the latch plate at the end
of the belt into the fixture on the rear win-
dow shelf.
2.Push the corresponding head restraint
down as far as it will go, refer to page49.
3.To release the rear backrest, pull the corre-
sponding lever in the cargo bay.
4.The unlocked rear backrest moves forward
slightly. Fold the backrest forward by the
head restraint.
Closing
1.Fold the rear backrest into the seating posi-
tion and engage.
When you return the seat to its upright
position, make sure that the catch
engages properly. If it is not properly engaged,
transported cargo could enter the vehicle dur-
ing braking or evasive maneuvers and endanger
the vehicle occupants.<
2.Release the latch plate from the bracket on
the rear window shelf and insert it into the
buckle of the center safety belt. The latch
plate must audibly engage.
The lashing eyes in the cargo bay provide you
with a way to attach cargo-bay nets
* or luggage
straps for securing suitcases and luggage, refer
to page130.
Sports Wagon: cargo bay
Make sure that no fluids leak in the cargo
bay; otherwise the vehicle could be dam-
aged.<
Roll-up cover
Pull out the roll-up cover and hook it into the
brackets.
Do not place heavy or hard objects on the
roll-up cover. If you do so, they may
already pose a danger to vehicle occupants dur-
ing braking or evasive maneuvers.
Do not allow the roll-up cover to snap back, oth-
erwise it can be damaged.<
Page 129 of 273
Driving tips
127Reference
At a glance
Controls
Communications
Navigation
Entertainment
Mobility
Mobile communications devices in
vehicle
BMW discourages the use of mobile
communications devices, e. g. mobile
phones, inside the vehicle without a direct con-
nection to an outside antenna. Otherwise, the
vehicle electronics and mobile communication
device can influence one another. In addition,
there is no assurance that the radiation which
results from transmission will be dissipated
from the vehicle interior.<
Hydroplaning
When driving on wet or slushy roads,
reduce road speed. If you do not, a wedge
of water can form between tires and road sur-
face. This phenomenon is referred to as hydro-
planing, and is characterized by a partial or
complete loss of contact between the tires and
the road surface, ultimately undermining your
ability to steer and brake the vehicle.<
The risk of hydroplaning increases as the tread
depth of the tires decreases, refer also to Mini-
mum tire tread on page213.
Driving through water
Do not drive through water on the road if it
is deeper than 1 ft/30 cm, and then only at
walking speed at the most. Otherwise, the vehi-
cle's engine, the electrical systems and the
transmission may be damaged.<
Using handbrake on inclines
On inclines, do not hold the vehicle with
the clutch; use the handbrake. Otherwise
greater clutch wear will result.<
SMG Sequential Manual Transmission
Start off quickly on slopes. Do not hold
the vehicle on a hill by pressing the accel-
erator, but apply the handbrake instead. Other-
wise overheating can occur in the transmission
region.<
Starting assistant
The starting assistant enables you to start off
conveniently on slopes. The handbrake is not
required for this purpose.
1.Hold the vehicle with the footbrake.
2.Release the footbrake and drive off quickly.
The starting assistant holds the vehicle
for approx. 2 seconds after releasing the
footbrake. Depending on the load, the vehicle
may also roll back slightly during this time.
After releasing the footbrake, drive off quickly,
otherwise the starting assistant no longer holds
the vehicle after approx. 2 seconds and it
begins to roll back.<
Braking safely
Your BMW is equipped with ABS as a standard
feature. In situations that require it, it is best to
brake with full force. Since the vehicle maintains
steering responsiveness, you can still avoid
possible obstacles with a minimum of steering
effort.
Pulsation of the brake pedal, combined with
sounds from the hydraulic circuits, indicate that
ABS is in its active mode.
Do not drive with your foot resting on the
brake pedal. Even light but consistent
pedal pressure can lead to high temperatures,
brake wear and possibly even brake failure.<
Driving in wet conditions
When roads are wet or there is heavy rain,
briefly exert gentle pressure on the brake pedal
every few miles. Monitor traffic conditions to
ensure that this maneuver does not endanger
other road users. The heat generated in this
process helps dry the pads and rotors to ensure
that full braking efficiency will then be available
when you need it.
Hills
To prevent overheating and the resulting
reduced efficiency of the brake system,
drive long or steep downhill gradients in the
gear in which the least braking is required. Even
light but consistent pressure on the brake pedal
Page 132 of 273
Things to remember when driving
130
Securing cargo
>Use the luggage net*, luggage straps, or
securing straps to hold down small and
lightweight luggage and cargo.
>Heavy-duty cargo straps
* for securing
larger and heavier objects are available at
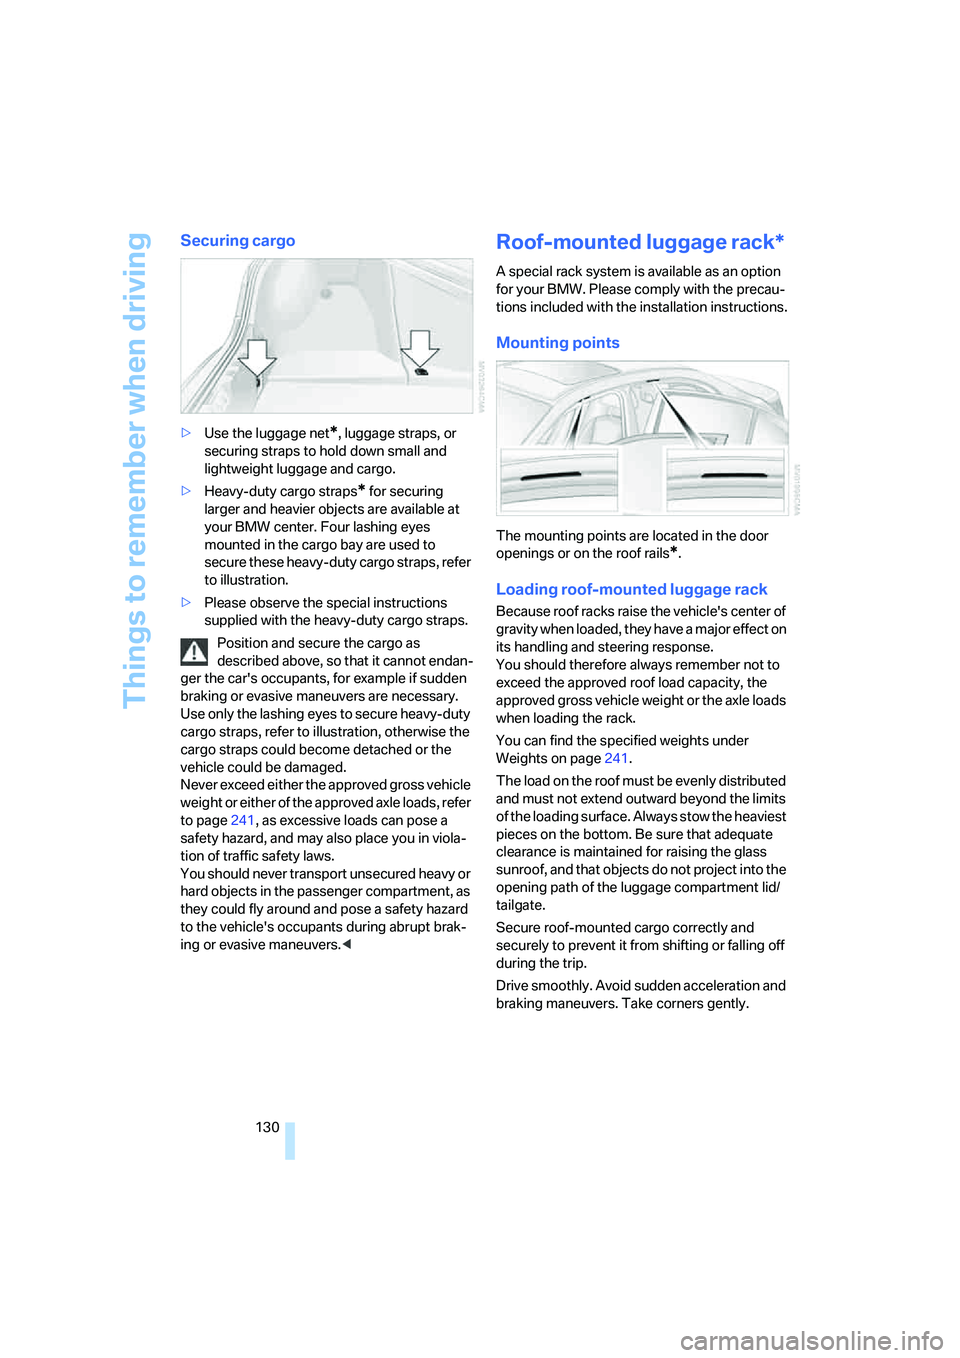
your BMW center. Four lashing eyes
mounted in the cargo bay are used to
secure these heavy-duty cargo straps, refer
to illustration.
>Please observe the special instructions
supplied with the heavy-duty cargo straps.
Position and secure the cargo as
described above, so that it cannot endan-
ger the car's occupants, for example if sudden
braking or evasive maneuvers are necessary.
Use only the lashing eyes to secure heavy-duty
cargo straps, refer to illustration, otherwise the
cargo straps could become detached or the
vehicle could be damaged.
Never exceed either the approved gross vehicle
weight or either of the approved axle loads, refer
to page241, as excessive loads can pose a
safety hazard, and may also place you in viola-
tion of traffic safety laws.
You should never transport unsecured heavy or
hard objects in the passenger compartment, as
they could fly around and pose a safety hazard
to the vehicle's occupants during abrupt brak-
ing or evasive maneuvers.<
Roof-mounted luggage rack*
A special rack system is available as an option
for your BMW. Please comply with the precau-
tions included with the installation instructions.
Mounting points
The mounting points are located in the door
openings or on the roof rails
*.
Loading roof-mounted luggage rack
Because roof racks raise the vehicle's center of
gravity when loaded, they have a major effect on
its handling and steering response.
You should therefore always remember not to
exceed the approved roof load capacity, the
approved gross vehicle weight or the axle loads
when loading the rack.
You can find the specified weights under
Weights on page241.
The load on the roof must be evenly distributed
and must not extend outward beyond the limits
of the loading surface. Always stow the heaviest
pieces on the bottom. Be sure that adequate
clearance is maintained for raising the glass
sunroof, and that objects do not project into the
opening path of the luggage compartment lid/
tailgate.
Secure roof-mounted cargo correctly and
securely to prevent it from shifting or falling off
during the trip.
Drive smoothly. Avoid sudden acceleration and
braking maneuvers. Take corners gently.
Page 136 of 273
Starting navigation system
134
Starting navigation system
Your navigation system can use satellites to
ascertain the precise position of your vehicle
and guide you reliably to any destination you
enter.
Navigation DVD
The navigation system requires a special navi-
gation DVD. The latest version is available at
your BMW center.
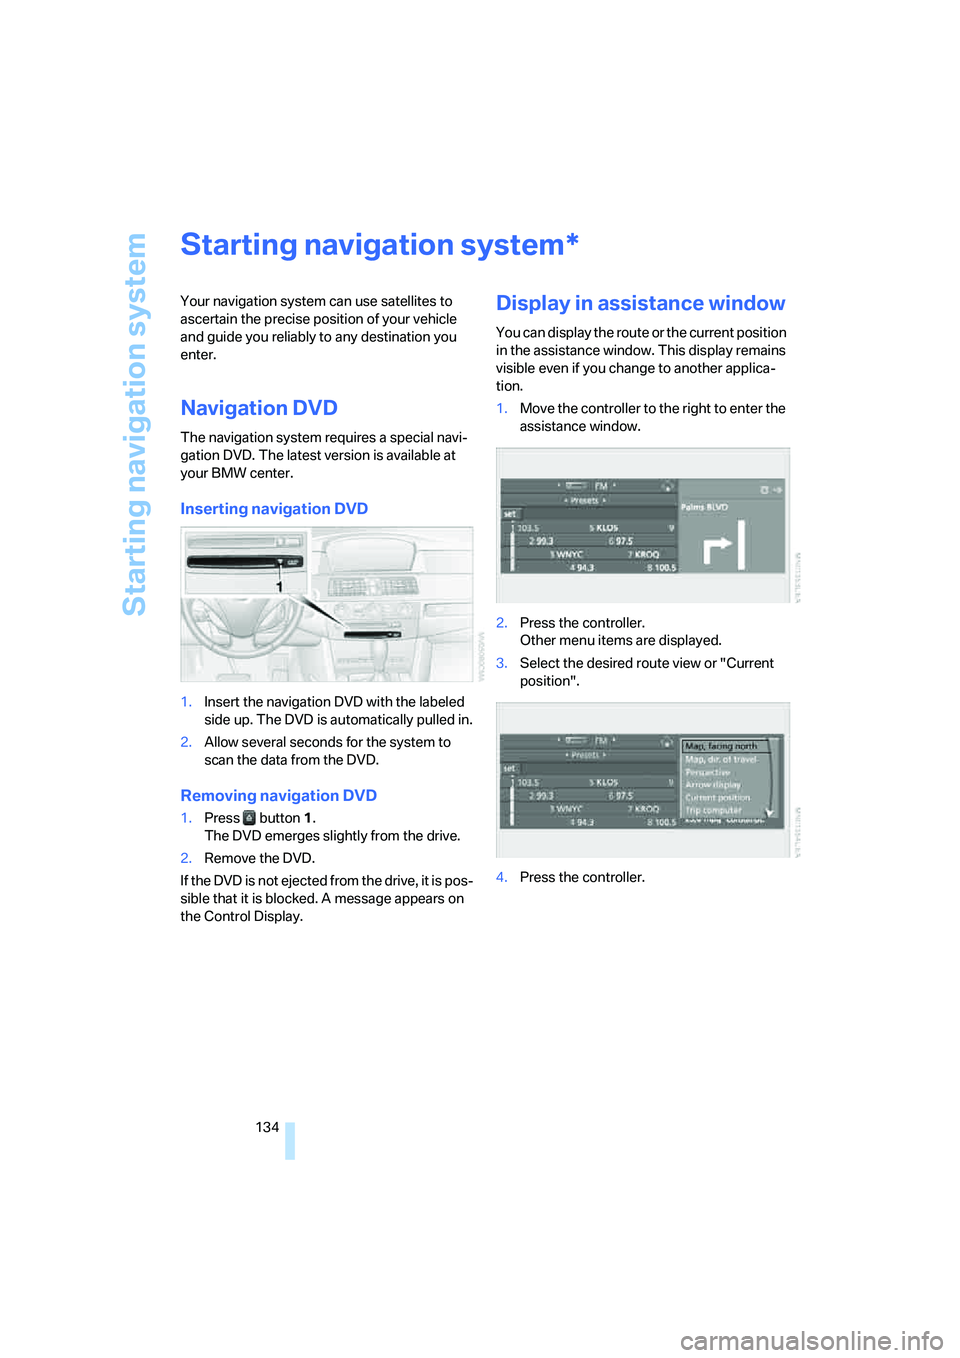
Inserting navigation DVD
1.Insert the navigation DVD with the labeled
side up. The DVD is automatically pulled in.
2.Allow several seconds for the system to
scan the data from the DVD.
Removing navigation DVD
1.Press button 1.
The DVD emerges slightly from the drive.
2.Remove the DVD.
If the DVD is not ejected from the drive, it is pos-
sible that it is blocked. A message appears on
the Control Display.
Display in assistance window
You can display the route or the current position
in the assistance window. This display remains
visible even if you change to another applica-
tion.
1.Move the controller to the right to enter the
assistance window.
2.Press the controller.
Other menu items are displayed.
3.Select the desired route view or "Current
position".
4.Press the controller.
*
Page 141 of 273
Navigation
Driving tips
139Reference
At a glance
Controls
Communications
Entertainment
Mobility
Selecting country
1.Wait for the system to ask for the country of
destination.
Say the name of the country of destination in
the language of the voice command system.
Entering destination
The destination can be spelled or entered as an
entire word.
Spelling destination
To enter the destination, spell it using the
orthography of the country of destination.
Pronounce the letters smoothly and at normal
volume, avoiding excessive emphasis and
pauses.
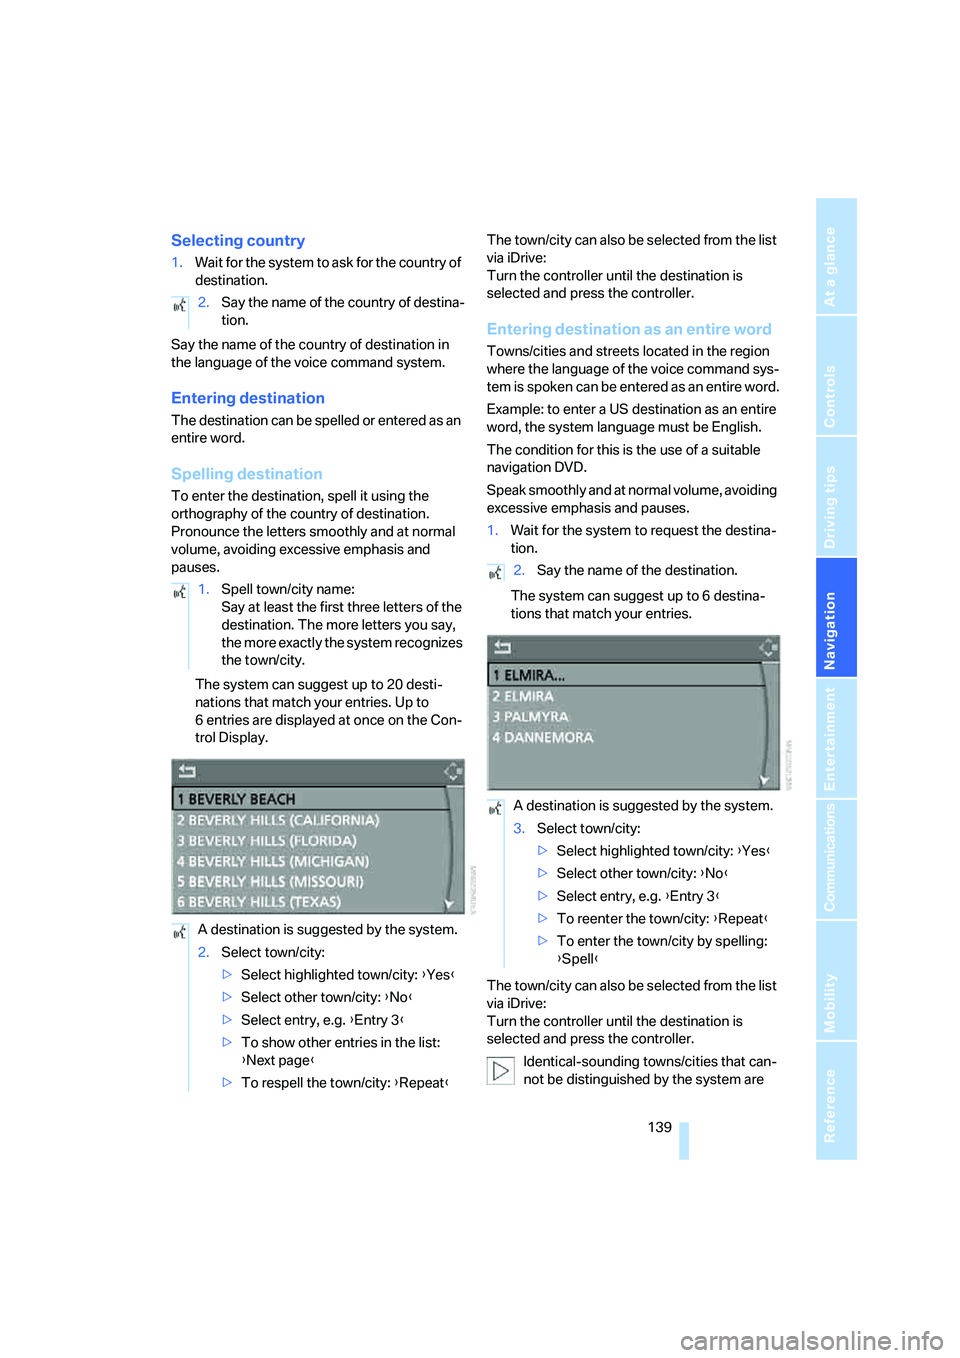
The system can suggest up to 20 desti-
nations that match your entries. Up to
6 entries are displayed at once on the Con-
trol Display.The town/city can also be selected from the list
via iDrive:
Turn the controller until the destination is
selected and press the controller.
Entering destination as an entire word
Towns/cities and streets located in the region
where the language of the voice command sys-
tem is spoken can be entered as an entire word.
Example: to enter a US destination as an entire
word, the system language must be English.
The condition for this is the use of a suitable
navigation DVD.
Speak smoothly and at normal volume, avoiding
excessive emphasis and pauses.
1.Wait for the system to request the destina-
tion.
The system can suggest up to 6 destina-
tions that match your entries.
The town/city can also be selected from the list
via iDrive:
Turn the controller until the destination is
selected and press the controller.
Identical-sounding towns/cities that can-
not be distinguished by the system are 2.Say the name of the country of destina-
tion.
1.Spell town/city name:
Say at least the first three letters of the
destination. The more letters you say,
the more exactly the system recognizes
the town/city.
A destination is suggested by the system.
2.Select town/city:
>Select highlighted town/city: {Yes}
>Select other town/city: {No}
>Select entry, e.g. {Entry 3}
>To show other entries in the list:
{Next page}
>To respell the town/city: {Repeat}
2.Say the name of the destination.
A destination is suggested by the system.
3.Select town/city:
>Select highlighted town/city: {Yes}
>Select other town/city: {No}
>Select entry, e.g. {Entry 3}
>To reenter the town/city: {Repeat}
>To enter the town/city by spelling:
{Spell}
Page 147 of 273
Navigation
Driving tips
145Reference
At a glance
Controls
Communications
Entertainment
Mobility
Selecting route
You can influence the calculated route by
choosing certain route criteria. You can change
the route criteria as often as you like while
entering the destination and whenever the des-
tination guidance is active.
The route is planned according to fixed rules.
The type of road is taken into account, e.g.
whether it is a highway or a winding road. The
road types are stored on the navigation DVD.
As a result, the routes recommended by the
navigation system may not always be the same
ones that you would choose based on personal
experience.
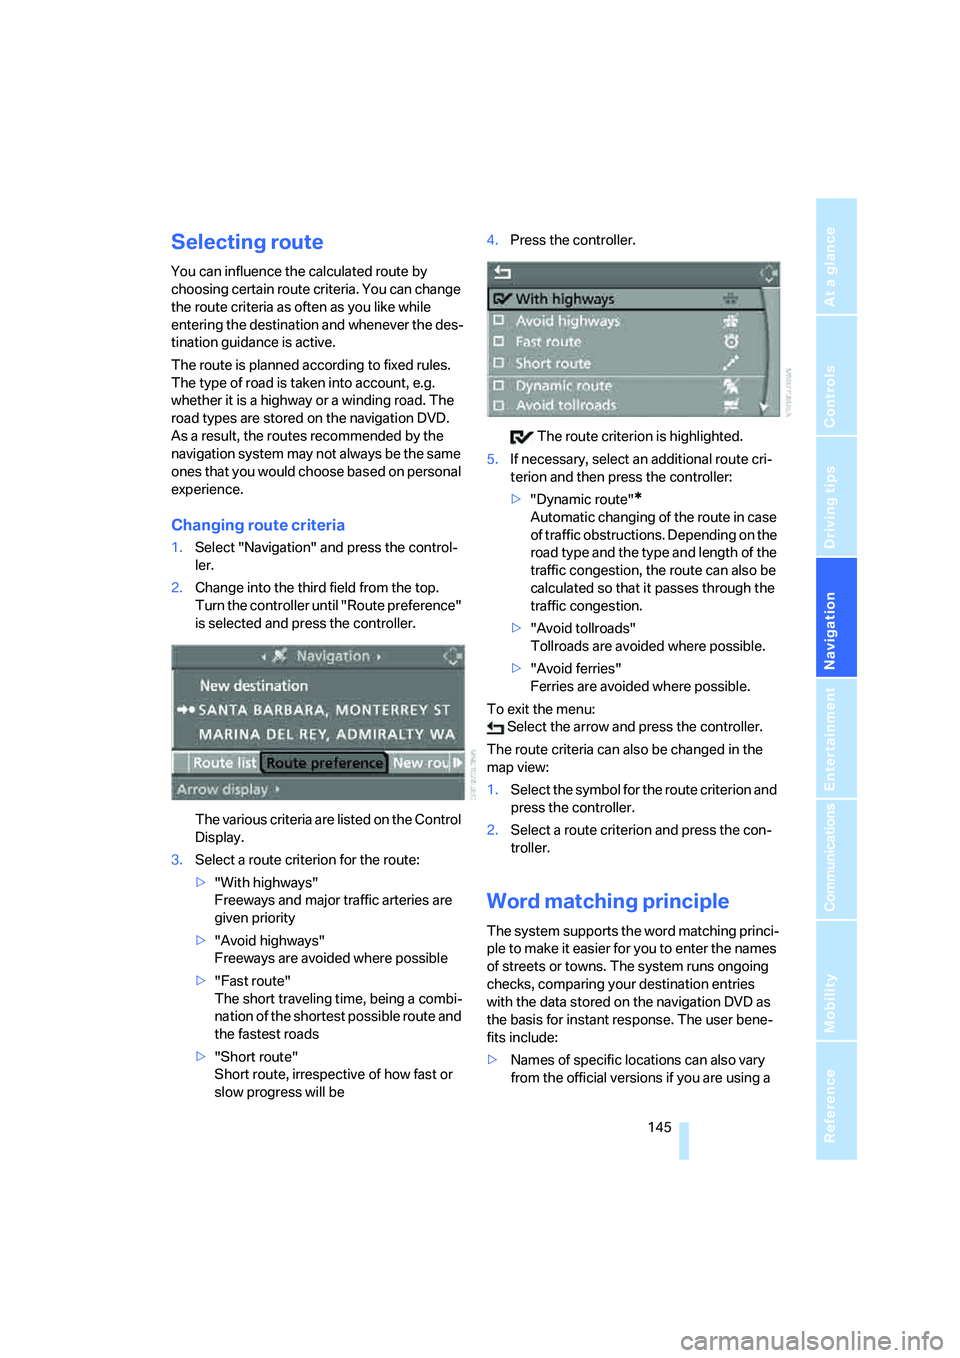
Changing route criteria
1.Select "Navigation" and press the control-
ler.
2.Change into the third field from the top.
Turn the controller until "Route preference"
is selected and press the controller.
The various criteria are listed on the Control
Display.
3.Select a route criterion for the route:
>"With highways"
Freeways and major traffic arteries are
given priority
>"Avoid highways"
Freeways are avoided where possible
>"Fast route"
The short traveling time, being a combi-
nation of the shortest possible route and
the fastest roads
>"Short route"
Short route, irrespective of how fast or
slow progress will be4.Press the controller.
The route criterion is highlighted.
5.If necessary, select an additional route cri-
terion and then press the controller:
>"Dynamic route"
*
Automatic changing of the route in case
of traffic obstructions. Depending on the
road type and the type and length of the
traffic congestion, the route can also be
calculated so that it passes through the
traffic congestion.
>"Avoid tollroads"
Tollroads are avoided where possible.
>"Avoid ferries"
Ferries are avoided where possible.
To exit the menu:
Select the arrow and press the controller.
The route criteria can also be changed in the
map view:
1.Select the symbol for the route criterion and
press the controller.
2.Select a route criterion and press the con-
troller.
Word matching principle
The system supports the word matching princi-
ple to make it easier for you to enter the names
of streets or towns. The system runs ongoing
checks, comparing your destination entries
with the data stored on the navigation DVD as
the basis for instant response. The user bene-
fits include:
>Names of specific locations can also vary
from the official versions if you are using a