2007 BMW 525XI sport mode
[x] Cancel search: sport modePage 9 of 273

7Reference
At a glance
Controls
Driving tips
Communications
Navigation
Entertainment
Mobility
Service and warranty
We recommend that you read this publication
thoroughly.
Your BMW is covered by the following warran-
ties:
>New Vehicle Limited Warranty
>Rust Perforation Limited Warranty
>Federal Emissions System Defect Warranty
>Federal Emissions Performance Warranty
>California Emission Control System Limited
Warranty
Detailed information about these warranties is
listed in the Service and Warranty Information
Booklet for US models or in the Warranty and
Service Guide Booklet for Canadian models.
Reporting safety defects
For US customers
The following applies only to vehicles owned
and operated in the US.
If you believe that your vehicle has a defect
which could cause a crash or could cause injury
or death, you should immediately inform the
National Highway Traffic Safety Administration,
NHTSA, in addition to notifying BMW of North
America, LLC, P.O. Box 1227, Westwood, New
Jersey 07675-1227, Telephone 1-800-831-
1117.
If NHTSA receives similar complaints, it may
open an investigation, and if it finds that a safety
defect exists in a group of vehicles, it may order
a recall and remedy campaign. However,
NHTSA cannot become involved in individual
problems between you, your dealer, or BMW of
North America, LLC.
To contact NHTSA, you may call the Vehicle
Safety Hotline toll-free at 1-888-327-4236
(TTY: 1-800-424-9153); go to
http://www.safercar.gov; or write to: Adminis-
trator, NHTSA, 400 Seventh Street, SW.,
Washington, DC 20590. You can also obtain
other information about motor vehicle safety
from http://www.safercar.gov
For Canadian customers
Canadian customers who wish to report a
safety-related defect to Transport Canada,
Defect Investigations and Recalls, may call
1-800-333-0510 toll-free from anywhere in
Canada or 1-613-993-9851 from the Ottawa
region and from other countries, or contact
Transport Canada by mail at: Transport
Canada, ASFAD, Place de Ville, Tower C,
330 Sparks Street, Ottawa, ON, K1A 0N5.
You can also obtain other information about
motor vehicle safety from http://www.tc.gc.ca
Page 33 of 273

Controls
31Reference
At a glance
Driving tips
Communications
Navigation
Entertainment
Mobility
Press the button twice to unlock the
entire vehicle.
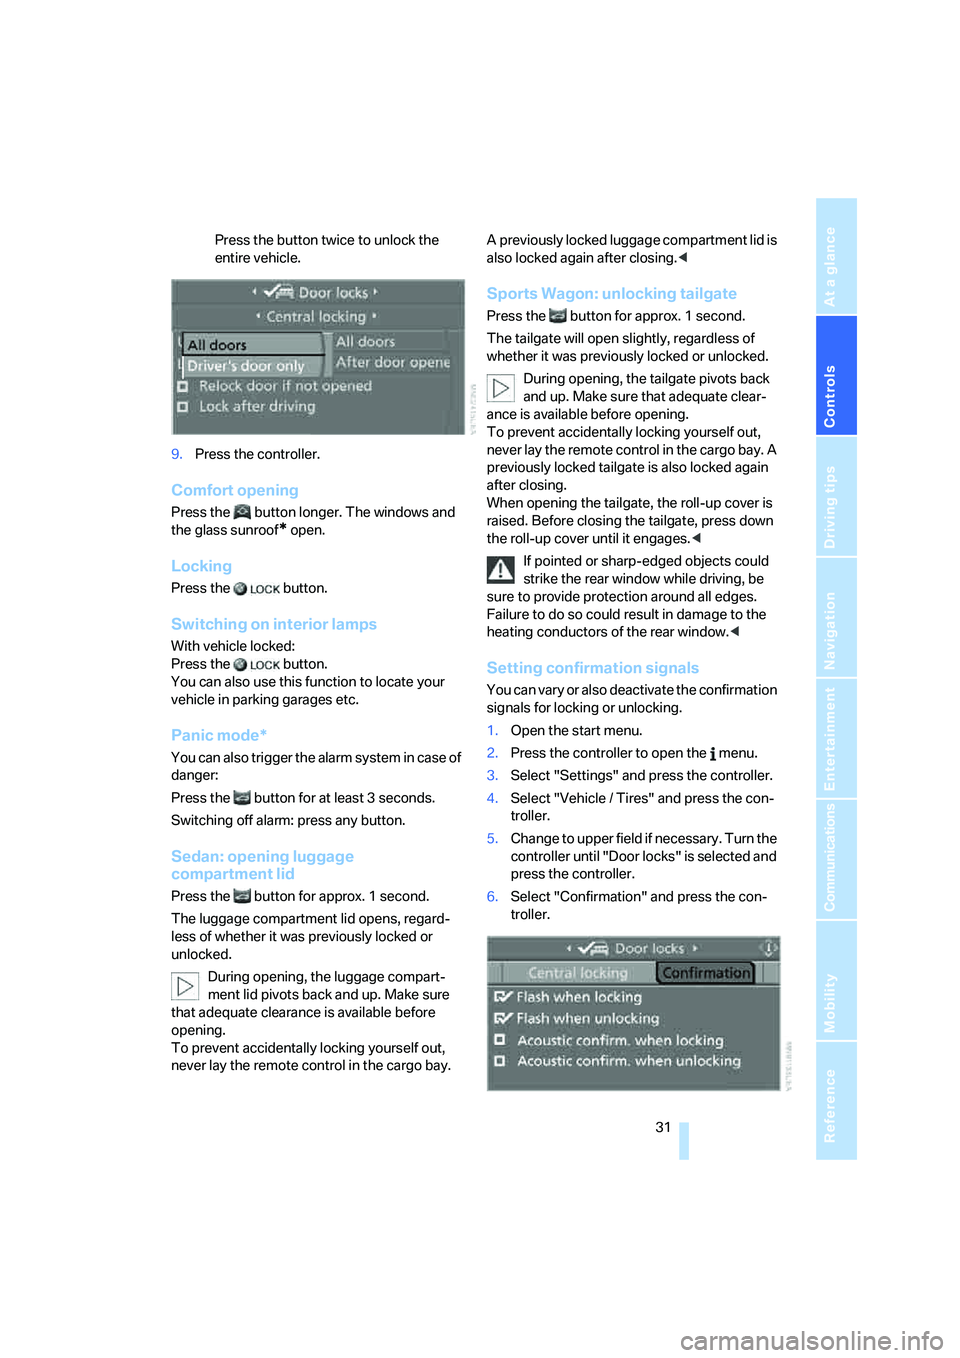
9.Press the controller.
Comfort opening
Press the button longer. The windows and
the glass sunroof
* open.
Locking
Press the button.
Switching on interior lamps
With vehicle locked:
Press the button.
You can also use this function to locate your
vehicle in parking garages etc.
Panic mode*
You can also trigger the alarm system in case of
danger:
Press the button for at least 3 seconds.
Switching off alarm: press any button.
Sedan: opening luggage
compartment lid
Press the button for approx. 1 second.
The luggage compartment lid opens, regard-
less of whether it was previously locked or
unlocked.
During opening, the luggage compart-
ment lid pivots back and up. Make sure
that adequate clearance is available before
opening.
To prevent accidentally locking yourself out,
never lay the remote control in the cargo bay. A previously locked luggage compartment lid is
also locked again after closing.<
Sports Wagon: unlocking tailgate
Press the button for approx. 1 second.
The tailgate will open slightly, regardless of
whether it was previously locked or unlocked.
During opening, the tailgate pivots back
and up. Make sure that adequate clear-
ance is available before opening.
To prevent accidentally locking yourself out,
never lay the remote control in the cargo bay. A
previously locked tailgate is also locked again
after closing.
When opening the tailgate, the roll-up cover is
raised. Before closing the tailgate, press down
the roll-up cover until it engages.<
If pointed or sharp-edged objects could
strike the rear window while driving, be
sure to provide protection around all edges.
Failure to do so could result in damage to the
heating conductors of the rear window.<
Setting confirmation signals
You can vary or also deactivate the confirmation
signals for locking or unlocking.
1.Open the start menu.
2.Press the controller to open the menu.
3.Select "Settings" and press the controller.
4.Select "Vehicle / Tires" and press the con-
troller.
5.Change to upper field if necessary. Turn the
controller until "Door locks" is selected and
press the controller.
6.Select "Confirmation" and press the con-
troller.
Page 49 of 273

Controls
47Reference
At a glance
Driving tips
Communications
Navigation
Entertainment
Mobility
Adjusting lumbar support*
You can also adjust the contour of the backrest
to obtain additional support in the lumbar
region.
The upper hips and spinal column receive sup-
plementary support to help you maintain a
relaxed, upright sitting position.
>Increase or decrease curvature: press front
or rear section of switch.
>Shift curvature up or down: press upper or
lowers section of switch.
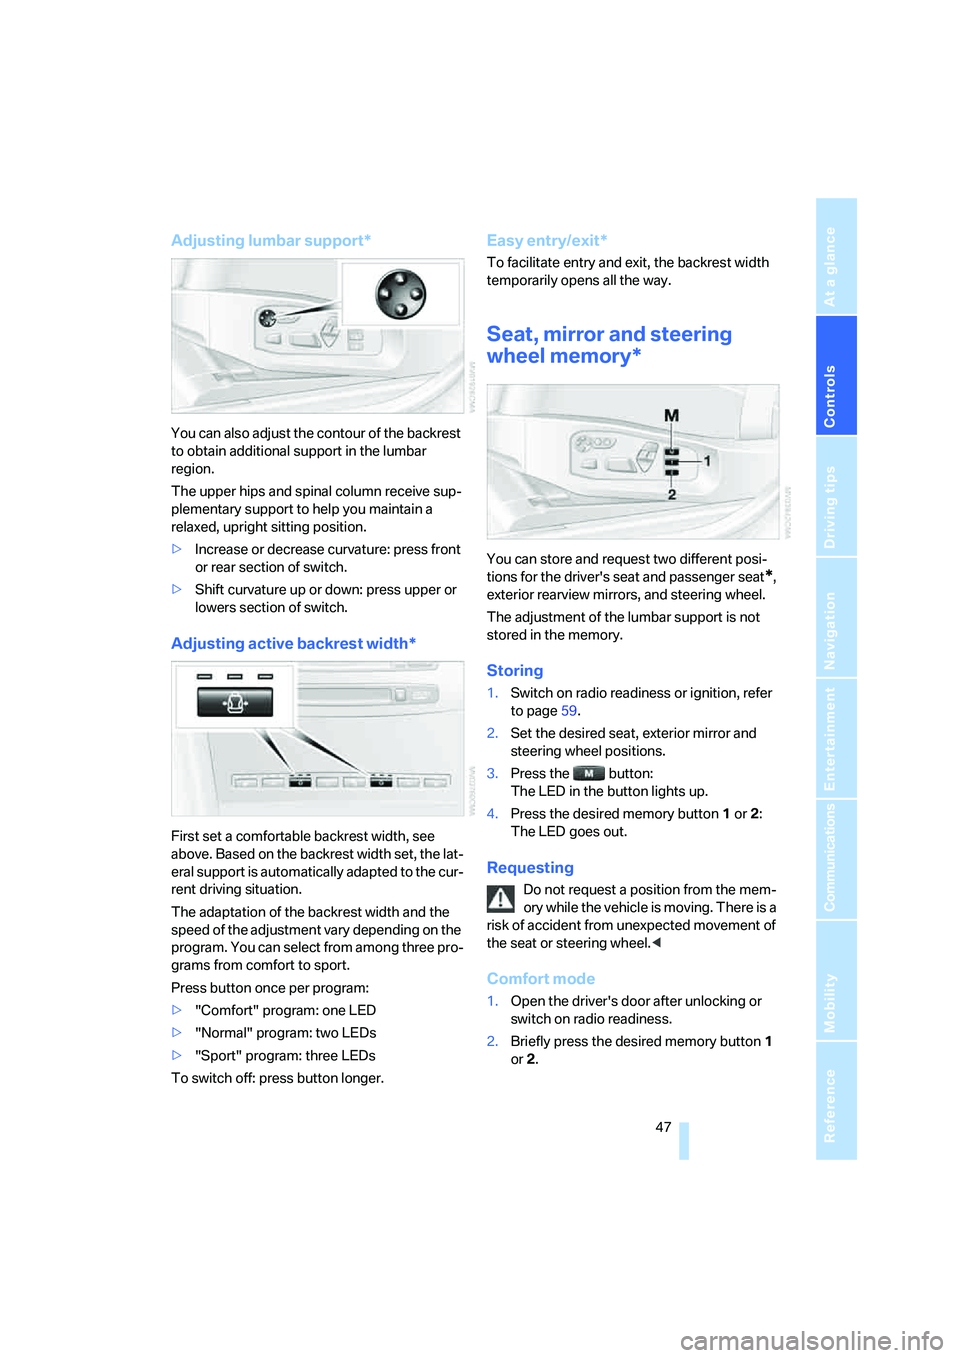
Adjusting active backrest width*
First set a comfortable backrest width, see
above. Based on the backrest width set, the lat-
eral support is automatically adapted to the cur-
rent driving situation.
The adaptation of the backrest width and the
speed of the adjustment vary depending on the
program. You can select from among three pro-
grams from comfort to sport.
Press button once per program:
>"Comfort" program: one LED
>"Normal" program: two LEDs
>"Sport" program: three LEDs
To switch off: press button longer.
Easy entry/exit*
To facilitate entry and exit, the backrest width
temporarily opens all the way.
Seat, mirror and steering
wheel memory*
You can store and request two different posi-
tions for the driver's seat and passenger seat
*,
exterior rearview mirrors, and steering wheel.
The adjustment of the lumbar support is not
stored in the memory.
Storing
1.Switch on radio readiness or ignition, refer
to page59.
2.Set the desired seat, exterior mirror and
steering wheel positions.
3.Press the button:
The LED in the button lights up.
4.Press the desired memory button1 or2:
The LED goes out.
Requesting
Do not request a position from the mem-
ory while the vehicle is moving. There is a
risk of accident from unexpected movement of
the seat or steering wheel.<
Comfort mode
1.Open the driver's door after unlocking or
switch on radio readiness.
2.Briefly press the desired memory button1
or2.
Page 64 of 273

Driving
62
Manual transmission
While shifting in the 5th/6th gear lane,
press the gearshift lever toward the right,
otherwise accidental shifting into the 3rd or 4th
gear could result in engine damage.<
Reverse gear
Select only when the vehicle is stationary.
When pressing the gearshift lever to the left,
overcome some resistance.
SMG Sequential Manual
Transmission*
The concept
The SMG Sequential Manual Transmission is
an automated manual transmission in which an
electrohydraulic system handles the clutching
and gear changes.
The SMG is operated with the selector lever
and two shift paddles on the steering wheel.
It offers you the following functions:
>Optional manual or automatic operation:
Sequential mode or Drive mode
>You have a choice of two driving programs:
Normal or Sport, refer to Dynamic Driving
Control page63
>Automatic downshifting and prevention of
incorrect shifting even in Sequential opera-
tion
>Acceleration assistant, refer to page64
Selector lever positions
>R: Reverse gear
>N: Neutral
>One-touch functions for Sequential mode:
+: manual upshifting
–: manual downshifting
>D: activate/deactivate the Drive mode
The transmission automatically shifts
into N if the driver's door is opened with
the engine running and neither the pedals, the
shift paddles nor the selector lever are oper-
ated.
This is signaled by an acoustic signal and the
flashing display N in the instrument cluster; a
message appears on the Control Display.<
Gear display
R N 1 to 6
The currently engaged gear is displayed, pre-
ceded by a D in Drive mode.
It is only possible to recognize whether
the desired selector lever position is
engaged with this display.<
Page 66 of 273

Driving
64
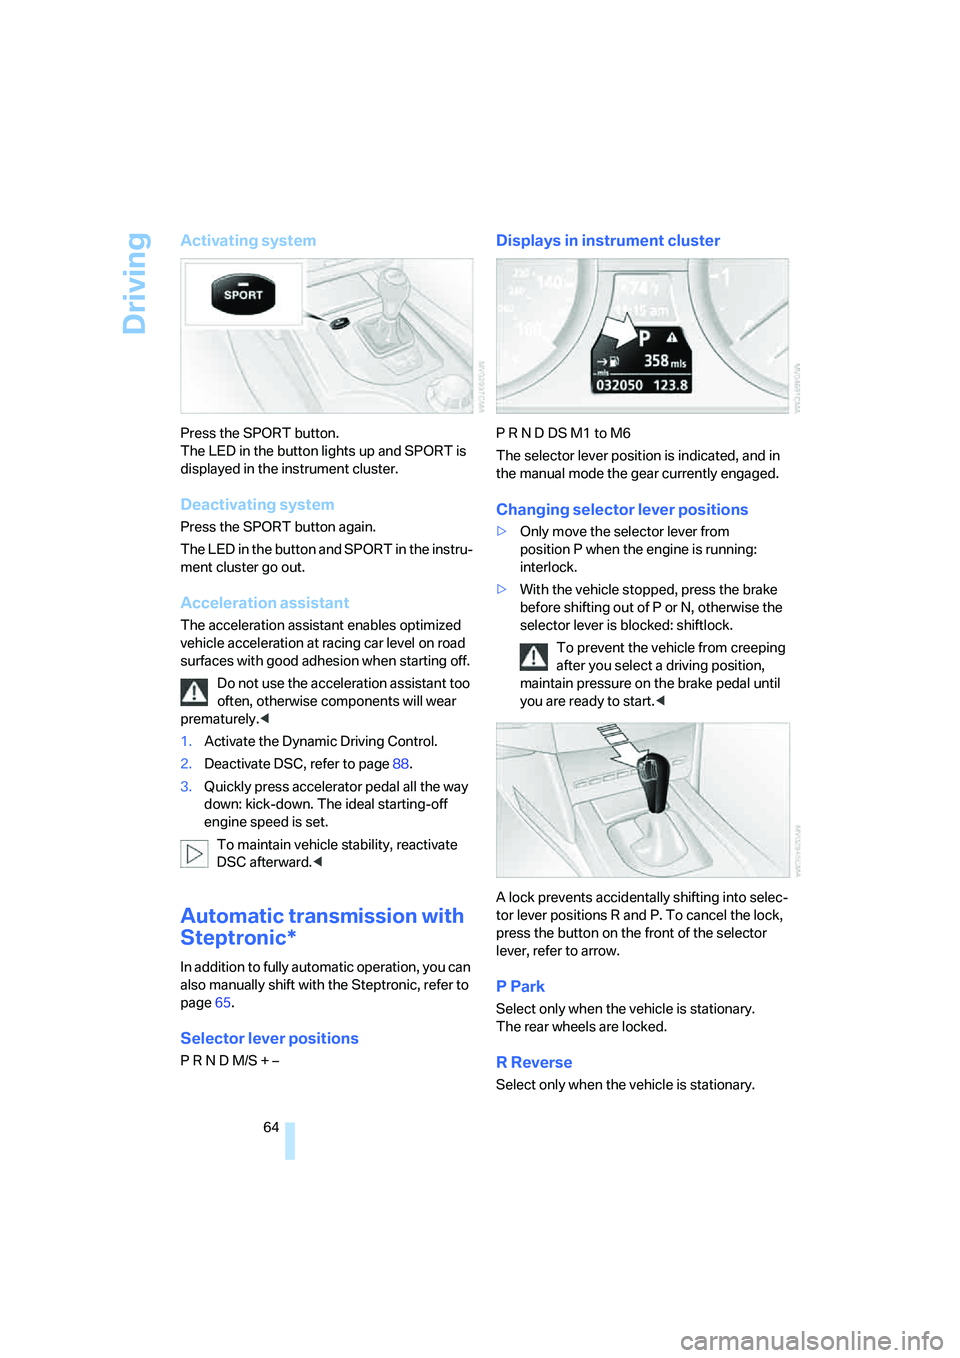
Activating system
Press the SPORT button.
The LED in the button lights up and SPORT is
displayed in the instrument cluster.
Deactivating system
Press the SPORT button again.
The LED in the button and SPORT in the instru-
ment cluster go out.
Acceleration assistant
The acceleration assistant enables optimized
vehicle acceleration at racing car level on road
surfaces with good adhesion when starting off.
Do not use the acceleration assistant too
often, otherwise components will wear
prematurely.<
1.Activate the Dynamic Driving Control.
2.Deactivate DSC, refer to page88.
3.Quickly press accelerator pedal all the way
down: kick-down. The ideal starting-off
engine speed is set.
To maintain vehicle stability, reactivate
DSC afterward.<
Automatic transmission with
Steptronic*
In addition to fully automatic operation, you can
also manually shift with the Steptronic, refer to
page65.
Selector lever positions
P R N D M/S + –
Displays in instrument cluster
P R N D DS M1 to M6
The selector lever position is indicated, and in
the manual mode the gear currently engaged.
Changing selector lever positions
>Only move the selector lever from
position P when the engine is running:
interlock.
>With the vehicle stopped, press the brake
before shifting out of P or N, otherwise the
selector lever is blocked: shiftlock.
To prevent the vehicle from creeping
after you select a driving position,
maintain pressure on the brake pedal until
you are ready to start.<
A lock prevents accidentally shifting into selec-
tor lever positions R and P. To cancel the lock,
press the button on the front of the selector
lever, refer to arrow.
P Park
Select only when the vehicle is stationary.
The rear wheels are locked.
R Reverse
Select only when the vehicle is stationary.
Page 67 of 273

Controls
65Reference
At a glance
Driving tips
Communications
Navigation
Entertainment
Mobility
N Neutral
Can, for example, be engaged in automatic car
washes. The vehicle can roll.
D Drive, automatic position
Position for normal vehicle operation. All for-
ward gears are available.
Under normal operating conditions, the fuel
consumption is lowest when driving in posi-
tion D.
Kick-down
The kick-down mode provides maximum accel-
eration: press the accelerator pedal beyond the
full-throttle resistance point.
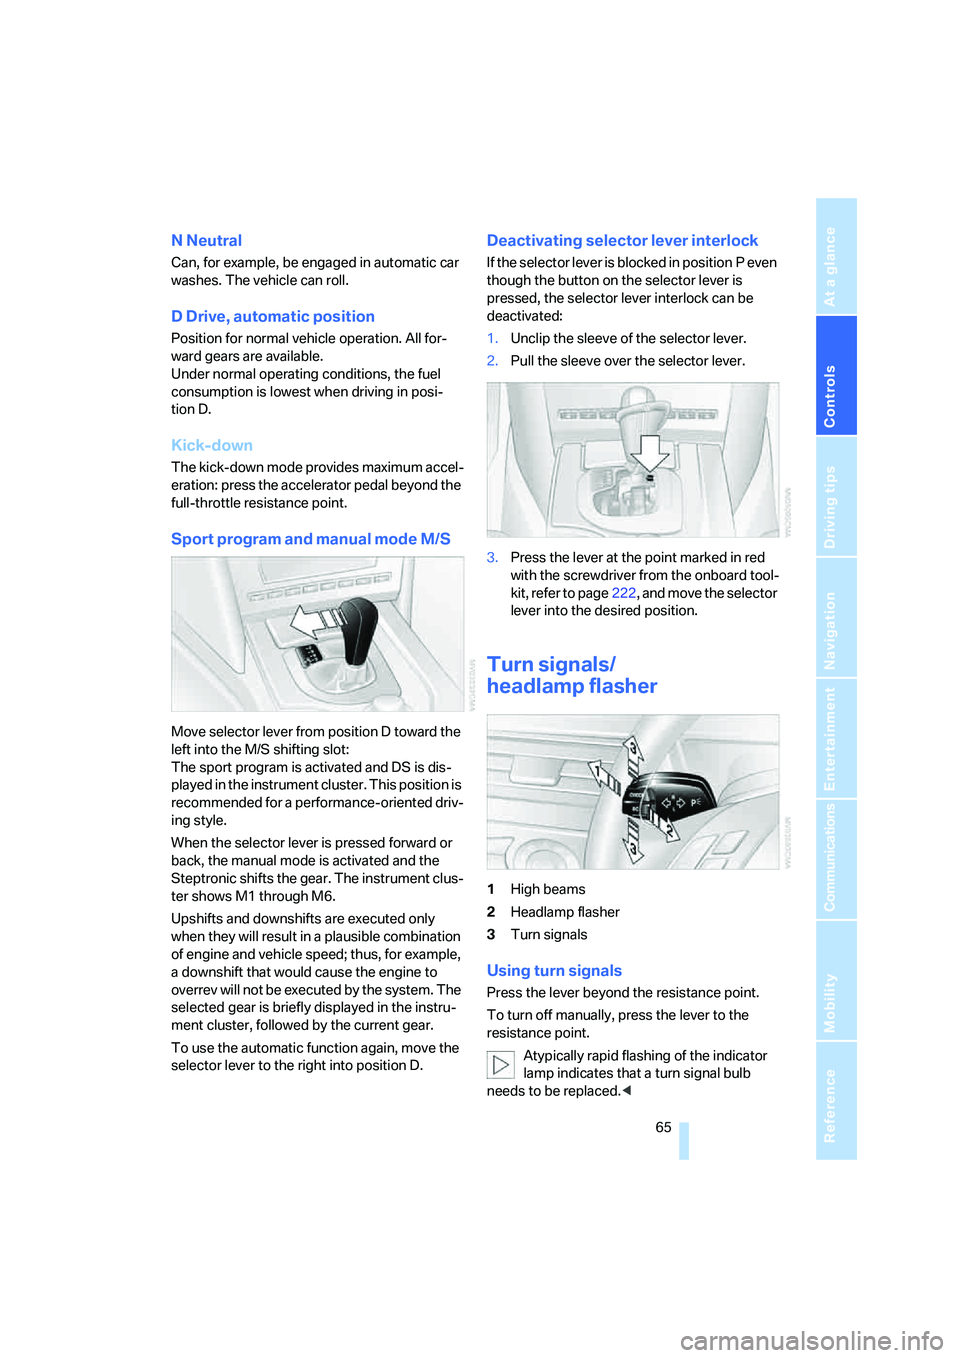
Sport program and manual mode M/S
Move selector lever from position D toward the
left into the M/S shifting slot:
The sport program is activated and DS is dis-
played in the instrument cluster. This position is
recommended for a performance-oriented driv-
ing style.
When the selector lever is pressed forward or
back, the manual mode is activated and the
Steptronic shifts the gear. The instrument clus-
ter shows M1 through M6.
Upshifts and downshifts are executed only
when they will result in a plausible combination
of engine and vehicle speed; thus, for example,
a downshift that would cause the engine to
overrev will not be executed by the system. The
selected gear is briefly displayed in the instru-
ment cluster, followed by the current gear.
To use the automatic function again, move the
selector lever to the right into position D.
Deactivating selector lever interlock
If the selector lever is blocked in position P even
though the button on the selector lever is
pressed, the selector lever interlock can be
deactivated:
1.Unclip the sleeve of the selector lever.
2.Pull the sleeve over the selector lever.
3.Press the lever at the point marked in red
with the screwdriver from the onboard tool-
kit, refer to page222, and move the selector
lever into the desired position.
Turn signals/
headlamp flasher
1High beams
2Headlamp flasher
3Turn signals
Using turn signals
Press the lever beyond the resistance point.
To turn off manually, press the lever to the
resistance point.
Atypically rapid flashing of the indicator
lamp indicates that a turn signal bulb
needs to be replaced.<
Page 69 of 273

Controls
67Reference
At a glance
Driving tips
Communications
Navigation
Entertainment
Mobility
Activating rain sensor
Press the button, arrow3. The LED in the but-
ton lights up.
Adjusting rain sensor sensitivity level
Turn the knurled wheel5.
Deactivating rain sensor
Press the button again, arrow3. The LED goes
out.
Deactivate the rain sensor when passing
through an automatic car wash. Failure to
do so could result in damage caused by undes-
ired wiper activation.<
Cleaning windshield, headlamps* and
BMW Night Vision camera*
Pull the lever, arrow4.
The system sprays washer fluid against the
windshield and activates the wipers for a brief
period.
With the vehicle lighting switched on, the head-
lamps and the BMW Night Vision camera are
also cleaned simultaneously at suitable inter-
vals.
Do not use the washing mechanisms if
there is any danger that the fluid will
freeze on the windshield. If you do so, your
vision could be obscured. To avoid freezing,
use a washer fluid antifreeze, refer to Washer
fluid. Do not use washing mechanisms when
the washer fluid reservoir is empty, otherwise
you will damage the washer pump.<
Windshield washer nozzles
Both windshield washer nozzles are automati-
cally heated with the engine running or the igni-
tion switched on.
Sports Wagon:
Rear window wiper
1Intermittent mode. When reverse gear is
engaged, continuous operation is switched
on automatically
2Cleaning the rear window
Do not use washing mechanisms when
the washer fluid reservoir is empty, other-
wise you will damage the washer pump.<
Washer fluid
Washer fluid antifreeze is flammable.
Always keep it well away from sparks and
open flames, and store it in tightly closed con-
tainers well out of the reach of children. Always
observe the instructions for use provided on the
containers.<
Washer fluid reservoir
All washer nozzles are supplied from one reser-
voir.
Page 92 of 273

Technology for comfort, convenience and safety
90
Displays in instrument cluster
1Display for target speed
2HDC display
Malfunction in driving-stability control
systems
The warning lamp for the brake system
lights up, together with the Indicator
and warning lamps for ABS, DSC and
Tire Pressure Control or Flat Tire Mon-
itor. A message appears on the Control
Display. The driving-stability control
systems have failed. Conventional
braking efficiency remains available
without limitations. While you may con-
tinue, you should remember to proceed
cautiously and drive defensively while avoiding
full brake applications. In addition, the Tire
Pressure Control or the Flat Tire Monitor has
also failed. Have the system checked as soon as
possible.
Display of the previously described
malfunction in Canadian models.
The DSC indicator lamp lights up. A
message appears on the Control Dis-
play. A malfunction has occurred in the
DSC and DTC. The stabilizing actions are no
longer available. The vehicle remains opera-
tional. Have the system checked as soon as
possible.The brake system warning lamp lights
up yellow. A message appears on the
Control Display. DBC has failed. Have
the system checked as soon as possible.
Display of the previously described
malfunction in Canadian models.
Dynamic Drive*
The concept
Dynamic Drive minimizes body roll and opti-
mizes vehicle stability during cornering and
evasive maneuvers.
Dynamic Drive is based on active stabilizers on
the front and rear axles. Suspension compli-
ance adapts to suit driving conditions, varying
from performance-oriented during cornering to
smooth and comfort-oriented when the vehicle
is proceeding in a straight line. During vehicle
operation, the system continuously runs
through closed-loop control cycles lasting only
fractions of a second.
The system assumes operational status each
time you start the engine.
Sports Wagon: self-leveling
suspension
Malfunction
The warning lamp for self-leveling sus-
pension lights up yellow and a message
is shown on the Control Display. A mal-
function has occurred in the self-leveling sus-
pension. Stop and check the vehicle. If it is con-
siderably lower at the rear than at the front, and
possibly also on one side – rear left compared to
rear right –, go to the nearest BMW center or a
workshop that works according to BMW repair
procedures with correspondingly trained per-
sonnel. Drive with appropriate caution in the
meantime. The vehicle has reduced ground
clearance and driving comfort may be notice-
ably reduced. Even if the position of the vehicle
is normal, go to the nearest BMW center or a