2007 BMW 525XI high beam
[x] Cancel search: high beamPage 12 of 273

Cockpit
10
Cockpit
Around the steering wheel: controls and displays
1Sedan: sun blind* for rear window114
2Rear window safety switch41
3Opening and closing windows40
4Adjusting exterior mirrors52
Automatic curb monitor
*52
5
Turn signals65
High beams,
headlamp flasher105
Roadside parking lamps105
Check Control80
Computer76
Page 15 of 273

At a glance
13Reference
Controls
Driving tips
Communications
Navigation
Entertainment
Mobility
Indicator and warning lamps
The concept
The indicator and warning lamps can light up in
different combinations and colors.
Some lamps are tested for proper function by
briefly lighting up during starting of the engine
or when the ignition is switched on.
Explanatory text messages
Text messages at the bottom edge of the Con-
trol Display explain the meaning of the dis-
played indicator and warning lamps.
Additional information, e.g. on the cause of a
malfunction and on the corresponding need to
take action can be displayed via the Check Con-
trol, refer to page80.In urgent cases, this information will be shown
as soon as the corresponding lamp comes on.
Indicator lamps without text messages
The following indicator lamps indicate that the
associated functions are activated:
Handbrake applied61
Handbrake applied for Canadian
models
Fog lamps
*105
DTC Dynamic Traction Control88
High beams/headlamp flasher105
Lamp flashes:
DSC or DTC controls the drive and
braking forces for maintaining vehicle
stability88
Page 40 of 273

Opening and closing
38 >with an acoustic alarm
>by switching on
the hazard warning flashers
>by flashing the high beams
Arming and disarming alarm system
When you lock or unlock the vehicle, either with
the remote control or at the door lock, the alarm
system is armed or disarmed at the same time.
The luggage compartment lid/tailgate can also
be opened with the system armed with the
button on the remote control, refer to page34.
When the luggage compartment lid/tailgate is
closed, it is locked and monitored again.
Switching off alarm
>Unlock the vehicle using the remote control,
refer to page30.
>Insert the remote control all the way into the
ignition lock.
Indicator lamp displays
>The indicator lamp under the interior rear-
view mirror flashes continuously: the sys-
tem is armed.
>The indicator lamp flashes after locking:
doors, hood, luggage compartment lid/tail-
gate or rear window
is/are not properly
closed. Even if you do not close the alerted
area, the system begins to monitor the
remaining areas, and the indicator lamp
flashes continuously after approx. 10 sec-
onds. However, the interior motion sensor
is not activated.
>The indicator lamp goes out after unlocking:
your vehicle has not been disturbed while
you were away.>The indicator lamp flashes after unlocking
until the remote control is inserted into the
ignition lock, however for a maximum of
approx. 5 minutes: your vehicle has been
disturbed while you were away.
Tilt alarm sensor
The tilt of the vehicle is monitored. The alarm
system reacts, e.g. in case of an attempted
wheel theft or towing.
Interior motion sensor
In order for the interior motion sensor to func-
tion properly, the windows and glass sunroof
*
must be completely closed.
Avoiding unintentional alarms
The tilt alarm sensor and interior motion sensor
may be switched off at the same time. This pre-
vents unintentional alarms, e.g. in the following
situations:
>In two-level garages
>When transporting on car-carrying trains,
by sea or on a trailer
>When animals are to remain in the vehicle
Switching off tilt alarm sensor and
interior motion sensor
Press the button on the remote control
again as soon as the vehicle is locked.
The indicator lamp lights up briefly and then
flashes continuously. The tilt alarm sensor and
the interior motion sensor are switched off until
the next time the vehicle is unlocked and subse-
quently locked again.
Comfort access*
Comfort access enables you to access your
vehicle without having to hold the remote con-
trol in your hand. It is sufficient to carry the
remote control with you, e.g. in your jacket
pocket. The vehicle automatically detects the
related remote control in the immediate vicinity
or in the interior.
Page 67 of 273

Controls
65Reference
At a glance
Driving tips
Communications
Navigation
Entertainment
Mobility
N Neutral
Can, for example, be engaged in automatic car
washes. The vehicle can roll.
D Drive, automatic position
Position for normal vehicle operation. All for-
ward gears are available.
Under normal operating conditions, the fuel
consumption is lowest when driving in posi-
tion D.
Kick-down
The kick-down mode provides maximum accel-
eration: press the accelerator pedal beyond the
full-throttle resistance point.
Sport program and manual mode M/S
Move selector lever from position D toward the
left into the M/S shifting slot:
The sport program is activated and DS is dis-
played in the instrument cluster. This position is
recommended for a performance-oriented driv-
ing style.
When the selector lever is pressed forward or
back, the manual mode is activated and the
Steptronic shifts the gear. The instrument clus-
ter shows M1 through M6.
Upshifts and downshifts are executed only
when they will result in a plausible combination
of engine and vehicle speed; thus, for example,
a downshift that would cause the engine to
overrev will not be executed by the system. The
selected gear is briefly displayed in the instru-
ment cluster, followed by the current gear.
To use the automatic function again, move the
selector lever to the right into position D.
Deactivating selector lever interlock
If the selector lever is blocked in position P even
though the button on the selector lever is
pressed, the selector lever interlock can be
deactivated:
1.Unclip the sleeve of the selector lever.
2.Pull the sleeve over the selector lever.
3.Press the lever at the point marked in red
with the screwdriver from the onboard tool-
kit, refer to page222, and move the selector
lever into the desired position.
Turn signals/
headlamp flasher
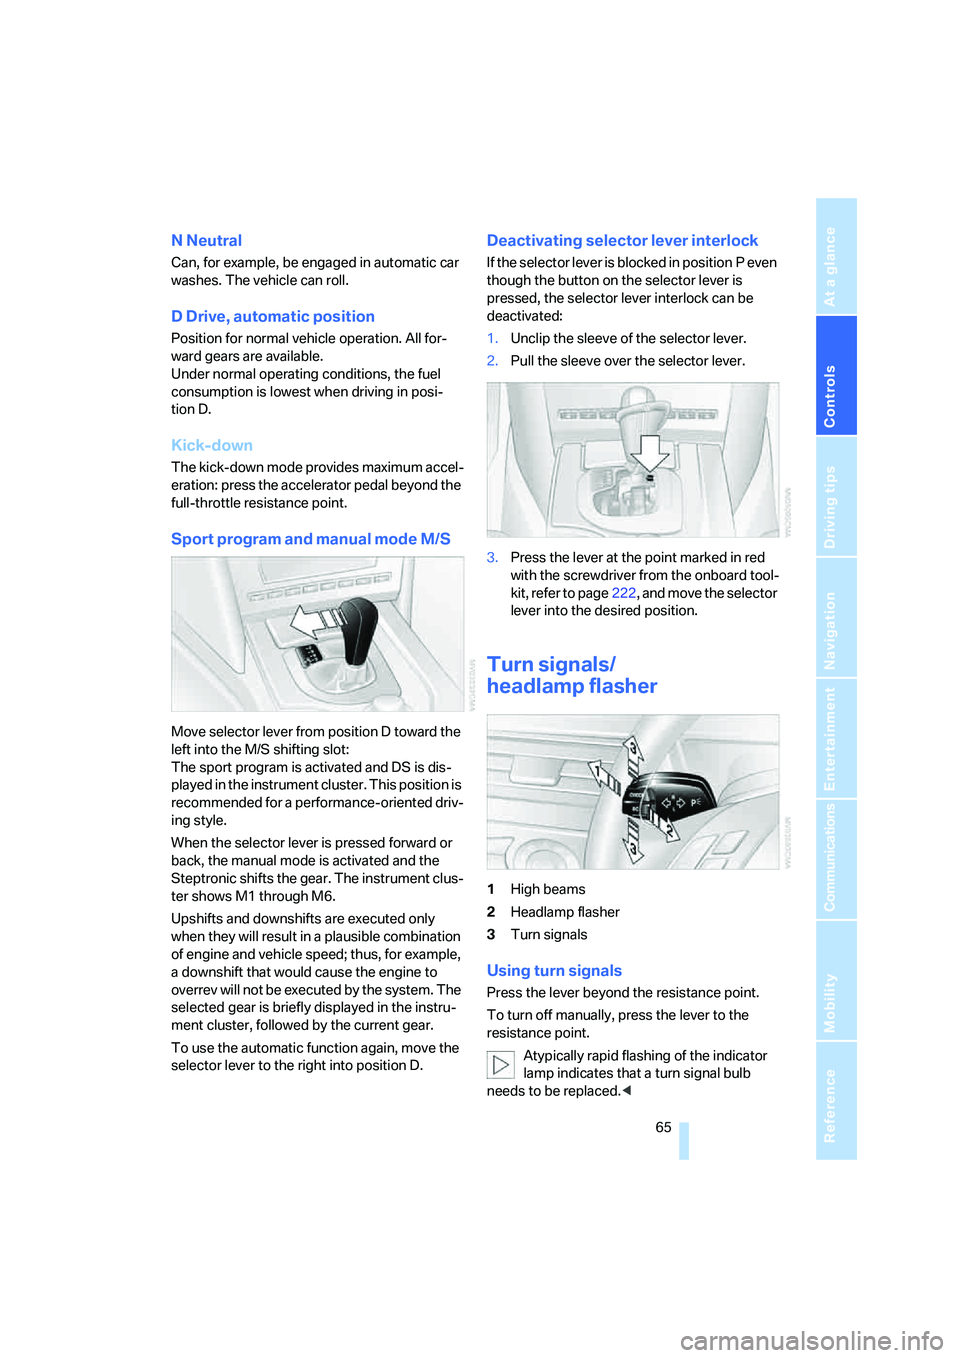
1High beams
2Headlamp flasher
3Turn signals
Using turn signals
Press the lever beyond the resistance point.
To turn off manually, press the lever to the
resistance point.
Atypically rapid flashing of the indicator
lamp indicates that a turn signal bulb
needs to be replaced.<
Page 107 of 273

Controls
105Reference
At a glance
Driving tips
Communications
Navigation
Entertainment
Mobility
High beams/
roadside parking lamps
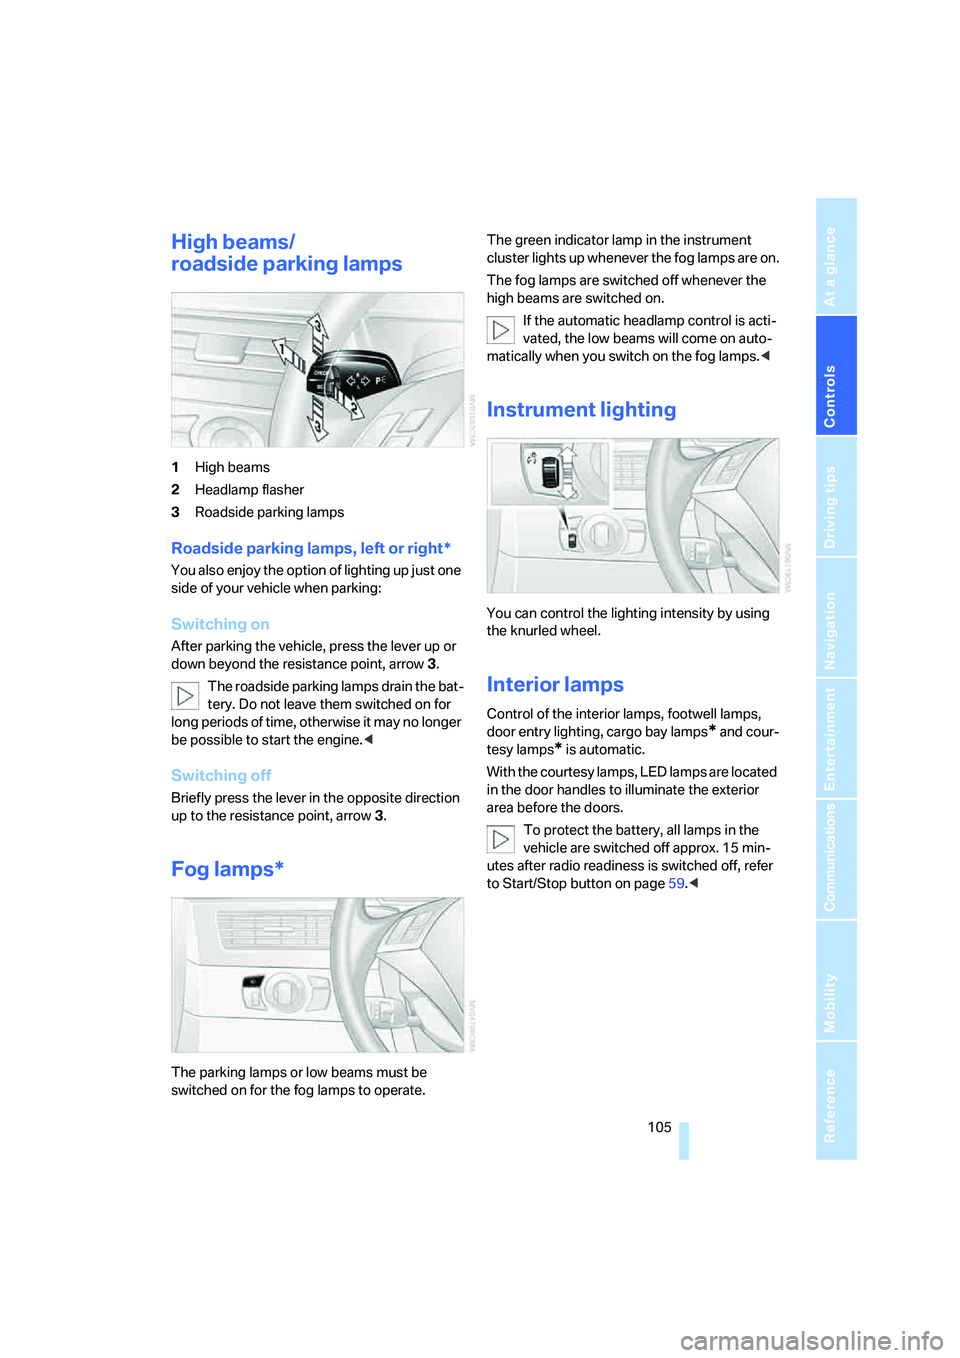
1High beams
2Headlamp flasher
3Roadside parking lamps
Roadside parking lamps, left or right*
You also enjoy the option of lighting up just one
side of your vehicle when parking:
Switching on
After parking the vehicle, press the lever up or
down beyond the resistance point, arrow 3.
The roadside parking lamps drain the bat-
tery. Do not leave them switched on for
long periods of time, otherwise it may no longer
be possible to start the engine.<
Switching off
Briefly press the lever in the opposite direction
up to the resistance point, arrow3.
Fog lamps*
The parking lamps or low beams must be
switched on for the fog lamps to operate. The green indicator lamp in the instrument
cluster lights up whenever the fog lamps are on.
The fog lamps are switched off whenever the
high beams are switched on.
If the automatic headlamp control is acti-
vated, the low beams will come on auto-
matically when you switch on the fog lamps.<
Instrument lighting
You can control the lighting intensity by using
the knurled wheel.
Interior lamps
Control of the interior lamps, footwell lamps,
door entry lighting, cargo bay lamps
* and cour-
tesy lamps
* is automatic.
With the courtesy lamps, LED lamps are located
in the door handles to illuminate the exterior
area before the doors.
To protect the battery, all lamps in the
vehicle are switched off approx. 15 min-
utes after radio readiness is switched off, refer
to Start/Stop button on page59.<
Page 225 of 273

Mobility
223Reference
At a glance
Controls
Driving tips
Communications
Navigation
Entertainment
Lamps and bulbs
Lamps and bulbs make an essential contribu-
tion to vehicle safety. You must be duly diligent
in replacing them. BMW recommends having
your BMW center perform any work that you do
not feel competent to perform yourself or that is
not described here.
Never touch the glass of new bulbs with
your bare fingers, as even minute
amounts of contamination will burn into the
bulb's surface and reduce its service life. Use a
clean cloth, napkin, etc., or hold the bulb by its
metal socket.<
A selection of replacement bulbs is available at
your BMW center.
Whenever you perform any work on the
electrical system, turn off the systems/
consumers involved to prevent short circuits
from occurring. To avoid possible injury or
equipment damage when replacing bulbs,
observe any instructions provided by the bulb
manufacturer.<
For care and maintenance of the headlamps,
please follow the instructions in the separate
Caring for your vehicle brochure.
For bulbs for which changing is not
described, and for checking and adjusting
headlamp aim, please contact your BMW cen-
ter.<
Light-emitting diodes LEDs
Light-emitting diodes installed behind translu-
cent lenses serve as the light source for many of
the controls and displays in your vehicle. These
light-emitting diodes, which operate using a
concept similar to that applied in conventional
lasers, are officially designated as Class 1 light-
emitting diodes.
Do not remove the covers, and never
stare into the unfiltered light for several
hours, as irritation of the retina could result.<
Halogen headlamps
The illustration shows the left-hand side of the
engine compartment.
1Cover cap for low beams
2Cover cap for high beams
Turn the cover cap to the left and remove.
Always wear gloves and eye protection –
the atmosphere within the H7 bulb is
pressurized. Otherwise there is a danger of inju-
ries if the bulb is accidentally damaged during
replacement.<
Low beams
H7 bulb, 55 watts
1.Turn the bulb holder to the left and remove.
2.Remove and replace the bulb.
Page 226 of 273

Replacing components
224
High beams
H7 bulb, 55 watts
1.Turn the bulb holder to the left and remove.
2.Remove and replace the bulb.
Parking and roadside parking lamps
5-watt bulbs, W5W
One bulb each is located above the low beams
and high beams.
1.Turn the cover cap for low beams or high
beams to the left and remove.
2.Pull out the bulb holder.
3.Remove and replace the bulb.
Xenon lamps*
The service life of these bulbs is very long and
the probability of a failure is very low, provided
that they are not switched on and off an unusual
number of times. If one of these bulbs should
nevertheless fail, it is possible to continue driv-
ing with great caution using the fog lamps, pro-
vided traffic laws in your area do not prohibit
this.
Have work on the xenon lighting system
performed only by your BMW center or a
workshop that works according to BMW repair procedures with correspondingly trained per-
sonnel. Due to the high voltage present in the
system, there is a danger of fatal injuries when
work is carried out improperly.<
Parking and roadside parking lamps
In the event of a malfunction, please go to your
BMW center or a workshop that works accord-
ing to BMW repair procedures with correspond-
ingly trained personnel.
Turn signals, front
21-watt bulb, PY21W
1.Turn the bulb holder to the left and remove.
2.Apply gentle pressure to the bulb while
turning it to the left for removal and replace-
ment.
Side-mounted turn signals
5-watt bulb, W5W
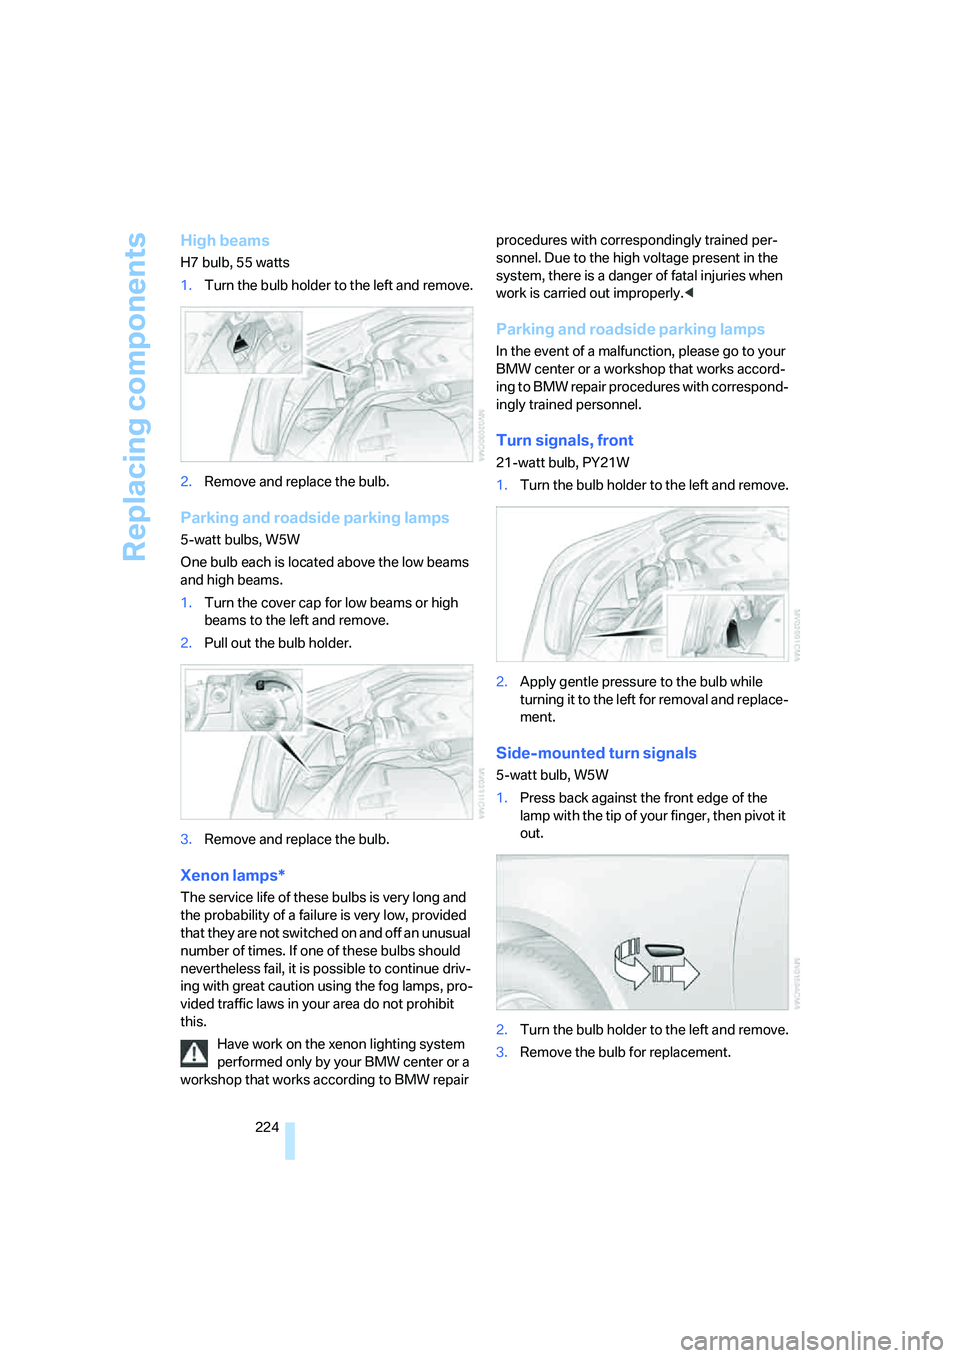
1.Press back against the front edge of the
lamp with the tip of your finger, then pivot it
out.
2.Turn the bulb holder to the left and remove.
3.Remove the bulb for replacement.
Page 255 of 273

Reference 253
At a glance
Controls
Driving tips
Communications
Navigation
Entertainment
Mobility
Decommissioning the vehicle
– refer to Caring for your
vehicle brochure
Decommissioning the vehicle,
refer to Caring for your
vehicle brochure
Defect
– door lock32
– fuel filler door206
– glass sunroof43
– luggage compartment lid34
– panorama glass roof44
– tailgate36
Defrosting windows109
Defrosting windows and
removing condensation109
Defrosting windshield, refer to
Defrosting windows109
Defrost position, refer to
Defrosting windows109
"Delete address book" for
navigation144
"Delete all numbers" on the
mobile phone190
"Delete data" for
navigation144
"Delete" for mobile
phone190
Destination address
– deleting144
– entering135,138
Destination for navigation
– destination list141
– entering via voice138
– entry135
– selecting from address
book143
– selecting using
information141
– storing142Destination guidance147
– bypassing route
sections151
– canceling voice
instructions54
– changing specified
route145
– displaying route148
– distance and arrival147
– interrupting147
– starting147
– terminating/continuing147
– voice instructions150
– volume of voice
instructions150
Destination list for
navigation141
Destinations recently driven
to141
"Details" in audio mode175
"Detour" for navigation154
"Dial" for mobile phone187
"Dial number"188
"Diamond button"54
Diamond button53
Digital clock75
Digital radio, refer to High
Definition Radio168
Dimensions239
Directional indicators, refer to
Turn signals65
Direction announcements,
refer to Voice
instructions150
Direction instructions, refer to
Voice instructions150
Directory, refer to Phone
book188
Directory for navigation, refer
to Address book142
Displacement, refer to Engine
data238
"Display"85
Display, refer to iDrive
controls16
Display elements, refer to
Instrument cluster12
Displaying vehicle data202Display lighting, refer to
Instrument lighting105
"Display off"21
Displays
– on Control Display, refer to
iDrive16
– refer to Instrument
cluster12
"Display settings"84,99
Displays on the windshield,
refer to Head-Up Display98
Disposal
– battery of remote control
with comfort access40
– coolant219
– vehicle battery229
Distance, refer to
Computer77
Distance cruise control, refer
to Active cruise control69
"Distance to dest."77
Distance to destination, refer
to Computer77
Distance warning, refer to
PDC Park Distance
Control86
Divided rear backrest, refer to
Through-loading
system119
Door entry lighting105
Door key, refer to Keys/
remote control28
Door lock32
Door locking, confirmation
signals31
"Door locks"30
Doors
– manual operation
32
– remote control30
DOT Quality Grades212
Draft-free ventilation110
Drinks holder, refer to Cup
holders116
Drive mode63
"Driver's door only"30
Driving lamps, refer to Parking
lamps/low beams103
Driving route, refer to
Displaying route148