2007 BMW 323i roof
[x] Cancel search: roofPage 43 of 268
Controls
41Reference
At a glance
Driving tips
Communications
Navigation
Entertainment
Mobility
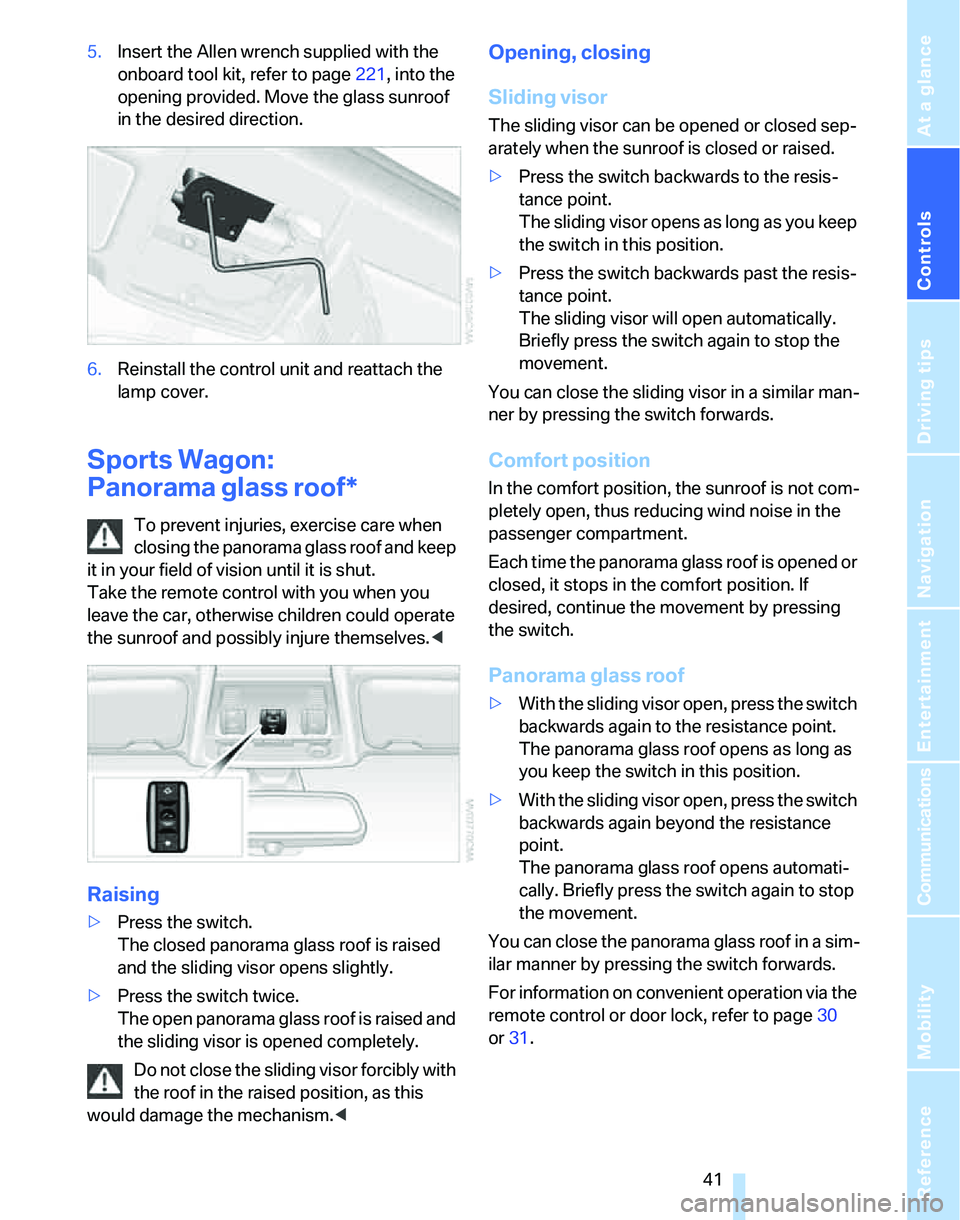
5.Insert the Allen wrench supplied with the
onboard tool kit, refer to page221, into the
opening provided. Move the glass sunroof
in the desired direction.
6.Reinstall the control unit and reattach the
lamp cover.
Sports Wagon:
Panorama glass roof*
To prevent injuries, exercise care when
closing the panorama glass roof and keep
it in your field of vision until it is shut.
Take the remote control with you when you
leave the car, otherwise children could operate
the sunroof and possibly injure themselves.<
Raising
>Press the switch.
The closed panorama glass roof is raised
and the sliding visor opens slightly.
>Press the switch twice.
The open panorama glass roof is raised and
the sliding visor is opened completely.
Do not close the sliding visor forcibly with
the roof in the raised position, as this
would damage the mechanism.<
Opening, closing
Sliding visor
The sliding visor can be opened or closed sep-
arately when the sunroof is closed or raised.
>Press the switch backwards to the resis-
tance point.
The sliding visor opens as long as you keep
the switch in this position.
>Press the switch backwards past the resis-
tance point.
The sliding visor will open automatically.
Briefly press the switch again to stop the
movement.
You can close the sliding visor in a similar man-
ner by pressing the switch forwards.
Comfort position
In the comfort position, the sunroof is not com-
pletely open, thus reducing wind noise in the
passenger compartment.
Each time the panorama glass roof is opened or
closed, it stops in the comfort position. If
desired, continue the movement by pressing
the switch.
Panorama glass roof
>With the sliding visor open, press the switch
backwards again to the resistance point.
The panorama glass roof opens as long as
you keep the switch in this position.
>With the sliding visor open, press the switch
backwards again beyond the resistance
point.
The panorama glass roof opens automati-
cally. Briefly press the switch again to stop
the movement.
You can close the panorama glass roof in a sim-
ilar manner by pressing the switch forwards.
For information on convenient operation via the
remote control or door lock, refer to page30
or31.
Page 44 of 268
Opening and closing
42
Opening and closing the sunroof and
sliding visor at the same time
Press the switch twice in quick succession
beyond the resistance point.
Pressing the switch again stops the operation.
After switching off the ignition
When the remote control is removed or the igni-
tion is switched off, you can still operate the
sunroof for approx. 1 minute as long as no door
has been opened.
Pinch protection system
If the panorama glass roof or the sliding visor
encounters an obstruction while closing from a
position about two-thirds closed, or during
closing from the raised position, the closing
movement is interrupted and the panorama
glass roof and the sliding visor are opened again
slightly.
Despite the pinch protection system
check and clear the sunroof's travel path
prior to closing it, otherwise the safety system
might fail to detect certain kinds of obstruc-
tions, such as very thin objects, and the sunroof
would continue closing.<
Closing without pinch protection
If there is an external danger, push the switch
past the resistance point and hold it there. The
roof closes without pinch protection.
Following interruptions in electrical
power supply
After a power failure, there is a possibility that
the panorama glass roof can only be raised. The
system must be initialized. BMW recommends
having this work done by your BMW center.
Closing manually
In the event of an electrical malfunction, you can
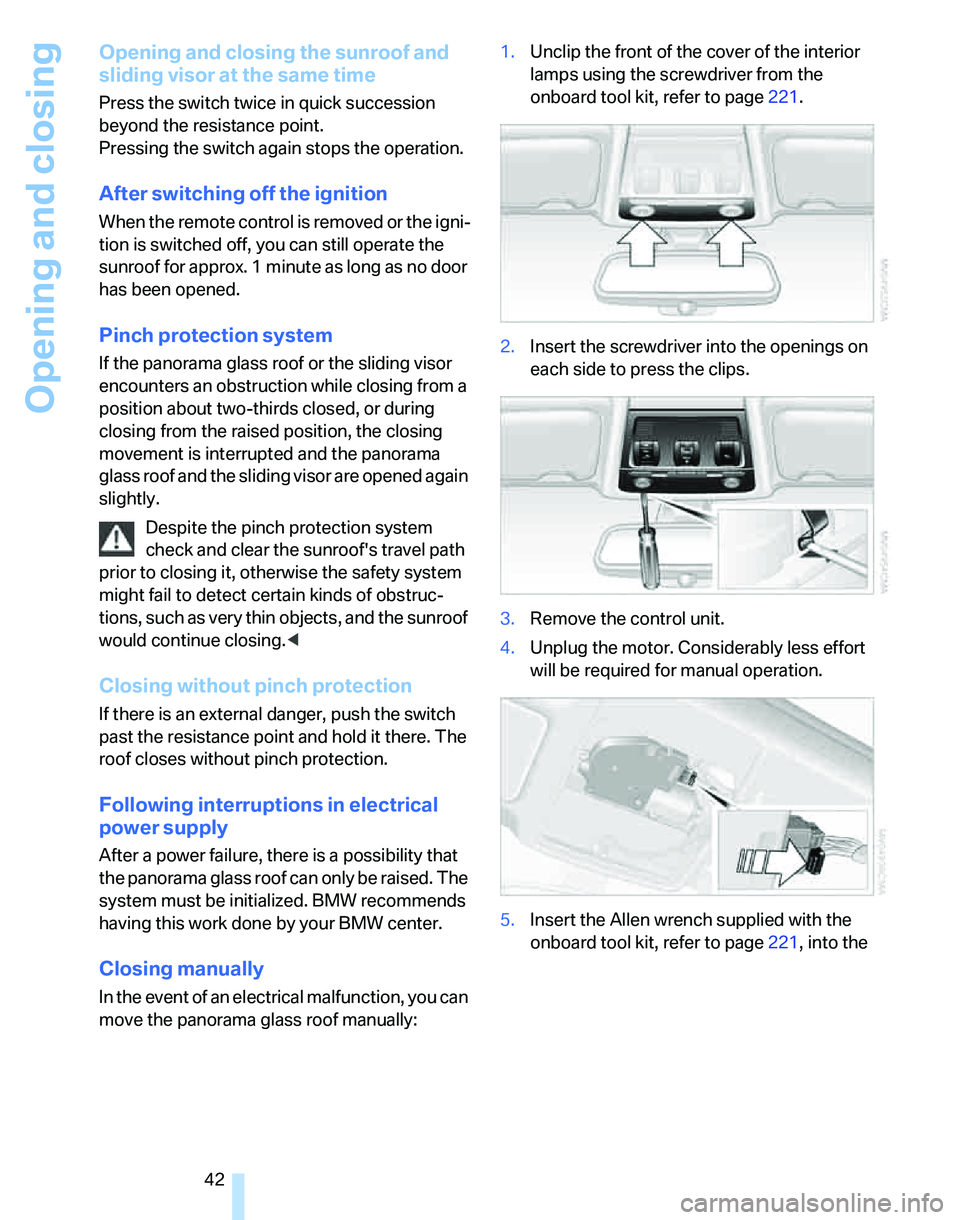
move the panorama glass roof manually:1.Unclip the front of the cover of the interior
lamps using the screwdriver from the
onboard tool kit, refer to page221.
2.Insert the screwdriver into the openings on
each side to press the clips.
3.Remove the control unit.
4.Unplug the motor. Considerably less effort
will be required for manual operation.
5.Insert the Allen wrench supplied with the
onboard tool kit, refer to page221, into the
Page 45 of 268
Controls
43Reference
At a glance
Driving tips
Communications
Navigation
Entertainment
Mobility
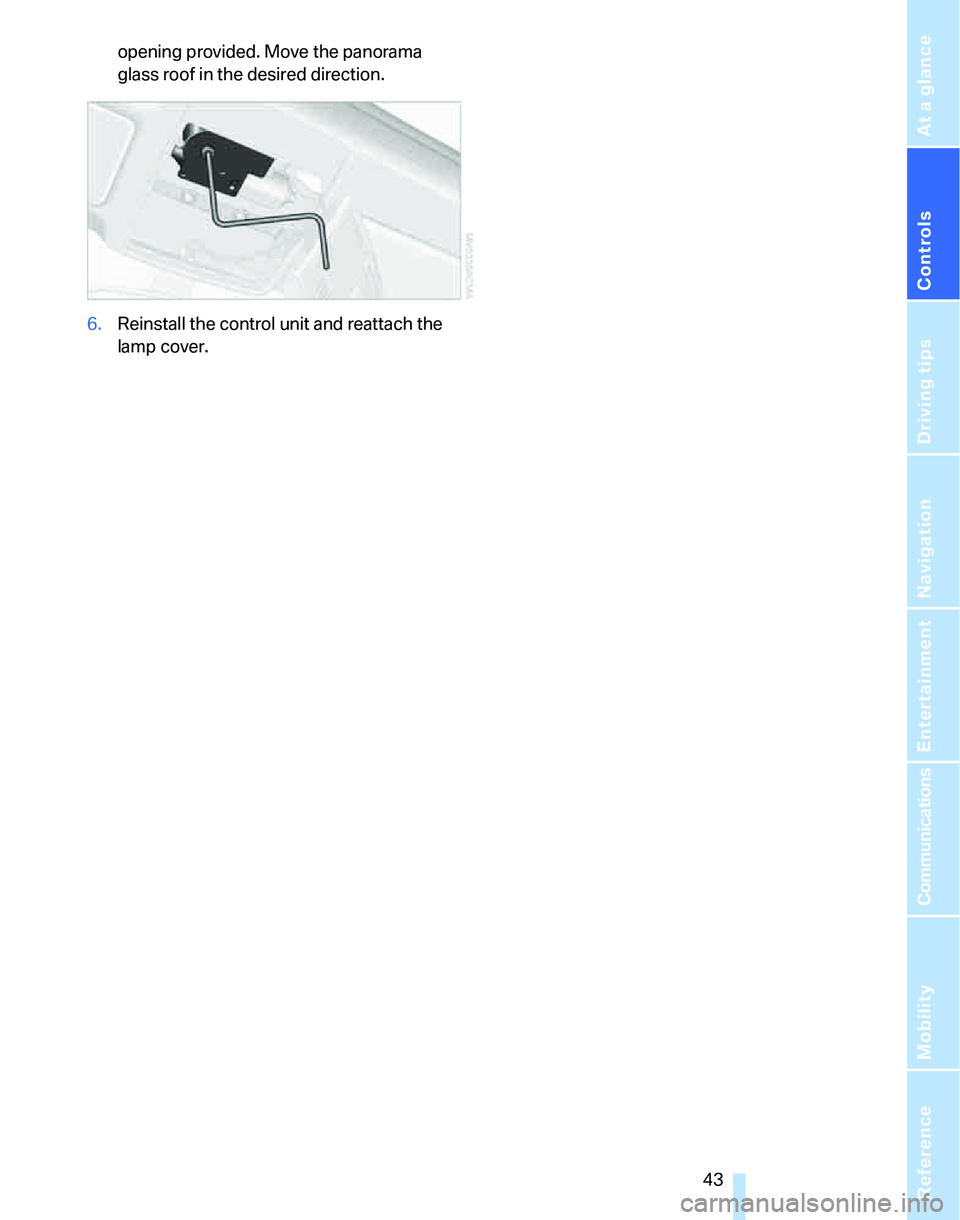
opening provided. Move the panorama
glass roof in the desired direction.
6.Reinstall the control unit and reattach the
lamp cover.
Page 97 of 268
Controls
95Reference
At a glance
Driving tips
Communications
Navigation
Entertainment
Mobility
Airbags
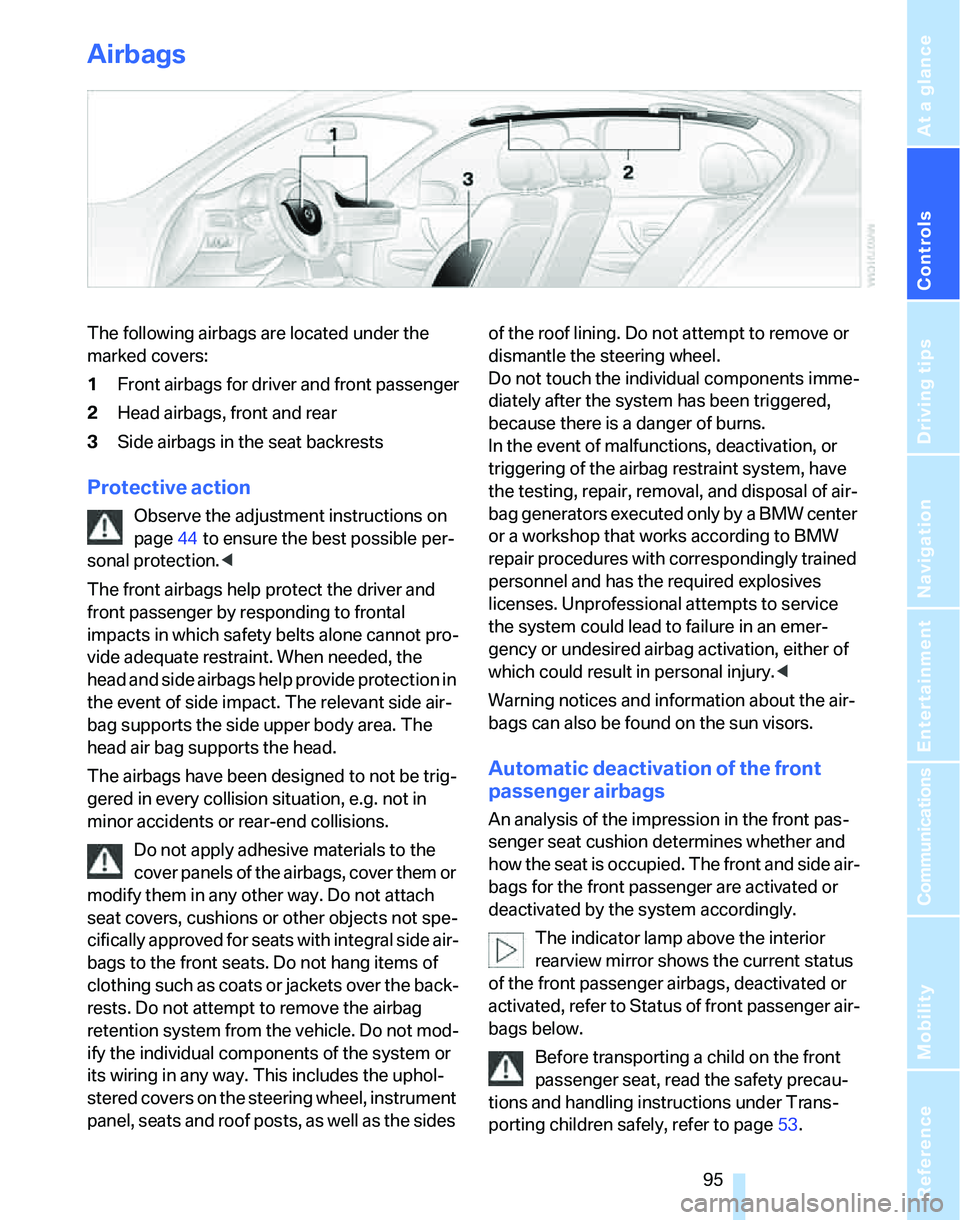
The following airbags are located under the
marked covers:
1Front airbags for driver and front passenger
2Head airbags, front and rear
3Side airbags in the seat backrests
Protective action
Observe the adjustment instructions on
page44 to ensure the best possible per-
sonal protection.<
The front airbags help protect the driver and
front passenger by responding to frontal
impacts in which safety belts alone cannot pro-
vide adequate restraint. When needed, the
head and side airbags help provide protection in
the event of side impact. The relevant side air-
bag supports the side upper body area. The
head air bag supports the head.
The airbags have been designed to not be trig-
gered in every collision situation, e.g. not in
minor accidents or rear-end collisions.
Do not apply adhesive materials to the
cover panels of the airbags, cover them or
modify them in any other way. Do not attach
seat covers, cushions or other objects not spe-
cifically approved for seats with integral side air-
bags to the front seats. Do not hang items of
clothing such as coats or jackets over the back-
rests. Do not attempt to remove the airbag
retention system from the vehicle. Do not mod-
ify the individual components of the system or
its wiring in any way. This includes the uphol-
stered covers on the steering wheel, instrument
panel, seats and roof posts, as well as the sides of the roof lining. Do not attempt to remove or
dismantle the steering wheel.
Do not touch the individual components imme-
diately after the system has been triggered,
because there is a danger of burns.
In the event of malfunctions, deactivation, or
triggering of the airbag restraint system, have
the testing, repair, removal, and disposal of air-
bag generators executed only by a BMW center
or a workshop that works according to BMW
repair procedures with correspondingly trained
personnel and has the required explosives
licenses. Unprofessional attempts to service
the system could lead to failure in an emer-
gency or undesired airbag activation, either of
which could result in personal injury.<
Warning notices and information about the air-
bags can also be found on the sun visors.
Automatic deactivation of the front
passenger airbags
An analysis of the impression in the front pas-
senger seat cushion determines whether and
how the seat is occupied. The front and side air-
bags for the front passenger are activated or
deactivated by the system accordingly.
The indicator lamp above the interior
rearview mirror shows the current status
of the front passenger airbags, deactivated or
activated, refer to Status of front passenger air-
bags below.
Before transporting a child on the front
passenger seat, read the safety precau-
tions and handling instructions under Trans-
porting children safely, refer to page53.
Page 113 of 268
Controls
111Reference
At a glance
Driving tips
Communications
Navigation
Entertainment
Mobility
Ventilated storage compartment
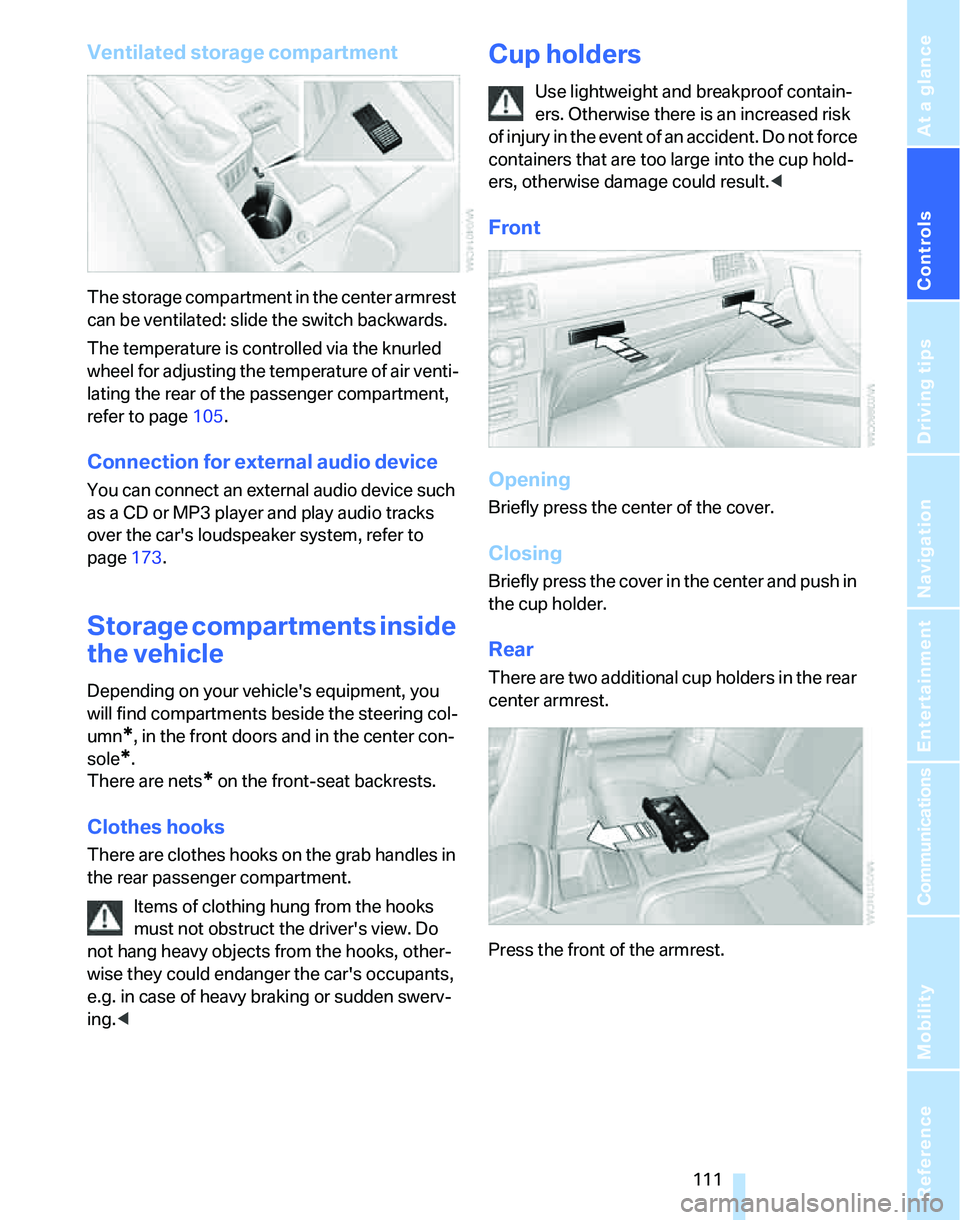
The storage compartment in the center armrest
can be ventilated: slide the switch backwards.
The temperature is controlled via the knurled
wheel for adjusting the temperature of air venti-
lating the rear of the passenger compartment,
refer to page105.
Connection for external audio device
You can connect an external audio device such
as a CD or MP3 player and play audio tracks
over the car's loudspeaker system, refer to
page173.
Storage compartments inside
the vehicle
Depending on your vehicle's equipment, you
will find compartments beside the steering col-
umn
*, in the front doors and in the center con-
sole
*.
There are nets
* on the front-seat backrests.
Clothes hooks
There are clothes hooks on the grab handles in
the rear passenger compartment.
Items of clothing hung from the hooks
must not obstruct the driver's view. Do
not hang heavy objects from the hooks, other-
wise they could endanger the car's occupants,
e.g. in case of heavy braking or sudden swerv-
ing.<
Cup holders
Use lightweight and breakproof contain-
ers. Otherwise there is an increased risk
of injury in the event of an accident. Do not force
containers that are too large into the cup hold-
ers, otherwise damage could result.<
Front
Opening
Briefly press the center of the cover.
Closing
Briefly press the cover in the center and push in
the cup holder.
Rear
There are two additional cup holders in the rear
center armrest.
Press the front of the armrest.
Page 124 of 268
Things to remember when driving
122
Things to remember when driving
Break-in period
Moving parts need breaking-in time to adjust to
each other. Please follow the instructions below
in order to achieve the optimal service life and
economy of operation for your vehicle.
Engine and differential
Always obey all official speed limits.
Up to 1,200 miles/2,000 km
Drive at varying engine and road speeds, but do
not exceed an engine speed of 4500 rpm or a
road speed of 100 mph/160 km/h.
Avoid full-throttle operation and use of the
transmission's kick-down mode.
After driving 1,200 miles/2,000 km
Engine and vehicle speeds can be gradually
increased.
Tires
Due to technical factors associated with their
manufacture, tires do not achieve their full trac-
tion potential until after an initial break-in
period. Therefore, drive cautiously during the
first 200 miles/300 km.
Brake system
Brakes require an initial break-in period of
approx. 300 miles/500 km to achieve optimized
contact and wear patterns between brake pads
and rotors. Drive cautiously during this break-in
period.
Clutch
The function of the clutch reaches its optimal
level only after a distance driven of approx.
300 miles/500 km. During this break-in period,
engage the clutch gently.
Following part replacement
The same break-in procedures should be
observed if any of the components mentioned
above have to be renewed in the course of the
vehicle's operating life.
General driving notes
Closing the luggage compartment lid/
tailgate
Operate the vehicle only when the lug-
gage compartment lid/tailgate and rear
window are closed. Otherwise, exhaust fumes
could enter the interior of the vehicle.<
If special circumstances make it absolutely nec-
essary to drive with the luggage compartment
lid/tailgate or rear window open:
1.Close all windows and the glass sunroof.
2.Increase the air flow rate of the automatic
climate control considerably, refer to
page103.
Hot exhaust system
In all vehicles, extremely high tempera-
tures are generated in the exhaust sys-
tem. Do not remove the heat shields installed
adjacent to various sections of the exhaust sys-
tem, and never apply undercoating to them.
When driving, standing at idle and while park-
ing, take care to avoid possible contact
between the hot exhaust system and any highly
flammable materials such as hay, leaves, grass,
etc. Such contact could lead to a fire, with the
risk of serious personal injuries and property
damage. Do not touch hot exhaust tail pipes.
Otherwise there is a risk of burns.<
Mobile phone in the vehicle
BMW discourages the use of mobile
communications devices, e.g. mobile
phones, inside the vehicle without a direct con-
nection to an outside antenna. Otherwise, the
Page 128 of 268

Things to remember when driving
126
Roof-mounted luggage rack*
A special rack system is available as an option
for your BMW. Comply with the directions given
in the installation instructions.
Mounting points
The mounting points are located in the roof/
along the roof rails
*.
Loading roof-mounted luggage rack
Because roof racks raise the vehicle's center of
gravity when loaded, they have a major effect on
vehicle handling and steering response.
You should therefore always remember not to
exceed the approved roof load capacity, the
approved gross vehicle weight or the axle loads
when loading the rack.
You can find the applicable data under Weights
on page239.
The roof load must be distributed uniformly and
should not be too large in area. Heavy items
should always be placed at the bottom. Be sure
that adequate clearance is maintained for rais-
ing the glass sunroof, and that objects do not
project into the opening path of the luggage
compartment lid/tailgate.
Fasten roof-mounted cargo correctly and
securely to prevent it from shifting or falling off
during the trip.
Drive smoothly. Avoid sudden acceleration and
braking maneuvers. Take corners gently.
Page 190 of 268
Telephoning
188
Selecting an entry
The connection to the phone number of the
selected entry is established.
Redialing
The {Redial} command calls up "Redial".
Notes
The commands in English were available
as of this printing. Other languages are
currently in preparation. To operate the mobile
phone via the voice command system, refer to
page22.<
Important for voice commands
For voice commands, bear in mind the follow-
ing:
>Pronounce the commands smoothly and at
normal volume, avoiding excessive empha-
ses and pauses.
>Keep the doors, windows and glass sunroof
closed to prevent interference from outside
noise.
>Avoid ambient noise in the vehicle while
speaking.
Inserting/removing snap-in
adapter
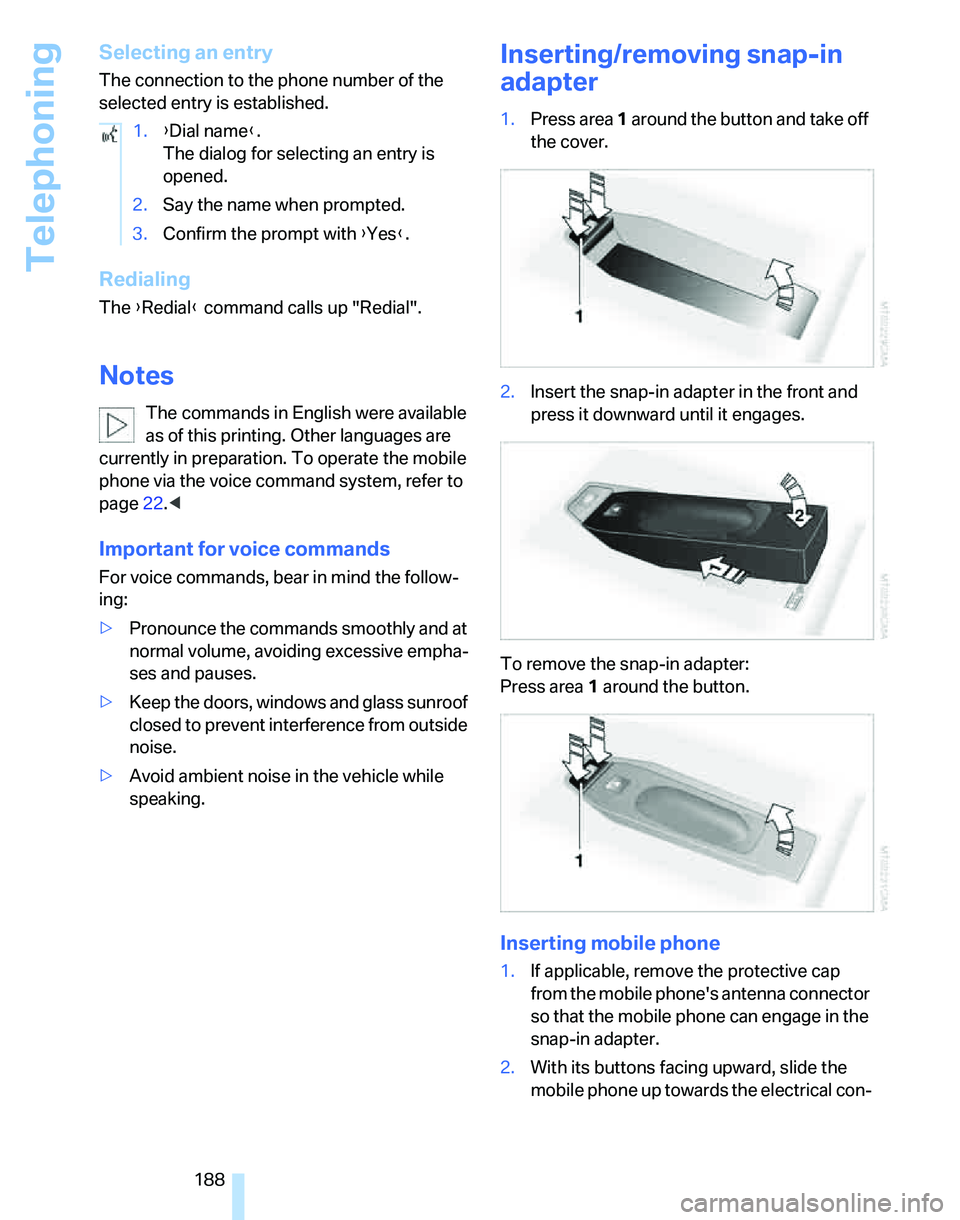
1.Press area 1 around the button and take off
the cover.
2.Insert the snap-in adapter in the front and
press it downward until it engages.
To remove the snap-in adapter:
Press area 1 around the button.
Inserting mobile phone
1.If applicable, remove the protective cap
from the mobile phone's antenna connector
so that the mobile phone can engage in the
snap-in adapter.
2.With its buttons facing upward, slide the
mobile phone up towards the electrical con- 1.{Dial name}.
The dialog for selecting an entry is
opened.
2.Say the name when prompted.
3.Confirm the prompt with {Yes}.