2007 AUDI R8 technical data
[x] Cancel search: technical dataPage 87 of 210

Driving85
Controls
Safety
Driving tips
General maintenance
Self-help
Technical data
Parking aidApplies to vehicles: with 8-channel parking aidFront and rear parking aid
The parking aid warns you if there are any obstacles
behind or in front of the car.Description
The front and rear acoustic parking aid (8-channel parking aid) uses
ultrasonic sensors to measure the distance between the vehicle and
an obstacle. The sensors are located in the front and rear bumpers.
The measuring range of the sensors starts at approximately:
Activating
The parking aid is activated automatically when reverse gear is
engaged. This is confirmed by a short beep.
The parking aid can also be activated manually by pressing the
switch
in the centre console ⇒fig. 74. This is also confirmed by
a short beep. At the same time a diode in the switch will light up.Activate the system manually if you are driving forwards and would
like the system to give warning as you approach potential obstacles,
for instance when parking.
Deactivating
The parking aid is switched off automatically when the vehicle
reaches a speed of about 15 km/h. It also switches itself off when
you stop the engine.
You can also deactivate the parking aid manually with the switch
⇒fig. 74.
Warning beeps
The warning beeps are produced by sound boxes located at the
front and rear of the vehicle. You can adjust the volume and pitch of
the beeps ⇒page 24.
Reversing
When the vehicle is reversing, the system starts to beep when it
registers an obstacle within its detection range (see above). The
warnings will beep increasingly rapidly as the vehicle approaches
the obstacle.
When the vehicle is less than 0.35 m away from the obstacle the
warning tone will sound continuously. The driver should then not
reverse any further.
Please note that low obstacles detected by the system may no
longer be registered by the sensors as the car moves closer, so the
system will not give any further warning.
Driving forwards
The same proximity warnings are given when driving forwards, but
obstacles have to be within a slightly closer range before they are
detected (the front measuring range is shorter). The warning tone
will sound continuously when the vehicle is less than 0.30 m away
from the obstacle.
Side sensors
0.60 m
Centre sensors at rear
1.50 m
Centre sensors at front
1.00 mFig. 74 Parking aid
switch in centre
console
document_0900452a816e6cc9.book Seite 85 Mittwoch, 21. Februar 2007 1:32 13
Page 89 of 210

Driving87
Controls
Safety
Driving tips
General maintenance
Self-help
Technical data
Caution
do not move the gear lever into neutral without depressing the
clutch when the cruise control system is active. Otherwise the
engine could rev up and be damaged.
Note
The cruise control cannot maintain a constant speed when travel-
ling down steep hills. The vehicle tends to accelerate under its own
weight. Change down to a lower gear in good time or use the foot
brake to slow the vehicle.Applies to vehicles: with cruise control systemSetting speed
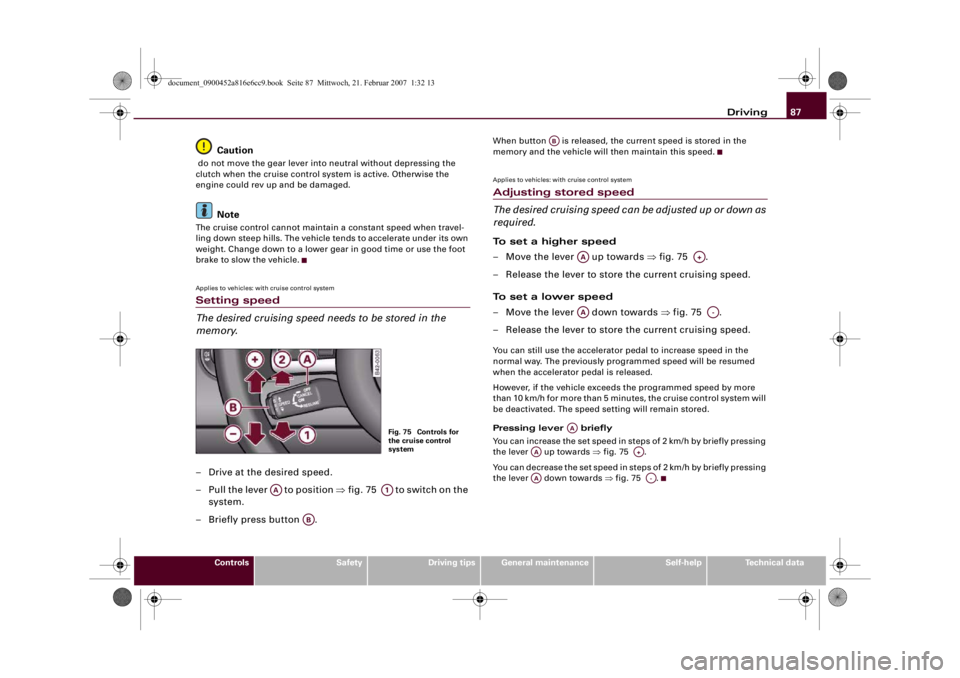
The desired cruising speed needs to be stored in the
memory.– Drive at the desired speed.
– Pull the lever to position ⇒f i g . 7 5 to s w i t ch o n t h e
system.
– Briefly press button .
When button is released, the current speed is stored in the
memory and the vehicle will then maintain this speed.Applies to vehicles: with cruise control systemAdjusting stored speed
The desired cruising speed can be adjusted up or down as
required.To set a higher speed
– Move the lever up towards ⇒fig. 75 .
– Release the lever to store the current cruising speed.
To set a lower speed
– Move the lever down towards ⇒fig. 75 .
– Release the lever to store the current cruising speed.You can still use the accelerator pedal to increase speed in the
normal way. The previously programmed speed will be resumed
when the accelerator pedal is released.
However, if the vehicle exceeds the programmed speed by more
than 10 km/h for more than 5 minutes, the cruise control system will
be deactivated. The speed setting will remain stored.
Pressing lever briefly
You can increase the set speed in steps of 2 km/h by briefly pressing
the lever up towards ⇒fig. 75 .
You can decrease the set speed in steps of 2 km/h by briefly pressing
the lever down towards ⇒fig. 75 .
Fig. 75 Controls for
the cruise control
system
AA
A1
AB
AB
AA
A+
AA
A-
AA
AA
A+
AA
A-
document_0900452a816e6cc9.book Seite 87 Mittwoch, 21. Februar 2007 1:32 13
Page 91 of 210

Driving89
Controls
Safety
Driving tips
General maintenance
Self-help
Technical data Sport driving mode
Select the sport setting for performance-oriented suspension char-
acteristics. The diode in the switch
will light up to indicate that the
sport mode is on.
Note
The warning lamp
lights up in the instrument cluster if a malfunc-
tion occurs. Drive to the nearest qualified workshop as soon as
possible and have the fault corrected.
document_0900452a816e6cc9.book Seite 89 Mittwoch, 21. Februar 2007 1:32 13
Page 93 of 210

Automatic gearbox91
Controls
Safety
Driving tips
General maintenance
Self-help
Technical data
WARNING
•
The accelerator pedal must on no account be pressed inadvert-
ently when a gear is engaged with the vehicle stationary. If this
were to happen, the vehicle would start to move immediately, and
even a firmly applied handbrake might not restrain it (accident
risk).
•
To avoid accidents, apply the handbrake firmly and select
neutral gear (N) before opening the engine lid and working on the
vehicle with the engine running. Please observe the important
safety warnings ⇒page 155, “Working on components in the
engine compartment”.Note
If you accidentally shift to N when driving, you can engage a gear in
the normal way using the selector lever or paddle levers.Applies to vehicles: with R tronicManual modeR tronic allows the driver to change gears manually.Driving away from a standstill
– Press and hold the brake pedal.
– Move the selector lever to the left.
– Briefly push the selector lever forwards .
– Release the brake and press the accelerator ⇒.
Changing gear
– Briefly push the selector lever forwards to change up
a gear.– Briefly pull the selector lever back to change down a
gear.
Stopping briefly
– Apply the foot brake to hold the vehicle when stationary
(for instance at traffic lights).
– Do not press the accelerator while waiting. Neutral gear
(N) will be engaged automatically and a warning tone will
sound after a certain period if the vehicle is at a standstill
and you do not press the brake pedal or accelerator.
Parking
– Press and hold the brake pedal ⇒.
– Apply the handbrake firmly.
– Engage a gear.
– Switch off the ignition.
Stopping on a slope
–Always apply the footbrake to hold the vehicle and
prevent it “rolling back” down the slope ⇒. Do not try
to stop the vehicle “rolling back” by increasing the
engine speed when a gear is engaged.
– Apply the handbrake firmly.
Driving away on a slope
– Once you have engaged a gear, release the footbrake,
press the accelerator and gradually release the hand-
brake.
When accelerating in 1st, 2nd, 3rd, 4th or 5th gear, the R tronic
gearbox automatically shifts up into the next gear shortly before the
A+A+
A-
document_0900452a816e6cc9.book Seite 91 Mittwoch, 21. Februar 2007 1:32 13
Page 95 of 210

Automatic gearbox93
Controls
Safety
Driving tips
General maintenance
Self-help
Technical data
Applies to vehicles: with R tronicLaunch control programmeThe launch control programme enables maximum accel-
eration.– Press the ESP switch once while the engine is running.
The ESP warning lamp
will light up in the driver infor-
mation system display.
– Press and hold the brake pedal with your left foot.
– Engage a gear.
– Press the button.
– Press the accelerator all the way down with your right
foot until the engine reaches a constant rpm speed.
– Take your left foot off the brake ⇒.
WARNING
•
Always adapt your driving style to the traffic conditions.
•
Only use the launch control programme when road and traffic
conditions permit, and make sure your manner of driving and
accelerating the vehicle does not inconvenience or endanger other
road users.
•
Please note that, when the ESP is switched off, the driven
wheels may start to spin, causing the vehicle to lose grip, in partic-
ular on slippery or wet roads - danger of skidding!
•
When acceleration has been completed, the ESP should be
reactivated by pressing the ESP switch.
Note
Accelerating with the launch control programme places a heavy
load on all parts of the vehicle. This can result in increased wear and
tear.Applies to vehicles: with R tronicSteering wheel with paddle leversThe paddle levers behind the steering wheel allow you to
change gear manually without taking your hands off the
steering wheel.– Briefly pull the left-hand paddle lever to change down
to a lower gear.
– Briefly pull the right-hand paddle lever to change up
to a higher gear.The manual shift programme can, of course, still be operated using
the selector lever in the centre console.
SPORT
Fig. 79 Sports steering
wheel with Paddle
leversA-A+
document_0900452a816e6cc9.book Seite 93 Mittwoch, 21. Februar 2007 1:32 13
Page 97 of 210

HomeLink95
Controls
Safety
Driving tips
General maintenance
Self-help
Technical data
HomeLinkUniversal transmitterApplies to vehicles: with HomeLinkDescription
The HomeLink universal transmitter can be programmed
to replace the hand-held controls of devices already in
use.The HomeLink universal transmitter allows you to conveniently acti-
vate garage doors, estate gates, security systems, home or office
lighting and other electric devices by means of control buttons
inside your car.
The single remote control unit that HomeLink provides will replace
up to three hand-held transmitters operating existing devices on
your property. This will be possible for most transmitters which
control the drive units for a garage door or external gates, etc.
Programming of the individual hand-held transmitters for your
remote control is done at the centre of the front bumper. This is
where the control unit is located.
To be able to control systems with HomeLink, you need to perform
initial programming on the HomeLink transmitter first. If systems
fail to respond after the initial programming, check whether these
systems work with a "rolling code" (variable security code)
⇒page 97.
WARNING
When you are programming the HomeLink universal transmitter,
make sure that no persons or objects are close to the devices
receiving the transmitter signals. If a gate or door is inadvertently
set into motion during programming, persons might be injured or
other damage caused by moving parts.
Note
•
For additional information on HomeLink® and/or products
compatible with HomeLink®, please call the toll-free HomeLink®
hotline (0) 08000466 35465 (in Germany) or alternatively +49 (0) 6838
907 277, or visit the HomeLink® website at: www.homelink.com
•
HomeLink
® is a registered trademark of Johnson Controls.
Applies to vehicles: with HomeLinkProgramming the universal transmitter
Programming of the HomeLink universal transmitter is
done on the operating unit located above the interior
mirror and at the front bumper.
Fig. 80 Operating unit
above the interior
mirror
document_0900452a816e6cc9.book Seite 95 Mittwoch, 21. Februar 2007 1:32 13
Page 99 of 210

HomeLink97
Controls
Safety
Driving tips
General maintenance
Self-help
Technical data
Applies to vehicles: with HomeLinkRolling code programming
Some devices require rolling code programming of the
HomeLink universal transmitter.Identifying a rolling code
– Press the already programmed HomeLink button again
and hold it down.
–Watch HomeLink diode ⇒page 95, fig. 80. If the diode
starts flashing rapidly and turns into a constant light
after about 2 seconds, this indicates that the device you
wish to operate (e.g. a garage door opener) is equipped
with a rolling code.
– Program the rolling code as follows:
Activating the garage door opener drive unit
– Locate the programming button on the garage door
drive. The exact location and colour of the button may
vary depending on the type of garage door opener.
– Press the programming button on the door drive unit
(this will normally cause a “programming mode indicator
lamp” on the unit to light up). You now have about 30
seconds to start and complete programming of the
HomeLink control button on the operating unit.
Programming of the operating unit above the
interior mirror
– Press and release the already programmed HomeLink
button.
– Press the HomeLink button again to complete rolling
code programming.
After programming at the operating unit, the garage door opener
should recognise the HomeLink signal and respond when the
HomeLink button is pressed. Now the other control buttons can be
programmed as required.
Note
•
Having a second person assist you makes programming of the
rolling code easier and faster. For some makes of garage door
openers the HomeLink button may have to be pressed a third time
to complete the training sequence.
•
If you encounter problems programming the rolling code you
may find helpful information in the operating instructions of the
garage door opener or other device you wish to operate.
Applies to vehicles: with HomeLinkOperating HomeLink
The programmed devices are activated by means of the
HomeLink control buttons above the interior mirror.– Switch on the ignition (do not start the engine).
– Press the programmed HomeLink button ⇒page 95,
fig. 80. The device assigned to that button (e.g. garage
door) will be activated.The HomeLink indicator diode ⇒page 95, fig. 80 will light up when
you press the button.Applies to vehicles: with HomeLinkErasing the HomeLink® button programming
You can erase the complete HomeLink programming by
pressing the two outer buttons.– Switch on the ignition (do not start the engine).
AA
document_0900452a816e6cc9.book Seite 97 Mittwoch, 21. Februar 2007 1:32 13
Page 101 of 210

HomeLink99
Controls
Safety
Driving tips
General maintenance
Self-help
Technical data
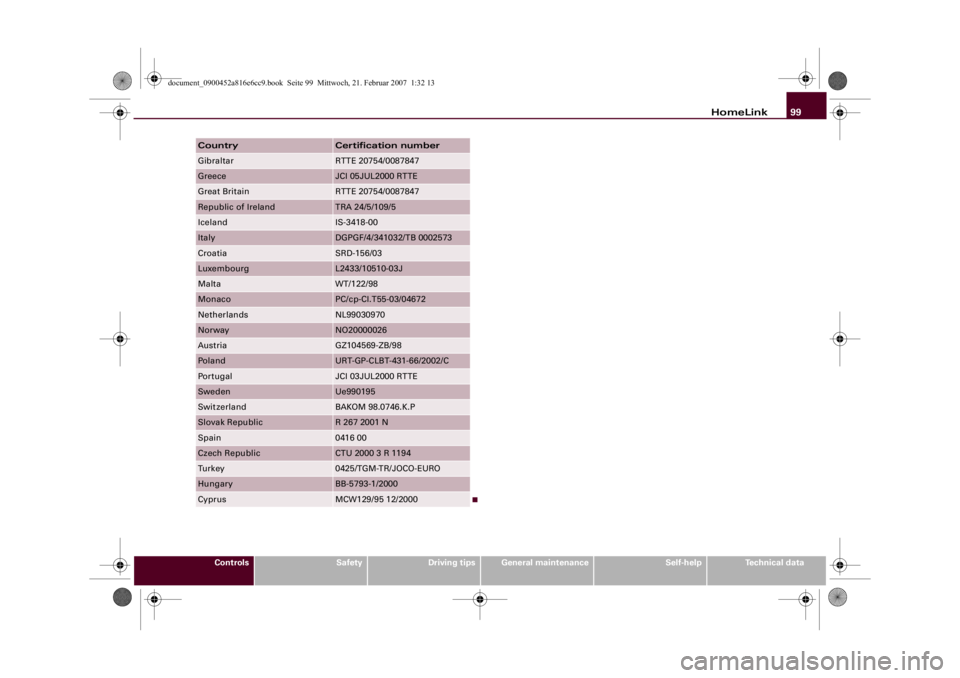
Gibraltar
RTTE 20754/0087847
Greece
JCI 05JUL2000 RTTE
Great Britain
RTTE 20754/0087847
Republic of Ireland
TRA 24/5/109/5
Iceland
IS-3418-00
Italy
DGPGF/4/341032/TB 0002573
Croatia
SRD-156/03
Luxembourg
L2433/10510-03J
Malta
WT/122/98
Monaco
PC/cp-CI.T55-03/04672
Netherlands
NL99030970
Norway
NO20000026
Austria
GZ104569-ZB/98
Pol and
URT-GP-CLBT-431-66/2002/C
Portugal
JCI 03JUL2000 RTTE
Sweden
Ue990195
Switzerland
BAKOM 98.0746.K.P
Slovak Republic
R 267 2001 N
Spain
0416 00
Czech Republic
CTU 2000 3 R 1194
Tu r k e y
0425/TGM-TR/JOCO-EURO
Hungary
BB-5793-1/2000
Cyprus
MCW129/95 12/2000
Country
Certification number
document_0900452a816e6cc9.book Seite 99 Mittwoch, 21. Februar 2007 1:32 13