2007 Acura MDX rest
[x] Cancel search: restPage 64 of 166
Navigation System63
Driving to Your Destination
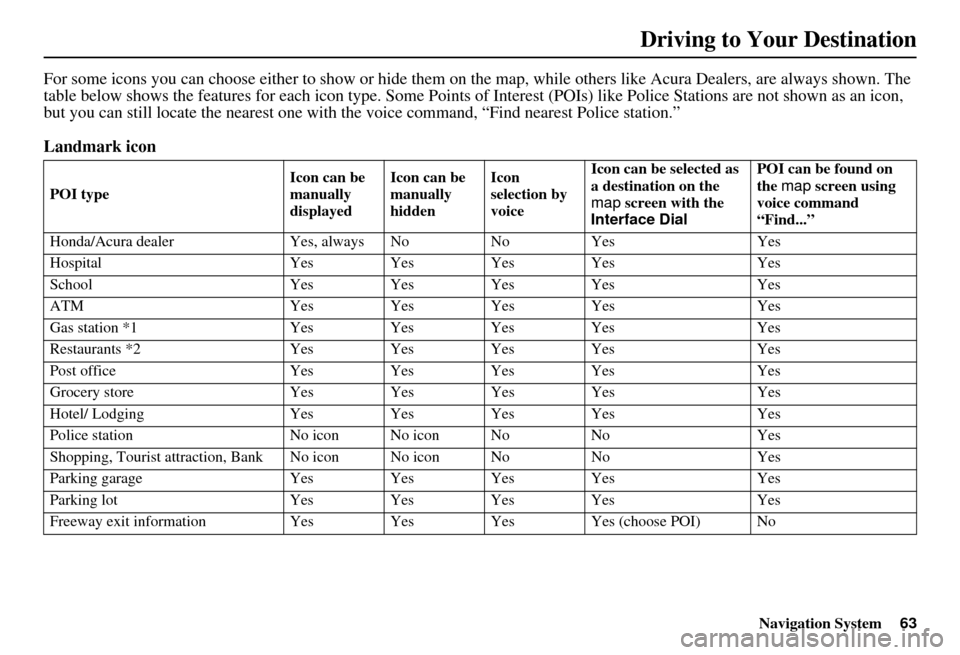
For some icons you can choose either to show or hide them on th e map, while others like Acura Dealers, are always shown. The
table below shows the features for each icon type. Some Points of Interest (POIs) like Police Stations are not shown as an icon ,
but you can still locate the near est one with the voice command, “Find nearest Police station.”
Landmark icon
POI type Icon can be
manually
displayedIcon can be
manually
hiddenIcon
selection by
voiceIcon can be selected as
a destination on the
map
screen with the
Interface Dial POI can be found on
the
map screen using
voice command
“Find...”
Honda/Acura dealer Ye s, always No No Yes Yes
Hospital Yes Yes Yes Yes Yes
School Yes Yes Yes Yes Yes
ATM Yes Yes Yes Yes Yes
Gas station *1 Yes Yes Yes Yes Yes
Restaurants *2 Yes Yes Yes Yes Yes
Post office Yes Yes Yes Yes Yes
Grocery store Yes Yes Yes Yes Yes
Hotel/ Lodging Yes Yes Yes Yes Yes
Police station No icon No icon No No Yes
Shopping, Tourist attraction, Bank No icon No icon No NoYes
Parking garage Yes Yes Yes Yes Yes
Parking lot Yes Yes Yes Yes Yes
Freeway exit information Yes Yes Yes Yes (choose POI) No
Page 65 of 166

64Navigation System
Incident icon
*1. When gas station icons are selected for view on the map, some icons are shown as “brand icons.”
*2. When selecting Restaurant on the Select category for icon settings screen (see Icon Options on page 65), specialty types
of restaurants, like Chinese or Italian, can be individually displayed or hidden. See Show Icon on Map on page 139. Also see
the Voice Command Index on page 140 for the “Display,” “Hide,” and “Find” commands.
*3. You can display the nearest traffic incide nts by saying, “Display traffic incidents.”
POI typeIcon can be
manually
displayedIcon can be
manually
hiddenIcon
selection by
voiceIcon can be selected as
a destination on the
map
screen with the
Interface Dial POI can be found on
the
map screen using
voice command
“Find...”
Traffic Speed Yes Yes Yes No No
Traffic Incident Yes Yes Yes No Yes *3
Driving to Your Destination
Page 66 of 166
Navigation System65
Driving to Your Destination
Showing Icons on the Map
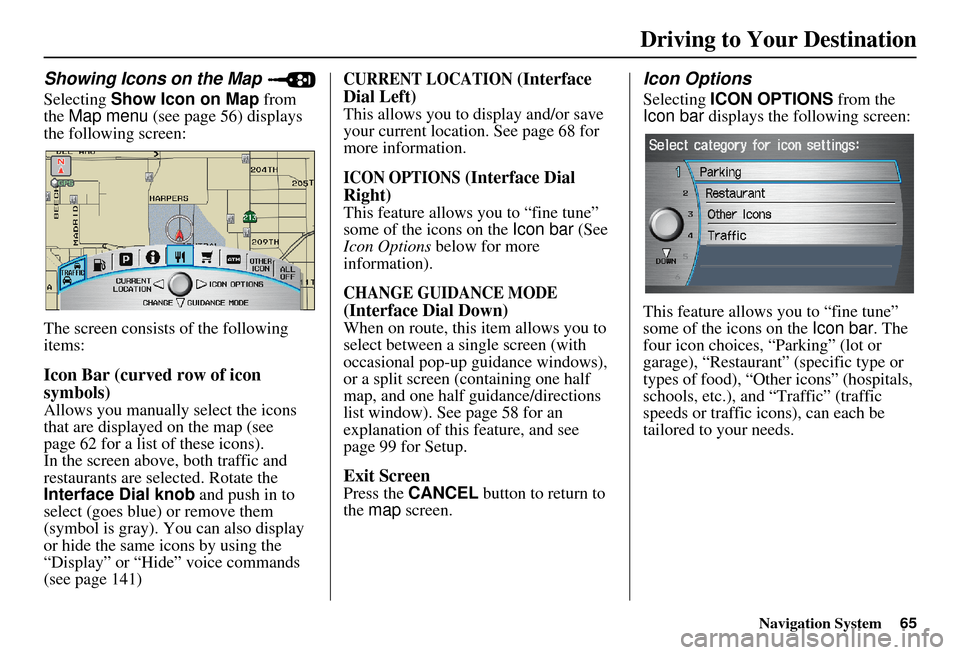
Selecting Show Icon on Map from
the Map menu (see page 56) displays
the following screen:
The screen consists of the following
items:
Icon Bar (curved row of icon
symbols)
Allows you manually select the icons
that are displayed on the map (see
page 62 for a list of these icons).
In the screen above, both traffic and
restaurants are selected. Rotate the
Interface Dial knob and push in to
select (goes blue) or remove them
(symbol is gray). You can also display
or hide the same icons by using the
“Display” or “Hide” voice commands
(see page 141)
CURRENT LOCATION (Interface
Dial Left)
This allows you to display and/or save
your current location. See page 68 for
more information.
ICON OPTIONS (Interface Dial
Right)
This feature allows you to “fine tune”
some of the icons on the Icon bar (See
Icon Options below for more
information).
CHANGE GUIDANCE MODE
(Interface Dial Down)
When on route, this item allows you to
select between a single screen (with
occasional pop-up guidance windows),
or a split screen (containing one half
map, and one half guidance/directions
list window). See page 58 for an
explanation of this feature, and see
page 99 for Setup.
Exit Screen
Press the CANCEL button to return to
the map screen.
Icon Options
Selecting ICON OPTIONS from the
Icon bar displays the following screen:
This feature allows you to “fine tune”
some of the icons on the Icon bar. The
four icon choices, “Parking” (lot or
garage), “Restaurant” (specific type or
types of food), “Other icons” (hospitals,
schools, etc.), and “Traffic” (traffic
speeds or traffic icons), can each be
tailored to your needs.
Page 71 of 166

70Navigation System
Changing the Route
While on route, you may wish to alter
your route, add an interim “Waypoint”
(pit stop), choose a different destination,
or cancel your current destination.
To change your present route, you can
do any of the following:
Say “Menu,” or press the MENU button
to view the Change route by screen:
Cancel the current route (page 70).
Change routing method (page 70).
Detour (page 70).
Avoid a certain street or streets (page 71).
Add a Waypoint or pit stop (page 71).
Back to the current route (page 72).
Choose a different destination (other
methods):
Saying, “Find nearest...” to find a POI (page 73). Saying, “Go home” (page 73).
Using the
Interface Dial to select a
different POI or address on the map
(page 73).
Pressing the MENU button twice to get to the Enter destination by
screen (page 74).
Change Route By Screen
Pressing the MENU button displays the
Change route by screen:
Cancel Current Route
Cancels the current route (and any
waypoints) and returns you to the map
screen.
Change Routing Method
From the Change route by screen, if
you say or select Change Routing
Method , then the Select routing
method screen is displayed. See
Changing the Routing Method on
page 51 for details.
Detour
Calculates a detour route for you if you
encounter an unexp ected obstacle such
as a closed road or extremely heavy
traffic congestion. If detour is selected,
the system will attempt to re-calculate a
new route, avoiding the next 2 miles
(while on a freeway) or
1/2 mile (while on a surface street).
Driving to Your Destination
Page 74 of 166

Navigation System73
Driving to Your Destination
Changing Your Destination
There are other methods by which you
can change or add a waypoint to your
route. These are:
Find Nearest (Voice command)
From the map screen, say one of the
“Find Nearest...” voice commands to
locate the nearest gas station, ATM,
restaurant or other point of interest. See
the “Find Nearest” voice commands
listing on page 142.
Go Home (Voice command)
From the map screen, say, “Go home.”
If you have entered a “Go home”
address, then the system will display a
confirmation screen.
Using Interface Dial to Change
Destination
While following a calculated route, you
can select a new destination with the
map screen and the Interface Dial .
With the map screen displayed, use the
Interface Dial to move the position
icon. It will change to cross hairs. Use
the Interface Dial to position the cross
hair on your desired new destination,
street, or icon, then push in on the
Interface Dial . The address within the
cross hairs will be displayed. If this is
not your desired new destination,
reposition the cross hairs with the
Interface Dial , then push in on the
Interface Dial again to see the new
address. When you push in on the
Interface
Dial on a new destination, you will see a
pop-up menu as well as the address
display. Say or select either Set as
Dest. , or Set as Waypoint on the
pop-up menu. The syst em will return to
the map screen and recalculate the route
to your new destination or waypoint.
NOTE:
When you scroll the map screen while
on route to a destination, some voice
controls will not function. These
include:
Display “Heading up”
Display “North up”
Page 75 of 166

74Navigation System
Entering a Destination from the
Menu Screen (while on route)
If you say “Menu” or press the MENU
button twice, the sy stem displays the
Enter destination by screen. Follow
the procedure described in Entering a
Destination , which begins on page 27.
After selecting OK to the Calculate
route to screen, your new location can
be used either as a waypoint or as a
replacement destination.
Continue Trip Screen
If you restart the vehicle, without having
completed your prior trip, you will see
the following screen:
To continue to your destination or other waypoints, say or select OK.
To cancel your destination, press the CANCEL button or the NAVI
BACK button on the steering wheel,
or using the voice control system, say
“Cancel” or “Back.”
If you wish to change the routing method, say or select CHANGE
METHOD by moving the Interface
Dial down. For additional information on
changing the routing method, see
Changing the Routing Method on
page 51.
Driving to Your Destination
Page 80 of 166
Navigation System79
Information Features
Edit Title
Say or select Edit Title, then enter the
name of your title using the Interface
Dial . Once you have entered the title,
say or select DONE. The title will be
displayed on the specified date of the
Calendar screen.
Edit Message
Say or select Edit Message , and the
system will show the Edit Message
screen. You can enter a message on two
lines. Use to change the line.
Once you have entered the message, say
or select DONE . The message will be
displayed on the specified date of the
Calendar screen.
Message Icon
Say or select Message Icon , and the
system displays a list of icons you can
select to help identify the type of
message you entered. The message icon
you choose will be displayed alongside
the specified date on the Calendar
screen.
Delete
From the Calendar screen, select the
date of the schedule you wish to
remove. To remove the schedule, say or
select DELETE .
Done
Once you have finished entering the
schedule, say or select DONE. The
Calendar screen is re-displayed and the
entered schedule is displayed.
NOTE:
You can only enter one message per day.
A maximum of 50 entries can be stored in the schedule.
To re-activate a previous message, turn the Reminder setting from OFF
to ON . If it is not turned on, the
reminder will not be displayed when
you start vehicle.
The system displays active calendar entries only after you answer OK on
the Disclaimer screen.
For more information, refer to System Start-up on page 17.
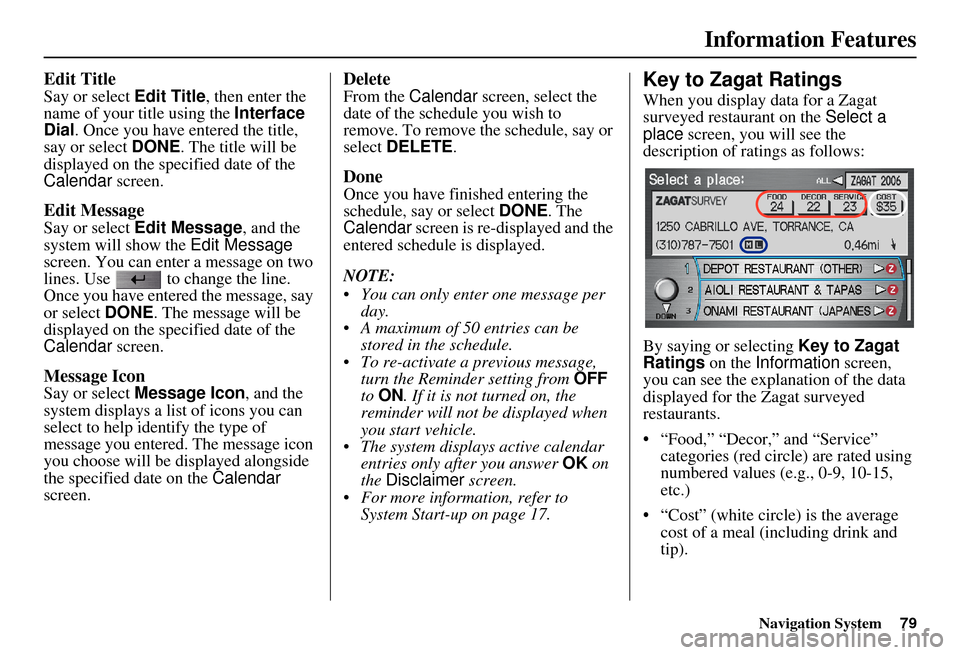
Key to Zagat Ratings
When you display data for a Zagat
surveyed restaurant on the Select a
place screen, you will see the
description of ratings as follows:
By saying or selecting Key to Zagat
Ratings on the Information screen,
you can see the explanation of the data
displayed for the Zagat surveyed
restaurants.
“Food,” “Decor,” and “Service” categories (red circle) are rated using
numbered values (e.g., 0-9, 10-15,
etc.)
“Cost” (white circle) is the average cost of a meal (including drink and
tip).
Page 87 of 166
86Navigation System
System Set-up
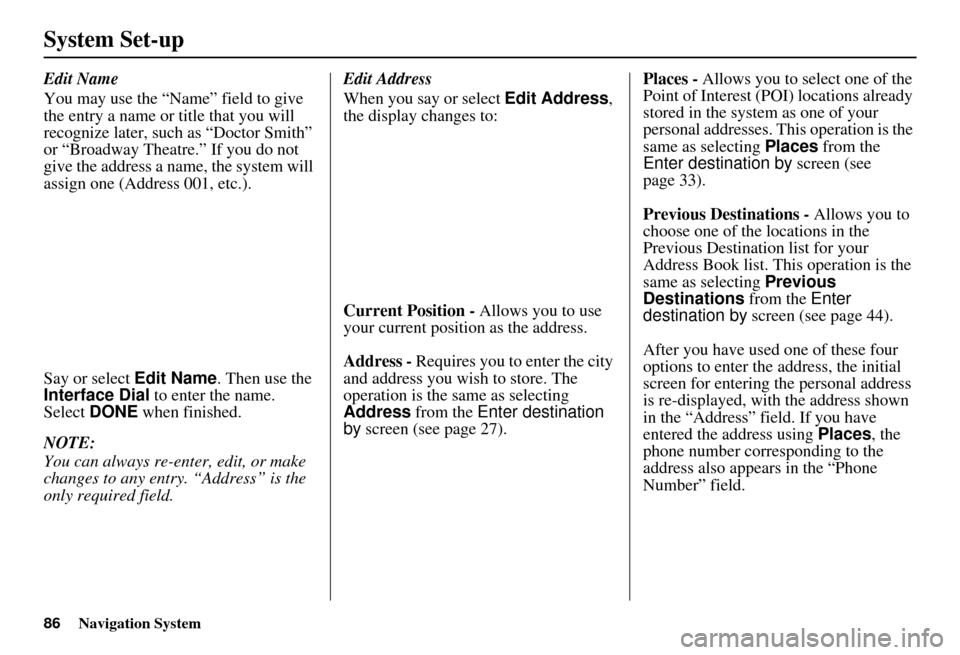
Edit Name
You may use the “Name” field to give
the entry a name or title that you will
recognize later, such as “Doctor Smith”
or “Broadway Theatre.” If you do not
give the address a name, the system will
assign one (Address 001, etc.).
Say or select Edit Name. Then use the
Interface Dial to enter the name.
Select DONE when finished.
NOTE:
You can always re-enter, edit, or make
changes to any entry. “Address” is the
only required field. Edit Address
When you say or select
Edit Address,
the display changes to:
Current Position - Allows you to use
your current position as the address.
Address - Requires you to enter the city
and address you wish to store. The
operation is the same as selecting
Address from the Enter destination
by screen (see page 27). Places -
Allows you to select one of the
Point of Interest (POI) locations already
stored in the system as one of your
personal addresses. This operation is the
same as selecting Places from the
Enter destination by screen (see
page 33).
Previous Destinations - Allows you to
choose one of the locations in the
Previous Destination list for your
Address Book list. This operation is the
same as selecting Previous
Destinations from the Enter
destination by screen (see page 44).
After you have used one of these four
options to enter the address, the initial
screen for entering the personal address
is re-displayed, with the address shown
in the “Address” field. If you have
entered the address using Places, the
phone number corr esponding to the
address also appears in the “Phone
Number” field.