2007 Acura MDX rest
[x] Cancel search: restPage 93 of 166
Navigation System92
System Set-up
Unverified Area Routing
Allows you to receive turn-by-turn map and voice guidance in unverified areas when on route to a destination (see Map Overview
on page 6). The chart below illustrates th e routing differences with this setting ON or OFF .
Unverified Area Routing: OFF (factory default) Unverified Area Routing: ON
Decision:
Why choose
ON or OFF ?
The driver wishes to navigate manually by using the
navigation map and choosing th e streets that lead to the
destination. The driver un derstands that unverified
roads may not be accurate, and can contain errors in
location, naming, and address range. The driver chooses to let th
e navigation system suggest
possible routing. The driver understands that in some
cases guidance may not be appropriate. Unverified
roads may not be accurate, and can contain errors in
location, naming, and address range.
What you will
see...A blue dotted vector line is displayed on the map that
continually points to your destination. The driver
should stop and then use the map to select streets that
lead to the destination. A blue-pink dashed route line highlights suggested
unverified streets on the ma
p while traveling to your
destination. This is in sharp contrast to the normal blue
route line displayed in verified areas.
Cautionary
messagesThere are cautionary pop-up screens and voice
announcements, before and during the route. These
serve as reminders that you should obey all traffic
restrictions. There are cautionary pop-
up screens and voice
announcements, before and during the route. These
serve as reminders that you should exercise additional
caution, and obey all traffic restrictions.
Guidance
(map/voice)There is no turn-by-turn map or voice guidan ce. Voice guidance commands end with the words “If
possible.” This is to remind the driver to verify all
traffic restrictions before making a maneuver.
Directions listA direction list is typically not available. However,
depending on your route, directions are provided to
help you reach the first available verified road. A direction list is provided showing street names and
turn symbols in pink.
Page 94 of 166
Navigation System93
System Set-up
Unverified Area Routing
When driving to your destination, you
have the choice of using or not using
“unverified” roads. You make this
choice in the Setup screen. The next
few pages contain an example of a route
to a destination in an unverified area
explaining the routing differences found
in unverified areas.
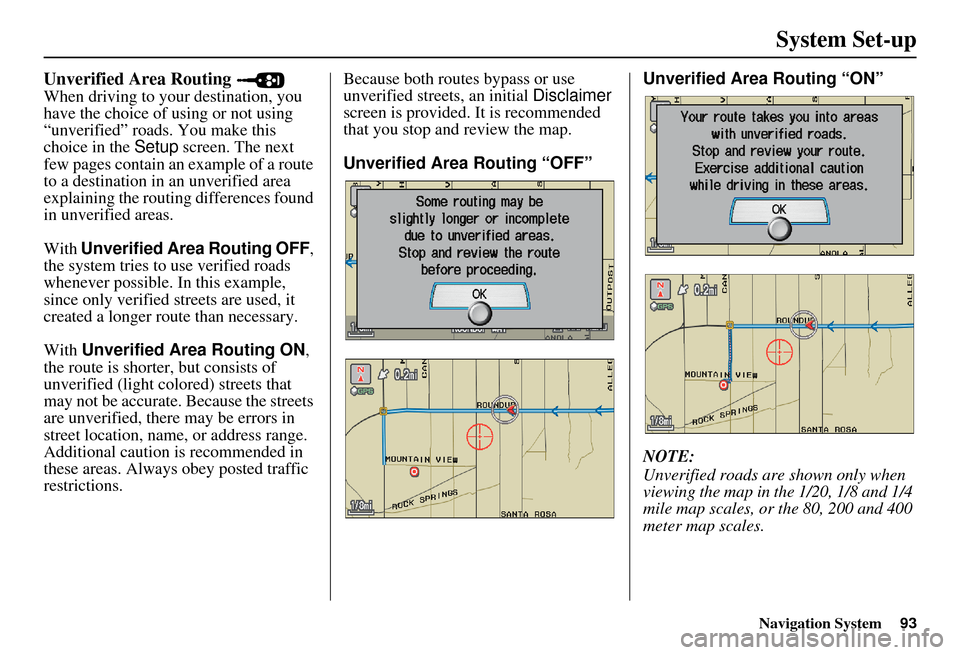
With Unverified Area Routing OFF ,
the system tries to use verified roads
whenever possible. In this example,
since only verified streets are used, it
created a longer rout e than necessary.
With Unverified Area Routing ON ,
the route is shorter, but consists of
unverified (light colored) streets that
may not be accurate. Because the streets
are unverified, there may be errors in
street location, name, or address range.
Additional caution is recommended in
these areas. Always obey posted traffic
restrictions. Because both routes bypass or use
unverified streets, an initial
Disclaimer
screen is provided. It is recommended
that you stop and review the map.
Unverified Area Routing “OFF” Unverified Area
Routing “ON”
NOTE:
Unverified roads are shown only when
viewing the map in the 1/20, 1/8 and 1/4
mile map scales, or the 80, 200 and 400
meter map scales.
Page 95 of 166

94Navigation System
System Set-up
With Unverified Area Routing OFF ,
the driver chose to take a shortcut, and
avoid the long route. The moment you
enter an unverified street, a caution box
appears on the screen, and is read by the
voice. This lets you know that you are
about to enter an unverified area and
that you will be following a dotted
“vector line” that points to your
destination.
With Unverified Area Routing ON ,
a caution box appear s on the screen and
is read by the voice. In this case you will
be presented with a dashed blue/pink
line instead of the regular blue route
line. You cannot assume that all
guidance is appropriate. This is your
signal to pay attention to posted traffic
restrictions.
In both cases, when you actually enter
the unverified street, a short caution will
remind you. You will see and hear this
short caution message whenever you
enter unverified areas. Unverified Area Routing “OFF” Unverified Area Routing “ON”
Page 96 of 166
Navigation System95
System Set-up
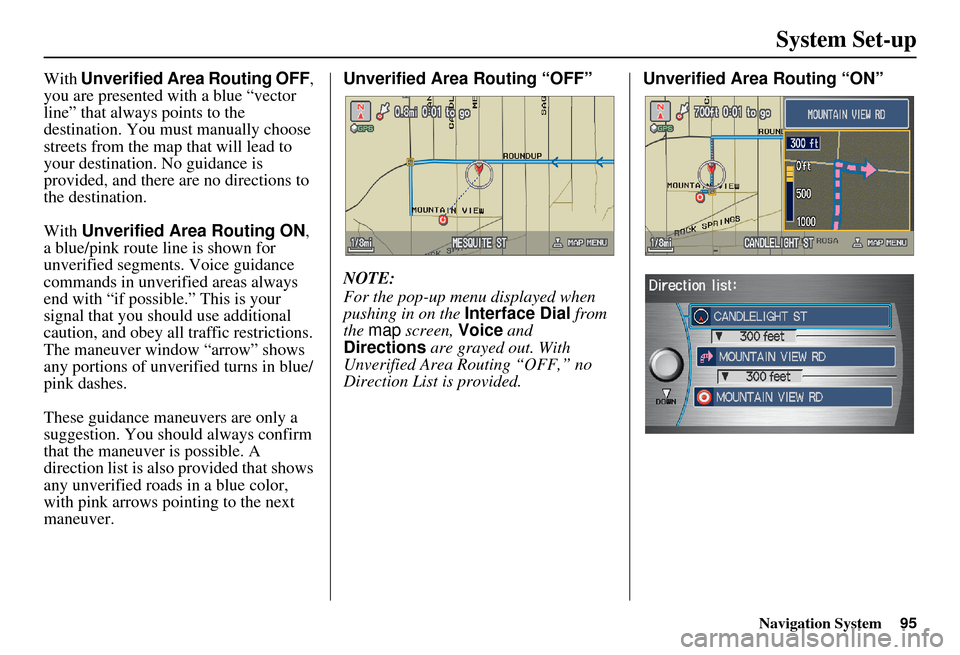
With Unverified Area Routing OFF ,
you are presented with a blue “vector
line” that always points to the
destination. You must manually choose
streets from the map that will lead to
your destination. No guidance is
provided, and there are no directions to
the destination.
With Unverified Area Routing ON ,
a blue/pink route line is shown for
unverified segments. Voice guidance
commands in unverified areas always
end with “if possible.” This is your
signal that you should use additional
caution, and obey all traffic restrictions.
The maneuver window “arrow” shows
any portions of unverified turns in blue/
pink dashes.
These guidance maneuvers are only a
suggestion. You should always confirm
that the maneuver is possible. A
direction list is also provided that shows
any unverified roads in a blue color,
with pink arrows pointing to the next
maneuver. Unverified Area Routing “OFF”
NOTE:
For the pop-up menu displayed when
pushing in on the
Interface Dial from
the map screen, Voice and
Directions are grayed out. With
Unverified Area Routing “OFF,” no
Direction List is provided. Unverified Area
Routing “ON”
Page 99 of 166
98Navigation System
System Set-up
NOTE:
You can select areas to avoid, however you cannot select roads or
areas that you want the system to use
for routing.
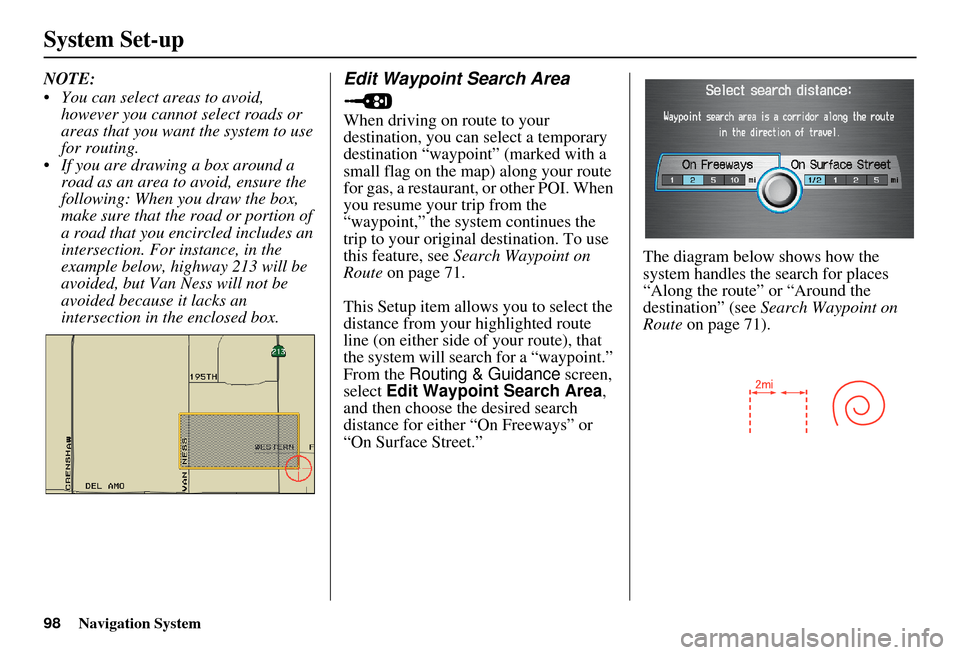
If you are drawing a box around a road as an area to avoid, ensure the
following: When you draw the box,
make sure that the road or portion of
a road that you encircled includes an
intersection. For instance, in the
example below, highway 213 will be
avoided, but Van Ness will not be
avoided because it lacks an
intersection in the enclosed box.Edit Waypoint Search Area
When driving on route to your
destination, you can select a temporary
destination “waypoint” (marked with a
small flag on the map) along your route
for gas, a restaurant, or other POI. When
you resume your trip from the
“waypoint,” the syst em continues the
trip to your original destination. To use
this feature, see Search Waypoint on
Route on page 71.
This Setup item allows you to select the
distance from your highlighted route
line (on either side of your route), that
the system will search for a “waypoint.”
From the Routing & Guidance screen,
select Edit Waypoint Search Area ,
and then choose the desired search
distance for either “On Freeways” or
“On Surface Street.” The diagram below shows how the
system handles the search for places
“Along the route”
or “Around the
destination” (see Search Waypoint on
Route on page 71).
Page 100 of 166
Navigation System99
System Set-up
For “Places along the route,” the system
looks in front of yo u within a corridor
width specified by your values for “On
Freeways” or “On Surface Street.” The
system checks the upcoming area, based
on your input.
For “Places around the destination,” the
system searches outwards in a spiral
from the destination. In this case,
specific search values are not needed;
the matches are displayed in order of
distance from destination.
NOTE:
These settings do not affect the search
range used for the voice commands like,
“Find nearest gas station,” that are
also available wh en viewing the map
screen.Guidance Mode
Allows you to select the guidance
display mode: Single Screen or Split
Screen .
The factry default is Single Screen.
NOTE:
The Guidance Mode can also be
selected on the Icon Selection screen.
See Showing Icons on the Map on
page 65.
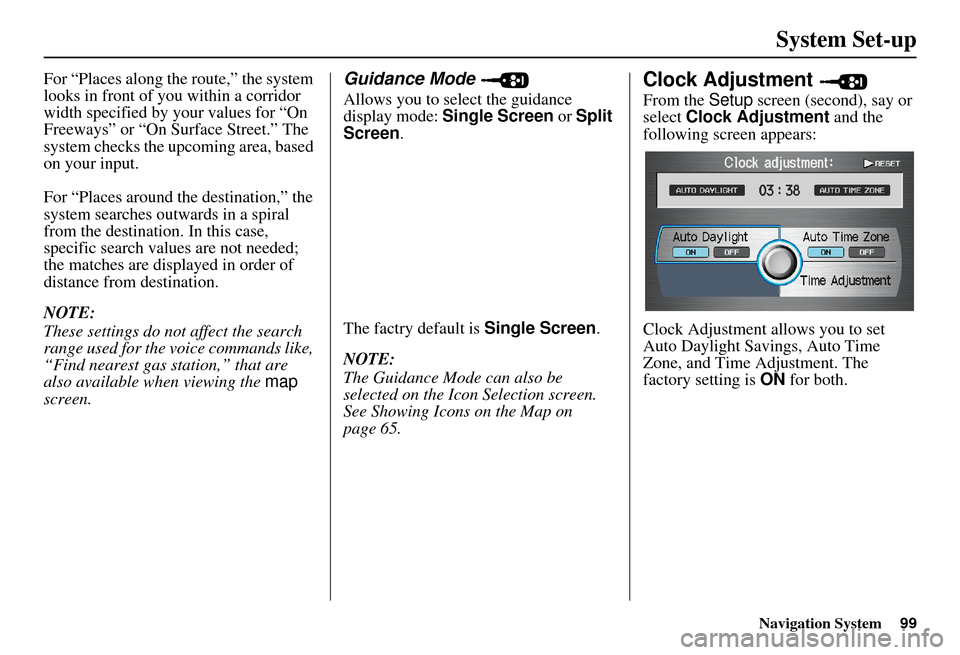
Clock Adjustment
From the Setup screen (second), say or
select Clock Adjustment and the
following screen appears:
Clock Adjustment allows you to set
Auto Daylight Savings, Auto Time
Zone, and Time Adjustment. The
factory setting is ON for both.
Page 106 of 166
105Navigation System
System Set-up
I
Recommended Display mode Day/Night settings:
With the headlights on, select mid range for the dash illumination (see Own er’s manual for location of knob).
With the headlights off, select mid range for the dash illumination (see Owner’s manual for location of knob).
On the Setup “Color” adjustment screen, choose White for the map Day display, and black for the map Night display (see
page 103). Inappropriate adjustment of these colors can cause the Day/Night modes to appear inoperative.
llumination control Priority Operation Override conditions
( Display mode )
button (
see page 11) 1 Allows selection of
Day, Night or Off display
mode. This button has the highest priority and
overrides all other displa y control adjustments
listed below. When the car is restarted, the display mode
previously selected by th
is button is canceled,
and the display mode is determined by one of
the controls below.
Sunlight Sensor (Middle of
dash near the windshield).
(See owner's manual for
location) 2 If the sunlight sensor
detects daylight and the
headlights are turned on, the navi automatically
overrides (cancels) the Night display and
displays the Day display mode. If desired, use the
(
Display mode )
button to override this automatic choice.
Dash illumination adjustment
button (See Owner’s manual
for location) 3 When headlights are turned on, and you wish to
have the Day display mode, then adjust the
illumination to the full bright setting (beeps). When the headlights are turned
ON, adjust the
dash brightness down (counterclockwise) from
the maximum brightness position.
Headlights (On/Off) 4 When turned on, it changes the display to the Night display mode. The previous 3 controls
listed above can “cancel” this function. Use the
(
Display mode ) button, or
adjust the dash illuminati on to full bright to set
the display to your desired choice.
Map Day/Night screen color
choice (
see page 103 for the
Day and Night color choices) N/A The user can select the color of the screen that
will be displayed for the Day, and Night
display modes described above. For best contrast
, ensure that the Map “color”
is white for Day, and black for Night.
Page 107 of 166

106Navigation System
System Set-up
To allow the Sunlight sensor to function properly, avoid blocking the sensor with loose articles (see Owner’s manual for
location of sensor).
Remember that once the
(Display mode ) button is selected, the other display mode controls are overridden until the
vehicle is restarted.
NOTE:
Loose articles in the center dash can block or interfere with th e operation of the sunlight sensor. See the MDX Owner’s manual
for additional information regardin g the dash brightness adjustment.