Page 39 of 674

GEN
INFO
1 - 8
SPECIAL TOOLS
YU-33975, 90890-01403 Steering nut wrench
This tool is used when tighten the steering ring nut to
specification.YU-33975 90890-01403
YM-01500, 90890-01500 Cap bolt wrench
This tool is used to loosen or tighten the base valve.YM-01500 90890-01500
YM-01501, 90890-01501 Cap bolt ring wrench
This tool is used to loosen or tighten the damper
assembly.YM-01501 90890-01501
YM-A0948, 90890-01502 Fork seal driver
This tool is used when install the fork oil seal.YM-A0948 90890-01502
YU-3112-C, 90890-03112 Pocket tester
Use this tool to inspect the coil resistance, output
voltage and amperage.YU-3112-C 90890-03112
YM-33277-A, 90890-03141 Timing light
This tool is necessary for checking ignition timing.YM-33277-A 90890-03141
YM-4019, 90890-04019 Valve spring compressor
This tool is needed to remove and install the valve
assemblies.YM-4019 90890-04019
YM-91042, 90890-04086 Clutch holding tool
This tool is used to hold the clutch when removing or
installing the clutch boss securing nut.YM-91042 90890-04086
YM-4111, 90890-04111
YM-4116, 90890-04116Valve guide remover
Intake 4.0 mm (0.16 in)
Exhaust 4.5 mm (0.18 in)
This tool is needed to remove and install the valve
guide.YM-4111
YM-411690890-04111
90890-04116
Part number Tool name/How to use Illustration
Page 78 of 674

SPEC
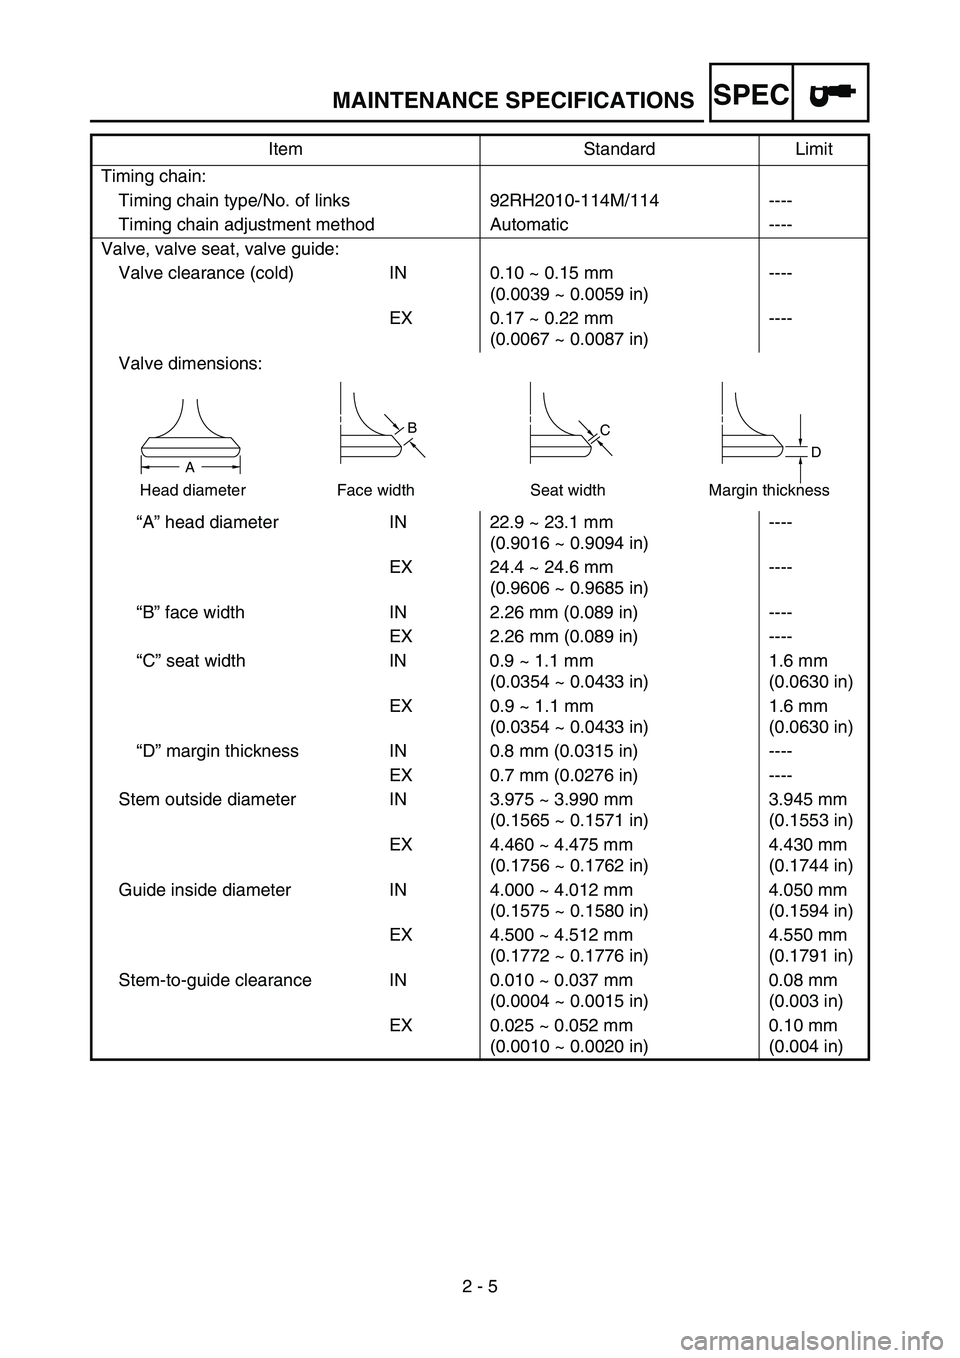
2 - 5 Timing chain:
Timing chain type/No. of links 92RH2010-114M/114 ----
Timing chain adjustment method Automatic ----
Valve, valve seat, valve guide:
Valve clearance (cold) IN 0.10 ~ 0.15 mm
(0.0039 ~ 0.0059 in)----
EX 0.17 ~ 0.22 mm
(0.0067 ~ 0.0087 in)----
Valve dimensions:
“A” head diameter IN 22.9 ~ 23.1 mm
(0.9016 ~ 0.9094 in)----
EX 24.4 ~ 24.6 mm
(0.9606 ~ 0.9685 in)----
“B” face width IN 2.26 mm (0.089 in) ----
EX 2.26 mm (0.089 in) ----
“C” seat width IN 0.9 ~ 1.1 mm
(0.0354 ~ 0.0433 in)1.6 mm
(0.0630 in)
EX 0.9 ~ 1.1 mm
(0.0354 ~ 0.0433 in)1.6 mm
(0.0630 in)
“D” margin thickness IN 0.8 mm (0.0315 in) ----
EX 0.7 mm (0.0276 in) ----
Stem outside diameter IN 3.975 ~ 3.990 mm
(0.1565 ~ 0.1571 in)3.945 mm
(0.1553 in)
EX 4.460 ~ 4.475 mm
(0.1756 ~ 0.1762 in)4.430 mm
(0.1744 in)
Guide inside diameter IN 4.000 ~ 4.012 mm
(0.1575 ~ 0.1580 in)4.050 mm
(0.1594 in)
EX 4.500 ~ 4.512 mm
(0.1772 ~ 0.1776 in)4.550 mm
(0.1791 in)
Stem-to-guide clearance IN 0.010 ~ 0.037 mm
(0.0004 ~ 0.0015 in)0.08 mm
(0.003 in)
EX 0.025 ~ 0.052 mm
(0.0010 ~ 0.0020 in)0.10 mm
(0.004 in) Item Standard Limit
BC
DA
Head diameter Face width Seat width Margin thickness
MAINTENANCE SPECIFICATIONS
Page 83 of 674

SPEC
2 - 10 Part to be tightened Thread size Q’tyTightening torque
Nm m·kg ft·lb
Spark plug M10S × 1.0 1 13 1.3 9.4
Camshaft cap M6 × 1.0 10 10 1.0 7.2
Cylinder head blind plug screw M12 × 1.0 1 28 2.8 20
Cylinder head (stud bolt) M6 × 1.0 2 7 0.7 5.1
(stud bolt) M8 × 1.25 1 15 1.5 11
(bolt) M9 × 1.25 4 38 3.8 27
(nut) M6 × 1.0 2 10 1.0 7.2
Cylinder head cover M6 × 1.0 2 10 1.0 7.2
Cylinder M6 × 1.0 1 10 1.0 7.2
Balancer weight M6 × 1.0 2 10 1.0 7.2
Balancer shaft driven gear M14 × 1.0 1 50 5.0 36
Timing chain guide (intake side) M6 × 1.0 2 10 1.0 7.2
Timing chain tensioner M6 × 1.0 2 10 1.0 7.2
Timing chain tensioner cap bolt M6 × 1.0 1 7 0.7 5.1
Impeller M8 × 1.25 1 14 1.4 10
Radiator hose clamp M6 × 1.0 10 2 0.2 1.4
Coolant drain bolt M6 × 1.0 1 10 1.0 7.2
Water pump housing M6 × 1.0 4 10 1.0 7.2
Radiator M6 × 1.0 6 10 1.0 7.2
Radiator guard M6 × 1.0 2 10 1.0 7.2
Radiator pipe M6 × 1.0 1 10 1.0 7.2
Oil pump cover M4 × 0.7 1 2 0.2 1.4
Oil pump M6 × 1.0 3 10 1.0 7.2
Oil filter element drain bolt M6 × 1.0 1 10 1.0 7.2
Oil filter element cover M6 × 1.0 2 10 1.0 7.2
Oil strainer (crankcase) M6 × 1.0 2 10 1.0 7.2
Oil delivery pipe 1 (M10) M10 × 1.25 1 20 2.0 14
(M8) M8 × 1.25 2 18 1.8 13
Oil hose M6 × 1.0 2 8 0.8 5.8
Oil hose clamp—120.21.4
Oil strainer (oil tank) M6 × 1.0 1 9 0.9 6.5
Oil tank drain bolt M8 × 1.25 1 18 1.8 13
Oil tank (upper) M6 × 1.0 1 7 0.7 5.1
Oil tank and frame M6 × 1.0 3 9 0.9 6.5
Carburetor joint clamp M4 × 0.7 2 3 0.3 2.2
Air filter joint clamp M6 × 1.0 1 3 0.3 2.2
Throttle cable adjust bolt and locknut M6 × 0.75 1 4 0.4 2.9
Throttle cable (pull) M6 × 1.0 1 4 0.4 2.9
Throttle cable (return) M12 × 1.0 1 11 1.1 8.0
Throttle cable cover M5 × 0.8 2 4 0.4 2.9
Hot starter plunger M12 × 1.0 1 2 0.2 1.4
Hot starter cable adjust bolt and locknut M6 × 0.75 1 4 0.4 2.9
MAINTENANCE SPECIFICATIONS
Page 154 of 674

3 - 1
INSP
ADJ
MAINTENANCE INTERVALS
EC300000
REGULAR INSPECTION AND ADJUSTMENTS
MAINTENANCE INTERVALS
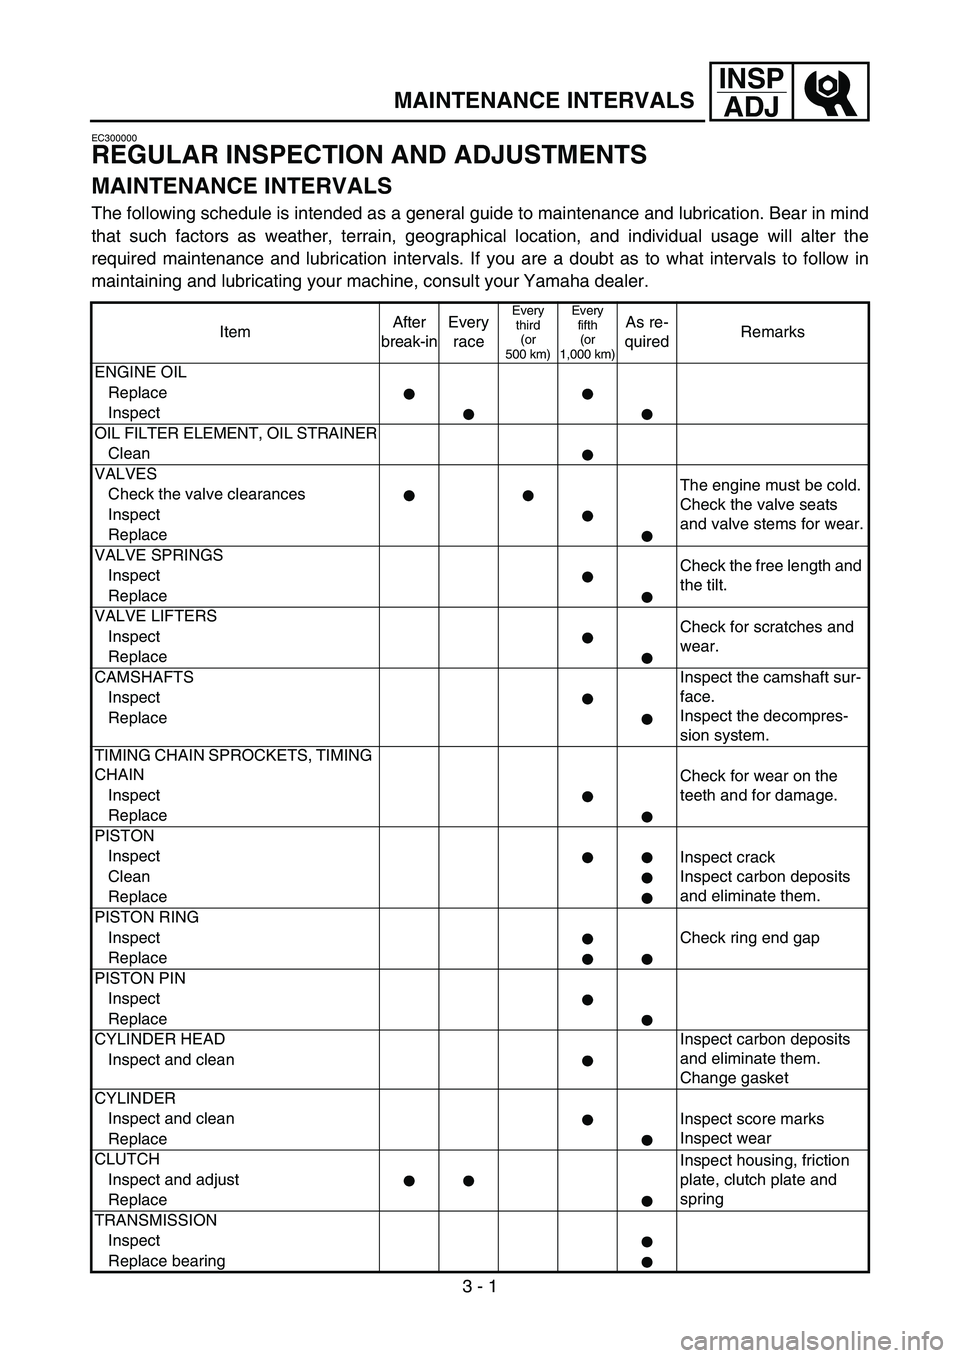
The following schedule is intended as a general guide to maintenance and lubrication. Bear in mind
that such factors as weather, terrain, geographical location, and individual usage will alter the
required maintenance and lubrication intervals. If you are a doubt as to what intervals to follow in
maintaining and lubricating your machine, consult your Yamaha dealer.
ItemAfter
break-inEvery
race
Every
third
(or
500 km)Every
fifth
(or
1,000 km)As re-
quiredRemarks
ENGINE OIL
Replace
Inspect
OIL FILTER ELEMENT, OIL STRAINER
Clean
VALVES
The engine must be cold.
Check the valve seats
and valve stems for wear. Check the valve clearances
Inspect
Replace
VALVE SPRINGS
Check the free length and
the tilt. Inspect
Replace
VALVE LIFTERS
Check for scratches and
wear. Inspect
Replace
CAMSHAFTS Inspect the camshaft sur-
face.
Inspect the decompres-
sion system. Inspect
Replace
TIMING CHAIN SPROCKETS, TIMING
CHAIN
Check for wear on the
teeth and for damage. Inspect
Replace
PISTON
Inspect
Inspect crack
Inspect carbon deposits
and eliminate them. Clean
Replace
PISTON RING
InspectCheck ring end gap
Replace
PISTON PIN
Inspect
Replace
CYLINDER HEAD Inspect carbon deposits
and eliminate them.
Change gasket Inspect and clean
CYLINDER
Inspect and clean
Inspect score marks
Inspect wear
Replace
CLUTCH
Inspect housing, friction
plate, clutch plate and
spring Inspect and adjust
Replace
TRANSMISSION
Inspect
Replace bearing
Page 198 of 674
3 - 19
INSP
ADJ
VALVE CLEARANCE INSPECTION AND ADJUSTMENT
2. Remove:
Spark plug
Cylinder head cover
Refer to “CAMSHAFTS” section in the
CHAPTER 4.
3. Remove:
Timing mark accessing screw 1
Crankshaft end accessing screw 2
O-ring
4. Check:
Valve clearance
Out of specification → Adjust.
Valve clearance (cold):
Intake valve:
0.10 ~ 0.15 mm
(0.0039 ~ 0.0059 in)
Exhaust valve:
0.17 ~ 0.22 mm
(0.0067 ~ 0.0087 in)
Checking steps:
Turn the crankshaft counterclockwise with
a wrench.
Align the T.D.C. mark a on the rotor with
the align mark b on the crankcase cover
when piston is at T.D.C. on compression
stroke.
NOTE:
In order to be sure that the piston is at Top
Dead Center, the punch mark c on the
exhaust camshaft and the punch mark d on
the intake camshaft must align with the cyl-
inder head surface, as shown in the illustra-
tion.
Page 200 of 674
3 - 20
INSP
ADJ
VALVE CLEARANCE INSPECTION AND ADJUSTMENT
Measure the valve clearance e using a
feeler gauge 1.
NOTE:
Record the measured reading if the clear-
ance is incorrect.
5. Adjust:
Valve clearance
Adjustment steps:
Remove the camshaft (intake and
exhaust).
Refer to “CAMSHAFTS” section in the
CHAPTER 4.
Remove the valve lifters 1 and the pads
2.
NOTE:
Place a rag in the timing chain space to
prevent pads from falling into the crank-
case.
Identity each valve lifter and pad position
very carefully so that they can be rein-
stalled in their original place.
Select the proper pad using the pad
selecting table.
Pad rangePad Availability:
25 increments
No. 120
~
No. 2401.20 mm
~
2.40 mmPads are available in
0.05 mm increments
Page 254 of 674
3 - 46
INSP
ADJ
IGNITION TIMING CHECK
IGNITION TIMING CHECK
1. Remove:
Timing mark accessing screw 1
2. Attach:
Timing light
Inductive tachometer
To the ignition coil lead (orange lead 1).
Timing light:
YM-33277-A/90890-03141
1
3. Adjust:
Engine idling speed
Refer to “ENGINE IDLING SPEED
ADJUSTMENT” section.
4. Check:
Ignition timing
Visually check the stationary pointer a is
within the firing range b on the rotor.
Incorrect firing range → Check rotor and
pickup assembly.
5. Install:
Timing mark accessing screw
Page 294 of 674
4 - 20
ENGCARBURETOR
Accelerator pump timing adjustment
* Except for USA and CDNAdjustment steps:
NOTE:
In order for the throttle valve height a to
achieve the specified value, tuck under the
throttle valve plate 1 the rod 2 etc. with the
same outer diameter as the specified value.
Throttle valve height:
0.8 mm (0.031 in)
* 0.7 mm (0.028 in)
Fully turn in the accelerator pump adjust-
ing screw 3.
Check that the link lever 4 has free play
b by pushing lightly on it.
Gradually turn out the adjusting screw
while moving the link lever until it has no
more free play.
Carburetor installation
1. Install:
Carburetor joint 1
NOTE:
Install the projection a on the cylinder head
between the carburetor joint slots b.
T R..3 Nm (0.3 m · kg, 2.2 ft · lb)
2. Install:
Carburetor 1
NOTE:
Install the projection a between the carburetor
joint slots.