Page 39 of 674

GEN
INFO
1 - 8
SPECIAL TOOLS
YU-33975, 90890-01403 Steering nut wrench
This tool is used when tighten the steering ring nut to
specification.YU-33975 90890-01403
YM-01500, 90890-01500 Cap bolt wrench
This tool is used to loosen or tighten the base valve.YM-01500 90890-01500
YM-01501, 90890-01501 Cap bolt ring wrench
This tool is used to loosen or tighten the damper
assembly.YM-01501 90890-01501
YM-A0948, 90890-01502 Fork seal driver
This tool is used when install the fork oil seal.YM-A0948 90890-01502
YU-3112-C, 90890-03112 Pocket tester
Use this tool to inspect the coil resistance, output
voltage and amperage.YU-3112-C 90890-03112
YM-33277-A, 90890-03141 Timing light
This tool is necessary for checking ignition timing.YM-33277-A 90890-03141
YM-4019, 90890-04019 Valve spring compressor
This tool is needed to remove and install the valve
assemblies.YM-4019 90890-04019
YM-91042, 90890-04086 Clutch holding tool
This tool is used to hold the clutch when removing or
installing the clutch boss securing nut.YM-91042 90890-04086
YM-4111, 90890-04111
YM-4116, 90890-04116Valve guide remover
Intake 4.0 mm (0.16 in)
Exhaust 4.5 mm (0.18 in)
This tool is needed to remove and install the valve
guide.YM-4111
YM-411690890-04111
90890-04116
Part number Tool name/How to use Illustration
Page 194 of 674

3 - 17
INSP
ADJ
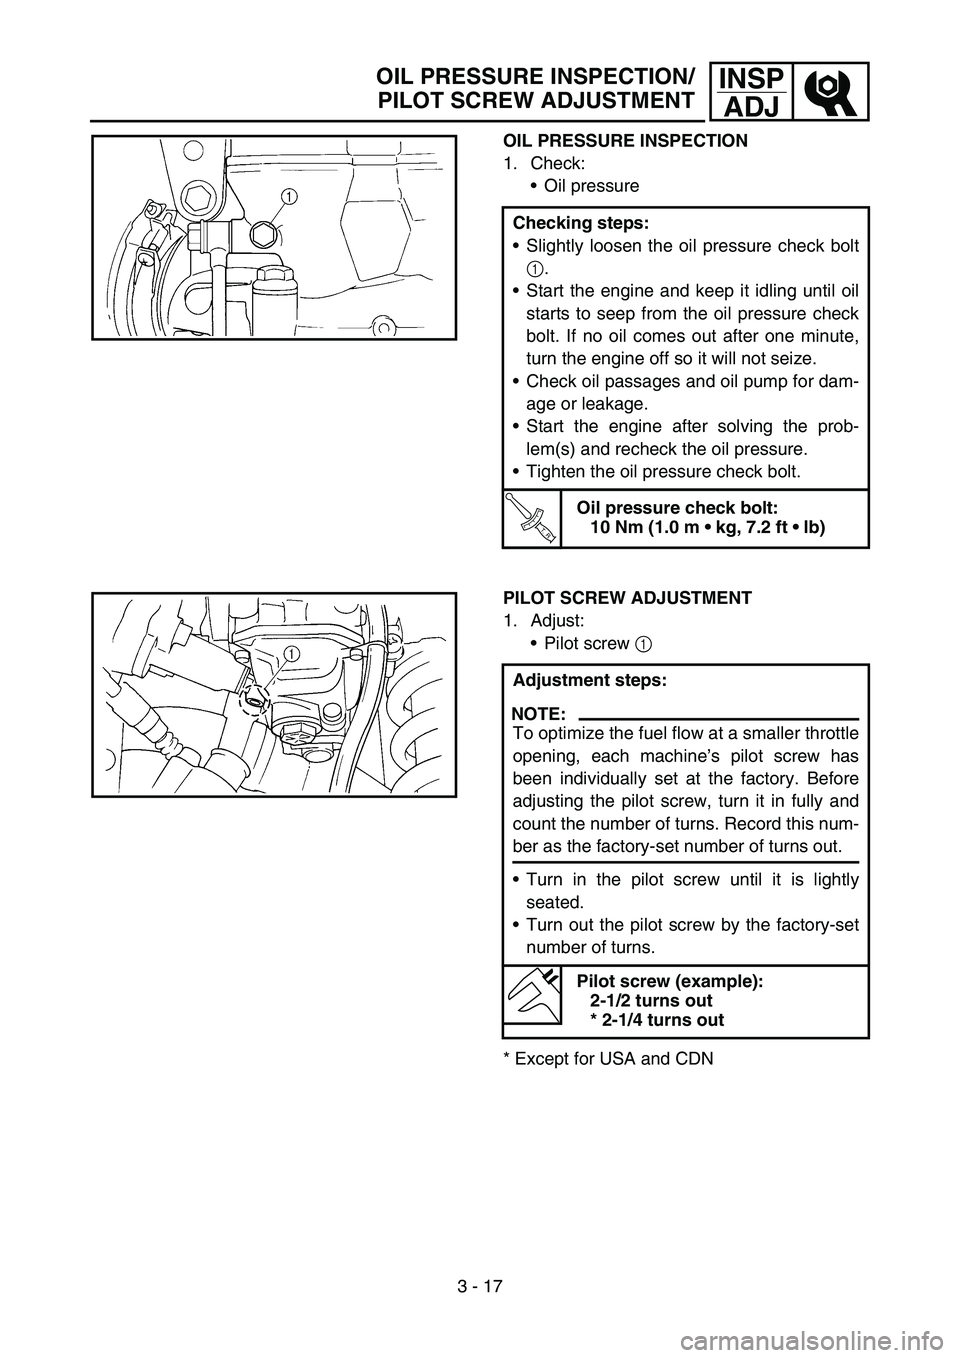
OIL PRESSURE INSPECTION
1. Check:
Oil pressure
Checking steps:
Slightly loosen the oil pressure check bolt
1.
Start the engine and keep it idling until oil
starts to seep from the oil pressure check
bolt. If no oil comes out after one minute,
turn the engine off so it will not seize.
Check oil passages and oil pump for dam-
age or leakage.
Start the engine after solving the prob-
lem(s) and recheck the oil pressure.
Tighten the oil pressure check bolt.
T R..
Oil pressure check bolt:
10 Nm (1.0 m kg, 7.2 ft lb)
PILOT SCREW ADJUSTMENT
1. Adjust:
Pilot screw 1
* Except for USA and CDNAdjustment steps:
NOTE:
To optimize the fuel flow at a smaller throttle
opening, each machine’s pilot screw has
been individually set at the factory. Before
adjusting the pilot screw, turn it in fully and
count the number of turns. Record this num-
ber as the factory-set number of turns out.
Turn in the pilot screw until it is lightly
seated.
Turn out the pilot screw by the factory-set
number of turns.
Pilot screw (example):
2-1/2 turns out
* 2-1/4 turns out
OIL PRESSURE INSPECTION/
PILOT SCREW ADJUSTMENT
Page 224 of 674
3 - 31
INSP
ADJ
DRIVE CHAIN SLACK ADJUSTMENT
4. Check:
Drive chain stiffness a
Clean and oil the drive chain and hold as
illustrated.
Stiff → Replace drive chain.
5. Install:
Drive chain 1
Joint 2
Master link clip 3
CAUTION:
Be sure to install the master link clip to the
direction as shown.
aTurning direction
6. Lubricate:
Drive chain
Drive chain lubricant:
SAE 10W-30 motor oil or
suitable chain lubricants
DRIVE CHAIN SLACK ADJUSTMENT
1. Elevate the rear wheel by placing the suit-
able stand under the engine.
2. Check:
Drive chain slack a
Above the seal guard installation bolt.
Out of specification → Adjust.
NOTE:
Before checking and/or adjusting, rotate the
rear wheel through several revolutions and
check the slack several times to find the tight-
est point. Check and/or adjust the drive chain
slack with the rear wheel in this “tight chain”
position.
Drive chain slack:
48 ~ 58 mm (1.9 ~ 2.3 in)
Page 308 of 674

4 - 27
ENGCAMSHAFTS
Decompression system
1. Check:
Decompression system
Timing chain tensioner
1. Check:
While pressing the tensioner rod lightly
with fingers, use a thin screwdriver 1
and wind the tensioner rod up fully clock-
wise.
When releasing the screwdriver by press-
ing lightly with fingers, make sure that the
tensioner rod will come out smoothly.
If not, replace the tensioner assembly.
ASSEMBLY AND INSTALLATION
Camshaft
1. Install:
Exhaust camshaft 1
Intake camshaft 2 Checking steps:
Check that the decompression mecha-
nism cam 1 moves smoothly.
Check that the decompression mecha-
nism cam lever pin 2 projects from the
camshaft.
Installation steps:
Turn the crankshaft counterclockwise with
a wrench.
NOTE:
Apply the molybdenum disulfide oil on the
camshafts.
Apply the engine oil on the decompression
system.
Squeezing the decompression lever
allows the crankshaft to be turned easily.
Align the T.D.C. mark a on the rotor with
the align mark b on the crankcase cover
when piston is at T.D.C. on compression
stroke.
Page 602 of 674
–+ELEC
6 - 3
IGNITION SYSTEM
EC620000
IGNITION SYSTEM
INSPECTION STEPS
Use the following steps for checking the possibility of the malfunctioning engine being attributable to
ignition system failure and for checking the spark plug which will not spark.
*marked: Only when the ignition checker is used.
NOTE:
•Remove the following parts before inspection.
1) Seat
2) Fuel tank
•Use the following special tools in this inspection.
Dynamic spark tester:
YM-34487
Ignition checker:
90890-06754Pocket tester:
YU-3112-C/90890-03112
Spark gap test*Clean or replace
spark plug.
Check entire ignition
system for connection.
(couplers, leads and
ignition coil)Repair or replace.
Check engine stop switch. Replace.
Check ignition coil. Primary coil Replace.
Secondary coil Replace.
Check CDI magneto. Pickup coil Replace.
Charging coil Replace.
Check neutral switch. Repair or replace.
Replace CDI unit.
No spark
OK
OK
OK
OK
OK
Spark
No good
No good
No good
No good
No good
No good
No good