Page 336 of 424
8-87
EBU08330
Adjusting the rear brake light switch
The rear brake light switch, which is activated by
the brake pedal and brake lever, is properly
adjusted when the brake light comes on just
before braking takes effect. If necessary, adjust
the brake light switch as follows.
Turn the adjusting nut while holding the rear
brake light switch in place. To make the brake
light come on earlier, turn the adjusting nut in
direction a. To make the brake light come on
later, turn the adjusting nut in direction b.1
2
ab
1. Rear brake light switch
2. Adjusting nut
1. Contacteur de feu stop sur frein arrière
2. Écrou de réglage
1. Interruptor de la luz de freno trasero
2. Tuerca de ajuste
1S3-9-60 9-11 4/27/05 2:13 PM Page 8-87
Page 370 of 424

8-121
EBU15840
Fuse replacement
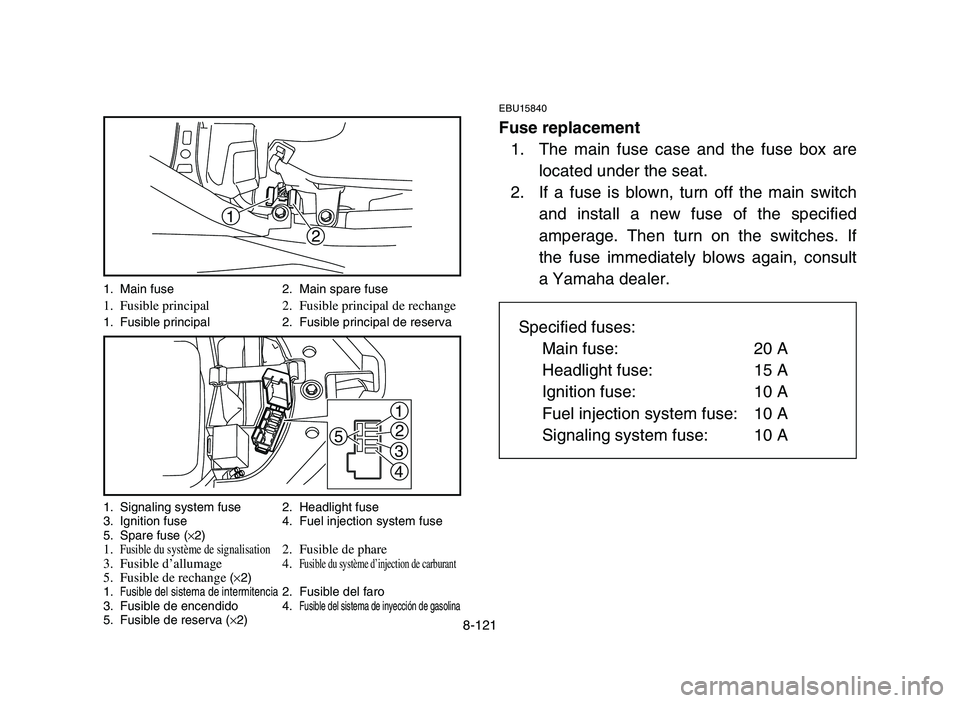
1. The main fuse case and the fuse box are
located under the seat.
2. If a fuse is blown, turn off the main switch
and install a new fuse of the specified
amperage. Then turn on the switches. If
the fuse immediately blows again, consult
a Yamaha dealer.
2 1
1
2
3
4 5
1. Main fuse 2. Main spare fuse1. Fusible principal 2. Fusible principal de rechange1. Fusible principal 2. Fusible principal de reserva
1. Signaling system fuse 2. Headlight fuse
3. Ignition fuse 4. Fuel injection system fuse
5. Spare fuse (×2)
1.Fusible du système de signalisation2. Fusible de phare
3. Fusible d’allumage 4.Fusible du système d’injection de carburant5. Fusible de rechange(×2)
1.Fusible del sistema de intermitencia2. Fusible del faro
3. Fusible de encendido 4.Fusible del sistema de inyección de gasolina5. Fusible de reserva (×2)
Specified fuses:
Main fuse: 20 A
Headlight fuse: 15 A
Ignition fuse: 10 A
Fuel injection system fuse: 10 A
Signaling system fuse: 10 A
1S3-9-60 9-11 4/27/05 2:13 PM Page 8-121
Page 374 of 424
8-125
EBU14170
Replacing a headlight bulb
If a headlight bulb burns out, replace it as fol-
lows.
1. Remove the headlight assembly by remov-
ing the bolts.
2. Disconnect the headlight coupler.
3. Remove the headlight bulb holder cover.1
2
1 2
1. Headlight assembly 2. Bolt (×2)1. Bloc de phare 2. Boulon (×2)1. Conjunto faro 2. Perno (×2)
1. Headlight bulb holder cover 2. Headlight coupler
1. Cache de la fixation d’ampoule 2. Coupleur de phare
de phare
1. Cubierta del portabombillas 2. Acoplador del faro
del faro
1S3-9-60 9-11 4/27/05 2:13 PM Page 8-125
Page 376 of 424
8-127
4. Push the headlight bulb holder in and turn
it counterclockwise to remove.
5. Remove the defective bulb and replace it
with a new bulb.
w
Do not touch a headlight bulb when it is on
or immediately after it is turned off. You can
be burned or a fire could start if the bulb
touches something flammable. Wait for the
bulb to cool before touching or removing it.
cC
Do not touch the glass part of the headlight
bulb to keep it free from oil, otherwise the
transparency of the glass, the luminosity of
the bulb, and the bulb life will be adversely
affected. Thoroughly clean off any dirt and
fingerprints on the headlight bulb using a
cloth moistened with alcohol or thinner.
1. Headlight bulb holder1. Fixation d’ampoule de phare1. Portabombillas del faro
1. Do not touch the glass part of the bulb.
1. Ne pas toucher le verre de l’ampoule1. Ne tocar la parte de cristal de la bombilla
1S3-9-60 9-11 4/27/05 2:13 PM Page 8-127
Page 378 of 424
8-129
6. Push the headlight bulb holder in and turn
it clockwise to install.
7. Install the headlight bulb holder cover.
8. Connect the headlight coupler.
9. Install the headlight assembly by installing
the bolts.
10. Adjust the headlight beam if necessary.
1S3-9-60 9-11 4/27/05 2:13 PM Page 8-129
Page 380 of 424
8-131
EBU14050
Headlight beam adjustment
cC
It is advisable to have a Yamaha dealer make
this adjustment.
To raise the beam, turn the adjusting bolt in
direction a.
To lower the beam, turn the adjusting bolt in
direction b.
EBU15852
Tail/brake light
This model is equipped with an LED type of
tail/brake light.
If the tail/brake light does not come on, have a
Yamaha dealer check it.
1
a
b
1. Adjusting screw1. Vis de réglage1. Tornillo de ajuste
1S3-9-60 9-11 4/27/05 2:13 PM Page 8-131
Page 384 of 424
8-135
w
Do not smoke when checking the fuel sys-
tem. Fuel can ignite or explode, causing
severe injury or property damage. Make sure
there are no open flames or sparks in the
area, including pilot lights from water
heaters or furnaces.
1S3-9-60 9-11 4/27/05 2:13 PM Page 8-135
Page 400 of 424
9-9
4. Lubricate all control cables.
5. Block up the frame to raise all wheels off
the ground.
6. Tie a plastic bag over the exhaust pipe out-
let to prevent moisture from entering.
7. If storing in a humid or salt-air atmosphere,
coat all exposed metal surfaces with a light
film of oil. Do not apply oil to any rubber
parts or the seat cover.
8. Remove the battery and charge it. Store it
in a dry place and recharge it once a
month. Do not store the battery in an
excessively warm or cold place (less than
0 °C (30 °F) or more than 30 °C (90 °F)).
NOTE:
Make any necessary repairs before storing the
machine.
1S3-9-60 9-11 4/27/05 2:13 PM Page 9-9