Page 120 of 390

3 - 1
INSPADJ
MAINTENANCE INTERVALS
EC300000
REGULAR INSPECTION AND ADJUSTMENTS
MAINTENANCE INTERVALS
The following schedule is intended as a general guide to maintenance and lubrication. Bear in mind
that such factors as weather, terrain, geographical location, and individual usage will alter the
required maintenance and lubrication intervals. If you are a doubt as to what intervals to follow in
maintaining and lubricating your machine, consult your Yamaha dealer.
No. ITEM CHECKS AND
MAINTENANCE JOBS WHICH-
EVER
COMES
FIRST INITIAL EVERY
month 1 6 12
hours 30 60 120
1 * Fuel line Check fuel hoses for cracks or damage.
Replace if necessary.
√
√
2 Spark plug Check condition.
Adjust gap and clean.
√
√
3 * Valve clearance Check and adjust valve clearance when engine is
cold.
√
4 * Air filter element Clean with solvent.
Replace if necessary.
√
√
5 * Breather system Check ventilation hose for cracks or damage.
Replace if necessary.
√
√
√
6 * Carburetor Check engine idling speed and starter operation.
Adjust if necessary.
√
√
√
7 Exhaust system Check for leakage.
Tighten if necessary.
Replace gasket if necessary.
√
√
8 Engine oil Change (warm engine before draining). √
√
√
9 * Clutch Check operation.
Adjust if necessary.
√
√
√
10 * Front brake Check operation.
Adjust brake lever free play and replace brake shoes
if necessary.
√
√
√
11 * Rear brake Check operation.
Adjust brake pedal free play and replace brake shoes
if necessary. √
√
√
12 * Wheels Check runout, spoke tightness and for damage.
Tighten spokes if necessary.
√
√
√
13 * Tires Check tread depth and for damage.
Replace if necessary.
Check air pressure.
Correct if necessary.
√
√
14 * Wheel bearings Check bearings for smooth operation.
Replace if necessary.
√
√
15 * Swingarm Check swingarm pivoting point for play.
Correct if necessary.
Lubricate with lithium soap based grease. √
√
√
16 Drive chain Check chain slack/alignment and condition.
Adjust and lubricate chain. Every ride
17 * Steering bearings Check bearing assemblies for looseness.
Lubricate with lithium soap based grease every
120 hours or 12 months (whichever comes first).
√
√
18 Brake lever pivot
shaft Apply lithium soap based grease lightly.
√
√
√
19 Brake pedal pivot
shaft Apply lithium soap based grease lightly.
√
√
√
3
Page 130 of 390

3 - 4
INSPADJ
ENGINE/THROTTLE CABLE ADJUSTMENT
EC350000
ENGINE
THROTTLE CABLE ADJUSTMENT
1. Check:
Throttle grip free play a
Out of specification → Adjust.
Throttle grip free play
a:
3 ~ 5 mm (0.12 ~ 0.20 in)
2. Adjust:
Throttle grip free play
Throttle grip free play adjustment steps:
Carburetor side
NOTE:
Before adjusting the throttle cable free play,
the engine idle speed should be adjusted.
Remove the seat assembly and air scoop
(right).
Refer to “FRONT FENDER, SEAT
ASSEMBLY AND FUEL TANK ” section in
the CHAPTER 4.
Pull back the adjuster cover.
Loosen the locknut 1 on throttle cable.
Turn the adjuster 2 in or out until the
specified free play is obtained.
Turning in b → Free play is increased.
Turning out c → Free play is decreased.
Tighten the locknut.
Slide the adjuster cover to its original posi-
tion.
Install the seat assembly and air scoop
(right).
NOTE:
If the specified throttle cable free play can-
not be obtained on the carburetor side of the
cable, use the adjusting nut on the handle-
bar side.
WARNING
After adjusting, turn the handlebar to
right and left and make sure that the
engine idling does not run faster.
c
b
1
2
Page 132 of 390

3 - 5
INSPADJTHROTTLE CABLE ADJUSTMENT/
SPEED LIMITER ADJUSTMENT
Handlebar side
Loosen the locknut 3 on throttle cable.
Turn the adjuster 4 in or out until the
specified free play is obtained.
Turning in d → Free play is increased.
Turning out e → Free play is decreased.
Tighten the locknut.
WARNING
After adjusting, turn the handlebar to
right and left and make sure that the
engine idling does not run faster.
4
d
e
3
SPEED LIMITER ADJUSTMENT
The speed limiter keeps the carburetor throttle
from becoming fully-opened even when the
throttle lever is applied to the maximum posi-
tion. Screwing in the adjuster stops the engine
speed from increasing.
1. Measure:
speed limiter length a
Out of specification → Adjust.
2. Adjust:
speed limiter length
Speed limiter length:
Less than 25 mm (0.98 in)
Speed limiter adjustment steps:
Loosen the locknut 1.
Turn the adjuster 2 in or out until the
specified speed limiter length is obtained.
Turning in a → Speed limiter length is
decreased.
Turning out b → Speed limiter length is
increased.
a
1 2
a
b
Page 168 of 390
3 - 23
INSPADJ
ELECTRICAL/SPARK PLUG INSPECTION
EC370000
ELECTRICAL
EC371001
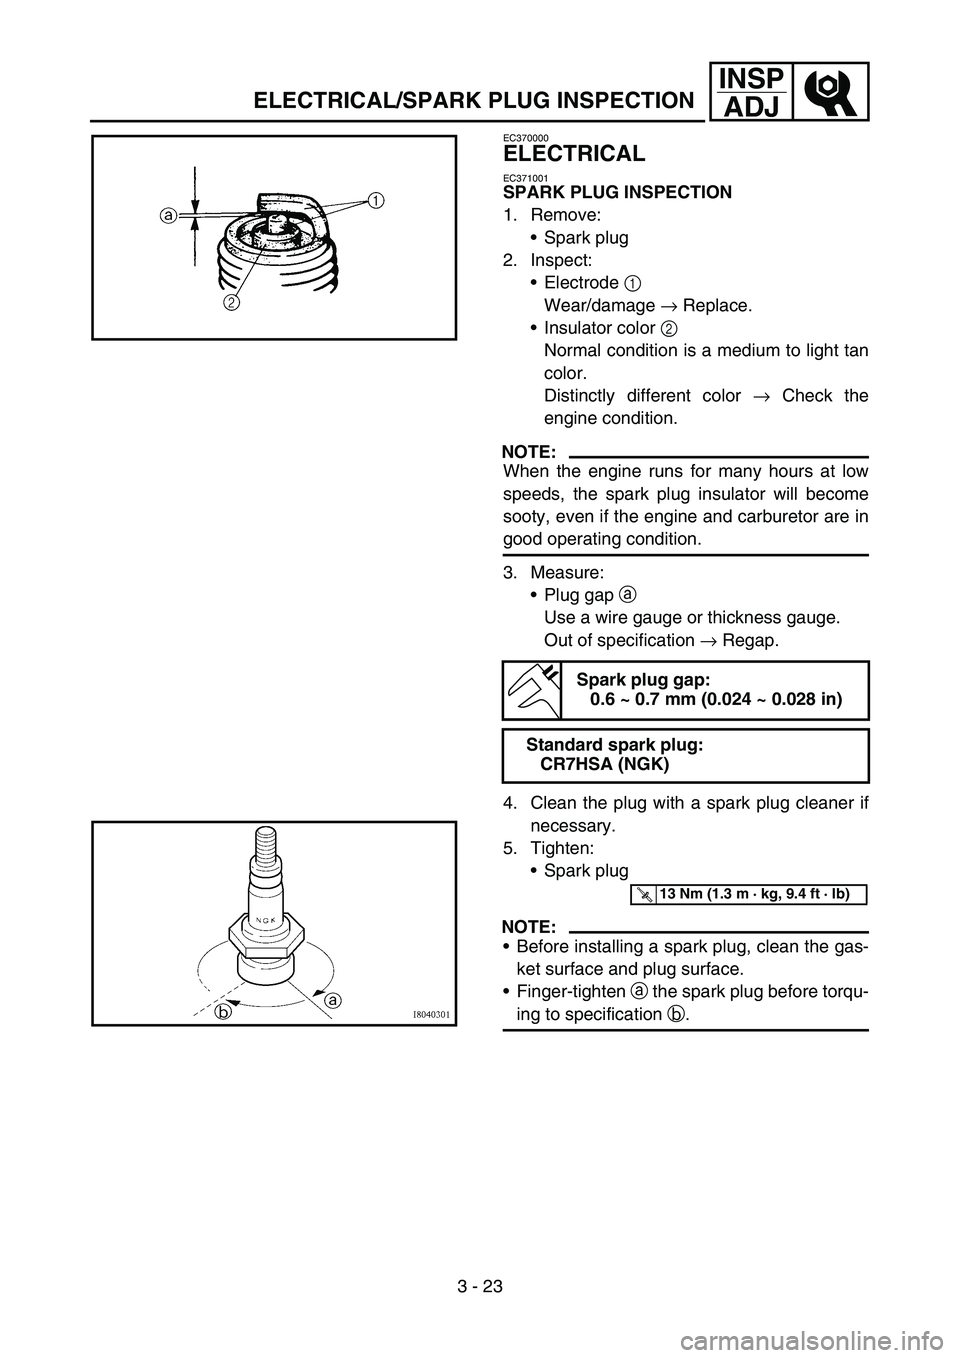
SPARK PLUG INSPECTION
1. Remove:
Spark plug
2. Inspect: Electrode 1
Wear/damage → Replace.
Insulator color 2
Normal condition is a medium to light tan
color.
Distinctly different color → Check the
engine condition.
NOTE:
When the engine runs for many hours at low
speeds, the spark plug insulator will become
sooty, even if the engine and carburetor are in
good operating condition.
3. Measure: Plug gap a
Use a wire gauge or thickness gauge.
Out of specification → Regap.
4. Clean the plug with a spark plug cleaner if necessary.
5. Tighten: Spark plug
NOTE:
Before installing a spark plug, clean the gas-
ket surface and plug surface.
Finger-tighten a the spark plug before torqu-
ing to specification b.
Spark plug gap:
0.6 ~ 0.7 mm (0.024 ~ 0.028 in)
Standard spark plug: CR7HSA (NGK)
T R..13 Nm (1.3 m · kg, 9.4 ft · lb)
Page 194 of 390
4 - 4
ENG
CARBURETOR
2
1
6
6
3
8
9 5
47
New
New
T R..7 Nm (0.7 m
•
kg, 5.1 ft • Ib)
New
T R..2 Nm (0.2 m •
kg, 1.4 ft • Ib)
Extent of removal: 1 Carburetor removal
Extent of removal Order Part name Q ’ty Remarks
CARBURETOR REMOVAL
Preparation for removal Fuel tank Refer to “FRONT FENDER, SEAT
ASSEMBLY AND FUEL TANK ” section.
1 Clamp (air filter joint) 1 Loosen the screw (air filter joint).
2 Carburetor heater lead connector 2
3 Air vent hose 1
4 Fuel hose 1
5 Carburetor assembly 1
6O-ring 2
7 Joint 1
8 Carburetor top 1
9 Starter plunger assembly 1
1
CARBURETOR
Page 196 of 390
4 - 5
ENGCARBURETOR
EC468000
CARBURETOR DISASSEMBLY
Extent of removal:1 Carburetor disassembly
Extent of removal Order Part name Q ’ty Remarks
CARBURETOR DISASSEMBLY
1 Throttle valve 1
2 Throttle cable 1
3 Spring 1
4 Clip 1
5 Gasket 1
6 Carburetor top cover 1
7 Jet needle assembly 1
8 Starter plunger assembly 1
9 Starter cable 1
0 Carburetor overflow hose 1
A Fuel drain screw 1
B Float chamber 1
1
Page 198 of 390
4 - 6
ENGCARBURETOR
Extent of removal Order Part name Q’ty Remarks
C Float pin 1
D Float 1
E Needle valve set 1
F Main jet 1
G Needle jet 1
H Pilot jet 1
I Throttle stop screw set 1
J Carburetor heater 1
K Fuel filter 1
1
Page 200 of 390
4 - 7
ENGCARBURETOR
EC464000
INSPECTION
Carburetor
1. Inspect:Carburetor body
Contamination → Clean.
NOTE:
Use a petroleum based solvent for cleaning.
Blow out all passages and jets with com-
pressed air.
Never use a wire.
2. Inspect: Main jet 1
Pilot jet 2
Needle jet 3
Damage → Replace.
Contamination → Clean.
NOTE:
Use a petroleum based solvent for cleaning.
Blow out all passages and jets with com-
pressed air.
Never use a wire.
3
Needle valve
1. Inspect:
Needle valve 1
Valve seat 2
Grooved wear a → Replace.
Dust b → Clean.
EC464301
Throttle valve
1. Check:
Free movement
Stick → Repair or replace.
NOTE:
Insert the throttle valve 1 into the carburetor
body, and check for free movement.
1