Page 49 of 182
To calibrate the mirror:
1. Stop the car in a large, open area, away from traffic.
2. Start the car.
3. Using a pen or similar object, hold the button (1) depressed for at least six seconds. The character C will be
displayed again.
4. Drive slowly in a circle at a maximum speed of 6 m.p.h. (10 km/h) until a compass direction is displayed.
Calibration is complete.
pg. 50 Instruments and controls
Mirrors
Adjusting the zone
The earth is divided into 15 magnetic zones. The compass is adjusted for the zone to which the car was delivered.
Select a different zone as follows:
1. Turn on the ignition.
2. Using a pen or similar object, hold the button (1 in the illustration on the previous page) depressed for at least 3
seconds. The number for the current area is displayed.
3. Press the button repeatedly until the number for the required geographical area (1-15) is displayed.
ProCarManuals.com
Page 50 of 182

A few seconds after browsing is complete, the display reverts to the compass direction.
Power door mirrors
The mirror control switches are located on the driver's door armrest.
To adjust the mirrors:
Driver's door mirror: Press the L button (a light in the switch will go on) to activate the adjustment control. Use this
control to adjust the driver's door mirror.
Passenger's door mirror: Press the R switch (a light in the switch will go on) to activate the adjustment control. Use
this control to adjust the passenger's door mirror.
After you have adjusted the mirror(s), press the L or R switch again (the LED will go out) to deactivate the adjustment
control.
WARNING!
The mirrors should always be adjusted prior to driving. Objects seen in the passenger's side wide -angle door mirror
are closer than they appear to be.
Storing the mirrors' position
The position of the power door mirrors is stored when the car is locked with the remote control. When the car is
unlocked with the same remote control, the mirrors will move to the stored position.
pg. 51 Instruments and controls
Personal settings
ProCarManuals.com
Page 51 of 182

Control panel
A - Display
B - Menu button
C - Exit button
D - Enter button
E - Menu navigation controls
Personal settings can be made for some of the car's functions, such as the central locking system, climate control, and
the audio system. Please refer to page 185
for more information on the audio functions that can be adjusted. The
settings are presented in the display (A).
To access the menu and adjust settings:
1. Press MENU (B).
2. Scroll to "Car Settings" using the menu navigation control (E).
3. Press ENTER (D).
4. Select an alternative using the menu navigation control (E).
5. Confirm your selection by pressing ENTER.
To exit the menu:
Press EXIT (C).
Available settings
Lock confirmation light
When the car is locked/unlocked with the remote control, the direction indicators can be selected to flash to confirm
the action. The alternatives On/Off are available for both locking and unlocking.
Autolock
When the car starts to move, the doors and trunk can be locked automatically. The alternatives On/Off are available.
Unlock
There are two alternatives for unlocking:
1. Global (All doors) Unlocks all doors and the trunk with one press on the remote control.
2. Two Step (Two-stage unlocking) This alternative unlocks the driver's door with one press on the remote control. A
second press unlocks the passenger's door and the trunk.
Approach lighting
This alternative determines the length of time for which the car's lights will remain on when the Approach light button
ProCarManuals.com
Page 52 of 182

on the central locking system's remote control is pressed. Intervals of 30/60/90 seconds may be selected. See page 87
for more information.
Home safe lighting
This alternative determines the length of time for which the car's lights will remain on when the high beam lever on the
steering column is pulled toward the wheel with the ignition
pg. 52 Instruments and controls
Personal settings
switched off. Intervals of 30/60/90 seconds may be selected. See page 40 for information on using this function.
Information
VIN number: The VIN (Vehicle Identification Number) is the car's unique identity number.
Number of Keys: The number of keys registered for the car is displayed here.
Climate functions
Blower speed in AUTO mode: The blower speed can be set to AUTO mode in models equipped with ECC. Choose
between "Low", "Normal" and "High".
Timer for recirculation: When the timer is active, the air recirculates in the car for 3-12 minutes depending on the
ambient temperature. Select On/Off depending on whether the recirculation timer is to be active or not.
Reset to factory settings
Use this alternative to return to the default climate system settings.
pg. 53 Instruments and controls
Home Link® Universal Transceiver (option)
Introduction
HomeLink* is an advanced system that can be programmed to learn the codes of three different remote controlled-
devices (e.g., garage door openers, remote lighting, entry door lock). HomeLink's sun visor-mounted transceiver,
powered by your car's electrical system, may then be used in place of your hand -held remote controls.
NOTE: For your security, the HomeLink Universal Transceiver is designed to not function if you lock your car from
the outside.
ProCarManuals.com
Page 53 of 182
 before programming the HomeLink Universal
Transceiver.
2. Begin by erasing all 3 factory default c")
Programming the transceiver
1. The ignition switch must be turned to the "accessory" position (II) before programming the HomeLink Universal
Transceiver.
2. Begin by erasing all 3 factory default channels. Hold down the two outside buttons (the left and right buttons in the
illustration) on the HomeLink Universal Transceiver for about 20 seconds, until HomeLink's indicator light begins to
flash. Then release the buttons.
3. Hold your hand -held transmitter (garage door opener, for example) 2 to 5 in. (5 to 12 cm) away from the HomeLink
surface, keeping the indicator light in view. For placement questions, contact HomeLink toll-free 1-800-355-3515
(Internet: http://www.HomeLink.com
).
4. Using two hands, push and hold both your hand -held transmitter's button and the transceiver button you wish to
program. The indicator light will flash first slowly, then rapidly. Rapid flashing indicates that the HomeLink button has
been successfully programmed. Release both buttons.
5. If you are programming a rolling code-equipped device (e.g., garage door opener or entry door lock), refer to
"Programming rolling codes" on the next page to complete the programming process.
6. Repeat steps 3 and 4 to program the other two transceiver buttons. If, after several attempts, you are unable to
successfully train the HomeLink Universal Transceiver to learn your hand -held transmitter's signal, contact HomeLink
toll-free 1-800-355-3515 (Internet: http://www.HomeLink.com
).
* HomeLink is a registered trademark of Johnson Controls, Intl.
©JCI, All rights reserved
WARNING!
If you use HomeLink to open a garage door or gate, be sure no one is near the gate or door while it is in motion. Do
not use the HomeLink Universal Transceiver with any garage door opener that lacks safety "stop" and "reverse"
features as required by federal safety standards. (This includes any garage door opener model manufactured before
April 1, 1982) A garage door opener that cannot "detect" an object, signalling the door to "stop" and "reverse" does
not meet current federal safety standards. Using a garage door opener without these features increases the risk of
serious injury or death. For more information on this matter, call toll-free 1-800-355-3515.
(Internet: http://www.HomeLink.com
)
pg. 54 Instruments and controls
Home Link® Universal Transceiver (option)
Canadian residents:
During programming, your hand -held transmitter may automatically stop transmitting. To successfully train
HomeLink, continue to hold the HomeLink button. At the same time, repeatedly press and hold your hand -held
transmitter's button at two-second intervals until HomeLink has learned your transmitter's code. The HomeLink
indicator light will flash first slowly, and then rapidly to indicate that the button has been successfully programmed.
Determining if your garage door uses a rolling code
Determine, in one of the following ways, if your garage door uses a rolling code system and is manufactured after
1996:
Refer to the garage door opener owner's manual for verification.
ProCarManuals.com
Page 54 of 182

If your hand -held transmitter appears to program the HomeLink Universal Transceiver but the programmed button
does not activate the garage door, your garage door opener may have a rolling code.
Press the programmed HomeLink button. If the garage door opener has the rolling code feature, the HomeLink
indicator light flashes rapidly and then glows steadily after approximately 2 seconds.
To train a rolling code garage door opener, follow these instructions after programming the desired transceiver
button according to "Programming the transceiver." The help of a second person may make training easier.
1. Locate the training button on the garage door opener motor head unit. The location and color of the training button
may vary. If you encounter difficulty, refer to the garage door opener owner's manual or call toll-free 1-800-355-3515
(Internet: http://www.HomeLink.com
).
2. Press the "training" button on the garage door opener motor head unit until the "training" light comes on.
3. Press and release the programmed HomeLink button. Press and release the programmed HomeLink button a second
time to complete the training process.
4. Some garage door openers may require you to do this procedure a third time to complete the training.
5. The programmed button on your HomeLink Universal Transceiver should now operate your garage door opener.
The original handheld transmitter can also be used, as desired, to operate the garage door.
The remaining two HomeLink buttons can be programmed in the same way. In the event of any problems in
programming the HomeLink Universal Transceiver, call toll-free 1-800- 355-3515 (Internet:
http://www.HomeLink.com
).
Operating the HomeLink Universal Transceiver
Once programmed, the HomeLink Universal Transceiver can be used in place of your handheld transmitters.
To operate, the key must be turned to the "accessory" position (II) or the engine must be running. Press the
programmed HomeLink button to activate the garage door, driveway gate, security lightning, home security system etc.
Your original hand -held transmitters may, of course, be used at any time.
Erasing programmed buttons
Individual buttons cannot be erased, To erase all three programmed buttons:
1. Turn the ignition key to the "accessory" position (II).
2. Hold down the two outside buttons on the HomeLink Universal Transceiver for about 20 seconds, until HomeLink's
indicator light begins to flash.
3. Release both buttons.
pg. 55 Instruments and controls
Home Link® Universal Transceiver (option)
The HomeLink buttons can be reprogrammed using the procedures described on the previous page.
Reprogramming a single HomeLink button
1. Press and hold the desired HomeLink button. Do not release the button until step 3 has been completed.
2. When the indicator light begins to flash slowly (after approximately 20 seconds), position your hand -held
transmitter 2 to 5 in. (5 to 12 cm) away from the HomeLink surface.
3. Press and hold the hand -held transmitter button. The HomeLink indicator light will flash first slowly, then rapidly.
When the indicator light flashes rapidly, release both buttons.
ProCarManuals.com
Page 55 of 182
The previously programmed device has now been erased and the new device can be activated by pressing the
HomeLink button that has just been programmed. This procedure will not affect any other programmed HomeLink
buttons
NOTE:
Retain the original transmitter(s) for future programming procedures (e.g., if you purchase a new vehicle).
For your own security, erase all programmed buttons on the HomeLink Universal Transceiver when you sell your
vehicle.
Metallic sun protection films should not be used on any windows in a vehicle equipped with HomeLink Universal
Transceiver. This could interfere with the transceivers function.
pg. 56 Instruments and controls
This page left intentionally blank.
Contents | Top of Page
ProCarManuals.com
Page 56 of 182
60
Air distribution63
pg. 58 Climate
General information
Air conditioning - A/")
2 0 0 6
VOLVO C70
Chapter 4 - Climate
pg. 57 Climate
General information 58
Air vents59
Electronic climate control (ECC)60
Air distribution63
pg. 58 Climate
General information
Air conditioning - A/C
Your car is equipped with Electronic Climate Control (ECC), which automatically maintains the selected temperature
in the passenger compartment and helps dehumidify the air.
NOTE:
The air conditioning system can be switched off, but for optimal air quality in the passenger compartment and to
prevent the windows from fogging, the air conditioning should be left on - even in cool weather.
In warm weather, a small amount of water may accumulate under the car when it has been parked. This water is
condensation from the A/C system and is normal.
Ice and snow
Always keep the air intake grille at the base of the windshield free of snow.
Climate control maintenance
Special tools and equipment are required to maintain and carry out repairs on the climate system. Work of this type
should only be done by a trained and qualified Volvo service technician.
Refrigerant
Volvo cares about the environment. The air conditioning system in your car contains a CFC-free refrigerant - R134a.
This substance will not deplete the ozone layer. The system contains 1.2 lbs (530 g) R134a (HFC 134a), and uses PAG
oil.
Passenger compartment filter
Replace the cabin air filter with a new one at the recommended intervals. Please refer to your Warranty and Service
Records Information booklet, or consult a trained and qualified Volvo service technician for these intervals. The filter
should be replaced more often when driving under dirty and dusty conditions. The filter cannot be cleaned and
therefore should always be replaced with a new one.
NOTE: There are different types of cabin air filters. Ensure that the correct type is installed.
ProCarManuals.com
 1
1 2
2 3
3 4
4 5
5 6
6 7
7 8
8 9
9 10
10 11
11 12
12 13
13 14
14 15
15 16
16 17
17 18
18 19
19 20
20 21
21 22
22 23
23 24
24 25
25 26
26 27
27 28
28 29
29 30
30 31
31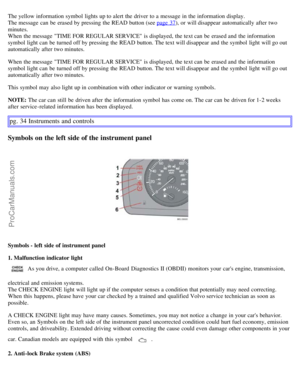 32
32 33
33 34
34 35
35 36
36 37
37 38
38 39
39 40
40 41
41 42
42 43
43 44
44 45
45 46
46 47
47 48
48 49
49 50
50 51
51 52
52 53
53 54
54 55
55 56
56 57
57 58
58 59
59 60
60 61
61 62
62 63
63 64
64 65
65 66
66 67
67 68
68 69
69 70
70 71
71 72
72 73
73 74
74 75
75 76
76 77
77 78
78 79
79 80
80 81
81 82
82 83
83 84
84 85
85 86
86 87
87 88
88 89
89 90
90 91
91 92
92 93
93 94
94 95
95 96
96 97
97 98
98 99
99 100
100 101
101 102
102 103
103 104
104 105
105 106
106 107
107 108
108 109
109 110
110 111
111 112
112 113
113 114
114 115
115 116
116 117
117 118
118 119
119 120
120 121
121 122
122 123
123 124
124 125
125 126
126 127
127 128
128 129
129 130
130 131
131 132
132 133
133 134
134 135
135 136
136 137
137 138
138 139
139 140
140 141
141 142
142 143
143 144
144 145
145 146
146 147
147 148
148 149
149 150
150 151
151 152
152 153
153 154
154 155
155 156
156 157
157 158
158 159
159 160
160 161
161 162
162 163
163 164
164 165
165 166
166 167
167 168
168 169
169 170
170 171
171 172
172 173
173 174
174 175
175 176
176 177
177 178
178 179
179 180
180 181
181 depressed for at least six seconds. T")
