2006 VOLKSWAGEN GOLF MK5 display
[x] Cancel search: displayPage 251 of 444
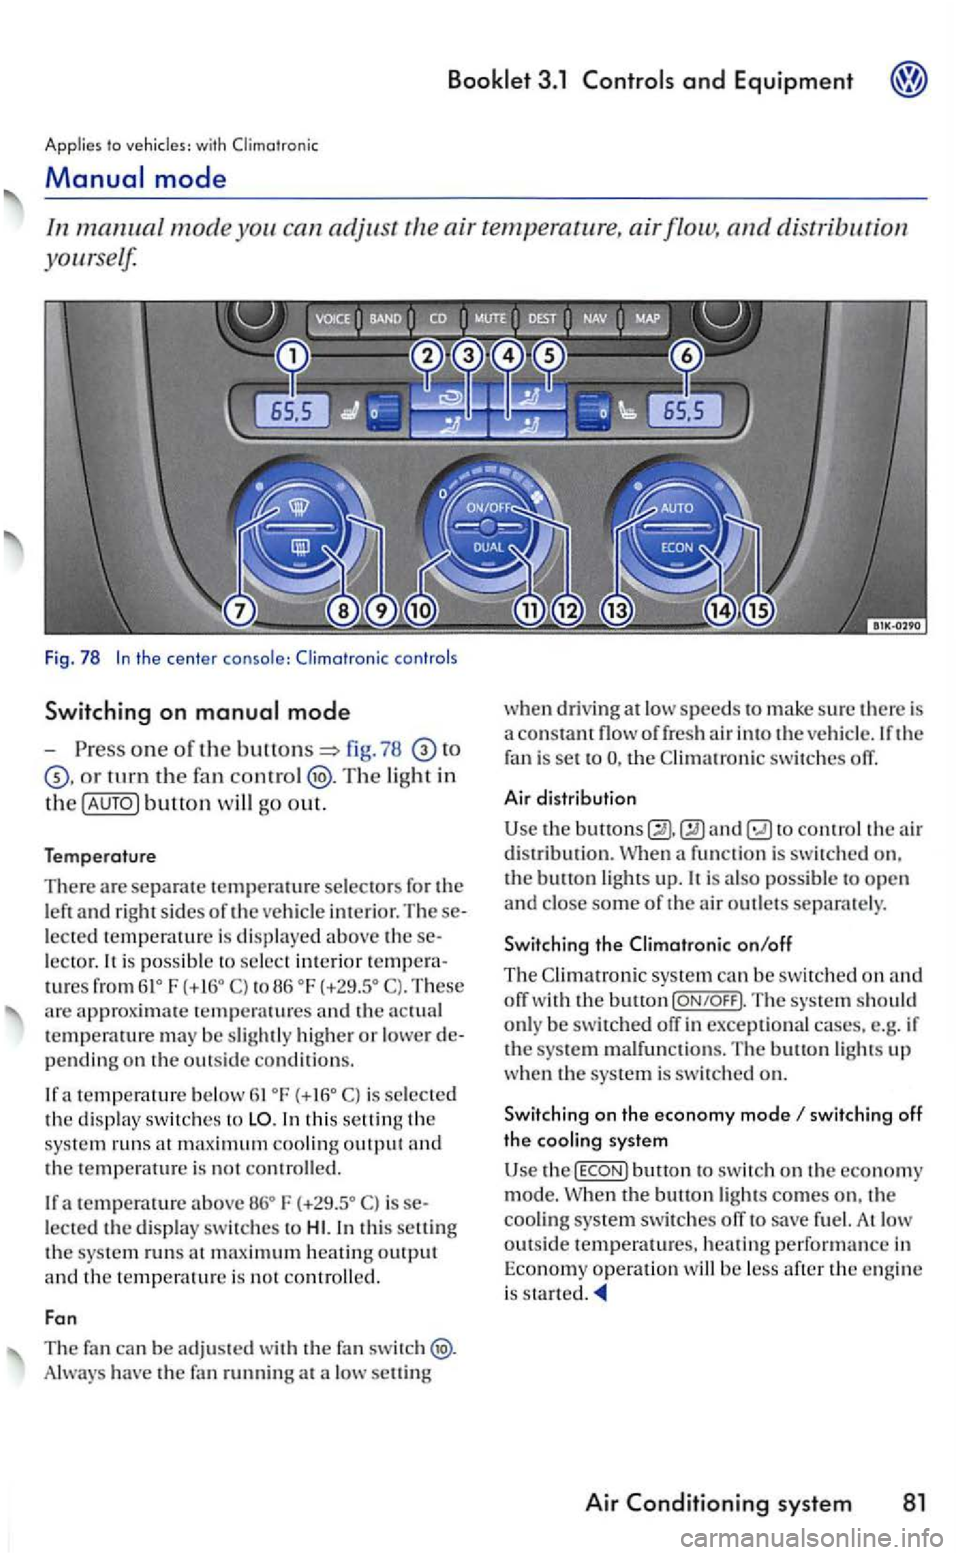
Booklet 3.1 and Equipment
Applies to
one of the fig . 78
turn th e fan Th e light in
th e button will go out.
Temperature
There are separate selectors for the left and right sides oft he ve hicle imerior. lected te mperature is displayed above le ctor. is possibl e to select imerior tures from6lo F to 86 oF T hese arc approximate temperatu res and th e temperawre m ay be slightly higher or lower pending on the outsid e conditions.
a temperature below is select e d the di spla y sw itches to
the tempe rature is no t roll ed .
If a temperature F is lected the displny switc he s to
have the fan running at a low selling w
hen dri ving
at lo w speeds to make sure there is
a cons flow of fresh air into th e ve hicle. If the fa n is set to the
to control the air d is tribution. a function is sw itched on.
the bu11on ligh ts up. p ossible to o pen and close som e of the air outlets separate ly .
Switch ing the on/off
The
switching off the cooling system
Use butlon to switc h on th e economy
mode. the buuon lig hts comes on, th e
cooling system switch es ofT to fu el. At low outside temperatu res, heating performance in
Econo my ope ratio n will be less after the e ng in e
i s started.
Air system 81
Page 262 of 444
to
s hift.
-
Move the s e lector lever back
downs hift.
Shifting with
-right paddle+
page
fig. 86.
-
l e ft paddle-towards th e steerin g
w h
eel ch ange dow n.
If the paddles on the steering w heel no t used. the auto m atic tra nsm ission switch es back to the previously sele cted D or afte r a delay of about
to with
s hiftin g into a lower gear, the downs h ift only when the re is no
bilit y of overrevving.
If
the i s sele cted while th e ve hicl e is
i n motion and the automatic tra n smissio n is in the 3 rd gear in selector leve r posit ion D. the then also be in the 3rd
86
w hile in Normal mode or mode, it switches tempo raril y to yo u would like to exi t mode agai n. press th e right rocke r switch+
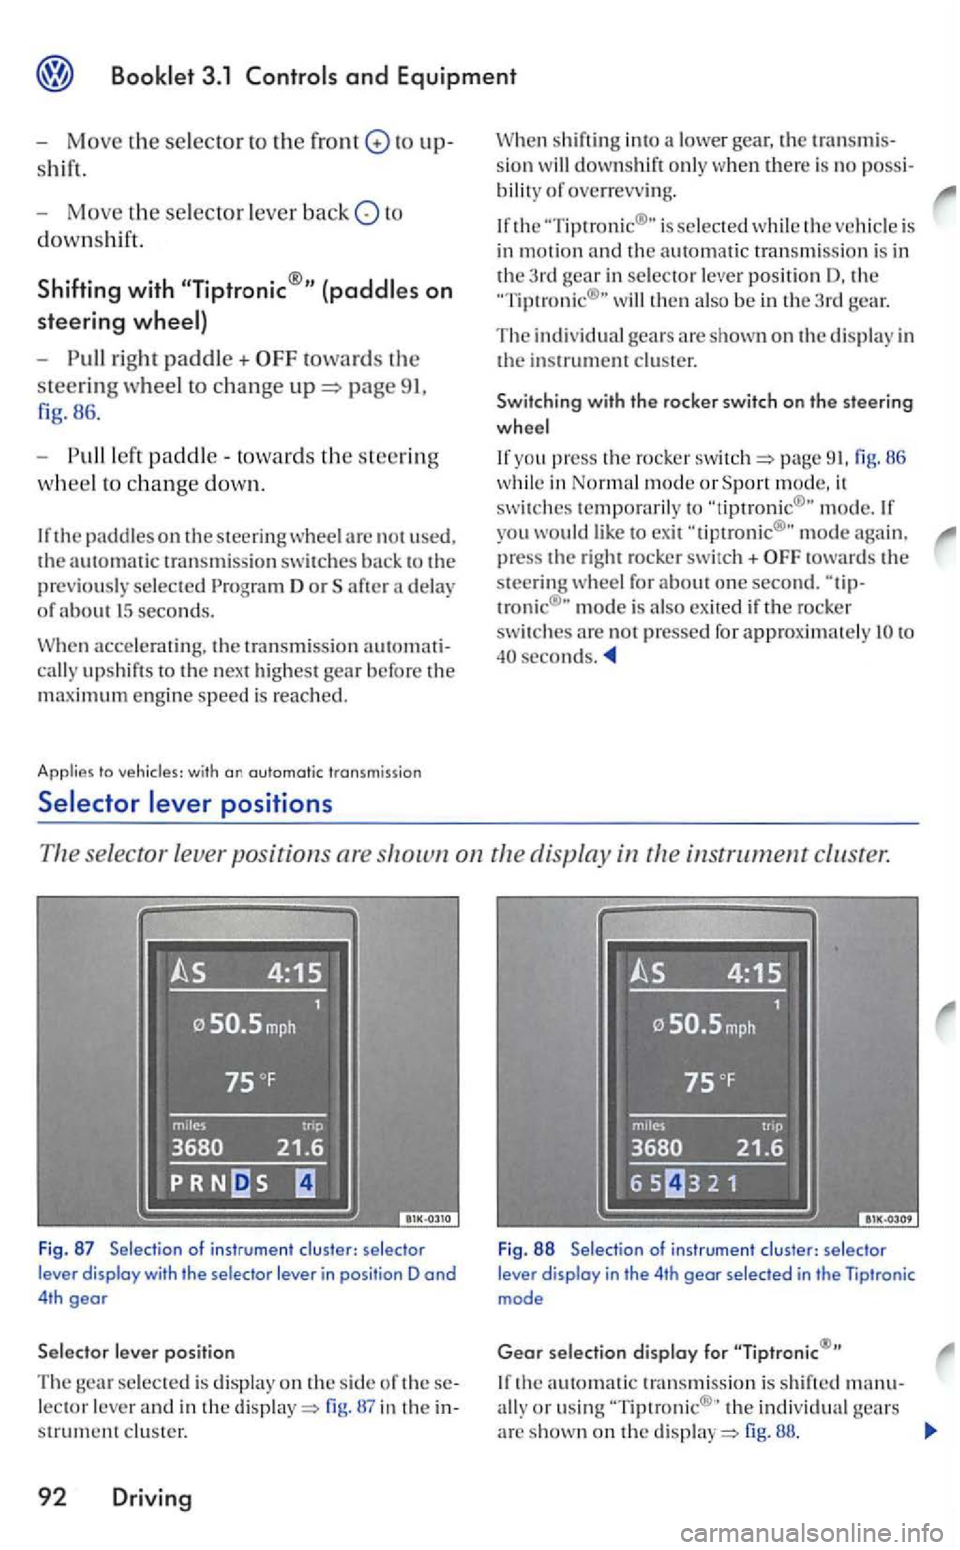
se lector leve r po sition s are instrument cluster.
Fig . 87 Selection of instru ment clus ter: se lecto r
lever display with the selector lever in posi tion D and 4th gear
lever position
The selected is displa y on the side of lector lever and in the display=> in the s trument clus ter.
92 Driving
Fig . 88 Selectio n of ins trumen t clu ster: selec tor lever display in the 4th gear selec ted in the Tiptronic mode
Gear selection display for
th e automatic transmissio n is s hift ed manu-
ally o r usin g th e in di vidual gears arc shown on the di sp la y=> fig. 88.
Page 263 of 444
3.1 and Equipment
When th e is in th e dri ve are mechanically.
w hen the is at a stopped
W hen and yo u must
p ress the buH on in the depress the brak e th e same
time.
the battery is dead. the canno t
b e m ove d out of
R Reverse
into reve rse w hen the is a t
To move the to R, press the button depressi ng the brake
is a n d the tion is on the b ack up come o n.
N-
the and the en gin e has no a braki ng tion.
T o
move the out ofN. yo u press the brak e th an
3 mph (5
becau se the not o n th e fo ot brake .
if
yo u drive down the
yo u the standa rd pro gram you be in the economy mod e and w ill red uce consumption. T he transmission upshift s
and down shift s at lower s peed s. d rivi ng in D. the e ngine does no t brak e the ve hicle. Th e shows whi ch gear has been in addition to pos ition D 67.
position N as been
hicle is or mov in g at than 3 mph {5
standard driving position (sport program)
yo u b e
dri vin g in a sporty m ode. shift and downshift automatically at higher gi ne s peeds dep e nding on engin e and the speed . dri ving th e e ng in e does no t
b rake t h e ve hicle. The shows whi ch gears has been in addit io n to positionS.
Never switch off the engine before the vehicl e has co me to a s top. can of the ve hicl e, crash and be jured.
The ai rbags and safet y pretensio n crs wiU not wo rk when the ignition is switch ed off.
The brake booster docs not work w he n the engine is turned off. more brake pres sure
The power steering sys te m does n ot wo rk when the en gi ne is turne d off and you need more force to steer the vehicle.
W he n the key is re m oved, the steerin g up and you no t b e to steer the
N ev er coast d ow n a miss ion in
Note
Neve r the a with in Nand th e en gin e s witc hed off .
Thi s damage the automatic tran smi ssion.
th e is unintentionally m oved
into N driving. your foot off the erato r and wait the en gine speed has
d roppe d to idle speed positio n.
there is a mati c transmissio n i s running in an em erge ncy
p rogram if th e displays oft h e select or posit ions t h e auto m atic transmis sion have a
light backgrou nd. The auto m atic tran smissio n be chec ked
D riv in g 93
Page 267 of 444
3.1
Applies to w ith cruise control system and without display in th e instrument cluste r
Using the cruise
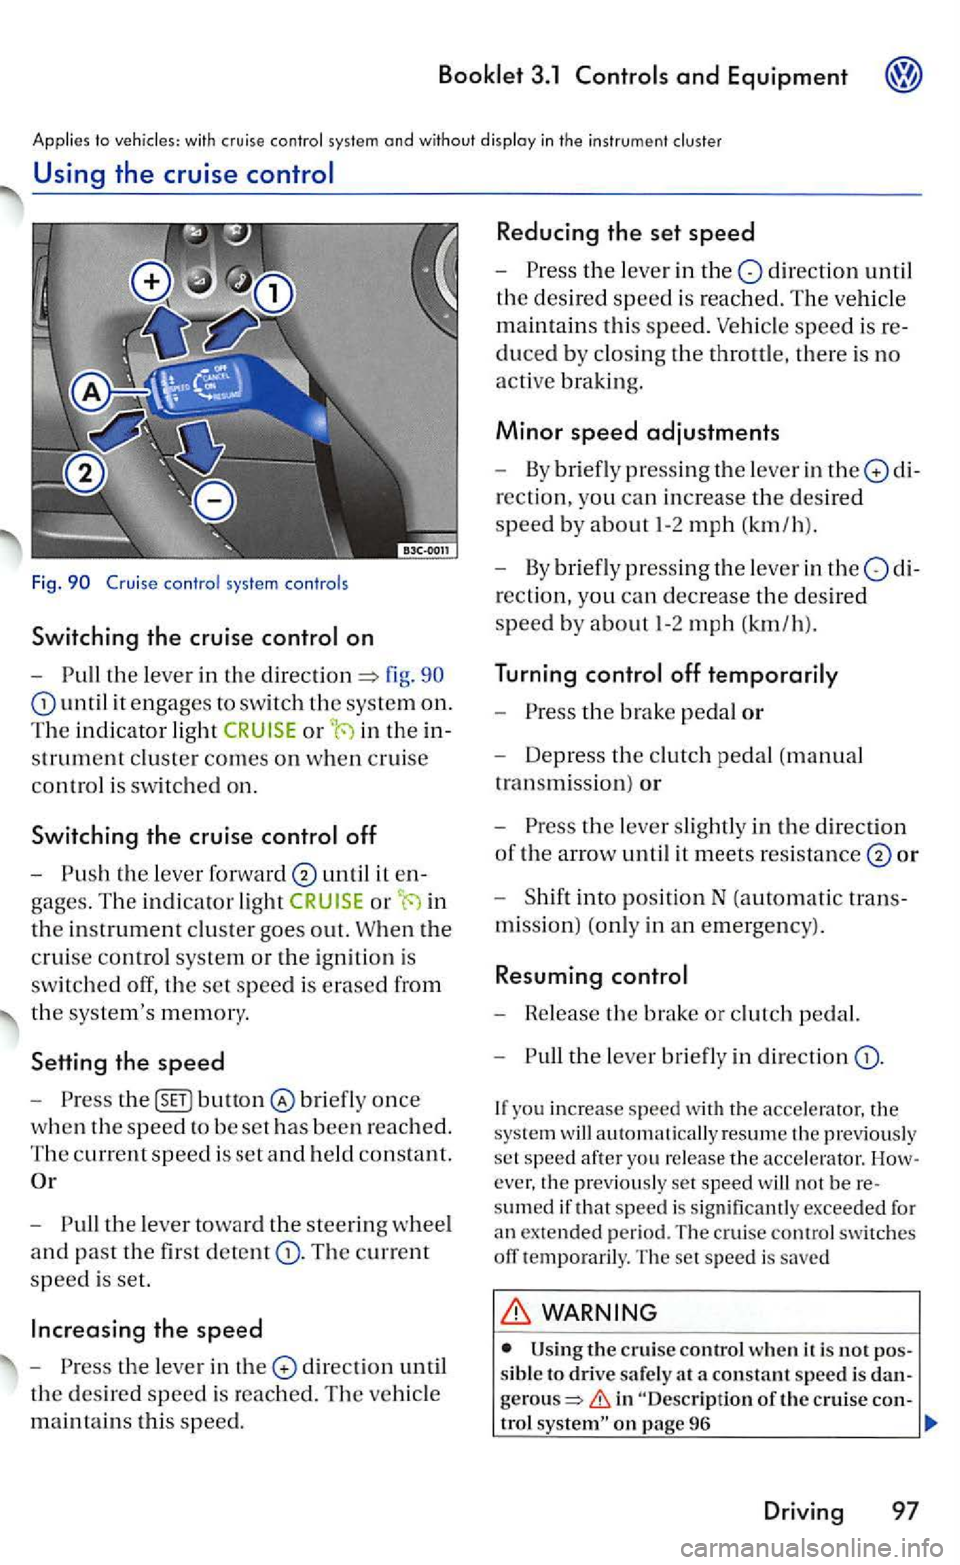
Fig.
on
- Pull the le ve r in the fig. 90
until it engages to switch the system on.
The in dicato r light in the
strument cluste r comes on w he n cruise
co ntrol is switche d on.
Switching the cruise
until it
or in
the in strument clu ste r goes out. W hen the
c rui
se control syste m or the ig niti on i s
sw itch
ed off , th e set speed is erased from
t h e syste
m's m em ory.
Setting the speed
- Press bunon once
w hen th e s peed to be se t has been reached .
The current sp ee d is set and h eld co nsta nt.
- Pull the leve r toward the steerin g w heel
and past the fir st d etent The current
speed is set.
directio n until
the desir e d speed is reac hed. The ve hicl e
m ain tain s thi s spee d.
Reducing the set speed
- Press the leve r in the dir ectio n until
th e desired speed is reached. T he ve hicle
m aint a
ins thi s s pee d. Vehicle speed is
duced b y clos in g th e throttle, there is no
acti ve bra king .
Minor speed adjustments
-By briefl y press ing the leve r in the
rection, yo u can increase th e des ired
speed b y about 1-2 mph (km /h ).
- By briefl y
pressing the leve r in the
-Press the brake pedal or
-Depress the clutch pedal (manual
tran smi ssi
on) or
- Press the leve r slightl y in the direction
of the arrow un til it m ee ts resis tance or
- Shift into posit io n N (automatic
mi ssion) (only in an em erge ncy).
Resuming
- Release th e brake or clutc h pedal.
- Pull
the le ve r briefly in direction
ever, the previou sly set speed will not be sumed if that s peed is s ignificantl y exce ed ed fo r
a n extended perio d. The cruise cont rol switc hes off tempo raril y. The set s p ee d i s saved
WARNING
sibl e to drive safe ly at a constant speed i s gerou s=> in "Desc ription of the crui se con-trol
Driving 97
Page 270 of 444
light 33
Dri v
ing time
Dri vin g wi th an t rans missio n 89
Du st filter 83
E
E le c trical socket 68
E l
ectro n ic immobilizer 85
Emergency fla sh er 45
Emergen cy opening
Doors 34
Env
ironme n tal informatio n
Fuel econom y 9
Environmen tal tip
Fuel economy 74
F
Fog light s 43
Front center armrest 65
Front seats 58
Fuel gauge Display
Fuel level
F u el ta n k
G
Gear se lector lever
See A
utomatic trans m ission wit h Tip tron
ic
illu stration 3
G l
ove compartment Front passenger sid e 64
H
Hand brake
See Parking brake
Hazard lights 45
H
ead restraints
Adjusting 57
R em
oving 57
46
Headlight lens fogging 44
Headlights 43
Fog
lights 43 Switching 43
syste m 52
H
eated f r ont seats 59
H ig h
beam 46
High
beam lever 46
Horn 3
I g niti on key
removal lock 85
I gni ti
on switch 84
Indicator light
control sy stem 96
See also
Indi vid ual unlocking
In formati o n messages
66
In struments
inte rio r front lights
front '1 7
Interio r lights
backg round 48
reading 48
readin g lig ht s 47
imerio r ligh ts 47
In te
rmitt ent wipe 49
K
Key 27
Keys 27
Kick-down functi on 94
Page 271 of 444
L
Lane c hange function
Language in display 14
L ight s 43
lights interior 47
Lights & Vision
Menu
Locks
Child
safety 33
M
Main menu-Multi-Funct io n
Malfun ction messages
Manual mode C limatronic
Manual tra n sm issio n
Menu compass 19
Menu fo r conven ience fu nctions 16
Menu for Lights & V isio n 17
Menu sound system
Menus
Exam ple of use 15
MFl
mirrors, electrical 53
Sim ultaneous adjustmen t 53
Mirrors lower ed function 17
M
ulti- Fun ction
Multi-fun cti on steering wheel 24
opening an d closing
power windows 39
Indica to r lights 4
button
bumper cove r. spoilers an d
s u spe nsi
on 96
When parking on slopes 95
brake 94
See also brake
p rotection roof 42
Windows
filter
filte r
loc ks lndividualunlocking
roof 41
p rotec tion 42
windows 38
R
Reading lights
back
47
Rear 35
clo sing 37 Indicator light 35
Rear seat folding forwa rd 61
Rear seat.
folding ba ck 61. 62
Hear view mirror 52
Hear window heating 75
Hear window wipe r 51
Rear wiper 49
Remot e control ke y
B u
ttons Repl acing th e battery
ind ex
Page 287 of 444
3.2 Tips and Advice
This warning light is part of the On-Board-Diagno stic System
The MIL is a required indicator
assure you that th e MIL is workin g properly.
If the Malfun ctio n (MIL )
does n o t go out after th e eng in e is s tarted, or if it comes on w hil e yo u are driv ing, th ere is a mal
function in the engine sys te m.
If
the lamp starts blinkin g. th e catal ytic converter could be damaged . T he re m ay be sag e in the in strument clu ste r informing yo u or
advis in g you of the necessa ry action to take.
(DLC) for On-Board-Diag
nostic
The O n-Board-Diagnost ics in mon
itor s the vario us components of your e mission
control system. Each controlled component in y
our ve
hicl e has been coded. In case of functio n the respective component in questio n
will be identi fied and the fault stored in the form of a code in the control module's memory.
The stored data can only be d isplaye d wit h spe
cial testing equipment (generic scan tool for di agnosis.
To c
onnect the speci al tes ting equipmen t, push the p lug into th e Da ta Link locate d to the rig ht of the release for engine
h oo d.
Your
authorize d Volkswagen dealer or quali fied
wo rkshop can interpret the code and m ake the ne cessar y correction.
you do not pay attention to the warning
lights whi c h have come on, including th e warning messages appearing in the display , this could lead to pers o n al injury or damage to your ve hicl e.
Smart
Page 312 of 444
Booklet 3.2 Tips and Advice
display come s on, turn off the engine and
t ig ht en th e fuel filler cap prop erly.
the cap is prop erly and comple te ly closed
a nd the ig nition has been switc h ed on agai n th e
wa rning message will disappear after abo ut
Improper refueling or handling of fuel can
cause fire, e xplosion and severe burns.
Always make sure the fuel cap is sc rewed
o n
Fuel is hi ghly flammable and can cause
eling and/or to insert the pump nozzle fully
into the filler neck could cause fuel flow and fuel s pray. Fuel spray and flowing fuel are dangerou s beca use they can cause fire or serious injury.
For safe ty reason engine must be turned off when refueling .
Never use a ce llular te lephon e or radio w hile refueling. The electrom ag ne ti c tion can caus e sp arks that can ig nite fuel pors and cause a fire .
Never get back into your ve hicl e while eling. If in exceptional circumstances you must ge t back in your vehicl e while refu eling, make ce rtain that you close door and touch metal to di scharge stati c electricity for e tou chin g the filler nozzle again. electricity can cause sparks can ignit e fuel
vapors released during refuelin g.
Never smoke or h ave an open flame where in or near you r vehicle when refu elin g or fillin g a portable fuel container.
36
For your safety, we strongl y recommend that you do not travel with a portable fuel
cially in cras h.
If , under exceptional circum stances, you must transport a portable fuel co ntain er,
pl ease observe the foUowing:
- Never
fill a portable fuel container while
it is anywhere in or on the ve hicl e (for ampl e, in the lu ggage compartment, or on the trunk). electricity can build up while filling and can ig nite fuel vapors
ca usin g a fire.
- Always pl
ace a portabl e fuel container on ground b efor e
-Alway s keep the filler nozz le co mplet ely
in side the portab le container b efo re and during fillin g.
- If filling a
portable container made of
metal , the filler nozzle must a lway s be in
contact with the container. This will help prevent static e lec tricity from disc ha rgin g and ca use a fire.
- Never
cial laws regarding the use, storage and transporta tion of fuel containers .
- Make certain
the fuel container meets
industry standa rd s F852-86).
Remove fu e l spills f rom the paint ately to prevent pai nt dam age.
Never run the tank completel y dry. An ular gas supply co uld cause misfiring. A s res ult ,
u n burn ed ga s co uld get into the ca ta lytic vener a nd cause damage .
For the sake of environm ent
Do no t try to p ut in more fuel after the au to m atic fille r no zzle has switched off; this may ca use fuel to over flow and pollut e th e enviro nment parti c-
ularl y when it ge ts hot outside.