Page 203 of 244

195
CAUTION
When jacking, be sure to observe the
following to reduce the possibility of
personal injury:
�Follow jacking instructions.
�Do not put any part of your body
under the vehicle supported by a
jack. Personal injury may occur.
�Do not start or run the engine while
your vehicle is supported by the
jack.
�Stop the vehicle on a level firm
ground, firmly set the parking brake
and put the transmission in “P”
(automatic) or reverse (manual).
Block the wheel diagonally opposite
to the one being changed if neces-
sary.
�Make sure to set the jack properly
in the jack point. Raising the ve-
hicle with jack improperly posi-
tioned will damage the vehicle or
may allow the vehicle to fall off the
jack and cause personal injury.
�Never get under the vehicle when
the vehicle is supported by the jack
alone; use vehicle support stands.
�Do not raise the vehicle with some-
one in the vehicle.
�When raising the vehicle, do not
place any objects on top of or un-
derneath the jack.
NOTICE
Make sure to place the jack correctly,
or your vehicle may be damaged.
Page 210 of 244

202
Checking power steering fluid
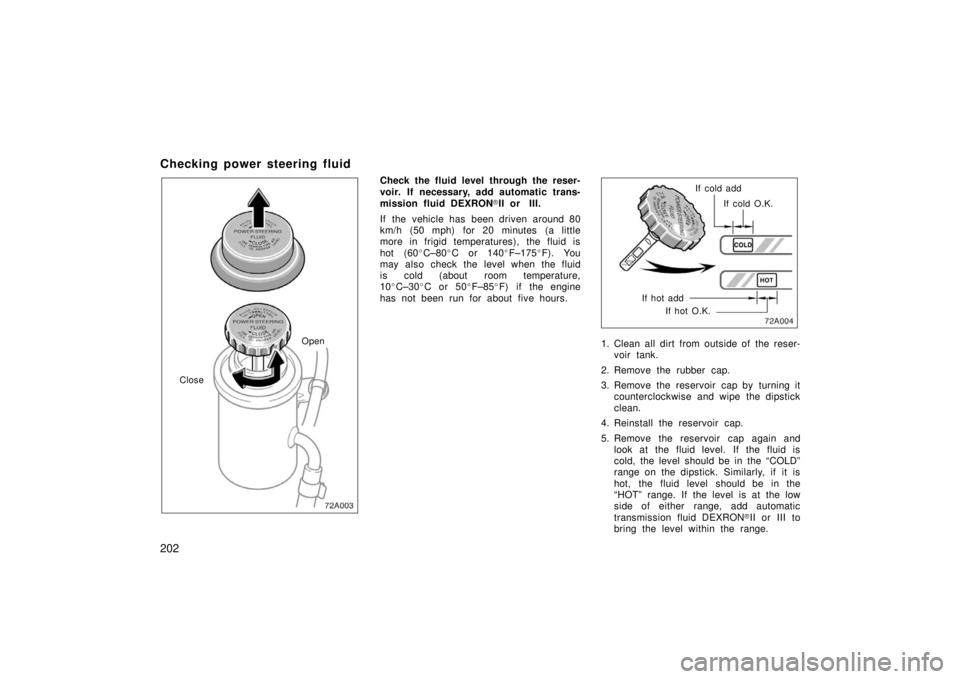
Open
Close
Check the fluid level through the reser-
voir. If necessary, add automatic trans-
mission fluid DEXRON �II or III.
If the vehicle has been driven around 80
km/h (50 mph) for 20 minutes (a little
more in frigid temperatures), the fluid is
hot (60 �C–80 �C or 140 �F–175 �F). You
may also check the level when the fluid
is cold (about room temperature,
10 �C–30 �C or 50 �F–85 �F) if the engine
has not been run for about five hours.
If cold O.K.
If cold add
If hot O.K.
If hot add
1. Clean all dirt from outside of the reser-
voir tank.
2. Remove the rubber cap.
3. Remove the reservoir cap by turning it counterclockwise and wipe the dipstick
clean.
4. Reinstall the reservoir cap.
5. Remove the reservoir cap again and look at the fluid level. If the fluid is
cold, the level should be in the “COLD”
range on the dipstick. Similarly, if it is
hot, the fluid level should be in the
“HOT” range. If the level is at the low
side of either range, add automatic
transmission fluid DEXRON �II or III to
bring the level within the range.
Page 217 of 244

209
TIRE CHAIN SELECTION
Use the tire chains of correct size and
type.
Use SAE Class “S” type radial tire chains
except radial cable chains or V−bar type
chains.
Regulations regarding the use of tire
chains vary according to location or
type of road, so always check local reg-
ulations before installing chains.
CHAIN INSTALLATION
Install the chains on the front tires as
tightly as possible. Do not use tire
chains on the rear tires. Retighten
chains after driving 0.5 – 1.0 km (1/4 –
1/2 mile).
When installing chains on your tires, care-
fully follow the instructions of the chain
manufacturer.
If wheel covers are used, they will be
scratched by the chain band, so remove
the covers before putting on the chains.CAUTION
�Do not exceed 50 km/h (30 mph) or
the chain manufacturer ’s recom-
mended speed limit, whichever is
lower.
�Drive carefully avoiding bumps,
holes, and sharp turns, which may
cause the vehicle to bounce.
�Avoid sharp turns or locked�wheel
braking, as use of chains may ad-
versely affect vehicle handling.
�When driving with chains installed,
be sure to drive carefully. Slow
down before entering curves to
avoid losing control of the vehicle.
Otherwise an accident may occur.
NOTICE
Do not attempt to use a tire chain on
the compact spare tire, as it may re-
sult in damage to the vehicle as well
as the tire.
Replacing wheels
WHEN TO REPLACE YOUR WHEELS
If you have wheel damage such as
bending, cracks or heavy corrosion, the
wheel should be replaced.
If you fail to replace damaged wheels, the
tire may slip off the wheel or cause loss
of handling control.
WHEEL SELECTION
When replacing wheels, care should be
taken to ensure that the wheels are re-
placed by ones with the same load ca-
pacity, diameter, rim width, and offset.
This must be observed on compact spare
tires, too.
Correct replacement wheels are available
at your Scion dealer.
A wheel of a different size or type may
adversely affect handling, wheel and bear-
ing life, brake cooling, speedometer/odom-
eter calibration, stopping ability, headlight
aim, bumper height, vehicle ground clear-
ance, and tire or snow chain clearance to
the body and chassis.
Page 234 of 244

226
CLUTCH
Pedal free play, mm (in.):5 – 15 (0.2 – 0.6)
Fluid type: SAE J1703 or FMVSS No. 116 DOT 3
MANUAL TRANSAXLE
Oil capacity, L (qt., Imp.qt.): 1.9 (2.0, 1.7)
Oil type: Gear oil API GL −4 or GL −5
Recommended oil viscosity: SAE 75W −90
AUTOMATIC TRANSAXLE
Fluid capacity (drain and refill), L (qt., Imp.qt.): 2.9 (3.1, 2.6)
Fluid type: Genuine ATF Type T −IV
Change automatic transmission fluid only
as necessary. Generally, it is necessary to change
automatic transmission fluid only if your
vehicle is driven under one of the Special
Operating Conditions listed in your
“Scheduled Maintenance Guide” or
“Owner ’s Manual Supplement”. When
changing the automatic transmission fluid,
use only “Genuine ATF Type T
−IV” (ATF
JWS3309 or NWS6500) to aid in assuring
optimum transaxle performance.
Notice: Using automatic transmission
fluid other than “Genuine ATF Type T�
IV” may cause deterioration in shift
quality, locking up of your transmission
accompanied by vibration, and ultimate-
ly damage the automatic transmission
of your vehicle. BRAKES
Minimum pedal clearance when depressed
with the pressure of 490 N (50 kgf, 110
lbf) with the engine running, mm (in.):
50 (2.0)
Pedal free play, mm (in.): 1 – 6 (0.04 – 0.24)
Pad wear limit, mm (in.): 1.0 (0.04)
Lining wear limit, mm (in.): 1.0 (0.04)
Parking brake adjustment when pulled with
the force of 196 N (20 kgf, 44 lbf): 6 – 9 clicks
Fluid type: SAE J1703 or FMVSS No. 116 DOT 3
STEERING
Wheel free play: Less than 30 mm (1.2 in.)
Power steering fluid type: Automatic transmission fluid DEXRON �II
or III
Page 236 of 244

228
Fuses
81A001
Engine compartment
Fuses1. RDI 30 A: Electric cooling fan
2. HTR SUB1 50 A: Air conditioning sys-
tem
3. ABS NO.1 40 A: Anti−lock brake sys-
tem
4. DOME 15 A: Clock, interior light,
gauges of meters
5. EFI 15 A: Multiport fuel injection sys-
tem/sequential multiport fuel injection
system
81A002a
Instrument panel
6. HORN 15 A: Horn
7. AM2 15 A: Starter system, SRS airbag
system, multiport fuel injection sys-
tem/sequential multiport fuel injection
system, discharge warning system
8. ST 30 A: Starter system
9. H�LP LH/H�LP LO LH 10 A: Left−
hand headlight
10. H�LP RH/H�LP LO RH 10 A: Right−
hand headlight
11. A/C2 7.5 A: Air conditioning system 12. SPARE 30 A:
Spare
13. SPARE 15 A: Spare
14. AM1 50 A: “ACC”, “GAUGE”, “WIPER”,
and “ECU −IG” fuses
15. POWER 30 A: Power windows
16. HTR 40 A: Air conditioning system
17. GAUGE 10 A: Back−up lights, charging
system, air c onditioning system, power
window system, gauges of meters
18. DEF 25 A: Rear window defogger sys-
tem.
19. D/L 25 A: Power door lock system
20. TAIL 10 A: Tail lights, parking lights,
license plate lights
21. WIPER 25 A: Windshield wipers and
washer
22. ECU�B 7.5 A: SRS airbag system
23. FOG 15 A: Front fog lights
24. ACC 15 A: Clock, cigarette lighter
25. ECU�IG 7.5 A: Anti−lock brake system,
electric cooling fan
26. OBD 7.5 A: On−board diagnosis sys-
tem
Page 237 of 244
229
27. HAZ 10 A: Turn signal lights, emergen-
cy flashers
28. A.C 7.5 A: Air conditioning system
29. STOP 10 A: Stop lights, high mounted
stop light, anti −lock brake system, shift
lock system, multiport fuel injection
system/s equential multiport fuel injec-
tion system