Page 264 of 527

252
2006 TUNDRA from Oct. ’06 Prod. (OM 34458U)
The rear seat entertainment system is de-
signed for the rear passengers to enjoy
audio and DVD video separately from the
fr")
’06 TUNDRA_U (L/O 0508)
252
2006 TUNDRA from Oct. ’06 Prod. (OM 34458U)
The rear seat entertainment system is de-
signed for the rear passengers to enjoy
audio and DVD video separately from the
front audio system.
The rear seat entertainment system can
be operated when the ignition key is in
the “ACC” or “ON” position.
The rear passengers can enjoy all modes
(AM and FM radio, cassette tape player,
compact disc player with changer and
DVD player) on the rear seat entertain-
ment system only if a cassette tape and
a compact disc are loaded in the front
audio system.
The rear seat entertainment system can
play DVD video, audio CD, video CD, CD
text, dts−CD or DVD audio only when a
disc is loaded in the DVD player.
You can enjoy videos and sound when
your personal audio system is connected
to the input terminal adapter on the rear
console box. For details, refer to the
manufacturer ’s instructions. You can enjoy the rear seat entertainment
system with commercial hea
dphone. See
“—Headphone ja cks” in this Section for
details.
You can also enjoy the rear seat enter-
tainment system with a wireless head-
phone. The wireless headphone can be
used within rear seat. If the signal be-
comes weak, the headphone will mute.
For details, refer to the manufacturer’s
instructions.
With some wireless headphone generally
available in the market, it may be difficult
to catch sound properly. Toyota recom-
mends the use of Toyota genuine wireless
headphone.
You can purchase a wireless headphone
at a Toyota dealer.CAUTION
�Do not operate a motor vehicle
while using headphones. Doing so
may cause an accident, resulting in
death or serious injury.
�Conversational speech on some
DVDs is recorded at a low volume
to emphasize the impact of sound
effects. If you adjust the volume
assuming that the conversations
represent the maximum volume lev-
el that the DVD will play, you may
be startled by louder sound effects
or when you change to a different
audio source. Be sure to adjust the
volume with this in mind.
Make sure the volume is not in-
creased, before you turn on the
headphone.
Page 269 of 527
’06 TUNDRA_U (L/O 0508)
257
2006 TUNDRA from Oct. ’06 Prod. (OM 34458U)
CONTROL BUTTONS
1. “
” and “” (TUNE/TRACK) buttons
These buttons operate the front audio
system or select the track/chapter
when the DVD player is operated.
2. “
” and “” (DISC/CH/PROG) buttons
These buttons skip directly to a desired
preset station, disc, track or chapter.
3. “CURSOR” button This button indicates the control
switches on the screen when the DVD
player is operated.
4. Joy stick
This joy stick selects a control switch,
mode switch on the screen or the
menu for the disc.
5. “ENT” button This button inputs the selected switch
or the selected menu for the disc.
6. “SOURCE” button
This button turns on the rear seat en-
tertainment system and selects the
mode.
7. “DISPLAY” button This button adjusts the color, tone,
contrast and brightness of the screen.
Page 270 of 527

258
2006 TUNDRA from Oct. ’06 Prod. (OM 34458U)
8. “VIDEO” button
This button turns on the video mode
when your personal audio device is
connected.
9. “DVD” button")
’06 TUNDRA_U (L/O 0508)
258
2006 TUNDRA from Oct. ’06 Prod. (OM 34458U)
8. “VIDEO” button
This button turns on the video mode
when your personal audio device is
connected.
9. “DVD” button
This button turns on the DVD mode.
10. “RETURN” button
This button skips to the predetermined
scene for the disc when the DVD play-
er is operated.
11. “SET UP” button This button indicates the initial set up
screen when the DVD player is oper-
ated.
12. “SEARCH” button This button indicates the title search
screen when the DVD player is oper-
ated.
13. “ANGLE” button
This button selects the angle of the
screen when the DVD player is oper-
ated.
14. “ ��” button
This button fast forwards a screen
when the DVD player is operated. 15. “
�” button
This button plays a screen when the
DVD player is operated.
16. “
” button
This button pauses a screen when the
DVD player is operated.
17. “ ��” button
This button reverse a screen when the
DVD player is operated.
18. “TOP MENU” button
This button indicates the title selection
screen for DVD video when the DVD
player is operated.
19. “AUDIO” button
This button indicates the changing au-
dio screen when the DVD player is
operated.
20. “SUB TITLE” button This button indicates the changing sub-
title screen when the DVD player is
operated.
21. “MENU” button
This button indicates the menu screen
for DVD video when the DVD player is
operated. 22. “OFF” button
This button turns off the rear seat en-
tertainment system.
Page 271 of 527
’06 TUNDRA_U (L/O 0508)
259
2006 TUNDRA from Oct. ’06 Prod. (OM 34458U)
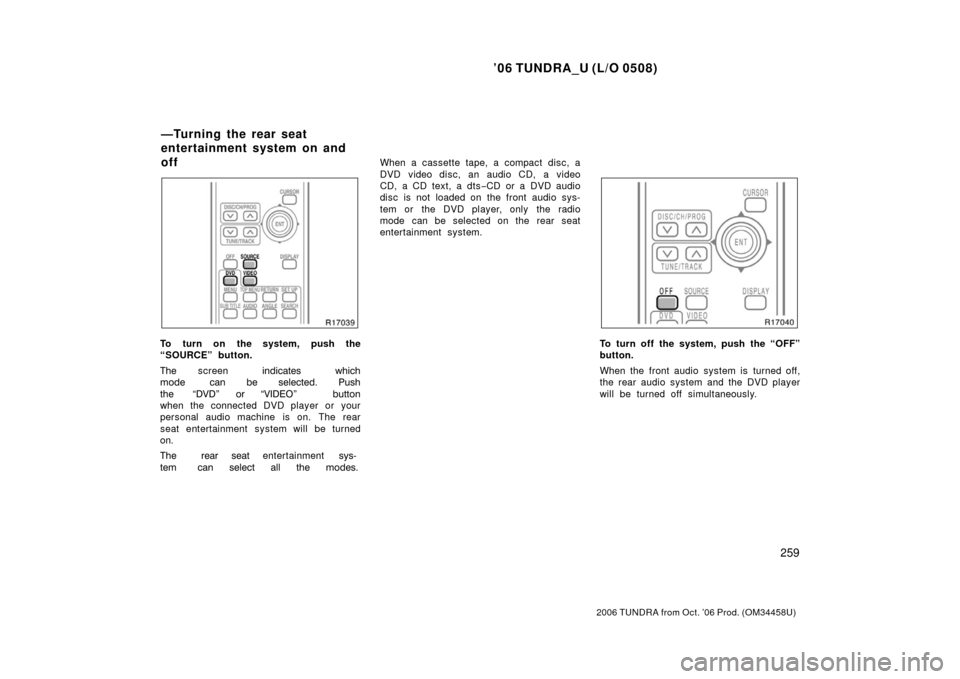
To turn on the system, push the
“SOURCE” button.
��� screen ����\b
�� \f��\b�
��� \b � �� ����\b
��� ����
�� “���� �� “������ ��
��
when the connected DVD player or your
personal audio machine is on. The rear
seat entertainment system will be turned
on �
��� �� � ��
entertainment ����
�
\b � ����\b
��
��
����� When a cassette tape, a compact disc, a
DVD video disc, an audio CD, a video
CD, a CD text, a dts
−CD or a DVD audio
disc is not loaded on the front audio sys-
tem or the DVD player, only the radio
mode can be selected on the rear seat
entertainment system.To turn off the system, push the “OFF”
button.
When the front audio system is turned off,
the rear audio system and the DVD player
will be turned off simultaneously.
—Turning the rear seat
entertainment system on and
off
Page 272 of 527
’06 TUNDRA_U (L/O 0508)
260
2006 TUNDRA from Oct. ’06 Prod. (OM 34458U)
All the modes of the front audio system
can be operated on the rear seat enter-
tainment system.
When the same mode is selected on the
front and rear audio systems simulta-
neously, the system can be operated on
the front audio system.
If the radio mode is selected on the front
and rear audio systems at the same time,
AM and FM modes cannot be changed on
the rear seat audio system.
SELECTING THE MODE
Use the joy stick to select the mode.
Push the “ENT” button to enter the mode.The mode display which is selected by
the joy stick is colored blue. When the
“ENT” button is pushed, the mode display
changes to green. If the mode display is
gray, it cannot be selected.
The “Speaker sound” on the mode display
is selected on the front audio system.
—����� �\b
� �\f��
� ��
���
��
Page 273 of 527

261
2006 TUNDRA from Oct. ’06 Prod. (OM 34458U)
Radio
Cassette tape player and compact disc
player
When you select a mode, the screen indi-
cates which is selected.
Radio
A")
’06 TUNDRA_U (L/O 0508)
261
2006 TUNDRA from Oct. ’06 Prod. (OM 34458U)
Radio
Cassette tape player and compact disc
player
When you select a mode, the screen indi-
cates which is selected.
Radio
AM mode:
When you select the AM mode, “AM” will
appear on the screen.
FM mode:
When you select the FM mode, “FM1” or
“FM2” will appear on the screen.
Tape mode
“TAPE” appears on the screen while this
mode is selected.
Compact disc mode
“CD” appears on the screen while this
mode is selected.
The screen shows the track, or track and
disc number currently being played.
OPERATING FRONT AUDIO SYSTEM
To operate the front audio system, use
the following switches.
1. “
” and “” (DISC/CH/PROG) but-
tons
Radio
You can scan only the preset stations for
the band of the front audio system. (For
instructions, see “—Controls and features”
in this Section.)
To scan the preset stations:
Push the “
” or “” (DISC/CH/PROG)
button. The radio will tune in the next
preset station up or down the band. The
station frequency will appear on the
screen.
Page 277 of 527

265
2006 TUNDRA from Oct. ’06 Prod. (OM 34458U)
The DVD player is set in the console
box.
The DVD player can play audio CDs,
DVD video discs, CD texts, dts�CDs
and video C")
’06 TUNDRA_U (L/O 0508)
265
2006 TUNDRA from Oct. ’06 Prod. (OM 34458U)
The DVD player is set in the console
box.
The DVD player can play audio CDs,
DVD video discs, CD texts, dts�CDs
and video CDs.
For appropriate discs for this player, see
“Audio/video system operating hints”.
To access the DVD player, pull up the
console box lid while pushing the lock
release button.
The DVD player works when the ignition
key is in the “ACC” or “ON” position.
To turn on the DVD player, a disc must
be loaded in the player.
To
��� ��� the �� ���, eject the
disc�
Error messages
If the player malfunctions, your audio sys-
tem will display following error messages.
If “DISC CHECK” appears on the
screen: It indicates that the disc is dirty,
damaged or it was inserted upside down.
Clean the disc or insert it correctly.
If “REGION CODE ERROR” appears on
the screen: It indicates that the DVD re-
gion code is not set properly. If “DVD ERROR” appears on the
screen:
There is a problem inside the
player. Eject the disc. Set the disc again.
If the malfunction still exists, take your
vehicle to your Toyota dealer.
INSERTING THE DISC
To open the DVD player, push the lid
backward.
Page 278 of 527

266
2006 TUNDRA from Oct. ’06 Prod. (OM 34458U)
Insert a disc and push the lid forward
to close the DVD player.
When you insert a disc, push it in gently
with the label sid")
’06 TUNDRA_U (L/O 0508)
266
2006 TUNDRA from Oct. ’06 Prod. (OM 34458U)
Insert a disc and push the lid forward
to close the DVD player.
When you insert a disc, push it in gently
with the label side up.
If the label faces down, the disc cannot
be played. In this case, “DISC CHECK”
and disc number appear on the screen.
If a disc which is not playable is inserted,
“DISC CHECK” will also appear on the
screen. For appropriate discs for this play-
er, see “Audio/video system operating
hints”.
The player is intended for the use with 12
cm (4.7 in.) discs only.The indicator light turns on while the disc
is loaded.
The player will play the track or chapter,
and it will play from the beginning of the
track or chapter again after it reaches the
end.
NOTICE
Never try to disassemble or oil any
part of the DVD player. Do not insert
anything other than a disc into the
slot.
EJECTING THE DISC
Push the lid backward to open the DVD
player. Push the disc eject button to
eject a disc.
CAUTION
To reduce the chance of injury in
case of an accident or a sudden stop,
always keep the console box closed
while driving.

257
2006 TUNDRA from Oct. ’06 Prod. (OM 34458U)
CONTROL BUTTONS
1. “
” and “” (TUNE/TRACK) buttons
These buttons operate the front audio
system or select the track")

260
2006 TUNDRA from Oct. ’06 Prod. (OM 34458U)
All the modes of the front audio system
can be operated on the rear seat enter-
tainment system.
When the same mode is sele")