Page 142 of 527
’06 TUNDRA_U (L/O 0508)
130
2006 TUNDRA from Oct. ’06 Prod. (OM 34458U)
3. While pressing the infant seat firmly
against the seat cushion and seatback,
let the shoulder belt retract as far as
it will go to hold the infant seat secure-
ly.CAUTION
Push and pull the child restraint sys-
tem in different directions to be sure
it is secure. Follow all the installation
instructions provided by its manufac-
turer.
4. To remove the infant seat, press thebuckle release button and allow the
belt to retract completely. The belt will
move freely again and be ready to
work for an adult or older child passen-
ger.
Page 147 of 527
’06 TUNDRA_U (L/O 0508)
135
2006 TUNDRA from Oct. ’06 Prod. (OM 34458U)
3. While pressing the convertible seat
firmly against the seat cushion and
seatback, let the shoulder belt retract
as far as it will go to hold the convert-
ible seat securely.CAUTION
Push and pull the child restraint sys-
tem in different directions to be sure
it is secure. Follow all the installation
instructions provided by its manufac-
turer.
4. To remove the convertible seat, pressthe buckle release button and allow the
belt to retract completely. The belt will
move freely again and be ready to
work for an adult or older child passen-
ger.
Page 150 of 527
’06 TUNDRA_U (L/O 0508)
138
2006 TUNDRA from Oct. ’06 Prod. (OM 34458U)
2. To remove the child restraint system,
press the buckle release button and
allow the belt to retract.Follow the procedure below for a child
restraint system that requires the use
of a top strap.
Anchor brackets
Use the anchor bracket on the back panel
to attach the top strap.
Anchor brackets are installed for each
passenger seating position.
This symbol indicates the locations of
user ready anchor brackets.
— U sin g a to p st rap
(standard cab models)
Page 159 of 527
’06 TUNDRA_U (L/O 0508)
147
2006 TUNDRA from Oct. ’06 Prod. (OM 34458U)
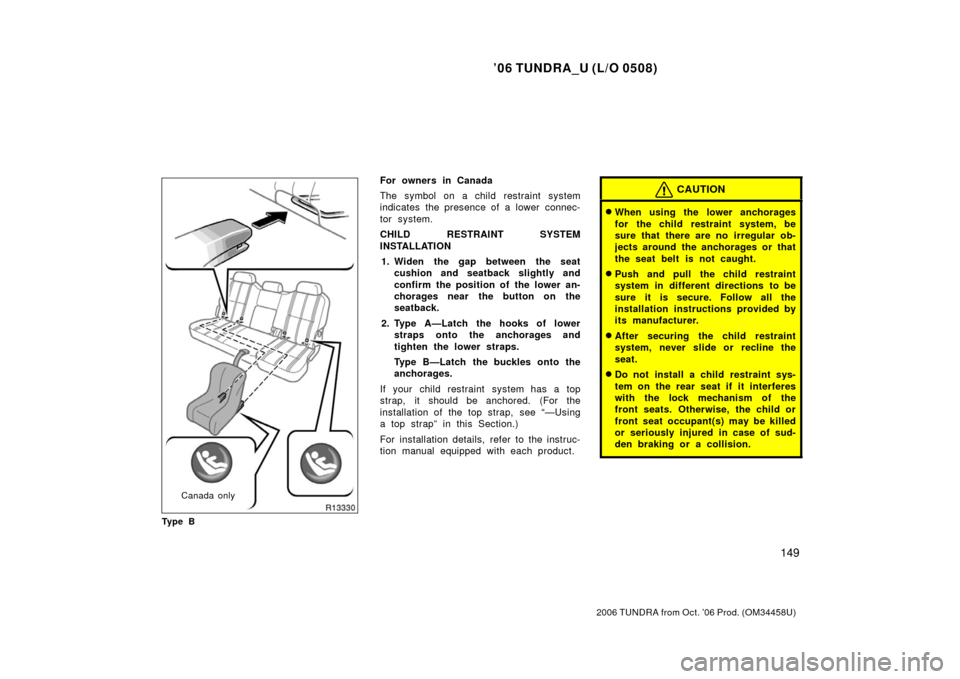
Canada only
Ty p e ACanada only
Ty p e B
For owners in Canada
The symbol on a child restraint system
indicates the presence of a lower connec-
tor system.
CHILD RESTRAINT SYSTEM
INSTALLATION 1. Widen the gap between the seat cushion and seatback slightly and
confirm the position of the lower an-
chorages near the button on the
seatback.
2. Type A—Latch the hooks of lower straps onto the anchorages and
tighten the lower straps.
Type B—Latch the buckles onto the
anchorages.
If your child restraint system has a top
strap, it should be anchored. (For the
installation of the top strap, see “—Using
a top strap” in this Section.)
For installation details, refer to the instruc-
tion manual equipped with each product.
Page 161 of 527

’06 TUNDRA_U (L/O 0508)
149
2006 TUNDRA from Oct. ’06 Prod. (OM 34458U)
Canada only
Ty p e B
For owners in Canada
The symbol on a child restraint system
indicates the presence of a lower connec-
tor system.
CHILD RESTRAINT SYSTEM
INSTALLATION 1. Widen the gap between the seat cushion and seatback slightly and
confirm the position of the lower an-
chorages near the button on the
seatback.
2. Type A—Latch the hooks of lower straps onto the anchorages and
tighten the lower straps.
Type B—Latch the buckles onto the
anchorages.
If your child restraint system has a top
strap, it should be anchored. (For the
installation of the top strap, see “—Using
a top strap” in this Section.)
For installation details, refer to the instruc-
tion manual equipped with each product.CAUTION
�When using the lower anchorages
for the child restraint system, be
sure that there are no irregular ob-
jects around the anchorages or that
the seat belt is not caught.
�Push and pull the child restraint
system in different directions to be
sure it is secure. Follow all the
installation instructions provided by
its manufacturer.
�After securing the child restraint
system, never slide or recline the
seat.
�Do not install a child restraint sys-
tem on the rear seat if it interferes
with the lock mechanism of the
front seats. Otherwise, the child or
front seat occupant(s) may be killed
or seriously injured in case of sud-
den braking or a collision.
Page 163 of 527

’06 TUNDRA_U (L/O 0508)
151
2006 TUNDRA from Oct. ’06 Prod. (OM 34458U)
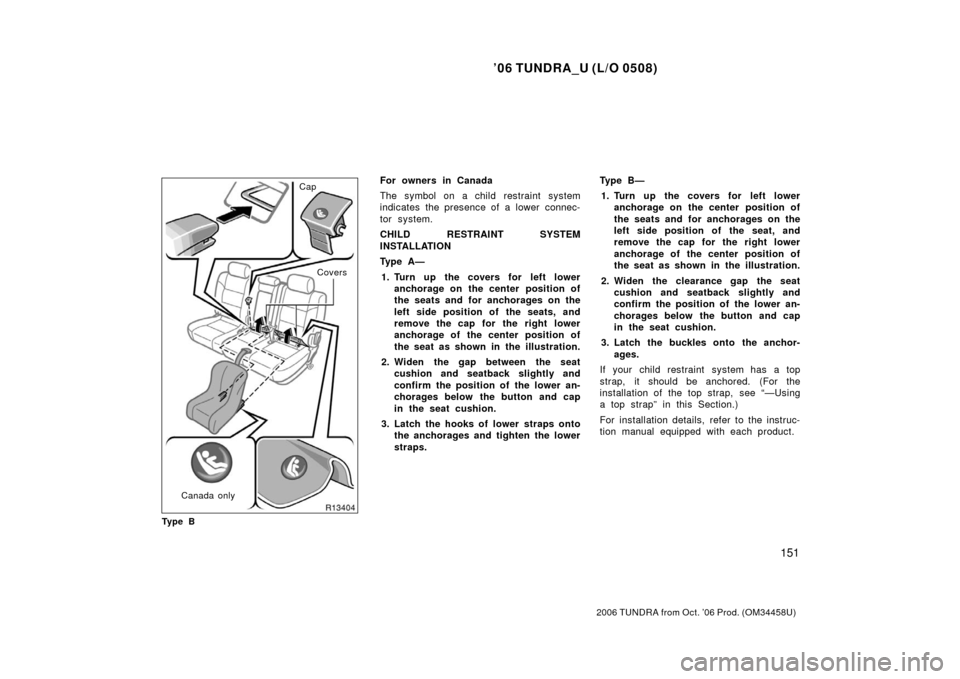
Cap
Covers
Canada only
Ty p e BFor owners in Canada
The symbol on a child restraint system
indicates the presence of a lower connec-
tor system.
CHILD RESTRAINT SYSTEM
INSTALLATION
Ty p e A — 1. Turn up the covers for left lower anchorage on the center position of
the seats and for anchorages on the
left side position of the seats, and
remove the cap for the right lower
anchorage of the center position of
the seat as shown in the illustration.
2. Widen the gap between the seat cushion and seatback slightly and
confirm the position of the lower an-
chorages below the button and cap
in the seat cushion.
3. Latch the hooks of lower straps onto the anchorages and tighten the lower
straps. Ty p e B —
1. Turn up the covers for left lower anchorage on the center position of
the seats and for anchorages on the
left side position of the seat, and
remove the cap for the right lower
anchorage of the center position of
the seat as shown in the illustration.
2. Widen the clearance gap the seat cushion and seatback slightly and
confirm the position of the lower an-
chorages below the button and cap
in the seat cushion.
3. Latch the buckles onto the anchor- ages.
If your child restraint system has a top
strap, it should be anchored. (For the
installation of the top strap, see “—Using
a top strap” in this Section.)
For installation details, refer to the instruc-
tion manual equipped with each product.
Page 226 of 527

’06 TUNDRA_U (L/O 0508)
214
2006 TUNDRA from Oct. ’06 Prod. (OM 34458U)
When parking, firmly apply the parking
brake to avoid inadvertent creeping.
Pedal type—
To set: Fully depress the parking brake
pedal. For better holding power, first de-
press the brake pedal and hold it while
setting the parking brake.
To release: Depress the parking brake
pedal once again.
Lever type—
To set: Pull out on the lever. For better
holding power, first depress the brake
pedal and hold it while setting the parking
brake.
To release: Press the lock release button
(1), turn the lever (2), then push it in (3).
To remind you that the parking brake is
set, the parking brake reminder light in
the instrument panel remains on until you
release the parking brake.
CAUTION
Before driving, be sure the parking
brake is fully released and the park-
ing brake reminder light is off.
The cruise control is designed to main-
tain a set cruising speed without requir-
ing the driver to operate the accelera-
tor. Cruising speed can be set to any
speed above 40 km/h (25 mph).
Within the limits of the engine’s capabili-
ties, cruising speed can be maintained up
or down grades. However, changes in ve-
hicle speed may occur on steeper grades.
CAUTION
�To help maintain maximum control
of your vehicle, do not use the
cruise control when driving in
heavy or varying traffic, or on slip-
pery (rainy, icy or snow�covered) or
winding roads.
�Avoid vehicle speed increases when
driving downhill. If the vehicle
speed is too fast in relation to the
cruise control set speed, cancel the
cruise control then downshift the
transmission to use engine braking
to slow down.
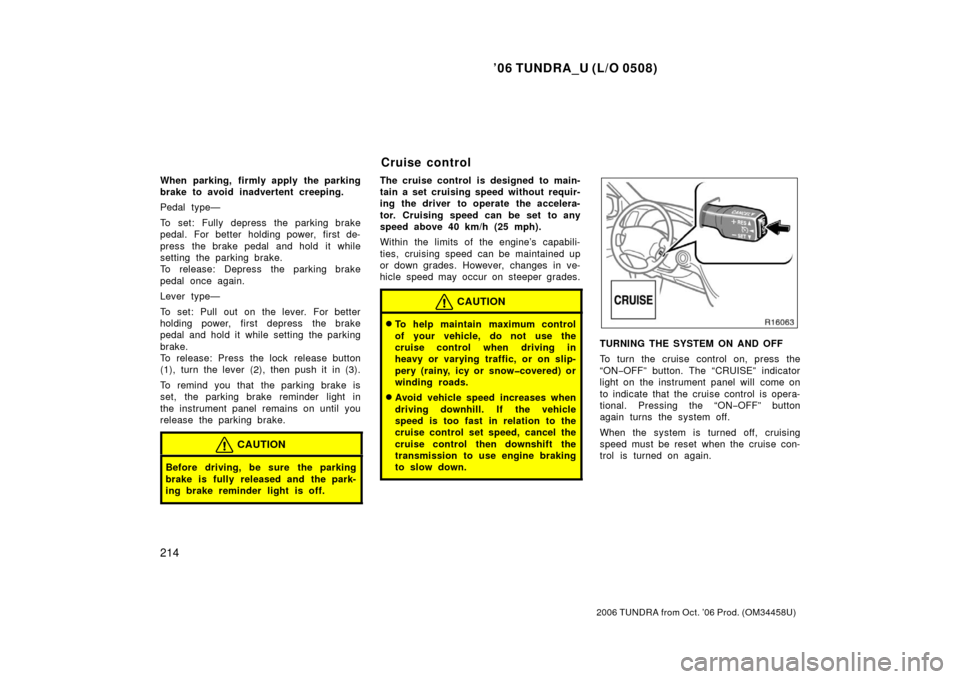
TURNING THE SYSTEM ON AND OFF
To turn the cruise control on, press the
“ON−OFF” button. The “CRUISE” indicator
light on the instrument panel will come on
to indicate that the cruise control is opera-
tional. Pressing the “ON −OFF” button
again turns the system off.
When the system is turned off, cruising
speed must be reset when the cruise con-
trol is turned on again.
Cruise control
Page 228 of 527

’06 TUNDRA_U (L/O 0508)
216
2006 TUNDRA from Oct. ’06 Prod. (OM 34458U)
The “CRUISE” indicator light remains on
to indicate that the system is still in op-
eration.
To turn the cruise control off, press the
“ON−OFF” button. Make sure the
“CRUISE” indicator light is off.
If the cruise control automatically cancels
out other than for the above cases, have
your vehicle checked by your Toyota deal-
er at the earliest opportunity.
RESUMING THE CRUISE CONTROL
If the cruise control is temporarily can-
celled, the cruising speed can be resumed
by pushing the lever up in the “+RES”
direction.
Vehicle speed must be above 40 km/h (25
mph).
RESETTING TO A FASTER SPEED
Push the lever up in the “+ RES” direction
and hold it. Release the lever when the
desired speed is attained. While the lever
is held up, the vehicle will gradually gain
speed.
However, a faster way to reset is to ac-
celerate the vehicle and then push the
lever down in the “− SET” direction. RESETTING TO A SLOWER SPEED
Push the lever down in the “
− SET” direc-
tion and hold it. Release the lever when
the desired speed is attained. While the
lever is held down, the vehicle speed will
gradually decrease.
However, a faster way to reset is to de-
press the brake pedal and then push the
lever down in the “− SET” direction.
Even if you turn off the overdrive switch
with the cruise control on, engine braking
will not be applied because the cruise
control is not cancelled. To decrease the
vehicle speed, reset to a slower speed
with the cruise control lever or depress
the brake pedal. If you use the brake
pedal, cruise control is cancelled. CRUISE CONTROL FAILURE WARNING
If the “CRUISE” indicator light flashes
when using the cruise control, press the
“ON
−OFF” button to turn the system off
and then press it again to turn it on.
If any of the following conditions then oc-
curs, there is some trouble in the cruise
control system.
�The indicator light does not come on.
�The indicator light flashes again.
�The indicator light goes out after it
comes on.
If this is the case, contact your Toyota
dealer and have your vehicle inspected.