Page 273 of 428

263
OPERATION OF INSTRUMENTS AND
CONTROLS
Other equipment
Multi−information display 264
. . . . . . . . . . . . . . . . . . . . . . . . . . . . . . . . . . . .
Clock 2")
’06 HIGHLANDER_U (L/O 0508)
263
OPERATION OF INSTRUMENTS AND
CONTROLS
Other equipment
Multi−information display 264
. . . . . . . . . . . . . . . . . . . . . . . . . . . . . . . . . . . .
Clock 265
. . . . . . . . . . . . . . . . . . . . . . . . . . . . . . . . . . . . \
. . . . . . . . . . . . . . . . . .
Compass 266
. . . . . . . . . . . . . . . . . . . . . . . . . . . . . . . . . . . . \
. . . . . . . . . . . . . .
Cigarette lighter and ashtrays 270
. . . . . . . . . . . . . . . . . . . . . . . . . . . . . . . .
Power outlets 271
. . . . . . . . . . . . . . . . . . . . . . . . . . . . . . . . . . . . \
. . . . . . . . . .
Power outlet 272
. . . . . . . . . . . . . . . . . . . . . . . . . . . . . . . . . . . . \
. . . . . . . . . . .
Glove box 273
. . . . . . . . . . . . . . . . . . . . . . . . . . . . . . . . . . . . \
. . . . . . . . . . . . . .
Garage door opener 274
. . . . . . . . . . . . . . . . . . . . . . . . . . . . . . . . . . . . \
. . . .
Auxiliary boxes 277
. . . . . . . . . . . . . . . . . . . . . . . . . . . . . . . . . . . . \
. . . . . . . . .
Container 279
. . . . . . . . . . . . . . . . . . . . . . . . . . . . . . . . . . . . \
. . . . . . . . . . . . . .
Cup holders 280
. . . . . . . . . . . . . . . . . . . . . . . . . . . . . . . . . . . . \
. . . . . . . . . . . .
Bottle holders 282
. . . . . . . . . . . . . . . . . . . . . . . . . . . . . . . . . . . . \
. . . . . . . . . .
Tie −down hooks 282
. . . . . . . . . . . . . . . . . . . . . . . . . . . . . . . . . . . . \
. . . . . . . .
Luggage cover 283
. . . . . . . . . . . . . . . . . . . . . . . . . . . . . . . . . . . . \
. . . . . . . . .
Roof luggage carrier 285
. . . . . . . . . . . . . . . . . . . . . . . . . . . . . . . . . . . . \
. . . .
Floor mat 287
. . . . . . . . . . . . . . . . . . . . . . . . . . . . . . . . . . . . \
. . . . . . . . . . . . . .
For information about the clock of a vehicle equipped with
Navigation system, please refer to the separate “Navigation
System Owner’s Manual”.
SECTION 1� 10
Page 275 of 428

265
3. Average fuel consumption
(“AVG MPG” or “AVG L/100 km”)
Average fuel consumption is calculated
and displayed based on total driving
distance and total fue")
’06 HIGHLANDER_U (L/O 0508)
265
3. Average fuel consumption
(“AVG MPG” or “AVG L/100 km”)
Average fuel consumption is calculated
and displayed based on total driving
distance and total fuel consumption
with the engine running.
The displayed value is updated every 10
seconds.
4. Instantaneous fuel consumption (“MPG” or “L/100 km”)
The instantaneous fuel consumption is
calculated and displayed based on dis-
tance and fuel consumption for 1 sec-
onds with the engine running.
The displayed value is updated every 2
seconds.
Note that an accurate figure may not be
shown in the following cases.
�The vehicle is stopped with the engine
running. (The display will indicate the
extremely high fuel consumption.)
�The vehicle is driving down a long
slope applying the engine brake. (The
display will indicate the extremely low
fuel consumption.)
The calculation is reset when the ignition
switch is turned off. 5. Driving time (“E/T”)
The elapsed time after the engine starts
is displayed.
When the engine is started, driving time
is counted from 0:00. Up to 11:59 (11
hours, 59 minutes) can be displayed.
When the driving time exceeds 11:59, the
counter returns to 0:00.
The calculation is reset when the ignition
switch is turned off.
To reset the hour: Push the “H” button.
To reset the minutes: Push the “M” button.
The key must be in the “ACC” or “ON”
position.
If the electrical power source has been
disconnected from the clock, the time dis-
play will automatically be set to 1:00 (one
o’clock).
Clock
Page 283 of 428
’06 HIGHLANDER_U (L/O 0508)
273
�
Appliances with high initial peak watt-
age: cathode−
ray tube type televisions,
compressor −driven refrigerators, electric
pumps, electric tools, etc.
�Measuring devices which process pre-
cise data: medical equipment, measur-
ing instruments, etc.
�Other appliances requiring an extremely
stable power supply: microcomputer −
controlled electric blankets, touch sen-
sor lamps, etc.
Certain electrical appliances may cause
radio noise.
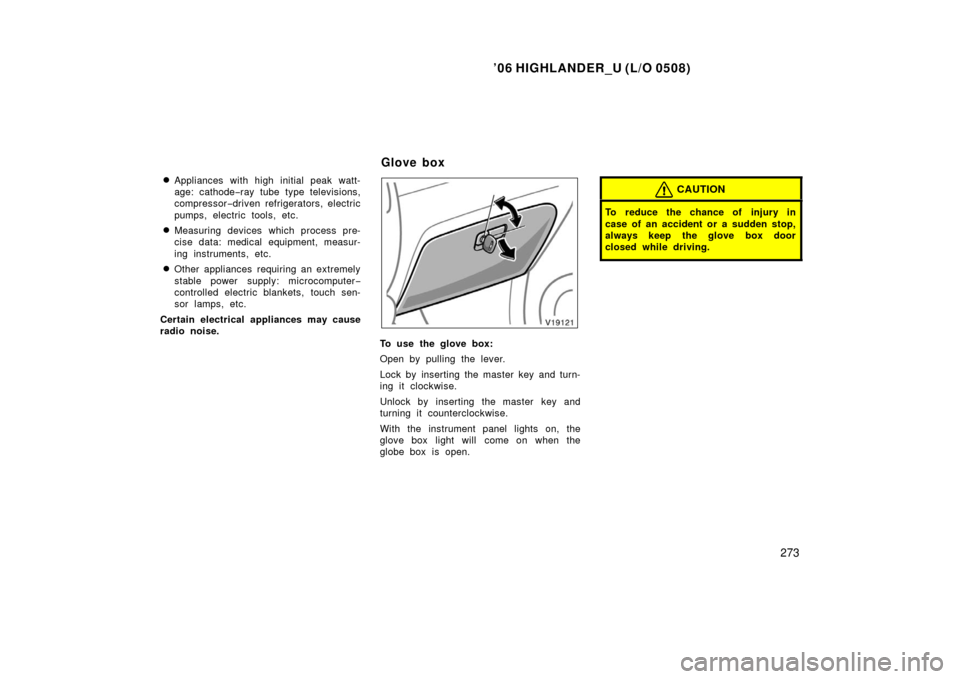
To use the glove box:
Open by pulling the lever.
Lock by inserting the master key and turn-
ing it clockwise.
Unlock by inserting the master key and
turning it counterclockwise.
With the instrument panel lights on, the
glove box light will come on when the
globe box is open.
CAUTION
To reduce the chance of injury in
case of an accident or a sudden stop,
always keep the glove box door
closed while driving.
Glove box
Page 295 of 428
’06 HIGHLANDER_U (L/O 0508)
285
2. Push in the left end of the luggage
cover and place the luggage cover in
the holder as shown.
CAUTION
Make sure the luggage cover is se-
curely stowed.
Cross rails
Roof rails
The roof luggage carrier consists of
roof rails and sliding cross rails.
Upper
knob Side knobs
ADJUSTING THE POSITION OF CROSS
RAILS:
1. Turn the upper and side knobs coun- terclockwise to loosen the cross
rails.
Roof luggage carrier
Page 296 of 428

286
2. Slide the cross rails to the appropri-
ate position for loading the luggages
and turn the side knobs clockwise to
tighten the cross rails securely.
Vehicles with")
’06 HIGHLANDER_U (L/O 0508)
286
2. Slide the cross rails to the appropri-
ate position for loading the luggages
and turn the side knobs clockwise to
tighten the cross rails securely.
Vehicles with the electric moon
roof—There are cross rail stoppers on the
roof rails which help you prevent the
cross rails being touched with the tilted up
moon roof.
NOTICE
Vehicles with the electric moon roof
only—Do not remove the cross rail
stoppers, or the moon roof may be
damaged when it is tilted.
3. In order to fix the cross rails to the appropriate length, turn the upper
knobs clockwise after tightening all
of the side knobs.
CAUTION
Make sure the cross rails are fixed
securely by pushing forward and rear-
ward them. Failure to do so may
cause an unexpected accident or se-
vere injury in the event of emergency
braking or a collision.
Follow the manufacture’s instructions and
precautions when installing the attach-
ments or their equivalent.
CAUTION
When you load cargo on the roof lug-
gage carrier, observe the following:
�Place the cargo so that its weight
is distributed evenly between the
front and rear axles.
�If loading long or wide cargo, never
exceed the vehicle overall length or
width. (See “Dimensions and
weights” on page 404 in Section 8
for information on your vehicle
overall length and width.)
�Before driving, make sure the cargo
is securely fastened on the roof
luggage carrier.
�Loading cargo on the roof luggage
carrier will make the center of the
vehicle gravity higher. Avoid high
speeds, sudden starts, sharp turns,
sudden braking or abrupt maneu-
vers, otherwise it may result in loss
of control or vehicle rollover due to
failure to operate this vehicle cor-
rectly.
Page 350 of 428
’06 HIGHLANDER_U (L/O 0508)
340
To detach the spare tire:
1. Vehicles with aluminium wheels— Remove the inside spare tire cov-
er by turning it counterclockwise.2. Pull the strap and open the centerdeck board.3. Vehicles with third seat—
If the third seat is upright, hang
the center deck board on the
right −side head restraint.
Page 351 of 428
’06 HIGHLANDER_U (L/O 0508)
341
4. Remove the cover as shown in the
illustration.5. Put the adapter socket (for remov-ing a spar e tir e) on the spar e tir e
clamp bolt.6. Threading the jack handle throughthe adapter socket, turn the jack
handle counterclockwise. Contin-
ue until the spare tire is lowered
completely to the ground.
Page 353 of 428
’06 HIGHLANDER_U (L/O 0508)
343
Ty p e A
Ty p e B 3. Remove the wheel ornament.
Pry off the wheel ornament, using the
beveled end of the wheel nut wrench
as shown.
CAUTION
Do not try to pull off the orna-
ment by hand. Take due care in
handling the ornament to avoid
unexpected personal injury.
4. Loosen all the wheel nuts.
Always loosen the wheel nuts before
raising the vehicle.
Turn the wheel nuts counterclockwise
to loosen. To get maximum leverage,
fit the wrench to the nut so that the
handle is on the right side, as shown
above. Grab the wrench near the end
of the handle and pull up on the han-
dle. Be careful that the wrench does
not slip off the nut.
Do not remove the nuts yet—just un-
screw them about one −half turn.
—Removing wheel ornament —Loosening wheel nuts

285
2. Push in the left end of the luggage
cover and place the luggage cover in
the holder as shown.
CAUTION
Make sure the luggage cover is se-
curely stowed.
Cross rail")

340
To detach the spare tire:
1. Vehicles with aluminium wheels— Remove the inside spare tire cov-
er by turning it counterclockwise.2. Pull the strap and open the cent")

341
4. Remove the cover as shown in the
illustration.5. Put the adapter socket (for remov-ing a spar e tir e) on the spar e tir e
clamp bolt.6. Threading the jack handle")

343
Ty p e A
Ty p e B 3. Remove the wheel ornament.
Pry off the wheel ornament, using the
beveled end of the wheel nut wrench
as shown.
CAUTION
Do not try to pull off the")