2006 SUZUKI SX4 AIR
[x] Cancel search: AIRPage 792 of 1556

Downloaded from www.Manualslib.com manuals search engine 5A-144 Automatic Transmission/Transaxle:
Automatic Transaxle Unit AssemblyS6RW0D5106058
CAUTION!
• Automatic transaxle consists of highly
precise parts. As even flaw in small part
may cause oil leakage or decrease in
function, check each part carefully before
installation.
• Clean all parts with compressed air. Never
use wiping cloths or rags.
• Before assembling new clutch or brake
discs, soak them in automatic transaxle
fluid for at least 2 hours.
• Be sure to use new gaskets and O-rings.
• Lubricate O-rings with automatic transaxle
fluid.
• Apply automatic transaxle fluid on sliding
or rotating surfaces of the parts before
assembly.
• Use Suzuki Super Grease “C” to retain
parts in place.
• Be sure to install thrust bearings and races
in correct direction and position.
• Make sure that snap ring ends are not
aligned with one of cutouts and are
installed in groove correctly.
• Do not use adhesive cements on gaskets
and similar parts.
• Be sure to torque each bolt and nut to
specification.
1) Install new manual shift shaft oil seal to transaxle
case.
Use special tool and hammer to install it, and then
apply grease to its lip.
Special tool
(A): 09925–98210
“A”: Grease 99000–25030 (SUZUKI Super
Grease C)
Manual shift shaft oil seal installing depth
“a”: 0.75 – 1.25 mm (0.03 – 0.05 in.)2) Install manual detent spring (1) to transaxle case
and tighten manual detent spring bolt to specified
torque.
Tightening torque
Manual detent spring bolt (a): 10 N·m (1.0 kgf-
m, 7.5 lb-ft)
3) Install parking lock pawl rod (2) to manual valve lever
(1).
4) After applying A/T fluid to new manual valve lever
(1), install new manual shift shaft (4), new spacer (3)
and manual valve lever to transaxle case.
5) After installing manual valve lever pin (2) by using
spring pin remover with 3 mm (0.12 in.) in diameter
(5) and hammer, turn spacer to set the position as
shown in figure. Then caulk spacer with a punch.
“a”
(A)
“A”
I2RH0B510258-01
I2RH0B510259-01
I2RH0B510260-01
I2RH0B510261-01
Page 794 of 1556
Downloaded from www.Manualslib.com manuals search engine 5A-146 Automatic Transmission/Transaxle:
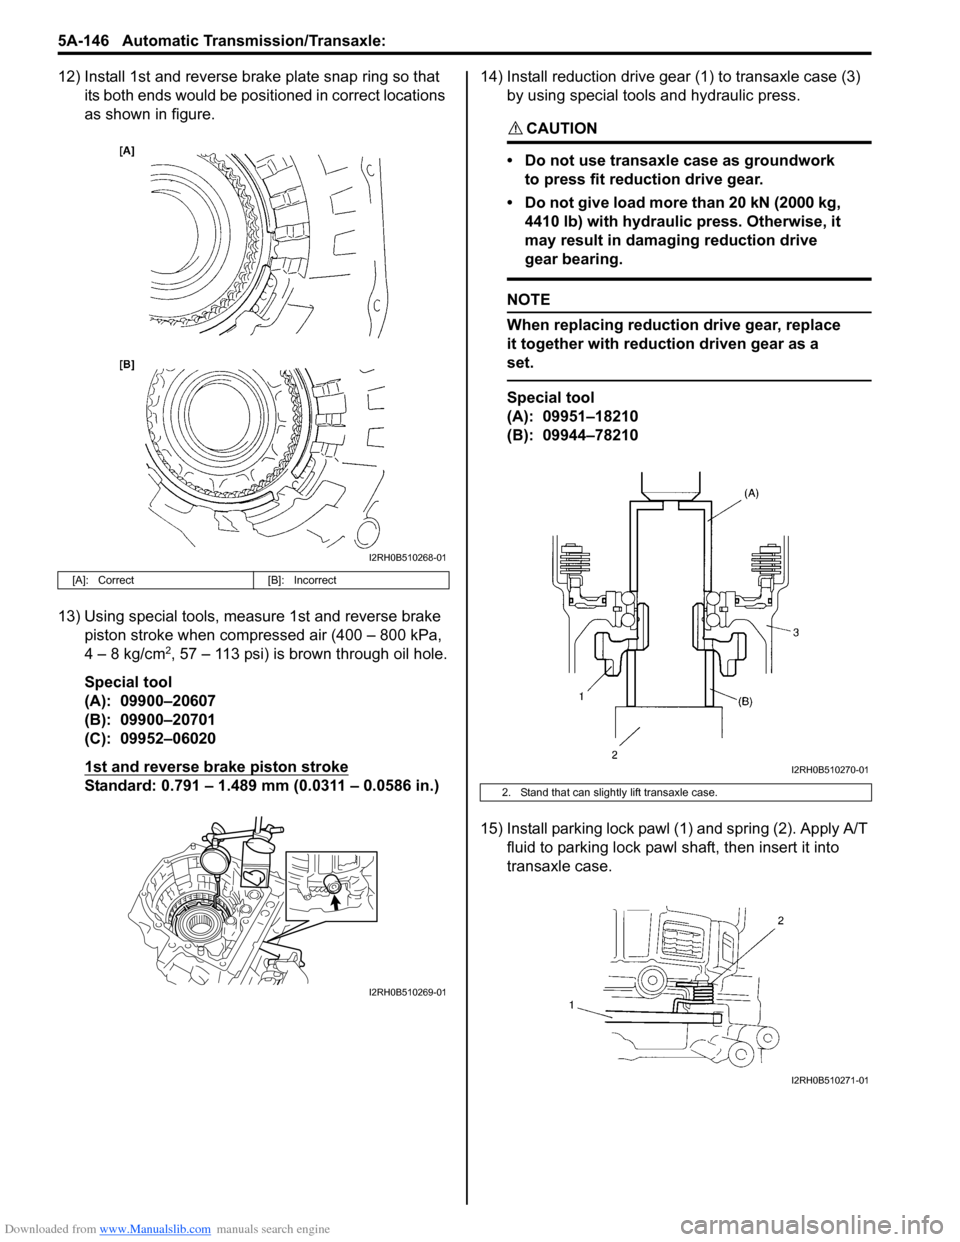
12) Install 1st and reverse brake plate snap ring so that
its both ends would be positioned in correct locations
as shown in figure.
13) Using special tools, measure 1st and reverse brake
piston stroke when compressed air (400 – 800 kPa,
4 – 8 kg/cm
2, 57 – 113 psi) is brown through oil hole.
Special tool
(A): 09900–20607
(B): 09900–20701
(C): 09952–06020
1st and reverse brake piston stroke
Standard: 0.791 – 1.489 mm (0.0311 – 0.0586 in.)14) Install reduction drive gear (1) to transaxle case (3)
by using special tools and hydraulic press.
CAUTION!
• Do not use transaxle case as groundwork
to press fit reduction drive gear.
• Do not give load more than 20 kN (2000 kg,
4410 lb) with hydraulic press. Otherwise, it
may result in damaging reduction drive
gear bearing.
NOTE
When replacing reduction drive gear, replace
it together with reduction driven gear as a
set.
Special tool
(A): 09951–18210
(B): 09944–78210
15) Install parking lock pawl (1) and spring (2). Apply A/T
fluid to parking lock pawl shaft, then insert it into
transaxle case.
[A]: Correct [B]: Incorrect
I2RH0B510268-01
I2RH0B510269-01
2. Stand that can slightly lift transaxle case.
I2RH0B510270-01
I2RH0B510271-01
Page 813 of 1556
Downloaded from www.Manualslib.com manuals search engine Manual Transmission/Transaxle: 5B-1
Transmission / Transaxle
Manual Transmission/Transaxle
General Description
Manual Transaxle ConstructionS6RW0D5201001
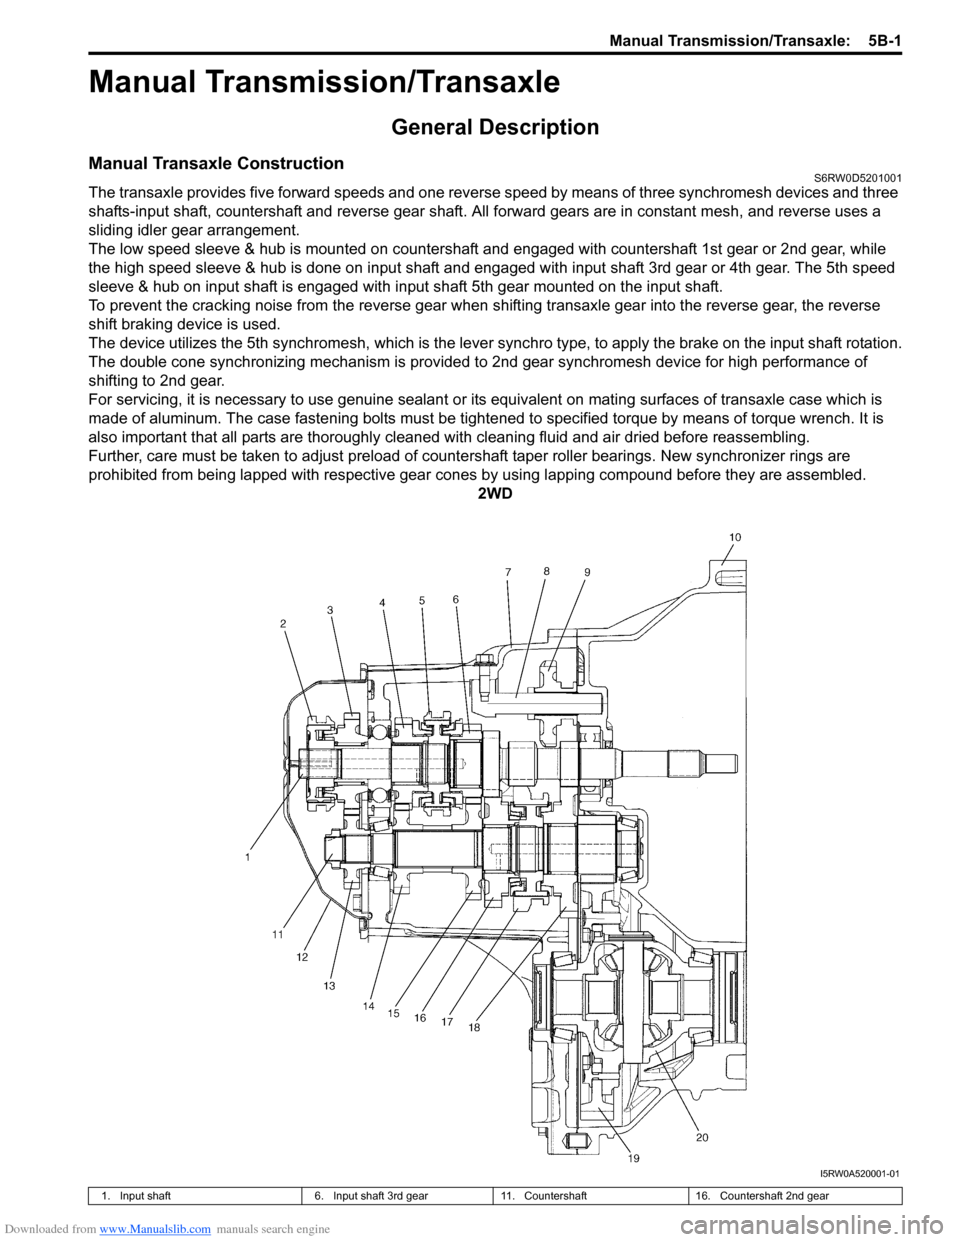
The transaxle provides five forward speeds and one reverse speed by means of three synchromesh devices and three
shafts-input shaft, countershaft and reverse gear shaft. All forward gears are in constant mesh, and reverse uses a
sliding idler gear arrangement.
The low speed sleeve & hub is mounted on countershaft and engaged with countershaft 1st gear or 2nd gear, while
the high speed sleeve & hub is done on input shaft and engaged with input shaft 3rd gear or 4th gear. The 5th speed
sleeve & hub on input shaft is engaged with input shaft 5th gear mounted on the input shaft.
To prevent the cracking noise from the reverse gear when shifting transaxle gear into the reverse gear, the reverse
shift braking device is used.
The device utilizes the 5th synchromesh, which is the lever synchro type, to apply the brake on the input shaft rotation.
The double cone synchronizing mechanism is provided to 2nd gear synchromesh device for high performance of
shifting to 2nd gear.
For servicing, it is necessary to use genuine sealant or its equivalent on mating surfaces of transaxle case which is
made of aluminum. The case fastening bolts must be tightened to specified torque by means of torque wrench. It is
also important that all parts are thoroughly cleaned with cleaning fluid and air dried before reassembling.
Further, care must be taken to adjust preload of countershaft taper roller bearings. New synchronizer rings are
prohibited from being lapped with respective gear cones by using lapping compound before they are assembled.
2WD
I5RW0A520001-01
1. Input shaft 6. Input shaft 3rd gear 11. Countershaft 16. Countershaft 2nd gear
Page 817 of 1556
Downloaded from www.Manualslib.com manuals search engine Manual Transmission/Transaxle: 5B-5
Diagnostic Information and Procedures
Manual Transaxle Symptom DiagnosisS6RW0D5204001
Repair Instructions
Manual Transaxle Oil Level CheckS6RW0D5206001
1) Lift up vehicle and check oil leakage. Repair leaky
point, if any.
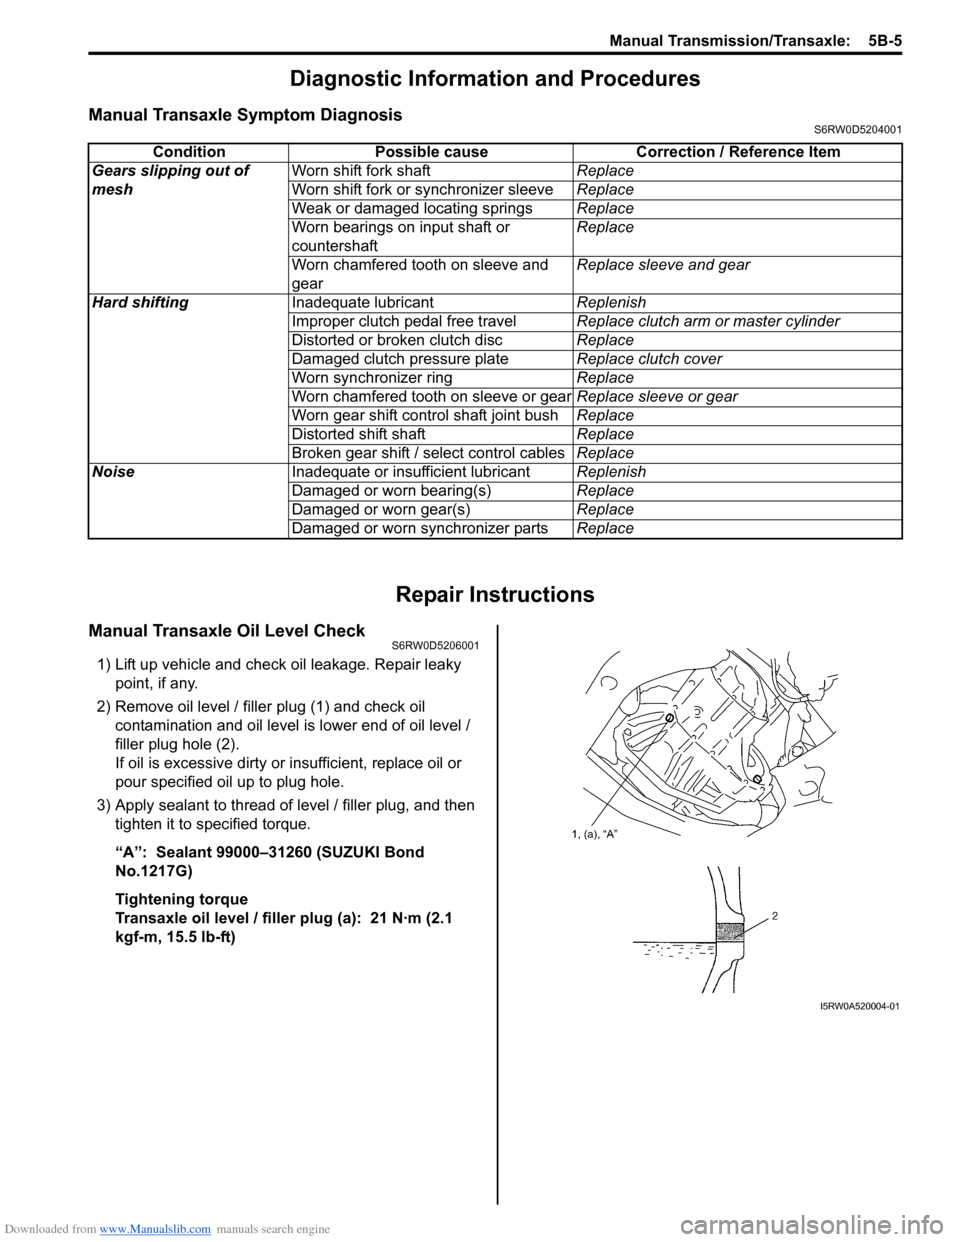
2) Remove oil level / filler plug (1) and check oil
contamination and oil level is lower end of oil level /
filler plug hole (2).
If oil is excessive dirty or insufficient, replace oil or
pour specified oil up to plug hole.
3) Apply sealant to thread of level / filler plug, and then
tighten it to specified torque.
“A”: Sealant 99000–31260 (SUZUKI Bond
No.1217G)
Tightening torque
Transaxle oil level / filler plug (a): 21 N·m (2.1
kgf-m, 15.5 lb-ft)Condition Possible cause Correction / Reference Item
Gears slipping out of
meshWorn shift fork shaftReplace
Worn shift fork or synchronizer sleeveReplace
Weak or damaged locating springsReplace
Worn bearings on input shaft or
countershaftReplace
Worn chamfered tooth on sleeve and
gearReplace sleeve and gear
Hard shiftingInadequate lubricantReplenish
Improper clutch pedal free travelReplace clutch arm or master cylinder
Distorted or broken clutch discReplace
Damaged clutch pressure plateReplace clutch cover
Worn synchronizer ringReplace
Worn chamfered tooth on sleeve or gearReplace sleeve or gear
Worn gear shift control shaft joint bushReplace
Distorted shift shaftReplace
Broken gear shift / select control cablesReplace
NoiseInadequate or insufficient lubricantReplenish
Damaged or worn bearing(s)Replace
Damaged or worn gear(s)Replace
Damaged or worn synchronizer partsReplace
I5RW0A520004-01
Page 824 of 1556

Downloaded from www.Manualslib.com manuals search engine 5B-12 Manual Transmission/Transaxle:
Manual Transaxle Unit Dismounting and
Remounting
S6RW0D5206010
Dismounting
1) Drain coolant.
2) Remove battery and tray with ECM.
3) Remove air cleaner case and resonator.
4) Remove clutch fluid pipe referring to “Clutch Fluid
Pipe Removal and Installation in Section 5C”.
5) Disconnect back up light switch coupler and undo
wiring harness clamps.
6) Disconnect gear shift and gear select control cables
(1) from transaxle.
7) Remove earth cable from transaxle.
8) Remove water inlet pipe.
9) Remove starting motor referring to “Starting Motor
Dismounting and Remounting in Section 1I”.
10) Remove transaxle to engine bolts (1) of upper side.
11) Drain transaxle oil and transfer oil, if equipped.
12) Remove engine under covers.
13) Remove drive shaft assembly and center shaft
referring to “Front Drive Shaft Assembly Removal
and Installation in Section 3A”.
14) Remove exhaust No.1, No.2 and No.3 pipes
referring to “Exhaust Pipe and Muffler Removal and
Installation in Section 1K”.
15) Remove suspension frame, engine front mounting
member and engine mounting member referring to
“Front Suspension Frame, Stabilizer Bar and/or
Bushing Removal and Installation in Section 2B” and
“Engine Mountings Components in Section 1D”.16) Remove transfer referring to “Transfer Dismounting
and Remounting in Section 3C”, if equipped.
17) Remove clutch housing lower plate.
18) Support transaxle with transmission jack.
19) Remove left mounting (1) and left mounting bracket
(2).
20) Remove stiffener bolts (2), transaxle to engine bolts
(1) and nut of lower side, and then lower transaxle.
Remounting
CAUTION!
• Care should be taken not to scratch oil
seal lip with drive shaft while raising
transaxle.
• Do not hit drive shaft joint with hammer
when installing it into differential gear.
Reverse dismounting procedure for remounting of
transaxle, noting the following points.
• Tighten each bolts and nuts to specified torque
referring to “Manual Transaxle Unit Components” and
“Engine Mountings Components in Section 1D”.
• Set each clamp for wiring securely.
• Fill transaxle oil and transfer oil referring to “Manual
Transaxle Oil Change” and “Transfer Oil Change in
Section 3C”.
• Connect battery and check function of engine, clutch
and transaxle.
1
I5RW0A520011-01
1
I5RW0A520012-01
1
2
I5RW0A520013-01
1
2I5RW0A520014-01
Page 841 of 1556
Downloaded from www.Manualslib.com manuals search engine Manual Transmission/Transaxle: 5B-29
Reassembly
1) Clean all components thoroughly, inspect them for
any abnormality and replace with new ones as
necessary.
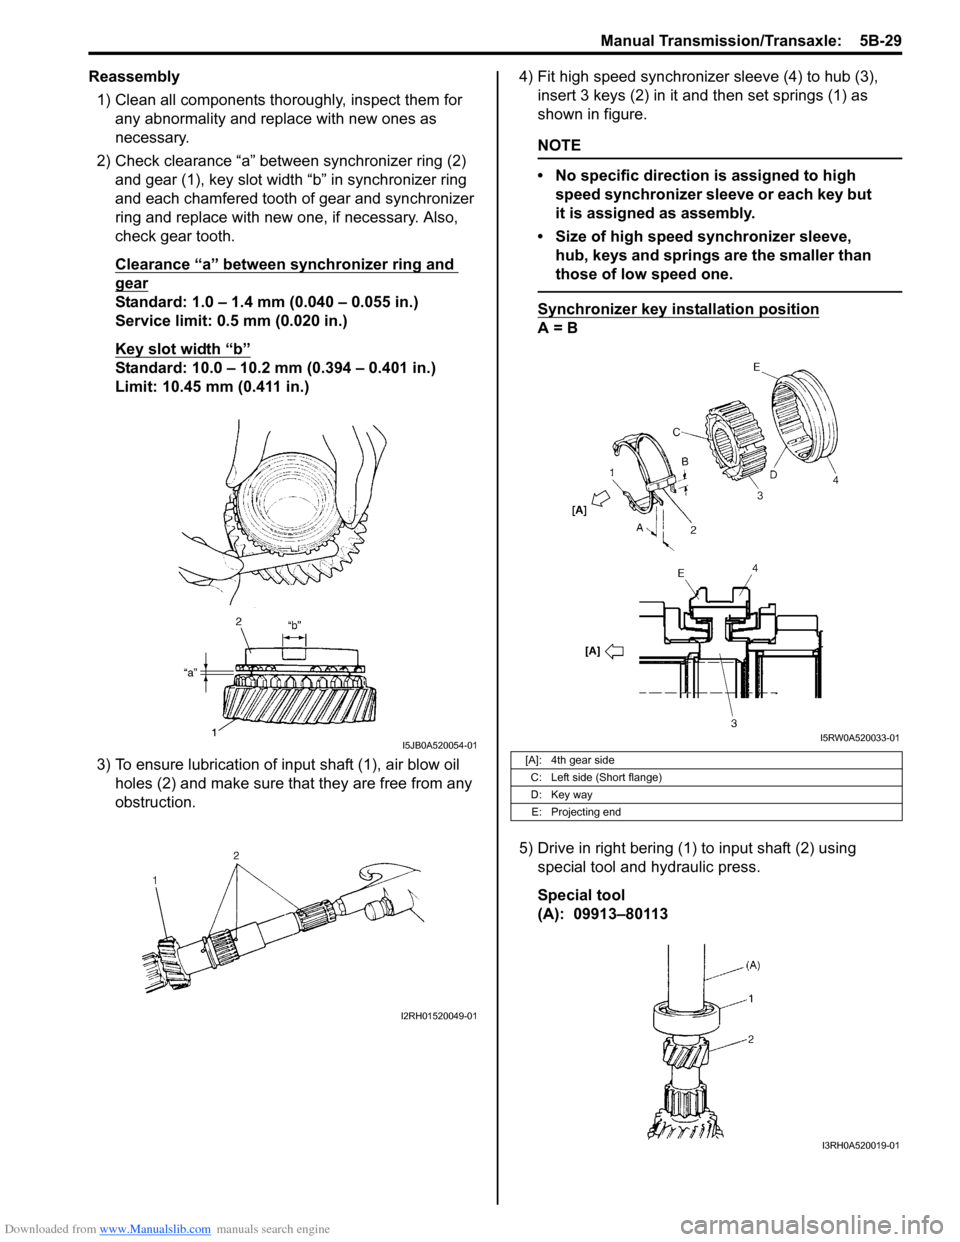
2) Check clearance “a” between synchronizer ring (2)
and gear (1), key slot width “b” in synchronizer ring
and each chamfered tooth of gear and synchronizer
ring and replace with new one, if necessary. Also,
check gear tooth.
Clearance “a” between synchronizer ring and
gear
Standard: 1.0 – 1.4 mm (0.040 – 0.055 in.)
Service limit: 0.5 mm (0.020 in.)
Key slot width “b”
Standard: 10.0 – 10.2 mm (0.394 – 0.401 in.)
Limit: 10.45 mm (0.411 in.)
3) To ensure lubrication of input shaft (1), air blow oil
holes (2) and make sure that they are free from any
obstruction.4) Fit high speed synchronizer sleeve (4) to hub (3),
insert 3 keys (2) in it and then set springs (1) as
shown in figure.
NOTE
• No specific direction is assigned to high
speed synchronizer sleeve or each key but
it is assigned as assembly.
• Size of high speed synchronizer sleeve,
hub, keys and springs are the smaller than
those of low speed one.
Synchronizer key installation position
A = B
5) Drive in right bering (1) to input shaft (2) using
special tool and hydraulic press.
Special tool
(A): 09913–80113
I5JB0A520054-01
I2RH01520049-01
[A]: 4th gear side
C: Left side (Short flange)
D: Key way
E: Projecting end
I5RW0A520033-01
I3RH0A520019-01
Page 844 of 1556

Downloaded from www.Manualslib.com manuals search engine 5B-32 Manual Transmission/Transaxle:
6) Disassemble synchronizer sleeve & hub assembly.
7) Take out 1st gear needle bearing from shaft.
8) In order to remove right bearing (1) from
countershaft, grind with a grinder (2) one part “a” of
right bearing (1) as illustrated till it becomes thin.
CAUTION!
Be careful not to grind too far not to damage
the shaft (3).
9) Break with a chisel (1) the thin ground right bearing
(2) and it can be removed.
Reassembly
1) Clean all components thoroughly, inspect them for
any abnormality and replace with new one as
necessary.
2) Check clearance “a” between synchronizer ring (2)
and gear (1), key slot width “b” in synchronizer ring
and each chamfered tooth of gear and synchronizer
ring and replace with new one, if necessary. Also,
check gear tooth.
Clearance “a” between synchronizer ring and
gear
Standard: 1.0 – 1.4 mm (0.040 – 0.055 in.)
Service limit: 0.5 mm (0.020 in.)
Key slot width “b”
Standard: 10.0 – 10.2 mm (0.394 – 0.401 in.)
Limit: 10.45 mm (0.411 in.)3) Put the synchronizer outer ring (1), inner ring (3) and
the cone (2) together and then measure the step
difference between the outer ring and the inner ring.
And also check each chamfered tooth of gear and
synchronizer ring and replace with new one, if
necessary. Also, check gear tooth.
Difference between synchronizer outer ring and
inner ring (2nd)
Standard “b”: 0.95 – 1.25 mm (0.036 – 0.048 in.)
Service limit “b”: 0.5 mm (0.019 in.)
4) To ensure lubrication of countershaft (1), air blow oil
holes (2) and make sure that they are free from any
obstruction.
3
1
2
“a”31
I5RW0A520035-01
1
2I5RW0A520036-01
I5JB0A520079-01
I2RH01520059-01
I2RH01520060-01
Page 855 of 1556
Downloaded from www.Manualslib.com manuals search engine Clutch: 5C-2
Diagnostic Information and Procedures
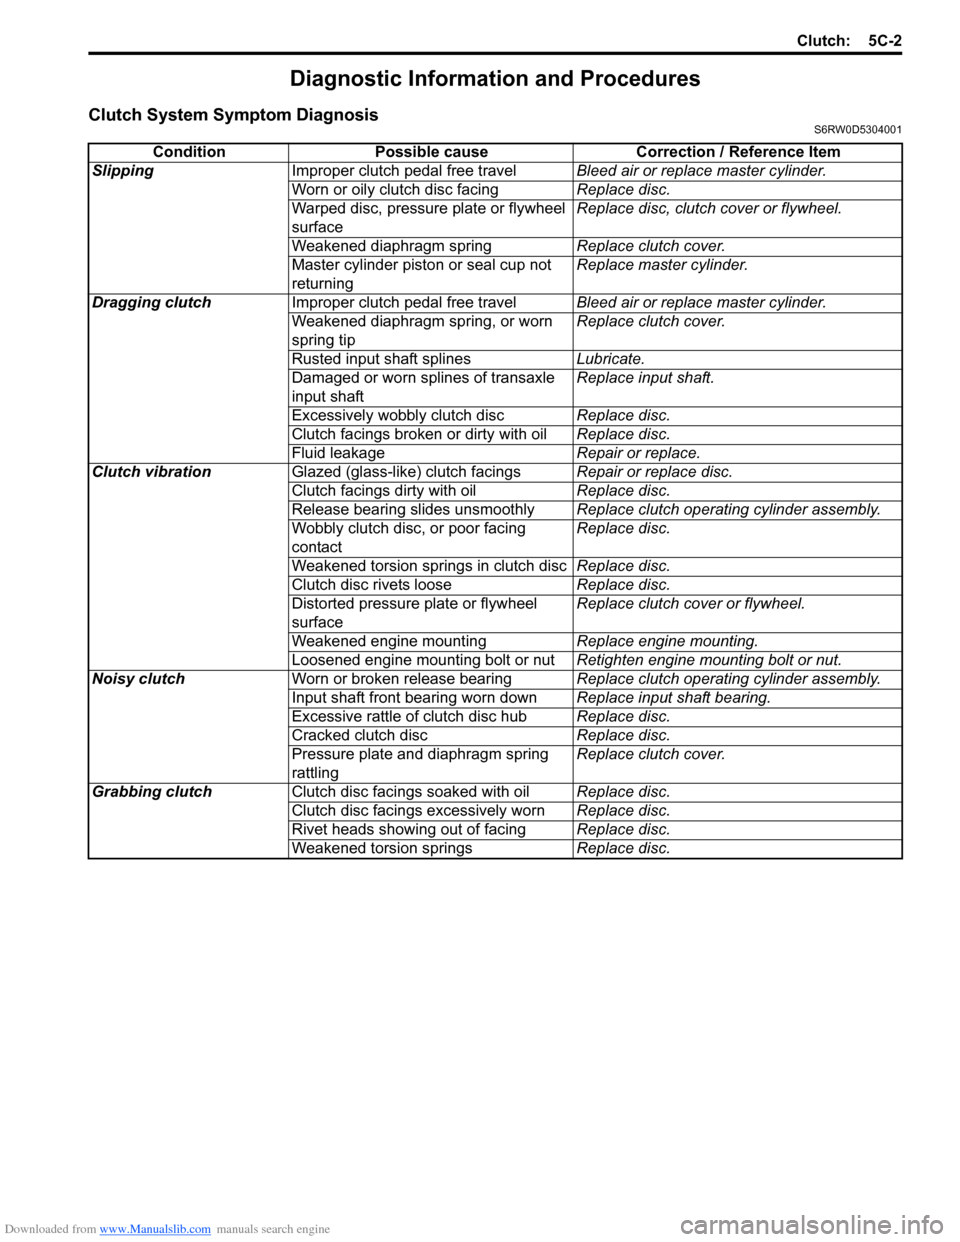
Clutch System Symptom DiagnosisS6RW0D5304001
Condition Possible cause Correction / Reference Item
SlippingImproper clutch pedal free travelBleed air or replace master cylinder.
Worn or oily clutch disc facingReplace disc.
Warped disc, pressure plate or flywheel
surfaceReplace disc, clutch cover or flywheel.
Weakened diaphragm springReplace clutch cover.
Master cylinder piston or seal cup not
returningReplace master cylinder.
Dragging clutchImproper clutch pedal free travelBleed air or replace master cylinder.
Weakened diaphragm spring, or worn
spring tipReplace clutch cover.
Rusted input shaft splinesLubricate.
Damaged or worn splines of transaxle
input shaftReplace input shaft.
Excessively wobbly clutch discReplace disc.
Clutch facings broken or dirty with oilReplace disc.
Fluid leakageRepair or replace.
Clutch vibrationGlazed (glass-like) clutch facingsRepair or replace disc.
Clutch facings dirty with oilReplace disc.
Release bearing slides unsmoothlyReplace clutch operating cylinder assembly.
Wobbly clutch disc, or poor facing
contactReplace disc.
Weakened torsion springs in clutch discReplace disc.
Clutch disc rivets looseReplace disc.
Distorted pressure plate or flywheel
surfaceReplace clutch cover or flywheel.
Weakened engine mountingReplace engine mounting.
Loosened engine mounting bolt or nutRetighten engine mounting bolt or nut.
Noisy clutchWorn or broken release bearingReplace clutch operating cylinder assembly.
Input shaft front bearing worn downReplace input shaft bearing.
Excessive rattle of clutch disc hubReplace disc.
Cracked clutch discReplace disc.
Pressure plate and diaphragm spring
rattlingReplace clutch cover.
Grabbing clutchClutch disc facings soaked with oilReplace disc.
Clutch disc facings excessively wornReplace disc.
Rivet heads showing out of facingReplace disc.
Weakened torsion springsReplace disc.