Page 856 of 1556

Downloaded from www.Manualslib.com manuals search engine 5C-3 Clutch:
Repair Instructions
Clutch Pedal InspectionS6RW0D5306001
Cylinder Push Rod Play “a”
1) Press clutch pedal (1) gradually with finger, stop
when slight increase of resistance is felt and
measure how much pedal has moved (push rod
play) as represented by “a” as shown.
Push rod play
“a”: Max. 3 mm (0.12 in.)
2) If “a” is not within specification, replace master
cylinder (3) or pedal arm (2).
Clutch Pedal Free Travel “b”
1) Depress clutch pedal (1), stop the moment clutch
resistance is felt, and measure how much pedal has
moved (clutch pedal free travel) as represented by
“b” in the figure.
Clutch pedal free travel
“b”
: 2 – 8 mm (0.08 – 0.31 in.)
2) If “b” is not within specification, check pedal arm (2)
and master cylinder (3) and replace defective part.
Clutch Release Margin “c”
1) Pull up parking brake fully and block wheels.
2) Start engine and keep engine at idle with neutral
gear position.
3) Without clutch pedal (1) depressed, slightly push the
shift lever to reverse position until transaxle emits
gear contact noise. Do not shift the lever to reverse
position.
4) With emitting gear contact noise, be slow to depress
clutch pedal (1), and at gear contact noise died
position (release point) stop depressing.
5) Measure distance between release point (4) and full
stroke point (5) on clutch pedal (1) which is shown by
“c” in the figure.
Clutch release margin
“c”: 25 – 55 mm (0.98 – 2.17 in.)6) If “c” is not within specification, it is possible that air
is trapped in this system. If suspected so, bleed air
referring to “Air Bleeding of Clutch System”.Upon
completion of above inspection, start engine and
check clutch for proper operation.
Clutch Fluid Level InspectionS6RW0D5306002
Refer to “Brake Fluid Level Inspection in Section 4A”.
Clutch fluid specification
: Refer to the reservoir cap of the brake master
cylinder.
Air Bleeding of Clutch SystemS6RW0D5306003
CAUTION!
When operating the pedal stroke for air
bleeding of clutch system, after releasing the
clutch pedal, be sure to wait 1 second or
more before depressing it again. Otherwise,
the oil seal of operating cylinder will be
damaged, resulting in oil leakage.
Bleed air from clutch system.
Refer to “Air Bleeding of Brake System in Section 4A”.
I5RW0A530002-01
Page 858 of 1556

Downloaded from www.Manualslib.com manuals search engine 5C-5 Clutch:
Clutch Master Cylinder Removal and
Installation
S6RW0D5306007
Removal
1) Clean around brake master cylinder reservoir cap
and take out fluid with syringe or such from brake
master cylinder reservoir.
2) Disconnect clutch fluid pipe (4) from clutch master
cylinder (1) referring to “Clutch Fluid Pipe Removal
and Installation”.
3) Disconnect clutch reservoir hose (2).
4) Remove push rod from clutch pedal, and then
remove clutch master cylinder.
Installation
Reverse removal procedure for installation noting the
following.
• Apply grease to push rod tip.
“A”: Grease 99000–25100 (SUZUKI Silicone
Grease)
• Tighten clutch master cylinder nut to specified torque.
Tightening torque
Clutch master cylinder nut: 13 N·m (1.3 kgf-m, 9.5
lb-ft)
Clutch Operating Cylinder Assembly Removal
and Installation
S6RW0D5306008
CAUTION!
• Do not allow fluid to get on painted
surfaces. It may cause painted surface
damage.
• Do not disassemble clutch operating
cylinder assembly.
Removal
1) Clean around reservoir cap of brake master cylinder
and take out fluid with syringe or such.
2) Dismount transaxle assembly referring to “Manual
Transaxle Unit Dismounting and Remounting in
Section 5B”.
3) Loosen clutch fluid pipe flare nut (1) of clutch
operating cylinder assembly (2).
4) Remove clutch pipe joint sleeve (3) from transaxle
and then remove clutch fluid pipe (4).
5) Remove clutch operating cylinder assembly from
transaxle.
3. Brake booster
1
3
2
4
I5RW0A530006-01
“A”
I5RW0A530007-01
3
4
2
1
I5RW0A530008-01
Page 859 of 1556

Downloaded from www.Manualslib.com manuals search engine Clutch: 5C-6
Installation
1) Install clutch operating cylinder assembly (2) to
transaxle. Tighten new mounting bolts to specified
torque.
Tightening torque
Clutch operating cylinder assembly mounting
bolt (a): 10 N·m (1.0 kgf-m, 7.5 lb-ft)
2) Connect clutch fluid pipe (4) to clutch operating
cylinder assembly temporarily.
3) Install clutch pipe joint sleeve (3) to transaxle
securely and then tighten clutch fluid pipe flare nut
(1) to specified torque.
Tightening torque
Clutch fluid pipe flare nut (b): 16 N·m (1.6 kgf-
m, 11.5 lb-ft)4) Remount transaxle assembly referring to “Manual
Transaxle Unit Dismounting and Remounting in
Section 5B”.
5) Bleed air from system and check clutch pedal free
travel. Refer to “Air Bleeding of Clutch System” and
“Clutch Pedal Inspection”.
Clutch Operating Cylinder Assembly InspectionS6RW0D5306013
Check clutch fluid leakage, spring for damage and
bearing for smooth rotation. If malfunction is found,
replace clutch operating cylinder assembly.
Clutch Cover, Clutch Disc and Flywheel ComponentsS6RW0D5306010
3
4
(a)
2
1, (b)
I5RW0A530009-01
I5RW0B530005-03
2
1
3(a)
6
4
5
(b)
I6RW0C530001-01
1. Clutch cover 4. Flywheel : 23 N⋅m (2.3 kgf-m, 17.0 lb-ft)
2. Clutch disc 5. Input shaft bearing : 70 N⋅m (7.0 kgf-m, 51.0 lb-ft)
3. Clutch cover bolt 6. Flywheel bolt : Do not reuse.
Page 860 of 1556

Downloaded from www.Manualslib.com manuals search engine 5C-7 Clutch:
Clutch Cover, Clutch Disc and Flywheel
Removal and Installation
S6RW0D5306011
Removal
1) Dismount manual transaxle assembly referring to
“Manual Transaxle Unit Dismounting and
Remounting in Section 5B”.
2) Hold flywheel with special tool and remove clutch
cover bolts (1), clutch cover (2) and clutch disc.
Special tool
(A): 09924–17811
3) Pull out input shaft bearing (1) from flywheel (2), use
the following special tool if necessary.
Special tool
(A): 09921–26020
(B): 09930–301044) Remove flywheel (1) from crankshaft using special
tool.
Special tool
(A): 09924–17810
Installation
NOTE
Before assembling, make sure that flywheel
surface and pressure plate surface have
been cleaned and dried thoroughly.
1) Install flywheel (2) to crankshaft and tighten new
bolts (1) to specification.
Special tool
(A): 09924–17810
Tightening torque
Flywheel bolt (a): 70 N·m (7.0 kgf-m, 51.0 lb-ft)
I4RS0A530014-01
I2RH01530023-01
I4RS0A530015-02
I2RH01530024-01
Page 861 of 1556

Downloaded from www.Manualslib.com manuals search engine Clutch: 5C-8
2) Using special tool, install input shaft bearing to
flywheel (1).
Special tool
(B): 09925–98210
3) Aligning clutch disc to flywheel center using special
tool, install clutch cover (1) and bolts (2). Then
tighten bolts (2) to specification.
NOTE
• While tightening clutch cover bolts,
compress clutch disc with special tool
(clutch center guide) by hand so that disc
is centered.
• Tighten cover bolts little by little evenly in
diagonal order.
Special tool
(A): 09924–17811
(B): 09923–36320
Tightening torque
Clutch cover bolt (a): 23 N·m (2.3 kgf-m, 17.0 lb-
ft)4) Slightly apply grease to input shaft (1), then join
manual transaxle assembly with engine referring to
“Manual Transaxle Unit Dismounting and
Remounting in Section 5B”.
“A”: Grease 99000–25210 (SUZUKI Super
Grease I)
NOTE
When inserting transaxle input shaft to clutch
disc, turn crankshaft little by little to match
the splines.
Clutch Cover, Clutch Disc and Flywheel
Inspection
S6RW0D5306012
Input Shaft Bearing
Check bearing (1) for smooth rotation and replace it if
abnormality is found.
I4RS0A530016-01
I4RS0A530017-01
1
“A”I5RW0A530013-01
I3RM0A530014-01
Page 1178 of 1556

Downloaded from www.Manualslib.com manuals search engine 9A-11 Wiring Systems:
Connector Layout Diagram
Connector Layout DiagramS6RW0D910A001
Refer to “Engine Compartment”.
Refer to “Instrument Panel”.
Refer to “Door, Roof”.
Refer to “Floor”.
Refer to “Rear”.
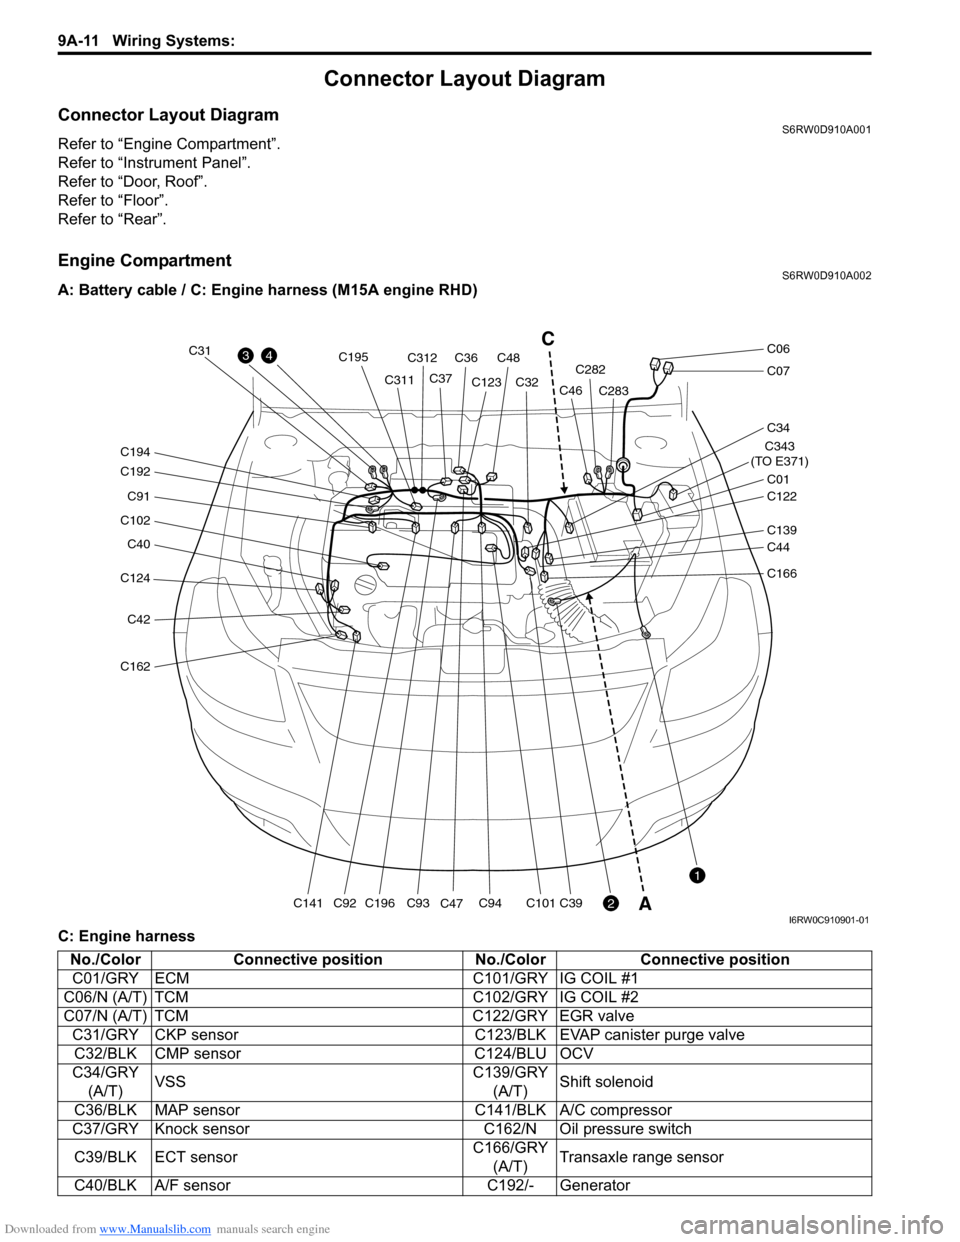
Engine CompartmentS6RW0D910A002
A: Battery cable / C: Engine harness (M15A engine RHD)
C: Engine harness
C124
C40
C102
C91
C192
C194
C42
C162
C141C196
C195
C93C94C101C39C92
C31
C311C312
C36C48
C37C123
C47C32C282
C283
C343
(TO E371)
C01
C34
C07
C06
C122
C46
C139
C44
C166
43
2
1
C
A
I6RW0C910901-01
No./Color Connective position No./Color Connective position
C01/GRY ECM C101/GRY IG COIL #1
C06/N (A/T) TCM C102/GRY IG COIL #2
C07/N (A/T) TCM C122/GRY EGR valve
C31/GRY CKP sensor C123/BLK EVAP canister purge valve
C32/BLK CMP sensor C124/BLU OCV
C34/GRY
(A/T)VSSC139/GRY
(A/T)Shift solenoid
C36/BLK MAP sensor C141/BLK A/C compressor
C37/GRY Knock sensor C162/N Oil pressure switch
C39/BLK ECT sensorC166/GRY
(A/T)Transaxle range sensor
C40/BLK A/F sensor C192/- Generator
Page 1180 of 1556

Downloaded from www.Manualslib.com manuals search engine 9A-13 Wiring Systems:
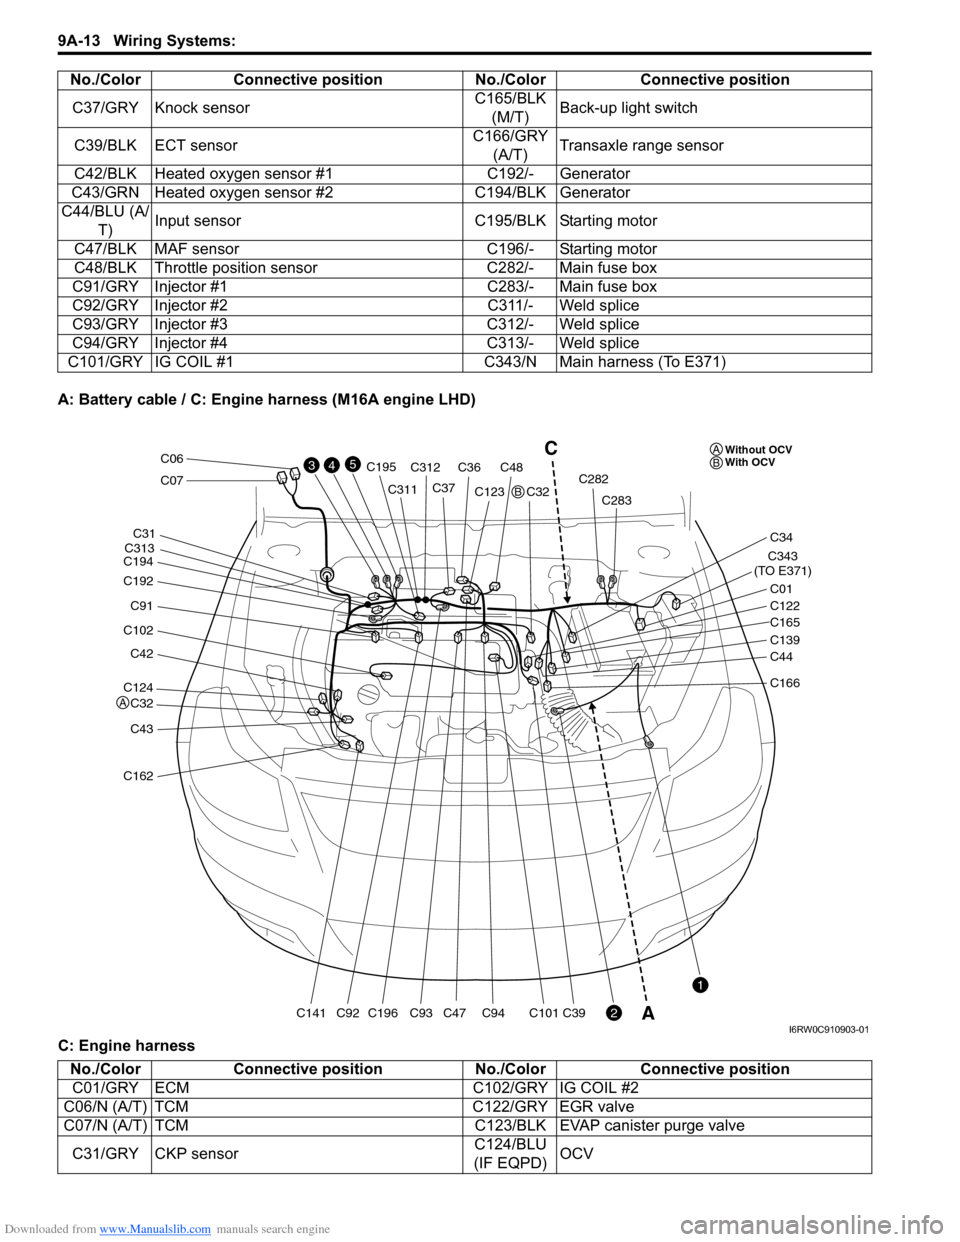
A: Battery cable / C: Engine harness (M16A engine LHD)
C: Engine harnessC37/GRY Knock sensorC165/BLK
(M/T)Back-up light switch
C39/BLK ECT sensorC166/GRY
(A/T)Transaxle range sensor
C42/BLK Heated oxygen sensor #1 C192/- Generator
C43/GRN Heated oxygen sensor #2 C194/BLK Generator
C44/BLU (A/
T)Input sensor C195/BLK Starting motor
C47/BLK MAF sensor C196/- Starting motor
C48/BLK Throttle position sensor C282/- Main fuse box
C91/GRY Injector #1 C283/- Main fuse box
C92/GRY Injector #2 C311/- Weld splice
C93/GRY Injector #3 C312/- Weld splice
C94/GRY Injector #4 C313/- Weld splice
C101/GRY IG COIL #1 C343/N Main harness (To E371)No./Color Connective position No./Color Connective position
C124
C32
C42
C102
C91
C192
C194
C43
C162
C141C196
C195
C93C94C101C39C92
C31
C311
C313C312
C36C48
C37C123
C47C32C282
C283
C343
(TO E371)
C01
C34
C07
C06
C122
C165
C139
C44
C166
43
2
1
5C
AWithout OCV
With OCV A
A
B
B
I6RW0C910903-01
No./Color Connective position No./Color Connective position
C01/GRY ECM C102/GRY IG COIL #2
C06/N (A/T) TCM C122/GRY EGR valve
C07/N (A/T) TCM C123/BLK EVAP canister purge valve
C31/GRY CKP sensorC124/BLU
(IF EQPD)OCV
Page 1181 of 1556

Downloaded from www.Manualslib.com manuals search engine Wiring Systems: 9A-14
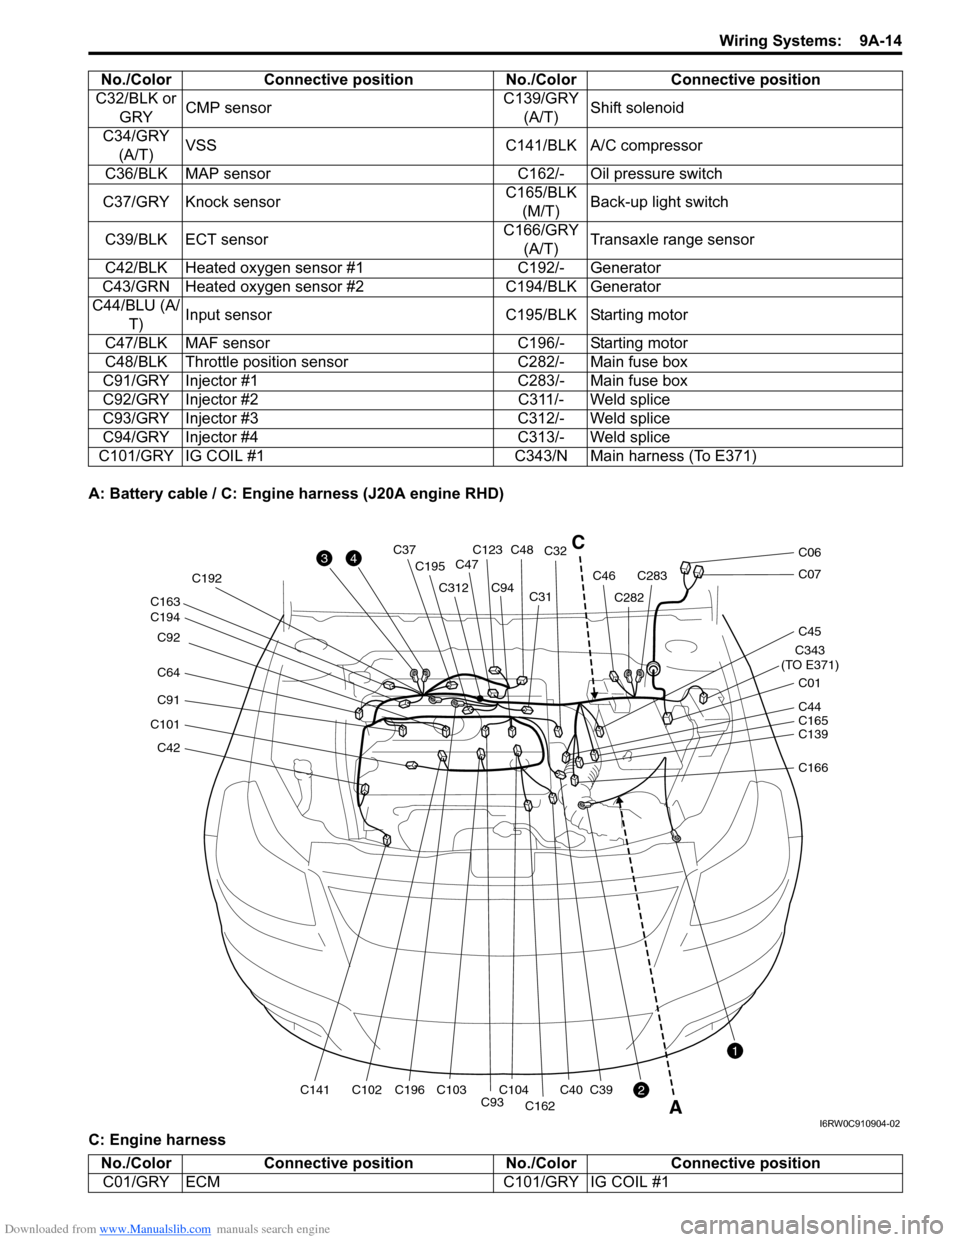
A: Battery cable / C: Engine harness (J20A engine RHD)
C: Engine harnessC32/BLK or
GRYCMP sensorC139/GRY
(A/T)Shift solenoid
C34/GRY
(A/T)VSS C141/BLK A/C compressor
C36/BLK MAP sensor C162/- Oil pressure switch
C37/GRY Knock sensorC165/BLK
(M/T)Back-up light switch
C39/BLK ECT sensorC166/GRY
(A/T)Transaxle range sensor
C42/BLK Heated oxygen sensor #1 C192/- Generator
C43/GRN Heated oxygen sensor #2 C194/BLK Generator
C44/BLU (A/
T)Input sensor C195/BLK Starting motor
C47/BLK MAF sensor C196/- Starting motor
C48/BLK Throttle position sensor C282/- Main fuse box
C91/GRY Injector #1 C283/- Main fuse box
C92/GRY Injector #2 C311/- Weld splice
C93/GRY Injector #3 C312/- Weld splice
C94/GRY Injector #4 C313/- Weld splice
C101/GRY IG COIL #1 C343/N Main harness (To E371)No./Color Connective position No./Color Connective position
C42
C101
C91
C64 C92
C194 C163
C141C102C196 C192
C195
C312
C93C104C103
C94C31C32
C40
C162
C39
C123C48C37
C47
C282
C283C46
C343
(TO E371)
C01
C45
C07
C06
C139 C44
C165
C166
3
2
1
4
A
C
I6RW0C910904-02
No./Color Connective position No./Color Connective position
C01/GRY ECM C101/GRY IG COIL #1