Page 282 of 1556
Downloaded from www.Manualslib.com manuals search engine 1C-14 Engine Electrical Devices:
Specifications
Tightening Torque SpecificationsS6RW0D1307001
Reference:
For the tightening torque of fastener not specified in this section, refer to “Fasteners Information in Section 0A”. Fastening partTightening torque
Note
N⋅mkgf-mlb-ft
ECM mounting bolt 8 0.8 6.0�)
ECT sensor 15 1.5 11.0�)
Heated oxygen sensor 45 4.5 32.5�)
CMP sensor bolt (non-VVT model) 10 1.0 7.5�)
CMP sensor bolt (VVT model) 11 1.1 8.0�)
CKP sensor bolt 11 1.1 8.0�)
Knock sensor 22 2.2 16.0�)
MAF and IAT sensor screw 1.5 0.15 1.1�)
Page 1158 of 1556

Downloaded from www.Manualslib.com manuals search engine 8B-119 Air Bag System:
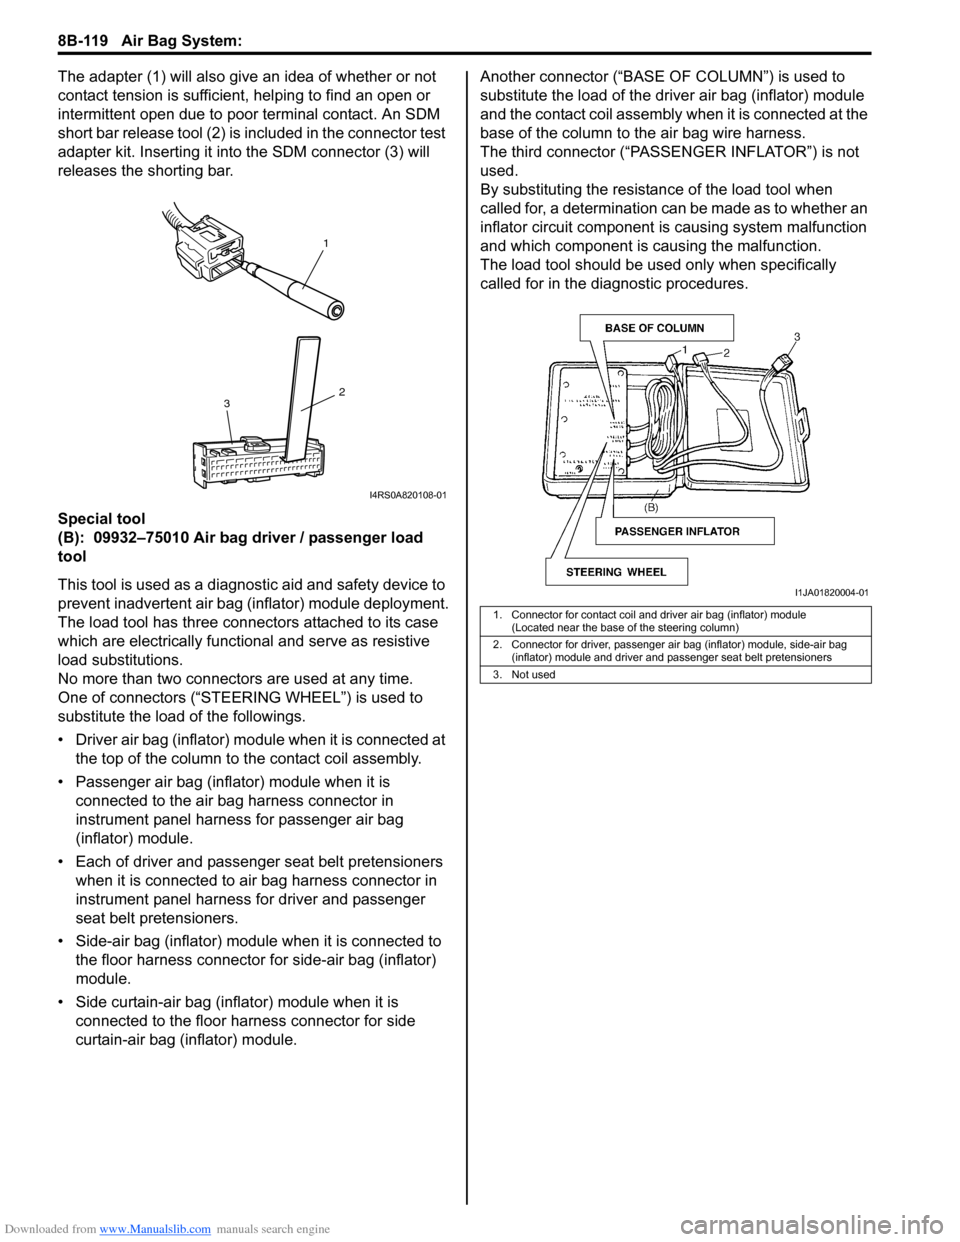
The adapter (1) will also give an idea of whether or not
contact tension is sufficient, helping to find an open or
intermittent open due to poor terminal contact. An SDM
short bar release tool (2) is included in the connector test
adapter kit. Inserting it into the SDM connector (3) will
releases the shorting bar.
Special tool
(B): 09932–75010 Air bag driver / passenger load
tool
This tool is used as a diagnostic aid and safety device to
prevent inadvertent air bag (inflator) module deployment.
The load tool has three connectors attached to its case
which are electrically functional and serve as resistive
load substitutions.
No more than two connectors are used at any time.
One of connectors (“STEERING WHEEL”) is used to
substitute the load of the followings.
• Driver air bag (inflator) module when it is connected at
the top of the column to the contact coil assembly.
• Passenger air bag (inflator) module when it is
connected to the air bag harness connector in
instrument panel harness for passenger air bag
(inflator) module.
• Each of driver and passenger seat belt pretensioners
when it is connected to air bag harness connector in
instrument panel harness for driver and passenger
seat belt pretensioners.
• Side-air bag (inflator) module when it is connected to
the floor harness connector for side-air bag (inflator)
module.
• Side curtain-air bag (inflator) module when it is
connected to the floor harness connector for side
curtain-air bag (inflator) module.Another connector (“BASE OF COLUMN”) is used to
substitute the load of the driver air bag (inflator) module
and the contact coil assembly when it is connected at the
base of the column to the air bag wire harness.
The third connector (“PASSENGER INFLATOR”) is not
used.
By substituting the resistance of the load tool when
called for, a determination can be made as to whether an
inflator circuit component is causing system malfunction
and which component is causing the malfunction.
The load tool should be used only when specifically
called for in the diagnostic procedures.
1
2
3
I4RS0A820108-01
1. Connector for contact coil and driver air bag (inflator) module
(Located near the base of the steering column)
2. Connector for driver, passenger air bag (inflator) module, side-air bag
(inflator) module and driver and passenger seat belt pretensioners
3. Not used
I1JA01820004-01
Page 1476 of 1556

Downloaded from www.Manualslib.com manuals search engine 10B-3 Body Electrical Control System:
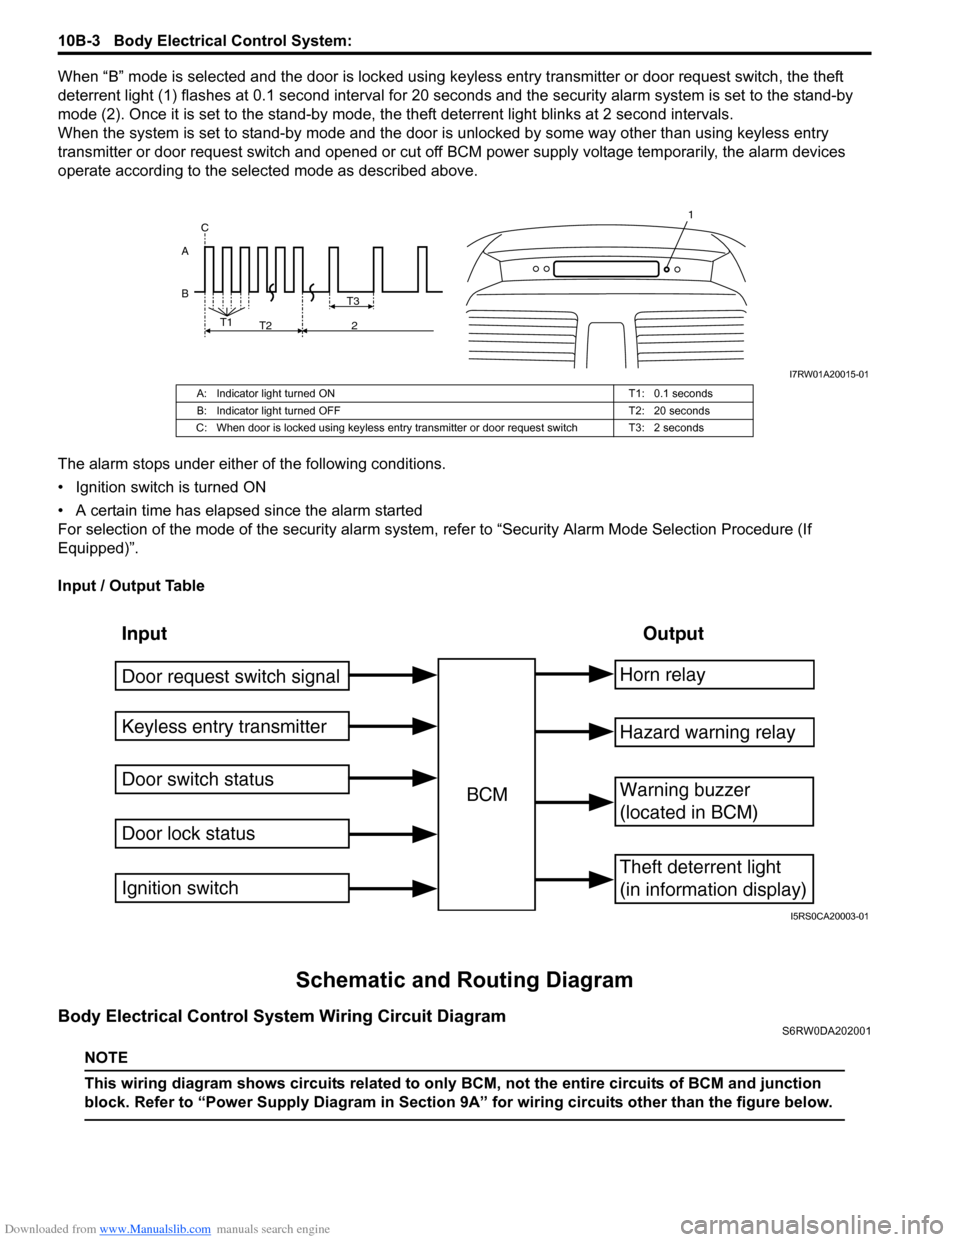
When “B” mode is selected and the door is locked using keyless entry transmitter or door request switch, the theft
deterrent light (1) flashes at 0.1 second interval for 20 seconds and the security alarm system is set to the stand-by
mode (2). Once it is set to the stand-by mode, the theft deterrent light blinks at 2 second intervals.
When the system is set to stand-by mode and the door is unlocked by some way other than using keyless entry
transmitter or door request switch and opened or cut off BCM power supply voltage temporarily, the alarm devices
operate according to the selected mode as described above.
The alarm stops under either of the following conditions.
• Ignition switch is turned ON
• A certain time has elapsed since the alarm started
For selection of the mode of the security alarm system, refer to “Security Alarm Mode Selection Procedure (If
Equipped)”.
Input / Output Table
Schematic and Routing Diagram
Body Electrical Control System Wiring Circuit DiagramS6RW0DA202001
NOTE
This wiring diagram shows circuits related to only BCM, not the entire circuits of BCM and junction
block. Refer to “Power Supply Diagram in Section 9A” for wiring circuits other than the figure below.
B AT3
T1
T2 2 C
1
I7RW01A20015-01
A: Indicator light turned ON T1: 0.1 seconds
B: Indicator light turned OFF T2: 20 seconds
C: When door is locked using keyless entry transmitter or door request switch T3: 2 seconds
Input Output
Keyless entry transmitter
Door switch status
Door lock statusBCMHorn relay
Theft deterrent light
(in information display)
Warning buzzer
(located in BCM)
Hazard warning relay
Door request switch signal
Ignition switch
I5RS0CA20003-01
Page:
< prev 1-8 9-16 17-24