2006 SUZUKI SX4 rear assembly
[x] Cancel search: rear assemblyPage 433 of 1556

Downloaded from www.Manualslib.com manuals search engine Table of Contents 2- i
2
Section 2
CONTENTS
Suspension
Precautions ................................................. 2-1
Precautions............................................................. 2-1
Precautions on Suspension .................................. 2-1
Suspension General Diagnosis.............. 2A-1
Diagnostic Information and Procedures ............ 2A-1
Suspension, Wheels and Tires Symptom
Diagnosis .......................................................... 2A-1
Specifications....................................................... 2A-3
Wheel Alignment Specifications .......................... 2A-3
Front Suspension .................................... 2B-1
General Description ............................................. 2B-1
Front Suspension Construction ........................... 2B-1
Front Wheel Alignment Construction .................. 2B-2
Repair Instructions .............................................. 2B-2
Front Wheel Alignment Inspection and
Adjustment ........................................................ 2B-2
Front Strut Assembly Components ..................... 2B-4
Front Strut Assembly Removal and
Installation ......................................................... 2B-5
Front Strut Assembly Disassembly and
Reassembly ...................................................... 2B-7
Front Strut Assembly Check ............................... 2B-8
Front Wheel Hub and Steering Knuckle
Components...................................................... 2B-9
Front Wheel Hub, Steering Knuckle and
Wheel Bearing Removal and Installation .......... 2B-9
Front Wheel Hub, Disc, Bolt and Bearing
Check .............................................................. 2B-14
Suspension Control Arm / Bushing Removal
and Installation ................................................ 2B-14
Suspension Control Arm / Bushing
Disassembly and Assembly ............................ 2B-15
Suspension Control Arm / Steering Knuckle
Check .............................................................. 2B-16
Suspension Control Arm Bushing Check .......... 2B-16
Suspension Control Arm Joint Check ............... 2B-16
Front Suspension Frame, Stabilizer Bar and/
or Bushing Components ................................. 2B-17
Front Suspension Frame, Stabilizer Bar and/
or Bushing Removal and Installation .............. 2B-18
Front Suspension Frame Check ....................... 2B-20
Front Stabilizer Bar, Bushing and/or Joint
Check .............................................................. 2B-20Front Suspension Fasteners Check .................. 2B-20
Specifications .....................................................2B-21
Tightening Torque Specifications ...................... 2B-21
Special Tools and Equipment ...........................2B-22
Recommended Service Material ....................... 2B-22
Special Tool ...................................................... 2B-22
Rear Suspension ..................................... 2C-1
Repair Instructions ..............................................2C-1
Rear Suspension Components ...........................2C-1
Rear Shock Absorber Removal and
Installation .........................................................2C-2
Rear Shock Absorber Inspection ........................2C-3
Rear Shock Absorber Bush Inspection ...............2C-3
Rear Coil Spring Removal and Installation .........2C-4
Spring Upper Seat / Spring Lower Seat
Inspection ..........................................................2C-5
Rear Axle Removal and Installation ....................2C-6
Rear Axle and Coil Spring Inspection .................2C-7
Rear Axle Bush Inspection ..................................2C-7
Rear Wheel Disc, Bolt and Bearing Inspection ....2C-7
Rear Wheel Hub Assembly Removal and
Installation .........................................................2C-8
Specifications .....................................................2C-10
Tightening Torque Specifications ......................2C-10
Wheels and Tires ..................................... 2D-1
General Description .............................................2D-1
Tires Description .................................................2D-1
Wheels Description .............................................2D-2
Irregular and/or Premature Wear Description .....2D-3
Wear Indicators Description ................................2D-3
Radial Tire Waddle Description...........................2D-3
Radial Tire Lead / Pull Description ......................2D-4
Balancing Wheels Description ............................2D-4
Repair Instructions ..............................................2D-5
Wheel Discs Inspection .......................................2D-5
Wheel Balance Inspection and Adjustment.........2D-5
Tire Rotation........................................................2D-5
Wheel (with Tire) Removal and Installation.........2D-6
Tire Mounting and Dismounting ..........................2D-6
Tire Repair ..........................................................2D-6
Specifications .......................................................2D-7
Wheels and Tires Specifications .........................2D-7
Tightening Torque Specifications ........................2D-7
Page 435 of 1556

Downloaded from www.Manualslib.com manuals search engine Suspension General Diagnosis: 2A-1
Suspension
Suspension General Diagnosis
Diagnostic Information and Procedures
Suspension, Wheels and Tires Symptom DiagnosisS6RW0D2104001
Condition Possible cause Correction / Reference Item
Vehicle pulls (Leads)Mismatched or uneven tiresReplace tires.
Tires not adequately inflatedAdjust tire pressure.
Broken or sagging coil springsReplace coil springs.
Radial tire lateral forceReplace tire.
Disturbed wheel alignmentCheck and adjust wheel alignment.
Brake dragging in one road wheelRepair brake.
Loose, bent or broken front or rear
suspension partsTighten or replace related suspension parts.
Abnormal or excessive
tire wearSagging or broken coil springReplace coil spring.
Tire out of balanceAdjust balance or replace tire.
Disturbed wheel alignmentCheck and adjust wheel alignment.
Faulty strut (shock absorber)Replace strut (shock absorber).
Hard drivingReplace tires.
Overloaded vehicleReplace tires.
Not rotated tiresReplace or rotate tires.
Worn or loose wheel bearingReplace wheel bearing.
Wobbly wheel or tireReplace wheel or tire.
Tires not adequately inflatedAdjust tire pressure.
Front suspension frame and/or
suspension control arm are transformedCheck and replace.
Wheel trampBlister or bump on tireReplace tire.
Improper strut (shock absorber) actionReplace strut (shock absorber).
Shimmy, shake or
vibrationTire or wheel out of balanceBalance wheel or replace tire and/or wheel.
Loosen wheel bearingsReplace wheel bearings.
Worn tie-rod endsReplace tie-rod ends.
Worn lower ball jointsReplace suspension control arm.
Excessive wheel runoutRepair or replace wheel and/or tire.
Blister or bump on tireReplace tire.
Excessively loaded radial runout of tire /
wheel assemblyReplace tire or wheel.
Disturbed wheel alignmentCheck and adjust wheel alignment.
Loose or worn steering linkageTighten or replace steering linkage.
Abnormal noise, front endWorn, sticky or loose tie-rod ends, lower
ball joints, tie-rod inside ball joints or
drive shaft jointsReplace tie-rod end, suspension arm, tie-rod
or drive shaft joint.
Damaged struts or mountingsRepair or replace struts or mountings.
Worn suspension arm bushingsReplace suspension arm bushings.
Loose stabilizer barTighten bolts or nuts and/or replace bushes.
Loose wheel boltsTighten wheel bolts.
Loose suspension bolts or nutsTighten suspension bolts or nuts.
Broken or damaged wheel bearingsReplace wheel bearings.
Broken suspension springsReplace suspension springs.
Worn strut bearingsReplace strut bearing.
Malfunction of Power Steering SystemCheck and correct malfunction.
Low or uneven trim height
NOTE
See NOTE *1.
Broken or sagging coil springsReplace coil springs.
Over loadedCheck loading.
Incorrect coil springsReplace coil spring.
Tires not adequately inflatedAdjust tire pressure.
Ride too softFaulty strut (shock absorber)Replace strut (shock absorber).
Suspension bottomsOverloadedCheck loading.
Faulty strut (shock absorber)Replace strut (shock absorber).
Incorrect, broken or sagging coil springsReplace coil spring.
Page 442 of 1556

Downloaded from www.Manualslib.com manuals search engine 2B-5 Front Suspension:
Front Strut Assembly Removal and InstallationS6RW0D2206003
CAUTION!
When rebound stopper and strut assembly
were removed, check strut support lower nut
for specified torque before installing strut
assembly.
Removal
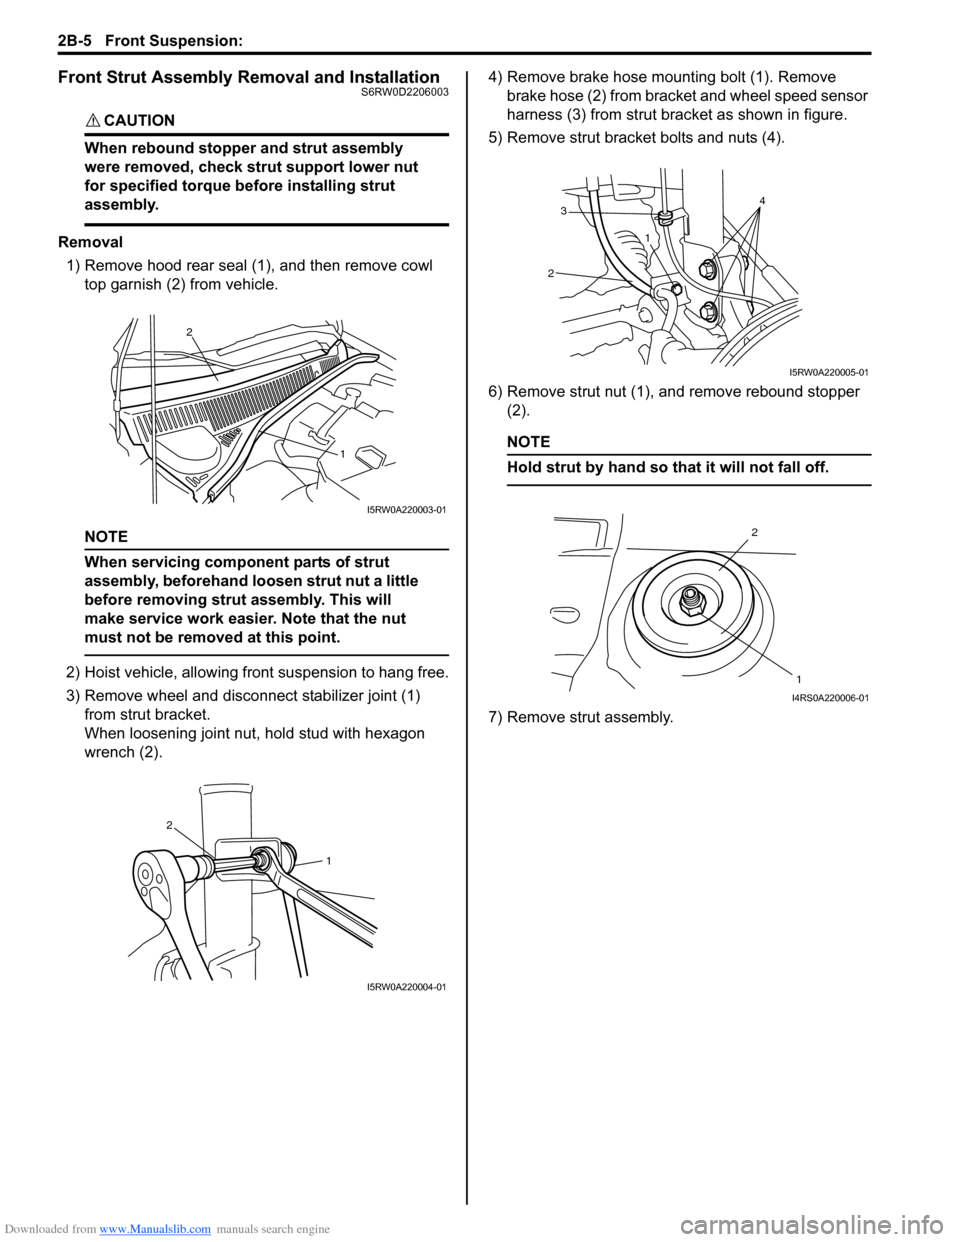
1) Remove hood rear seal (1), and then remove cowl
top garnish (2) from vehicle.
NOTE
When servicing component parts of strut
assembly, beforehand loosen strut nut a little
before removing strut assembly. This will
make service work easier. Note that the nut
must not be removed at this point.
2) Hoist vehicle, allowing front suspension to hang free.
3) Remove wheel and disconnect stabilizer joint (1)
from strut bracket.
When loosening joint nut, hold stud with hexagon
wrench (2).4) Remove brake hose mounting bolt (1). Remove
brake hose (2) from bracket and wheel speed sensor
harness (3) from strut bracket as shown in figure.
5) Remove strut bracket bolts and nuts (4).
6) Remove strut nut (1), and remove rebound stopper
(2).
NOTE
Hold strut by hand so that it will not fall off.
7) Remove strut assembly.
2
1
I5RW0A220003-01
1
2
I5RW0A220004-01
3
214
I5RW0A220005-01
2
1
I4RS0A220006-01
Page 455 of 1556

Downloaded from www.Manualslib.com manuals search engine Front Suspension: 2B-18
Front Suspension Frame, Stabilizer Bar and/or
Bushing Removal and Installation
S6RW0D2206015
WARNING!
When supporting and installing front
suspension frame, be sure to apply some
supporting equipment (such as mission jack)
at well-balanced position in the center
section of front suspension frame so as to
prevent from its drop. Otherwise drop and
injure.
CAUTION!
When removal and installing suspension
control arm, be careful not to damage dust
boots of suspension control arm joint by
drive shaft dust cover and brake dust cover.
Removal
1) Disconnect negative (–) cable at battery.
2) Remove air cleaner assembly referring to “Air
Cleaner Assembly Removal and Installation in
Section 1D”.
3) Remove hood referring to “Hood Removal and
Installation in Section 9J”.
4) Hoist vehicle and remove front wheels.
5) Remove exhaust No.1, No.2 and center pipes
referring to “Exhaust System Components in Section
1K”.
6) Remove steering gear case mounting bolt referring
to “Steering Gear Case Assembly Components in
Section 6C”.
7) Fix steering gear case to body with rope to avoid the
steering gear case fall off when front suspension
frame is lowered.
8) Remove suspension control arms and disconnect
stabilizer joints.
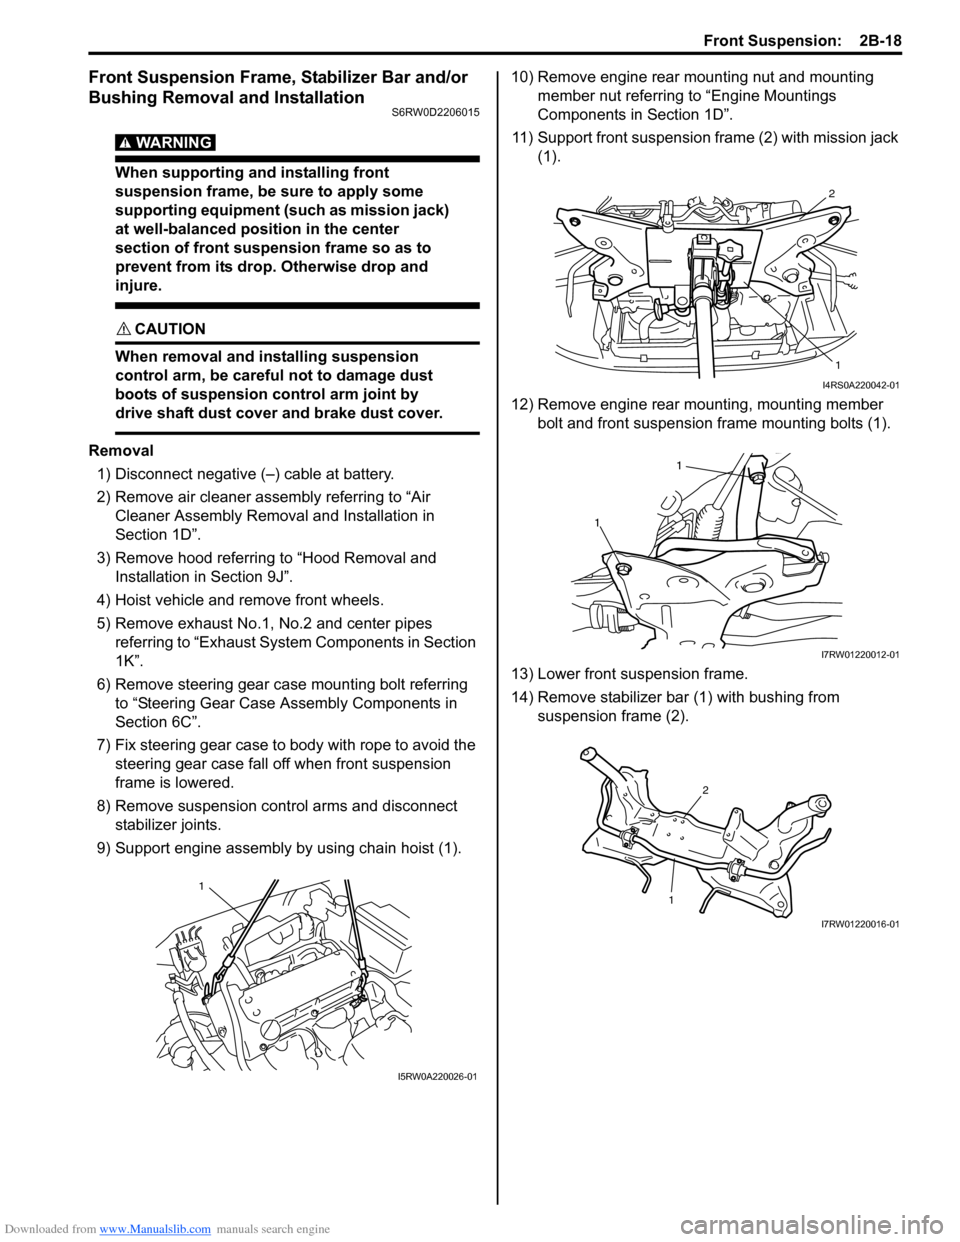
9) Support engine assembly by using chain hoist (1).10) Remove engine rear mounting nut and mounting
member nut referring to “Engine Mountings
Components in Section 1D”.
11) Support front suspension frame (2) with mission jack
(1).
12) Remove engine rear mounting, mounting member
bolt and front suspension frame mounting bolts (1).
13) Lower front suspension frame.
14) Remove stabilizer bar (1) with bushing from
suspension frame (2).
1
I5RW0A220026-01
2
1
I4RS0A220042-01
1
1
I7RW01220012-01
12
I7RW01220016-01
Page 456 of 1556

Downloaded from www.Manualslib.com manuals search engine 2B-19 Front Suspension:
Installation
1) Install stabilizer bar (1), stabilizer bushing (2) and
stabilizer mounting bracket (3) to front suspension
frame as shown in figure while ensuring that
stabilizer is centered, side-to-side.
NOTE
• For proper installing direction of stabilizer
mounting bracket (3), place oblong to rear
and circular hole to front.
• For correct installation of stabilizer bar,
side-to-side, be sure that stopper ring (4)
on stabilizer bar aligns with mounting
bush, both right and left, as shown in
figure.
2) Tighten stabilizer bar mounting bracket bolts to
specified torque.
NOTE
Tighten stabilizer bar mounting bracket rear
bolt (5) after front bolt (6).
Tightening torque
Stabilizer bar mounting bracket bolt (a): Tighten
23 N⋅m (2.3 kgf-m, 17.0 lb-ft) to specified
procedure
3) Support front suspension frame (2) with mission jack
(1) and jack up it.4) Align lugs (1) (right and left) of front suspension
frame with whole (2) in vehicle body.
5) Tighten front suspension frame bolts to specified
torque.
Tightening torque
Front suspension frame mounting bolt: 150 N·m
(15.0 kgf-m, 108.5 lb-ft)
6) Remove mission jack from front suspension frame.
7) Install engine rear mounting and tighten mounting
member bolts referring to “Engine Mountings
Components in Section 1D”.
8) Remove chain hoist from engine assembly.
9) Tighten steering gear case mounting bolts referring
to “Steering Gear Case Assembly Components in
Section 6C”.
10) Install suspension control arms referring to
“Suspension Control Arm / Bushing Removal and
Installation”.
11) Install stabilizer joint (1) and tighten nut to specified
torque.
When tightening nut, hold stud with hexagon wrench
(2).
Tightening torque
Stabilizer joint nut (a): 50 N·m (5.0 kgf-m, 36.5
lb-ft)
1
F
3
4
5,(a)
6,(a)
2
I5RW0A220029-02
2
1
I4RS0A220042-01
2
1
I5RW0A220030-01
1 2
(a)
I5RW0A220033-01
Page 460 of 1556

Downloaded from www.Manualslib.com manuals search engine 2C-1 Rear Suspension:
Suspension
Rear Suspension
Repair Instructions
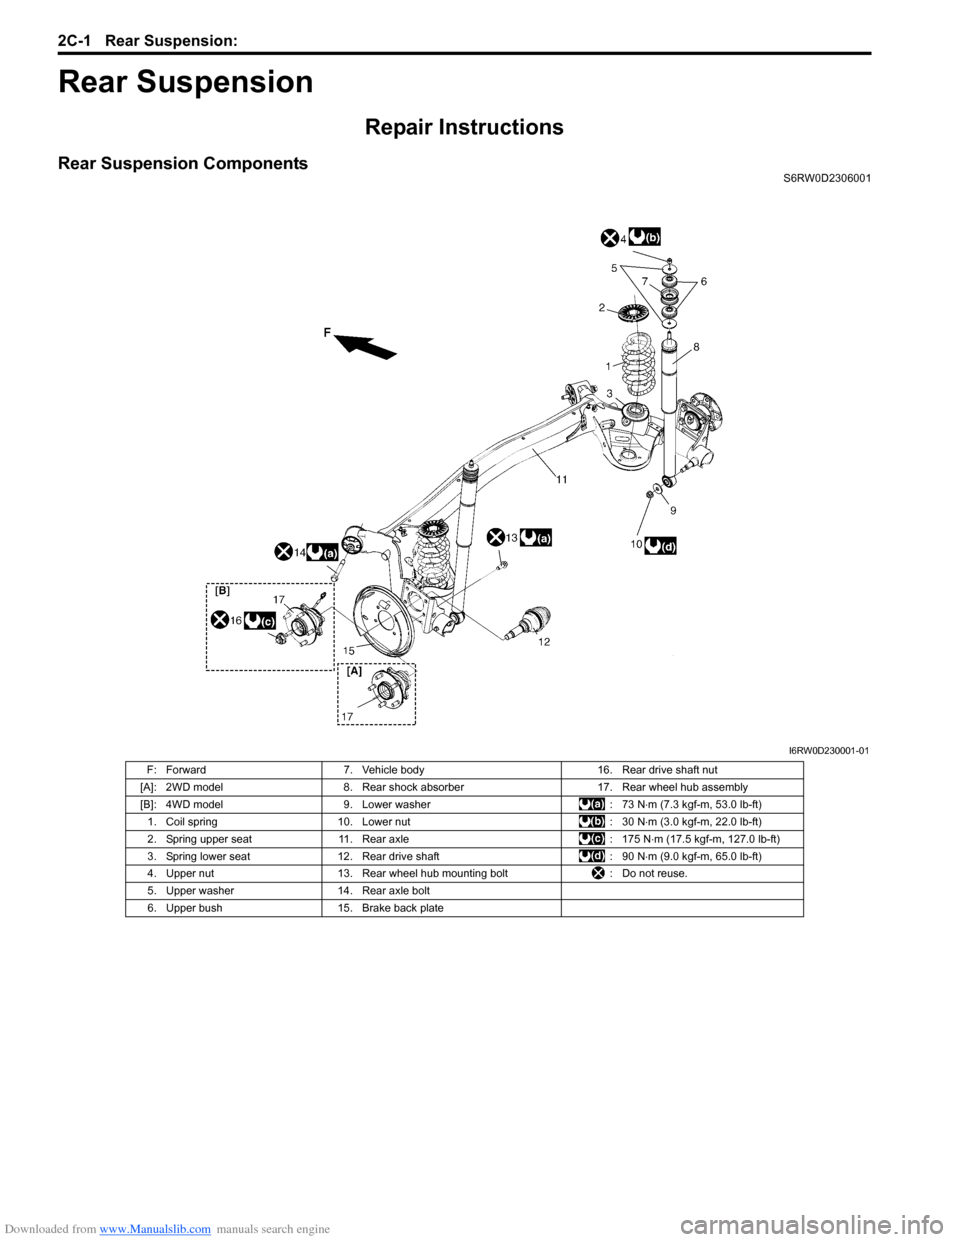
Rear Suspension ComponentsS6RW0D2306001
I6RW0D230001-01
F: Forward 7. Vehicle body 16. Rear drive shaft nut
[A]: 2WD model 8. Rear shock absorber 17. Rear wheel hub assembly
[B]: 4WD model 9. Lower washer : 73 N⋅m (7.3 kgf-m, 53.0 lb-ft)
1. Coil spring 10. Lower nut : 30 N⋅m (3.0 kgf-m, 22.0 lb-ft)
2. Spring upper seat 11. Rear axle : 175 N⋅m (17.5 kgf-m, 127.0 lb-ft)
3. Spring lower seat 12. Rear drive shaft : 90 N⋅m (9.0 kgf-m, 65.0 lb-ft)
4. Upper nut 13. Rear wheel hub mounting bolt : Do not reuse.
5. Upper washer 14. Rear axle bolt
6. Upper bush 15. Brake back plate
Page 465 of 1556

Downloaded from www.Manualslib.com manuals search engine Rear Suspension: 2C-6
Rear Axle Removal and InstallationS6RW0D2306007
CAUTION!
Do not drop brake fluid onto painted surface.
Painted surfaces will be damaged.
Removal
1) Hoist vehicle and remove exhaust center pipe and
muffler.
2) Disconnect rear height sensor link (if equipped) from
rear axle referring to “Height Sensor Removal and
Installation (If Equipped) in Section 9B”.
3) Remove rear wheel, rear brake drum and rear wheel
hub referring to “Removal” under “Rear Wheel Hub
Assembly Removal and Installation”.
4) Disconnect brake pipe (1) from brake flexible hoses
(2) and remove E-rings (3).
5) Remove coil springs referring to “Rear Coil Spring
Removal and Installation”.
6) Disconnect wheel speed sensor clamp (1) and
parking brake cable nuts (2) from rear axle.
7) While supporting rear axle at both ends, remove rear
axle bolts and then remove rear axle from chassis by
lowering floor jack gradually.
8) Remove brake pipes from rear axle, if necessary.Installation
CAUTION!
Never reuse rear axle bolts and rear wheel
hub mounting bolts.
1) Install brake pipes to rear axle, if removed.
2) Using floor jacks, install rear axle and new rear axle
bolts (1) and tighten bolts temporarily.
3) Install coil spring referring to “Rear Coil Spring
Removal and Installation”.
4) Install rear wheel hub and wheel speed sensor
referring to “Installation” under “Rear Wheel Hub
Assembly Removal and Installation”.
5) Connect brake flexible hoses (1) to bracket on rear
axle with E-ring (2) and tighten brake pipe flare nuts
(3) to specified torque.
Tightening torque
Brake pipe flare nut (a): 16 N·m (1.6 kgf-m, 11.5
lb-ft)
1 3
2
I5RW0A230013-01
2
1
I5RW0A230015-01
1
I5RW0A230017-01
2
1
3,(a)
I5RW0A230019-01
Page 466 of 1556

Downloaded from www.Manualslib.com manuals search engine 2C-7 Rear Suspension:
6) Connect rear height sensor link (if equipped) to rear
axle referring to “Height Sensor Removal and
Installation (If Equipped) in Section 9B”.
7) Install exhaust center pipe and muffler.
8) After installing removed parts, bleed air from brake
system referring to “Air Bleeding of Brake System in
Section 4A”. And then adjust parking brake cable
referring to “Parking Brake Inspection and
Adjustment in Section 4D”.
9) Install wheel and tighten wheel nuts to specified
torque.
Tightening torque
Wheel nut: 85 N·m (8.5 kgf-m, 61.5 lb-ft)
10) Lower hoist and bounce vehicle up and down
several times to stabilize suspension.
11) Tightening shock absorber lower nuts and rear axle
bolts to specified torque.
NOTE
When tightening these nuts and bolts, be
sure that vehicle is not on hoist and in
unloaded condition.
Tightening torque
Rear shock absorber lower nut: 90 N·m (9.0 kgf-
m, 65.0 lb-ft)
Rear axle bolt: 73 N·m (7.3 kgf-m, 53.0 lb-ft)
12) Perform brake test (foot brake and parking brake).
13) Check each installed parts for brake fluid leakage.
Rear Axle and Coil Spring InspectionS6RW0D2306009
• Inspect for cracks, deformation or damage.
• Inspect bushing for damage, wear or breakage.
Replace any defective part.
Rear Axle Bush InspectionS6RW0D2306010
Inspect for cracks, deformation or damage. If necessary,
replace rear axle assembly.
Rear Wheel Disc, Bolt and Bearing InspectionS6RW0D2306011
• Check tightness of wheel nuts and, if necessary,
retighten to specified torque.
• Check wheel disc deformation, damage, crack and
etc.
Replace defective disc with new one.
• Check installation face inside of wheel disc for rust.
As rust affects adversely, remove it thoroughly.
Tightening torque
Wheel nut: 85 N·m (8.5 kgf-m, 61.5 lb-ft)
• Check wear of wheel bearings. When measuring
thrust play, apply a dial gauge to axle shaft center.
When the thrust play exceeds limit, replace bearing.
Rear wheel bearing thrust play
Limit: 0.1 mm (0.004 in.)
• Check noise and smooth rotation of wheel by rotating
wheel. If it is defective, replace bearing.
(a)I5RW0A230022-01
I3RM0A230049-01
I3RM0A230050-01