2006 SUZUKI SX4 1d 60
[x] Cancel search: 1d 60Page 1449 of 1556
Downloaded from www.Manualslib.com manuals search engine Body Structure: 9K-5
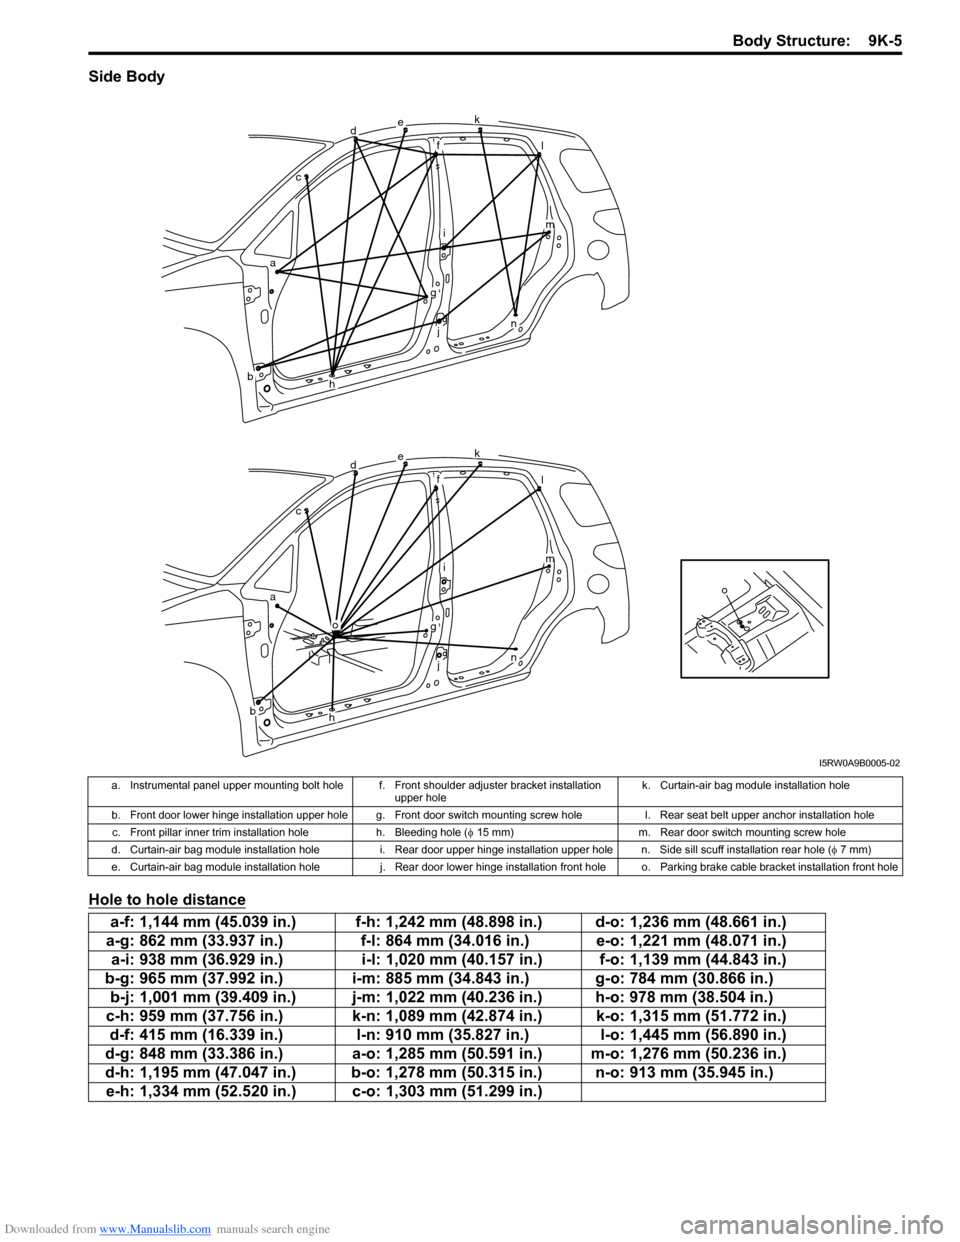
Side Body
Hole to hole distance
o
dek
fl
im
n
g
j
h
o
ac
b
dek
fl
im
n
g
j
h
ac
b
I5RW0A9B0005-02
a. Instrumental panel upper mounting bolt hole f. Front shoulder adjuster bracket installation
upper holek. Curtain-air bag module installation hole
b. Front door lower hinge installation upper hole g. Front door switch mounting screw hole l. Rear seat belt upper anchor installation hole
c. Front pillar inner trim installation hole h. Bleeding hole (φ 15 mm) m. Rear door switch mounting screw hole
d. Curtain-air bag module installation hole i. Rear door upper hinge installation upper hole n. Side sill scuff installation rear hole (φ 7 mm)
e. Curtain-air bag module installation hole j. Rear door lower hinge installation front hole o. Parking brake cable bracket installation front hole
a-f: 1,144 mm (45.039 in.) f-h: 1,242 mm (48.898 in.) d-o: 1,236 mm (48.661 in.)
a-g: 862 mm (33.937 in.) f-l: 864 mm (34.016 in.) e-o: 1,221 mm (48.071 in.)
a-i: 938 mm (36.929 in.) i-l: 1,020 mm (40.157 in.) f-o: 1,139 mm (44.843 in.)
b-g: 965 mm (37.992 in.) i-m: 885 mm (34.843 in.) g-o: 784 mm (30.866 in.)
b-j: 1,001 mm (39.409 in.) j-m: 1,022 mm (40.236 in.) h-o: 978 mm (38.504 in.)
c-h: 959 mm (37.756 in.) k-n: 1,089 mm (42.874 in.) k-o: 1,315 mm (51.772 in.)
d-f: 415 mm (16.339 in.) l-n: 910 mm (35.827 in.) l-o: 1,445 mm (56.890 in.)
d-g: 848 mm (33.386 in.) a-o: 1,285 mm (50.591 in.) m-o: 1,276 mm (50.236 in.)
d-h: 1,195 mm (47.047 in.) b-o: 1,278 mm (50.315 in.) n-o: 913 mm (35.945 in.)
e-h: 1,334 mm (52.520 in.) c-o: 1,303 mm (51.299 in.)
Page 1450 of 1556
Downloaded from www.Manualslib.com manuals search engine 9K-6 Body Structure:
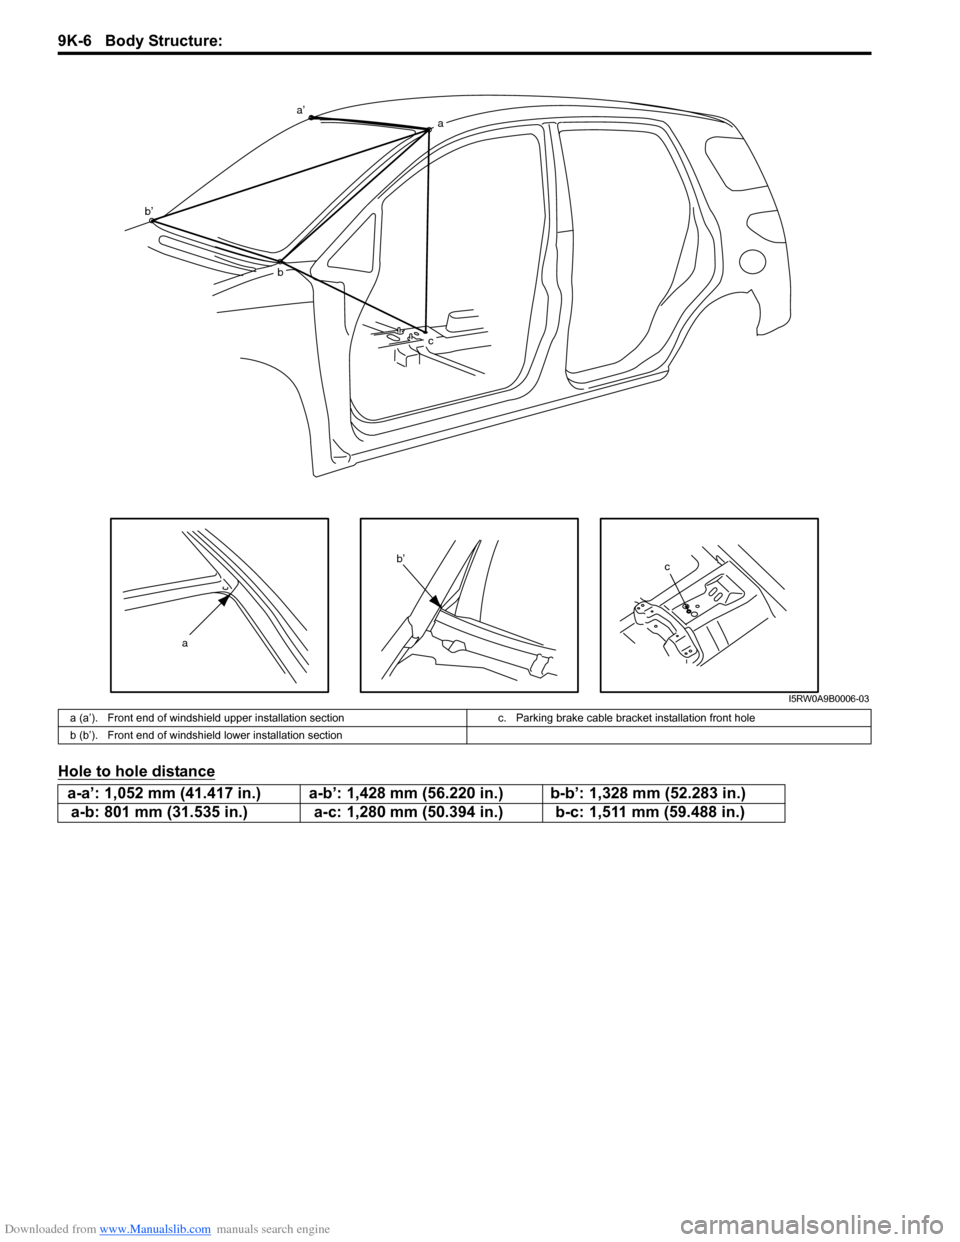
Hole to hole distance
c
a
a’a
b b’
c
b’
I5RW0A9B0006-03
a (a’). Front end of windshield upper installation section c. Parking brake cable bracket installation front hole
b (b’). Front end of windshield lower installation section
a-a’: 1,052 mm (41.417 in.) a-b’: 1,428 mm (56.220 in.) b-b’: 1,328 mm (52.283 in.)
a-b: 801 mm (31.535 in.) a-c: 1,280 mm (50.394 in.) b-c: 1,511 mm (59.488 in.)
Page 1451 of 1556
Downloaded from www.Manualslib.com manuals search engine Body Structure: 9K-7
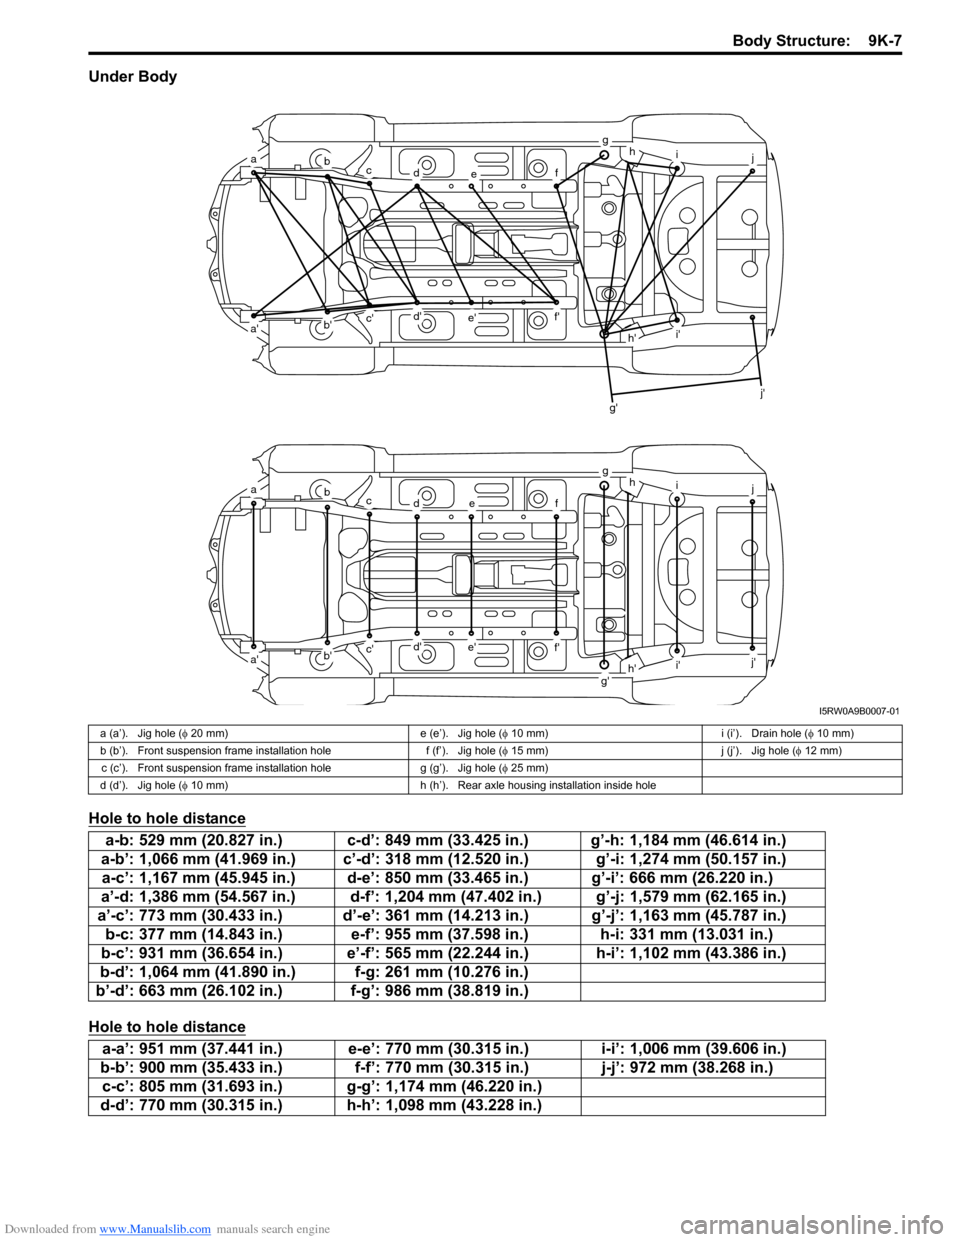
Under Body
Hole to hole distance
Hole to hole distance
abcdef
ghij
a'b'c'd'e'f'
g'
h'i'
j'
abcdef
ghij
a'b'c'd'e'f'
g'h'i'j'
I5RW0A9B0007-01
a (a’). Jig hole (φ 20 mm) e (e’). Jig hole (φ 10 mm) i (i’). Drain hole (φ 10 mm)
b (b’). Front suspension frame installation hole f (f’). Jig hole (φ 15 mm) j (j’). Jig hole (φ 12 mm)
c (c’). Front suspension frame installation hole g (g’). Jig hole (φ 25 mm)
d (d’). Jig hole (φ 10 mm) h (h’). Rear axle housing installation inside hole
a-b: 529 mm (20.827 in.) c-d’: 849 mm (33.425 in.) g’-h: 1,184 mm (46.614 in.)
a-b’: 1,066 mm (41.969 in.) c’-d’: 318 mm (12.520 in.) g’-i: 1,274 mm (50.157 in.)
a-c’: 1,167 mm (45.945 in.) d-e’: 850 mm (33.465 in.) g’-i’: 666 mm (26.220 in.)
a’-d: 1,386 mm (54.567 in.) d-f’: 1,204 mm (47.402 in.) g’-j: 1,579 mm (62.165 in.)
a’-c’: 773 mm (30.433 in.) d’-e’: 361 mm (14.213 in.) g’-j’: 1,163 mm (45.787 in.)
b-c: 377 mm (14.843 in.) e-f’: 955 mm (37.598 in.) h-i: 331 mm (13.031 in.)
b-c’: 931 mm (36.654 in.) e’-f’: 565 mm (22.244 in.) h-i’: 1,102 mm (43.386 in.)
b-d’: 1,064 mm (41.890 in.) f-g: 261 mm (10.276 in.)
b’-d’: 663 mm (26.102 in.) f-g’: 986 mm (38.819 in.)
a-a’: 951 mm (37.441 in.) e-e’: 770 mm (30.315 in.) i-i’: 1,006 mm (39.606 in.)
b-b’: 900 mm (35.433 in.) f-f’: 770 mm (30.315 in.) j-j’: 972 mm (38.268 in.)
c-c’: 805 mm (31.693 in.) g-g’: 1,174 mm (46.220 in.)
d-d’: 770 mm (30.315 in.) h-h’: 1,098 mm (43.228 in.)
Page 1452 of 1556
Downloaded from www.Manualslib.com manuals search engine 9K-8 Body Structure:
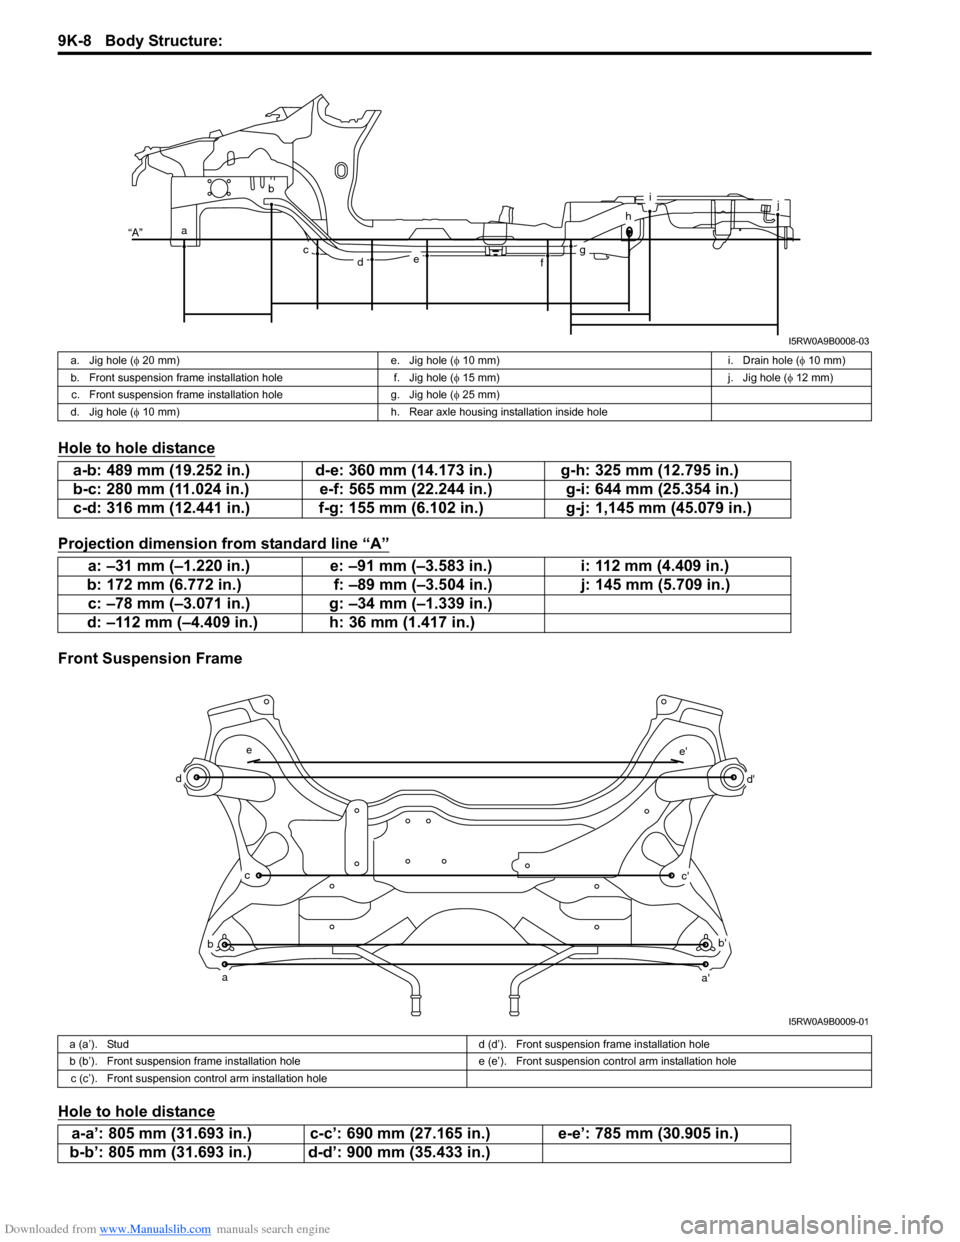
Hole to hole distance
Projection dimension from standard line “A”
Front Suspension Frame
Hole to hole distance
a
b
cdefg
h
ij
“A”
I5RW0A9B0008-03
a. Jig hole (φ 20 mm) e. Jig hole (φ 10 mm) i. Drain hole (φ 10 mm)
b. Front suspension frame installation hole f. Jig hole (φ 15 mm) j. Jig hole (φ 12 mm)
c. Front suspension frame installation hole g. Jig hole (φ 25 mm)
d. Jig hole (φ 10 mm) h. Rear axle housing installation inside hole
a-b: 489 mm (19.252 in.) d-e: 360 mm (14.173 in.) g-h: 325 mm (12.795 in.)
b-c: 280 mm (11.024 in.) e-f: 565 mm (22.244 in.) g-i: 644 mm (25.354 in.)
c-d: 316 mm (12.441 in.) f-g: 155 mm (6.102 in.) g-j: 1,145 mm (45.079 in.)
a: –31 mm (–1.220 in.) e: –91 mm (–3.583 in.) i: 112 mm (4.409 in.)
b: 172 mm (6.772 in.) f: –89 mm (–3.504 in.) j: 145 mm (5.709 in.)
c: –78 mm (–3.071 in.) g: –34 mm (–1.339 in.)
d: –112 mm (–4.409 in.) h: 36 mm (1.417 in.)
a
b
c
d
e
a'
b'
c'
d'
e'
I5RW0A9B0009-01
a (a’). Studd (d’). Front suspension frame installation hole
b (b’). Front suspension frame installation hole e (e’). Front suspension control arm installation hole
c (c’). Front suspension control arm installation hole
a-a’: 805 mm (31.693 in.) c-c’: 690 mm (27.165 in.) e-e’: 785 mm (30.905 in.)
b-b’: 805 mm (31.693 in.) d-d’: 900 mm (35.433 in.)
Page 1453 of 1556
Downloaded from www.Manualslib.com manuals search engine Body Structure: 9K-9
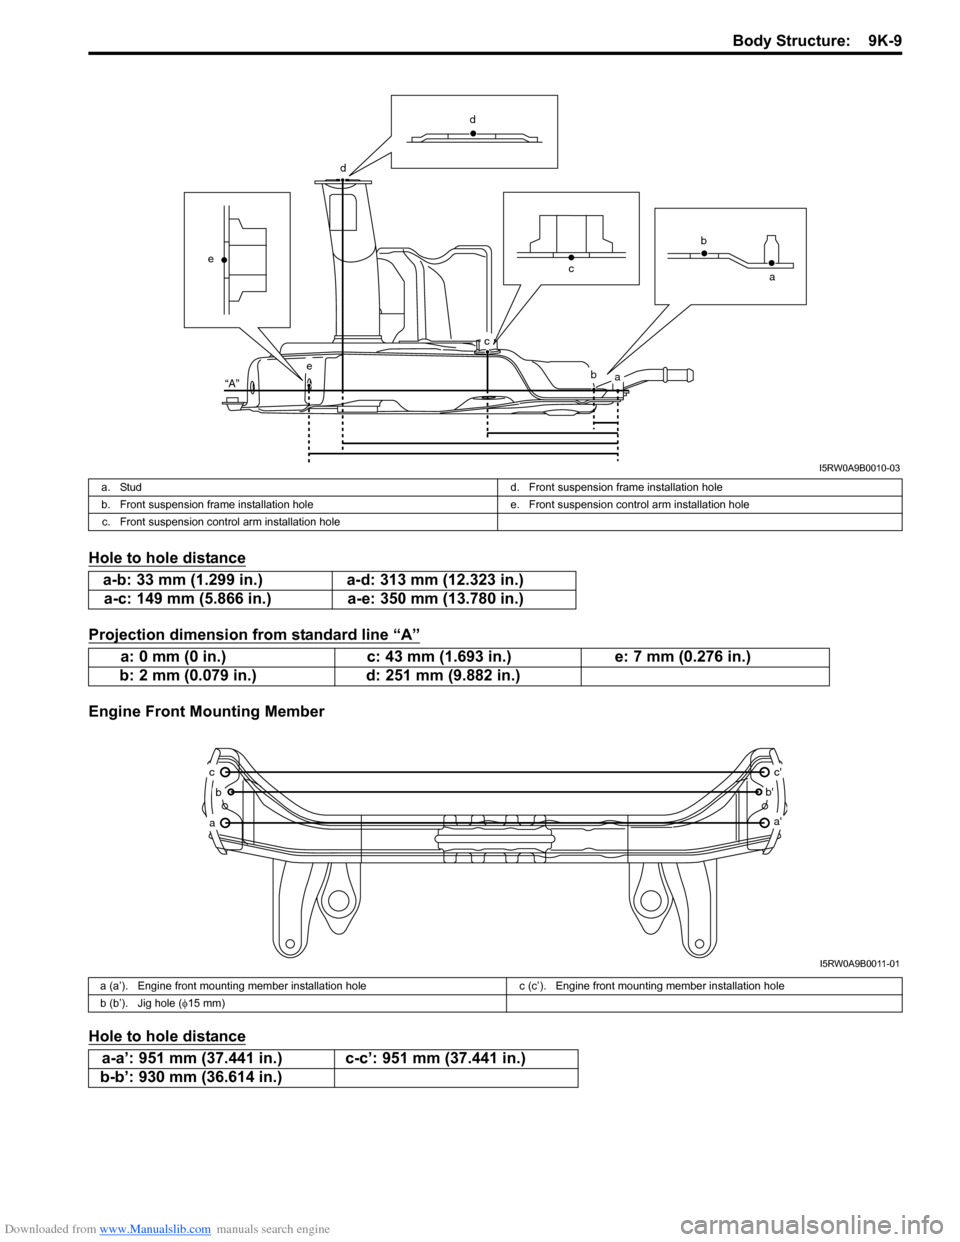
Hole to hole distance
Projection dimension from standard line “A”
Engine Front Mounting Member
Hole to hole distance
ab
c
d
e
“A”
e
d
ca b
I5RW0A9B0010-03
a. Studd. Front suspension frame installation hole
b. Front suspension frame installation hole e. Front suspension control arm installation hole
c. Front suspension control arm installation hole
a-b: 33 mm (1.299 in.) a-d: 313 mm (12.323 in.)
a-c: 149 mm (5.866 in.) a-e: 350 mm (13.780 in.)
a: 0 mm (0 in.) c: 43 mm (1.693 in.) e: 7 mm (0.276 in.)
b: 2 mm (0.079 in.) d: 251 mm (9.882 in.)
a
b
c
a'
b'
c'
I5RW0A9B0011-01
a (a’). Engine front mounting member installation hole c (c’). Engine front mounting member installation hole
b (b’). Jig hole (φ15 mm)
a-a’: 951 mm (37.441 in.) c-c’: 951 mm (37.441 in.)
b-b’: 930 mm (36.614 in.)
Page 1454 of 1556
Downloaded from www.Manualslib.com manuals search engine 9K-10 Body Structure:
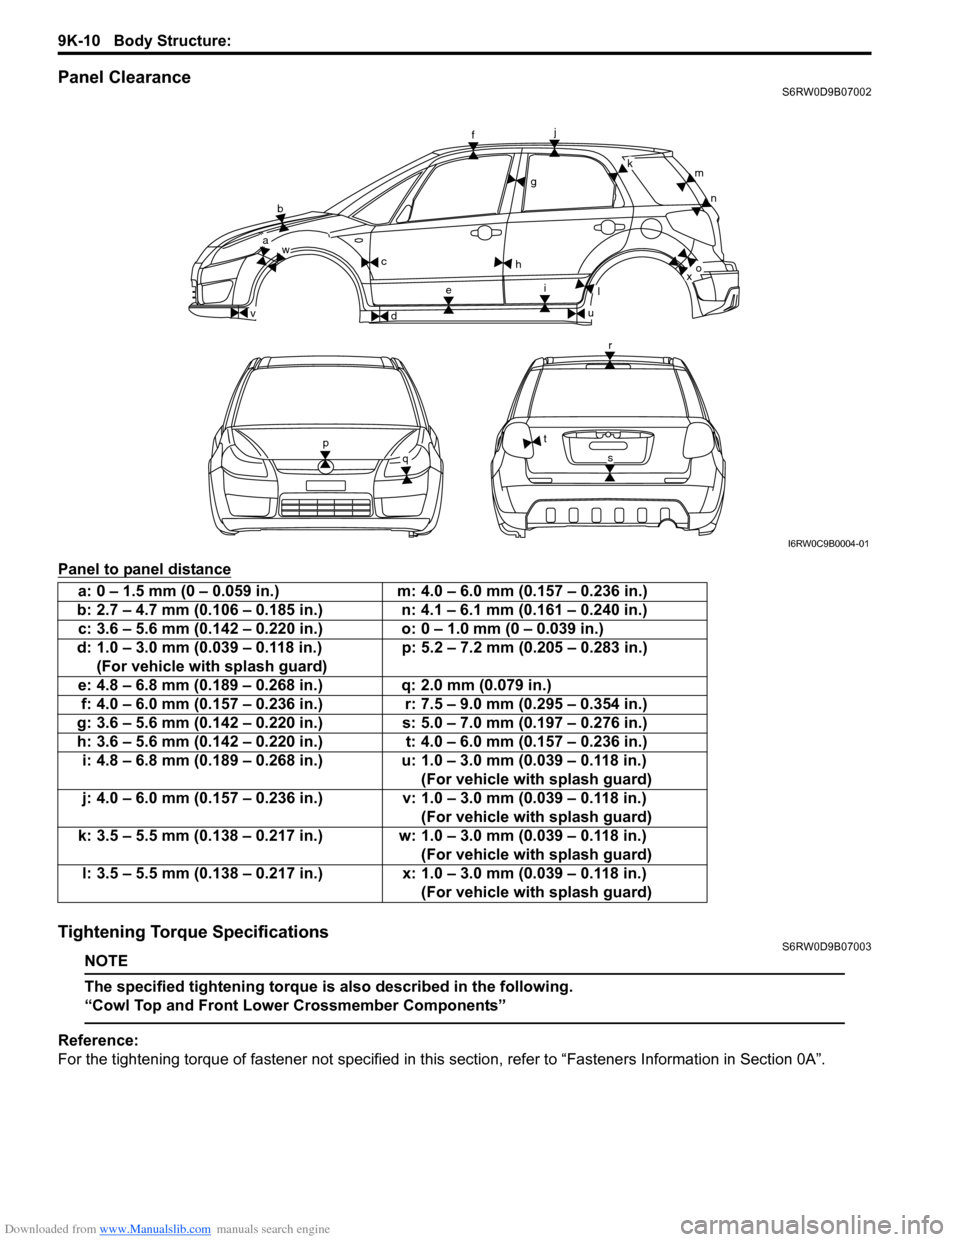
Panel ClearanceS6RW0D9B07002
Panel to panel distance
Tightening Torque SpecificationsS6RW0D9B07003
NOTE
The specified tightening torque is also described in the following.
“Cowl Top and Front Lower Crossmember Components”
Reference:
For the tightening torque of fastener not specified in this section, refer to “Fasteners Information in Section 0A”.
b
wa
v
c
d
f
g
j
h
ei
u
l
km
n
xo
r
t
sp
q
I6RW0C9B0004-01
a: 0 – 1.5 mm (0 – 0.059 in.) m: 4.0 – 6.0 mm (0.157 – 0.236 in.)
b: 2.7 – 4.7 mm (0.106 – 0.185 in.) n: 4.1 – 6.1 mm (0.161 – 0.240 in.)
c: 3.6 – 5.6 mm (0.142 – 0.220 in.) o: 0 – 1.0 mm (0 – 0.039 in.)
d: 1.0 – 3.0 mm (0.039 – 0.118 in.)
(For vehicle with splash guard)p: 5.2 – 7.2 mm (0.205 – 0.283 in.)
e: 4.8 – 6.8 mm (0.189 – 0.268 in.) q: 2.0 mm (0.079 in.)
f: 4.0 – 6.0 mm (0.157 – 0.236 in.) r: 7.5 – 9.0 mm (0.295 – 0.354 in.)
g: 3.6 – 5.6 mm (0.142 – 0.220 in.) s: 5.0 – 7.0 mm (0.197 – 0.276 in.)
h: 3.6 – 5.6 mm (0.142 – 0.220 in.) t: 4.0 – 6.0 mm (0.157 – 0.236 in.)
i: 4.8 – 6.8 mm (0.189 – 0.268 in.) u: 1.0 – 3.0 mm (0.039 – 0.118 in.)
(For vehicle with splash guard)
j: 4.0 – 6.0 mm (0.157 – 0.236 in.) v: 1.0 – 3.0 mm (0.039 – 0.118 in.)
(For vehicle with splash guard)
k: 3.5 – 5.5 mm (0.138 – 0.217 in.) w: 1.0 – 3.0 mm (0.039 – 0.118 in.)
(For vehicle with splash guard)
l: 3.5 – 5.5 mm (0.138 – 0.217 in.) x: 1.0 – 3.0 mm (0.039 – 0.118 in.)
(For vehicle with splash guard)
Page 1455 of 1556
Downloaded from www.Manualslib.com manuals search engine Paint / Coatings: 9L-1
Body, Cab and Accessories
Paint / Coatings
General Description
Anti-Corrosion Treatment ConstructionS6RW0D9C01001
WARNING!
Standard shop practices, particularly eye protection, should be followed during the performance of the
following operations to avoid personal injury.
As rust proof treatment, steel sheets are given corrosion resistance on the interior and/or exterior.
These corrosion resistance steel sheet materials are called one of two-side galvanized steel sheets.
It is for the sake of rust protection that these materials are selected and given a variety of treatments as described
blow.
• Steel sheets are treated with cathodic electro primer which is excellent in corrosion resistance.
• Rust proof wax coatings are applied to door and side sill insides where moisture is liable to stay.
• Vinyl coating is applied to body underside and wheel housing inside.
• Sealer is applied to door hem, engine compartment steel sheet-to-steel sheet joint, and the like portions to prevent
water penetration and resulting in rust occurrence.
In panel replacement or collision damage repair, leaving the relevant area untreated as it is in any operation which
does disturb the rust proof treatment will cause corrosion to that area. Therefore, it is the essential function of any
repair operation to correctly recoat the related surfaces of the relevant area.
All the metal panels are coated with metal conditioners and primer coating during vehicle production. Following the
repair and/or replacement parts installation, every accessible bare metal surface should be cleaned and coated with
rust proof primer. Perform this operation prior to the application of sealer and rust proof wax coating.
Sealer is applied to the specific joints of a vehicle during production. The sealer is intended to prevent dust from
entering the vehicle and serves also as an anticorrosion barrier. The sealer is applied to the door and hood hem areas
and between panels. Correct and reseal the originally sealed joints if damaged. Reseal the attaching joints of a new
replacement panel and reseal the hem area of a replacement door or hood.
Use a quality sealer to seal the flanged joints, overlap joints and seams. The sealer must have flexible characteristics
and paint ability after it’s applied to repair areas.
For the sealer to fill open joints, use caulking material. Select a sealer in conformance with the place and purpose of a
specific use. Observe the manufacturer’s label-stand instructions when using the sealer.
In many cases, repaired places require color painting. When this is required, follow the ordinary techniques specified
for the finish preparation, color painting and undercoating build-up.
Rust proof wax, a penetrative compound, is applied to the metal-to-metal surfaces (door and side sill insides) where it
is difficult to use ordinary undercoating material for coating. Therefore, when selecting the rust proof wax, it may be the
penetrative type.
During the undercoating (vinyl coating) application, care should be taken that sealer is not applied to the engine-
related parts and shock absorber mounting or rotating parts. Following the under coating, make sure that body drain
holes are kept open.
The sequence of the application steps of the anti-corrosion materials are as follows:
1) Clean and prepare the metal surface.
2) Apply primer.
3) Apply sealer (all joints sealed originally).
4) Apply color in areas where color is required such as hem flanges, exposed joints and under body components.
5) Apply anticorrosion compound (penetrative wax).
6) Apply undercoating (rust proof material).
Page 1456 of 1556
Downloaded from www.Manualslib.com manuals search engine 9L-2 Paint / Coatings:
Plastic Parts FinishingS6RW0D9C01002
Painting
Rigid or hard ABS plastic needs no primer coating.
General acrylic lacquers can be painted properly over hard ABS plastic in terms of adherence.
1) Use cleaning solvent for paint finish to wash each part.
2) Apply conventional acrylic color lacquer to part surface.
3) Follow lacquer directions for required drying time. (Proper drying temperature range is 60 – 70 °C (140 – 158 °F)).
Reference
Plastic parts employ not only ABS (Acrylonitrile Butadiene Styrene) plastic but also polypropylene, vinyl, or the like
plastic. Burning test method to identify ABS plastic is described below.
1) Use a sharp blade to cut off a plastic sliver from the part at its hidden backside.
2) Hold sliver with pincers and set it on fire.
3) Carefully observe condition of the burning plastic.
4) ABS plastic must raise readily distinguishable back smoke while burning with its residue suspended in air
temporarily.
5) Polypropylene must raise no readily distinguishable smoke while burning.