2006 SUZUKI SX4 service
[x] Cancel search: servicePage 1320 of 1556
Downloaded from www.Manualslib.com manuals search engine 9B-1 Lighting Systems:
Body, Cab and Accessories
Lighting Systems
Precautions
Precautions for Discharge Headlight Service (If Equipped)S6RW0D9200001
WARNING!
• Do not touch igniter or ballast when lighting switch is at “HEAD” position to avoid possible electric
shock.
• Do not measure voltage or resistance with tester connected to output connector of ballast or igniter
to avoid possible electric shock.
• Do not perform work where exposed to water including rain or with wet hands to avoid possible
electric shock.
• Disassembling igniter or ballast is strictly prohibited as it may cause an electric shock.
• Before inspecting or repairing discharge headlight or its peripheral parts, make sure that lighting
switch is at OFF position and battery is disconnected at negative terminal to avoid possible
electrical shock.
• Do not set lighting switch to “HEAD” position with connector disconnected or any part removed to
avoid possible electric shock.
• Do not touch glass surface of headlight bulb. Oil or grease attached on it may not only make bulb
service life shorter but also cause bulb to burst when lighting switch is turned on.
• Mercury, metal iodide and xenon gas are sealed in discharge headlight bulb. Be sure to dispose of
used discharge headlight bulb properly according to applicable rules or regulations.
Precautions in Diagnosing Troubles (Headlight Auto Leveling System)S6RW0D9200002
• Be sure to read “Air Bag Warning in Section 00” before inspection and observe what is written there.
• Replacement of height sensor and headlight leveling control module. When height sensor and/or headlight leveling
control module is replaced with new one, perform initialization of headlight auto leveling system according to
“Initialization of Headlight Auto Leveling System”.
General Description
Discharge Headlight Description (If Equipped)S6RW0D9201001
Discharge headlight provides more brightness and consumes less electricity as compared with the conventional
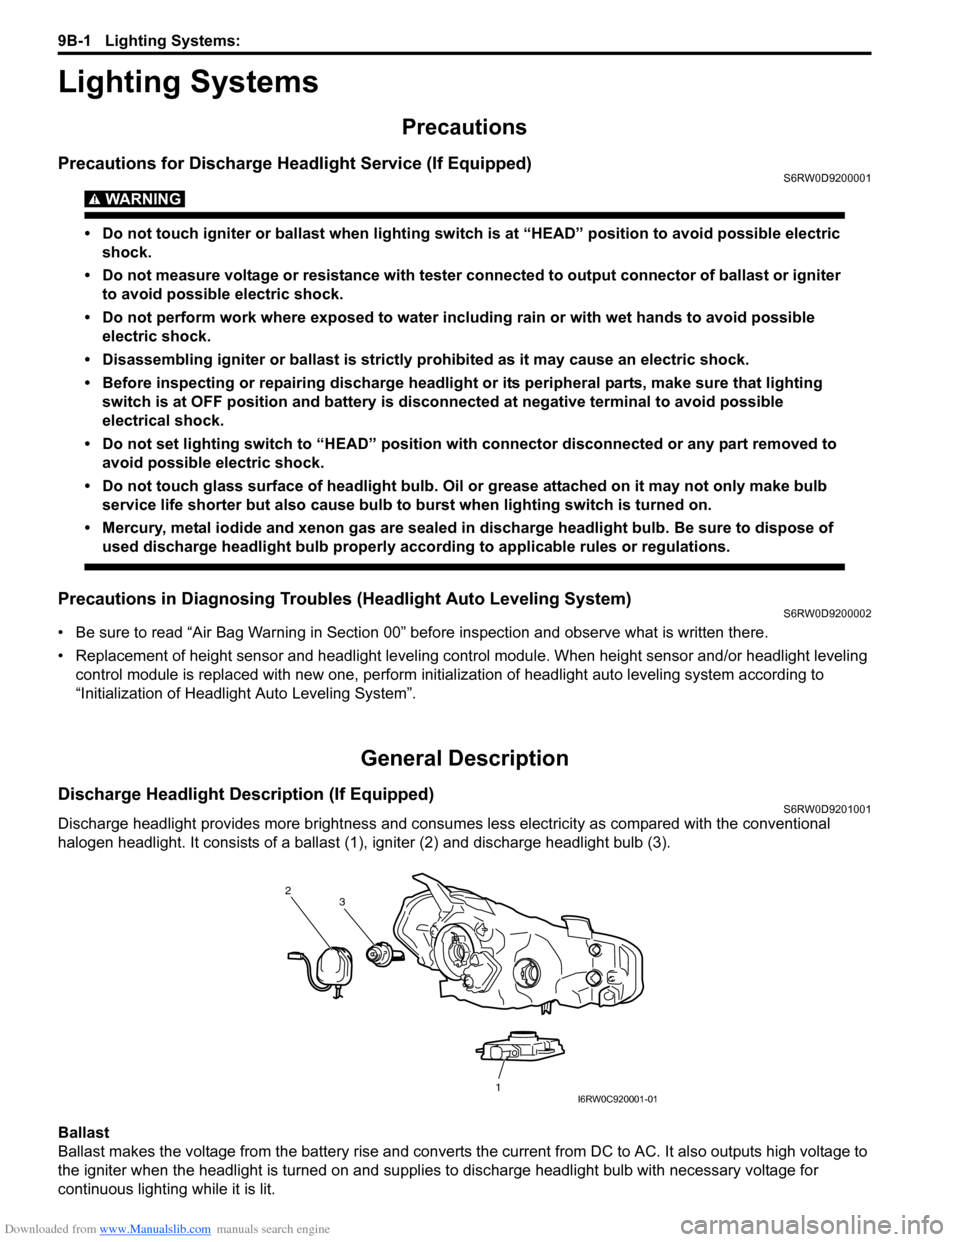
halogen headlight. It consists of a ballast (1), igniter (2) and discharge headlight bulb (3).
Ballast
Ballast makes the voltage from the battery rise and converts the current from DC to AC. It also outputs high voltage to
the igniter when the headlight is turned on and supplies to discharge headlight bulb with necessary voltage for
continuous lighting while it is lit.
2
1 3
I6RW0C920001-01
Page 1337 of 1556
Downloaded from www.Manualslib.com manuals search engine Lighting Systems: 9B-18
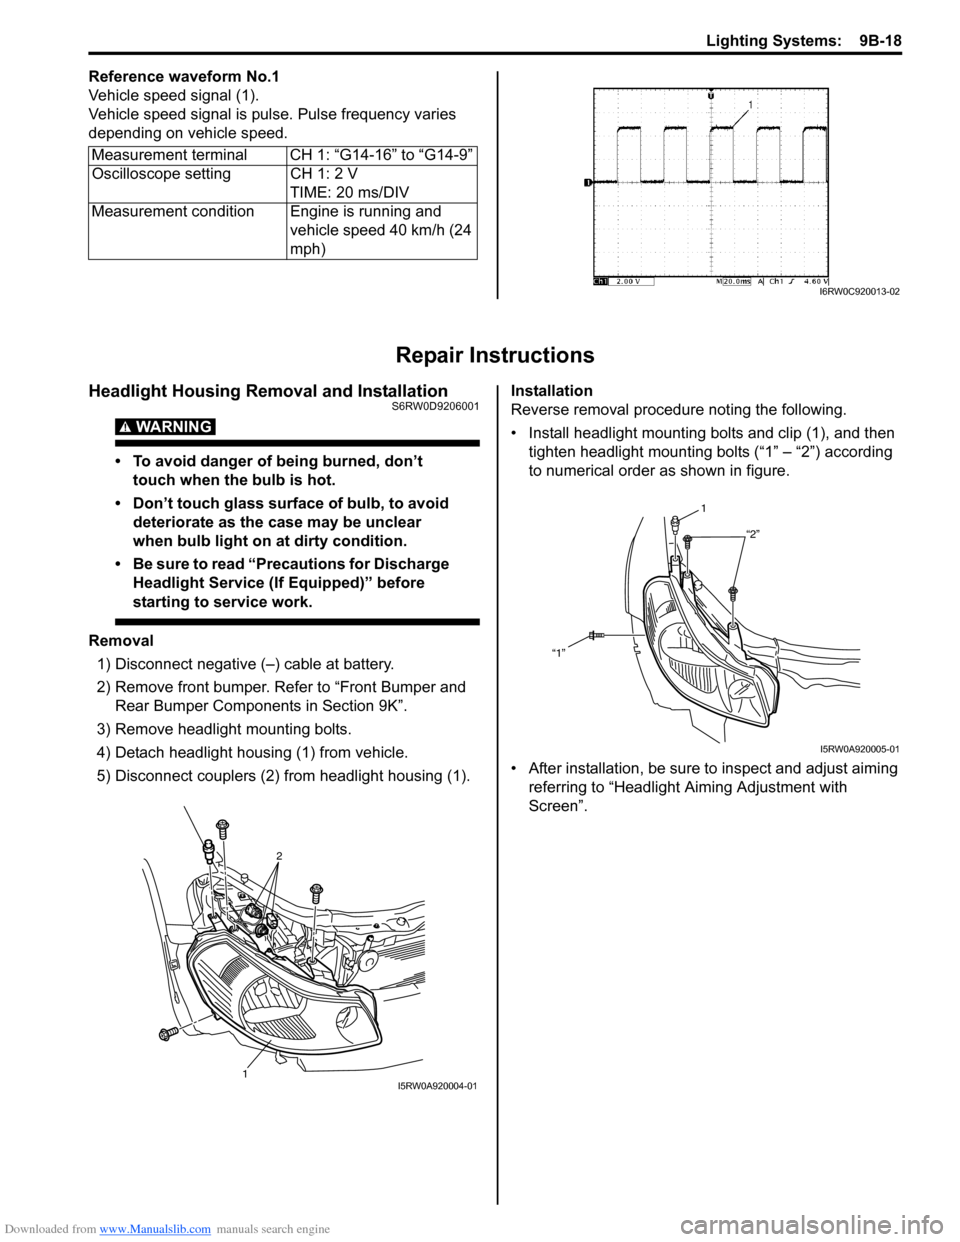
Reference waveform No.1
Vehicle speed signal (1).
Vehicle speed signal is pulse. Pulse frequency varies
depending on vehicle speed.
Repair Instructions
Headlight Housing Removal and InstallationS6RW0D9206001
WARNING!
• To avoid danger of being burned, don’t
touch when the bulb is hot.
• Don’t touch glass surface of bulb, to avoid
deteriorate as the case may be unclear
when bulb light on at dirty condition.
• Be sure to read “Precautions for Discharge
Headlight Service (If Equipped)” before
starting to service work.
Removal
1) Disconnect negative (–) cable at battery.
2) Remove front bumper. Refer to “Front Bumper and
Rear Bumper Components in Section 9K”.
3) Remove headlight mounting bolts.
4) Detach headlight housing (1) from vehicle.
5) Disconnect couplers (2) from headlight housing (1).Installation
Reverse removal procedure noting the following.
• Install headlight mounting bolts and clip (1), and then
tighten headlight mounting bolts (“1” – “2”) according
to numerical order as shown in figure.
• After installation, be sure to inspect and adjust aiming
referring to “Headlight Aiming Adjustment with
Screen”. Measurement terminal CH 1: “G14-16” to “G14-9”
Oscilloscope setting CH 1: 2 V
TIME: 20 ms/DIV
Measurement condition Engine is running and
vehicle speed 40 km/h (24
mph)
I6RW0C920013-02
2
1I5RW0A920004-01
1
“2”
“1”
I5RW0A920005-01
Page 1338 of 1556
Downloaded from www.Manualslib.com manuals search engine 9B-19 Lighting Systems:
Headlight Bulb Replacement (Discharge
Headlight Model)
S6RW0D9206002
WARNING!
• To avoid danger of being burned, don’t
touch when the bulb is hot.
• Don’t touch glass surface of bulb, to avoid
deteriorate as the case may be unclear
when bulb light on at dirty condition.
• Be sure to read “Precautions for Discharge
Headlight Service (If Equipped)” before
starting to service work.
1) Check to ensure that lighting switch is at OFF
position.
2) Disconnect negative (–) cable at battery.
3) Remove headlight housing referring to “Headlight
Housing Removal and Installation”.
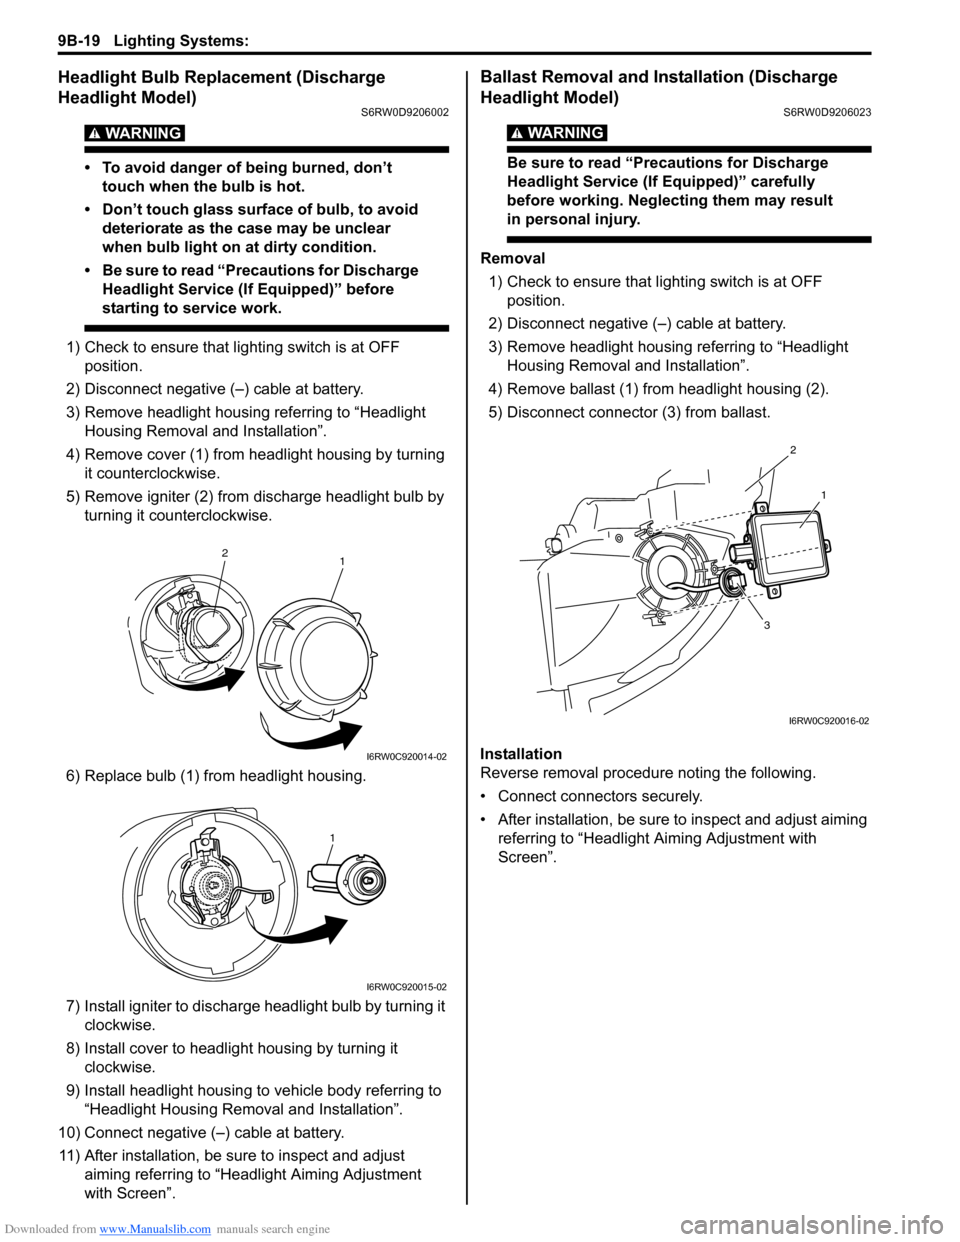
4) Remove cover (1) from headlight housing by turning
it counterclockwise.
5) Remove igniter (2) from discharge headlight bulb by
turning it counterclockwise.
6) Replace bulb (1) from headlight housing.
7) Install igniter to discharge headlight bulb by turning it
clockwise.
8) Install cover to headlight housing by turning it
clockwise.
9) Install headlight housing to vehicle body referring to
“Headlight Housing Removal and Installation”.
10) Connect negative (–) cable at battery.
11) After installation, be sure to inspect and adjust
aiming referring to “Headlight Aiming Adjustment
with Screen”.
Ballast Removal and Installation (Discharge
Headlight Model)
S6RW0D9206023
WARNING!
Be sure to read “Precautions for Discharge
Headlight Service (If Equipped)” carefully
before working. Neglecting them may result
in personal injury.
Removal
1) Check to ensure that lighting switch is at OFF
position.
2) Disconnect negative (–) cable at battery.
3) Remove headlight housing referring to “Headlight
Housing Removal and Installation”.
4) Remove ballast (1) from headlight housing (2).
5) Disconnect connector (3) from ballast.
Installation
Reverse removal procedure noting the following.
• Connect connectors securely.
• After installation, be sure to inspect and adjust aiming
referring to “Headlight Aiming Adjustment with
Screen”.
1 2
I6RW0C920014-02
1
I6RW0C920015-02
2
1
3
I6RW0C920016-02
Page 1339 of 1556
Downloaded from www.Manualslib.com manuals search engine Lighting Systems: 9B-20
Igniter Removal and Installation (Discharge
Headlight Model)
S6RW0D9206024
WARNING!
Be sure to read “Precautions for Discharge
Headlight Service (If Equipped)” carefully
before working. Neglecting them may result
in personal injury.
Removal
1) Remove ballast referring to “Ballast Removal and
Installation (Discharge Headlight Model)”.
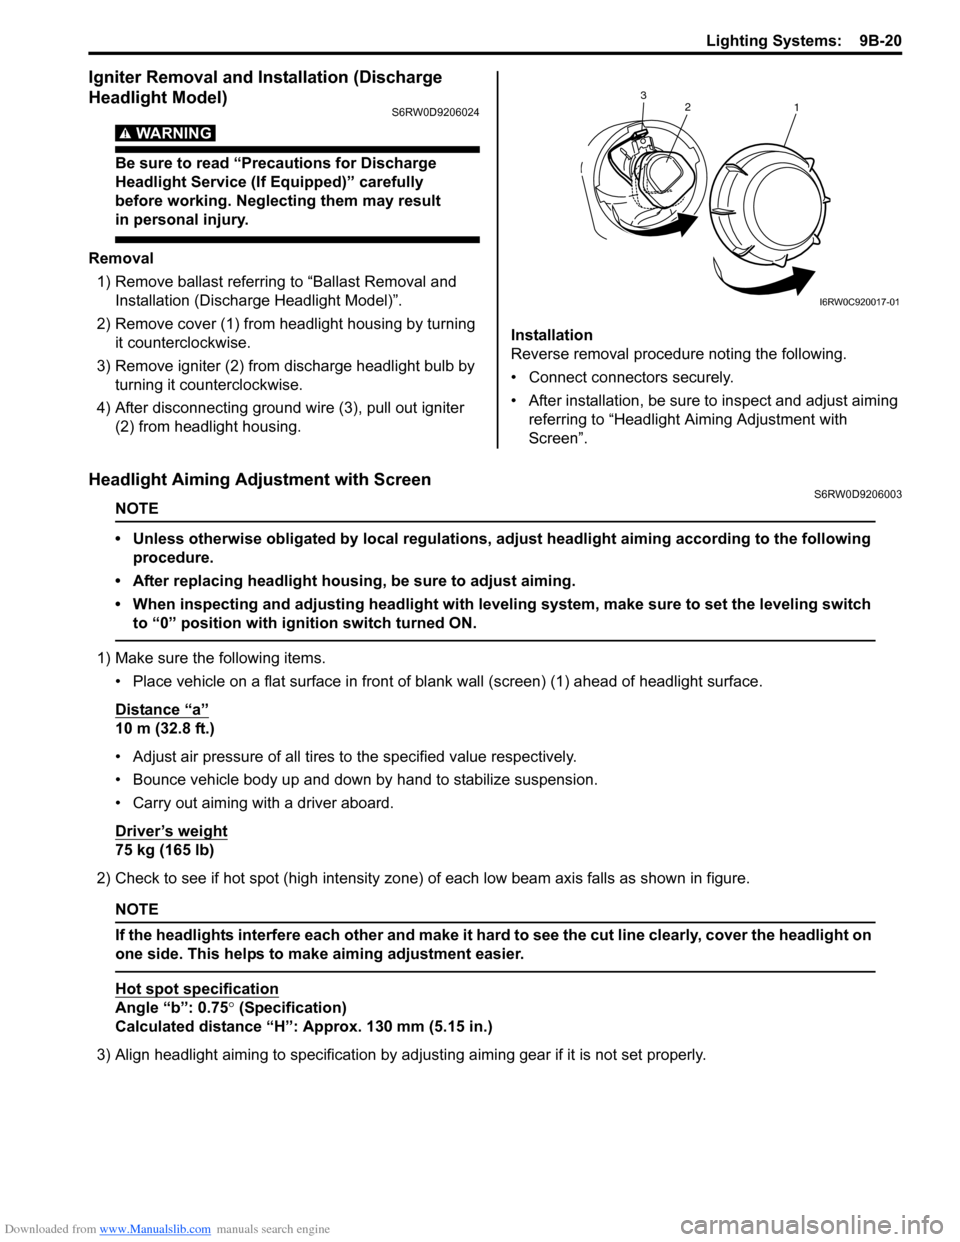
2) Remove cover (1) from headlight housing by turning
it counterclockwise.
3) Remove igniter (2) from discharge headlight bulb by
turning it counterclockwise.
4) After disconnecting ground wire (3), pull out igniter
(2) from headlight housing.Installation
Reverse removal procedure noting the following.
• Connect connectors securely.
• After installation, be sure to inspect and adjust aiming
referring to “Headlight Aiming Adjustment with
Screen”.
Headlight Aiming Adjustment with ScreenS6RW0D9206003
NOTE
• Unless otherwise obligated by local regulations, adjust headlight aiming according to the following
procedure.
• After replacing headlight housing, be sure to adjust aiming.
• When inspecting and adjusting headlight with leveling system, make sure to set the leveling switch
to “0” position with ignition switch turned ON.
1) Make sure the following items.
• Place vehicle on a flat surface in front of blank wall (screen) (1) ahead of headlight surface.
Distance “a”
10 m (32.8 ft.)
• Adjust air pressure of all tires to the specified value respectively.
• Bounce vehicle body up and down by hand to stabilize suspension.
• Carry out aiming with a driver aboard.
Driver’s weight
75 kg (165 lb)
2) Check to see if hot spot (high intensity zone) of each low beam axis falls as shown in figure.
NOTE
If the headlights interfere each other and make it hard to see the cut line clearly, cover the headlight on
one side. This helps to make aiming adjustment easier.
Hot spot specification
Angle “b”: 0.75° (Specification)
Calculated distance “H”: Approx. 130 mm (5.15 in.)
3) Align headlight aiming to specification by adjusting aiming gear if it is not set properly.
2
1 3
I6RW0C920017-01
Page 1347 of 1556
Downloaded from www.Manualslib.com manuals search engine Lighting Systems: 9B-28
Headlight Manual Levering Switch Inspection (If
Equipped)
S6RW0D9206019
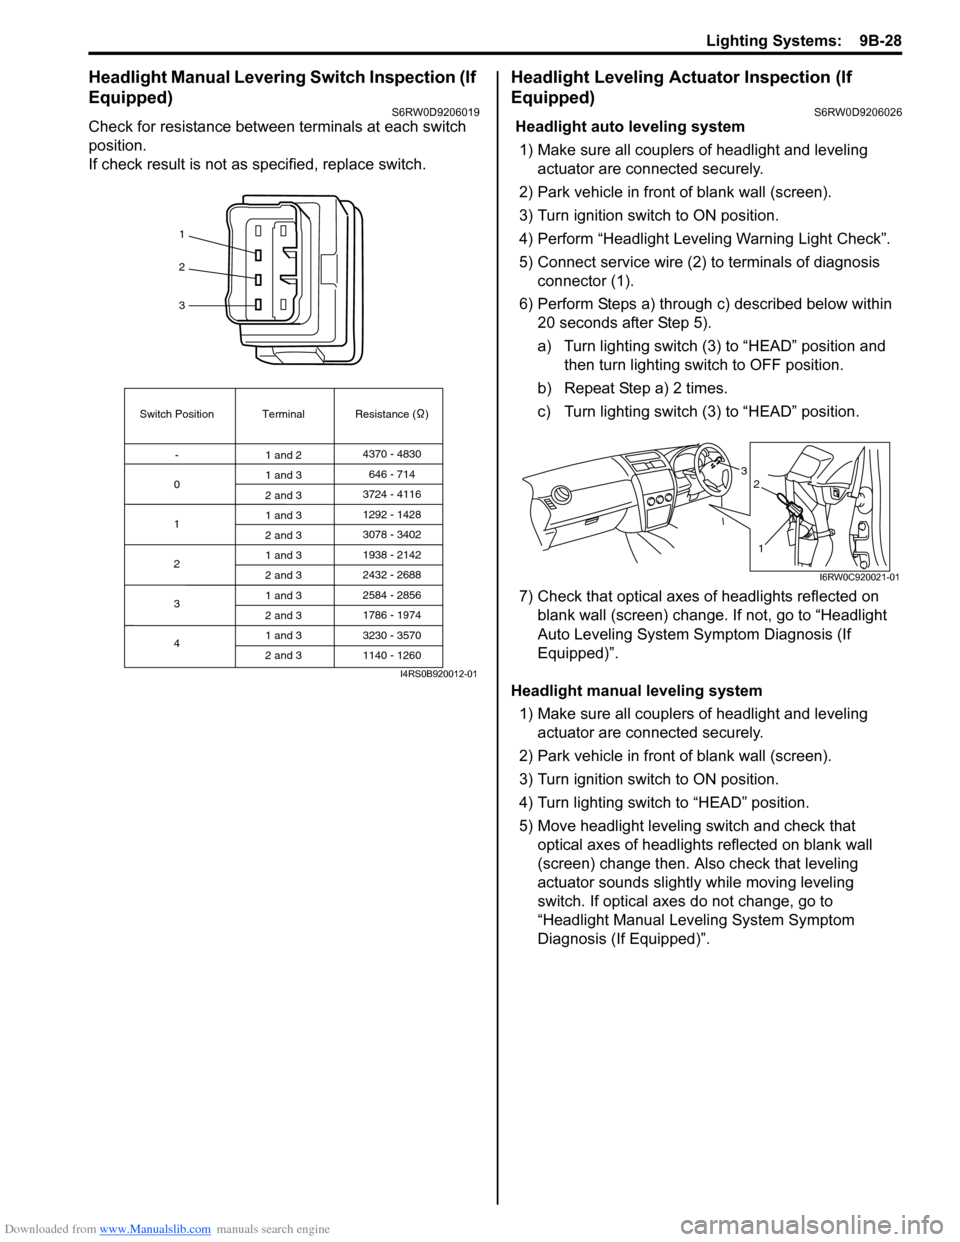
Check for resistance between terminals at each switch
position.
If check result is not as specified, replace switch.
Headlight Leveling Actuator Inspection (If
Equipped)
S6RW0D9206026
Headlight auto leveling system
1) Make sure all couplers of headlight and leveling
actuator are connected securely.
2) Park vehicle in front of blank wall (screen).
3) Turn ignition switch to ON position.
4) Perform “Headlight Leveling Warning Light Check”.
5) Connect service wire (2) to terminals of diagnosis
connector (1).
6) Perform Steps a) through c) described below within
20 seconds after Step 5).
a) Turn lighting switch (3) to “HEAD” position and
then turn lighting switch to OFF position.
b) Repeat Step a) 2 times.
c) Turn lighting switch (3) to “HEAD” position.
7) Check that optical axes of headlights reflected on
blank wall (screen) change. If not, go to “Headlight
Auto Leveling System Symptom Diagnosis (If
Equipped)”.
Headlight manual leveling system
1) Make sure all couplers of headlight and leveling
actuator are connected securely.
2) Park vehicle in front of blank wall (screen).
3) Turn ignition switch to ON position.
4) Turn lighting switch to “HEAD” position.
5) Move headlight leveling switch and check that
optical axes of headlights reflected on blank wall
(screen) change then. Also check that leveling
actuator sounds slightly while moving leveling
switch. If optical axes do not change, go to
“Headlight Manual Leveling System Symptom
Diagnosis (If Equipped)”.
1
2
3
Switch Position
0Terminal Resistance ( )
-
1
2
3
41 and 24370 - 4830
1 and 3
2 and 3
1 and 3
2 and 3
1 and 3
2 and 3
1 and 3
2 and 3
1 and 3
2 and 3646 - 714
3724 - 4116
3078 - 3402 1292 - 1428
1938 - 2142
2584 - 2856
3230 - 3570 2432 - 2688
1786 - 1974
1140 - 1260
I4RS0B920012-01
3
1
2
I6RW0C920021-01
Page 1350 of 1556
Downloaded from www.Manualslib.com manuals search engine 9B-31 Lighting Systems:
Without initialization of the headlight auto leveling
system, it is not possible to obtain its proper function.
Also, if the headlight auto leveling system is not
initialized after replacing the headlight leveling control
module, the headlight leveling warning light in the
combination meter flashes.
1) Observe the following instructions.
• Park vehicle on level ground.
• Adjust air pressure of all tires to the specified
value respectively.
• Bounce vehicle body up and down by hand to
stabilize suspension.
2) Turn ignition switch to ON position.
3) Perform “Headlight Leveling Warning Light Check”.
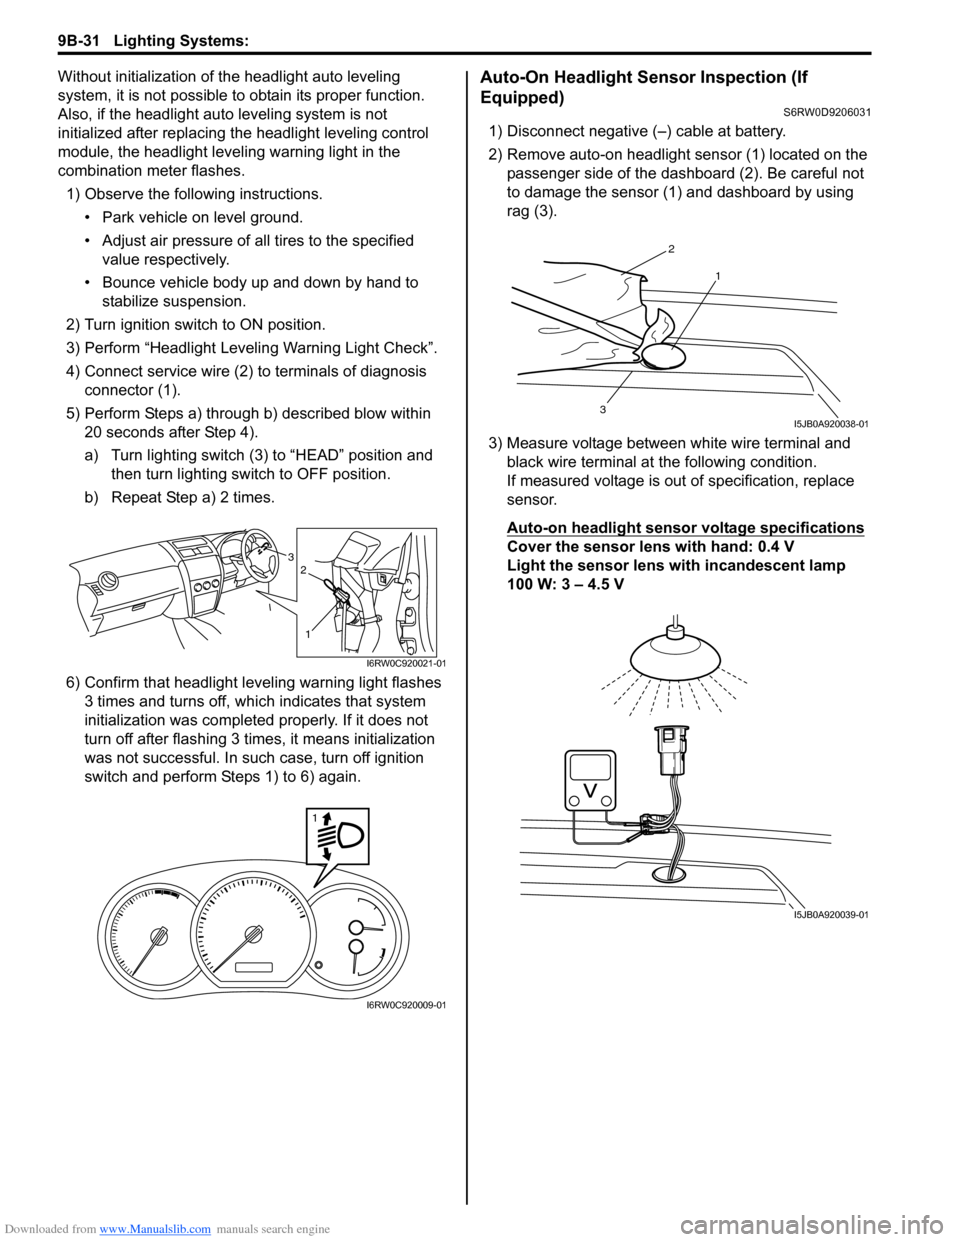
4) Connect service wire (2) to terminals of diagnosis
connector (1).
5) Perform Steps a) through b) described blow within
20 seconds after Step 4).
a) Turn lighting switch (3) to “HEAD” position and
then turn lighting switch to OFF position.
b) Repeat Step a) 2 times.
6) Confirm that headlight leveling warning light flashes
3 times and turns off, which indicates that system
initialization was completed properly. If it does not
turn off after flashing 3 times, it means initialization
was not successful. In such case, turn off ignition
switch and perform Steps 1) to 6) again.Auto-On Headlight Sensor Inspection (If
Equipped)
S6RW0D9206031
1) Disconnect negative (–) cable at battery.
2) Remove auto-on headlight sensor (1) located on the
passenger side of the dashboard (2). Be careful not
to damage the sensor (1) and dashboard by using
rag (3).
3) Measure voltage between white wire terminal and
black wire terminal at the following condition.
If measured voltage is out of specification, replace
sensor.
Auto-on headlight sensor voltage specifications
Cover the sensor lens with hand: 0.4 V
Light the sensor lens with incandescent lamp
100 W: 3 – 4.5 V3
1
2
I6RW0C920021-01
1
I6RW0C920009-01
2
1
3I5JB0A920038-01
I5JB0A920039-01
Page 1364 of 1556
Downloaded from www.Manualslib.com manuals search engine 9C-12 Instrumentation / Driver Info. / Horn:
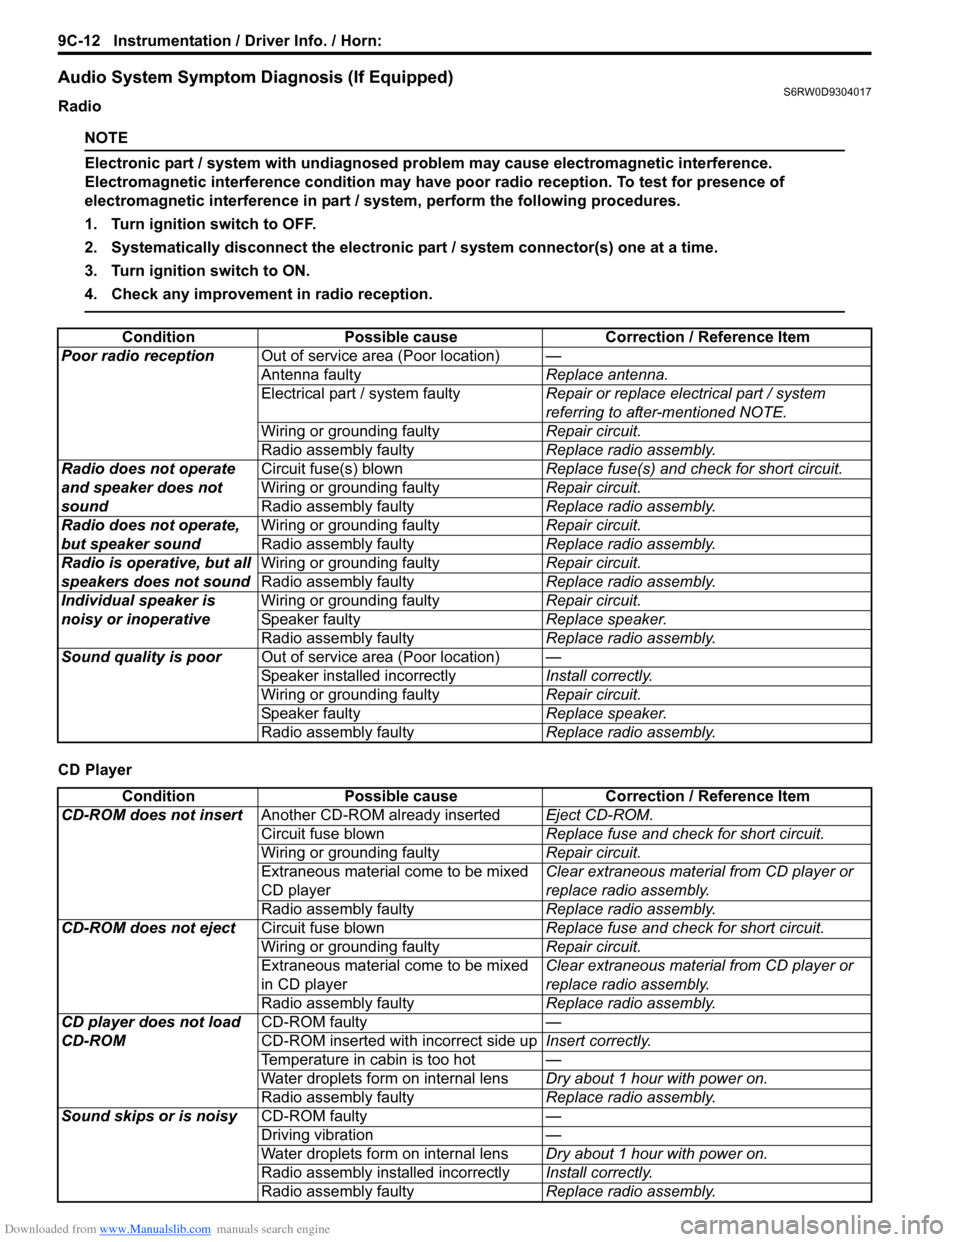
Audio System Symptom Diagnosis (If Equipped)S6RW0D9304017
Radio
NOTE
Electronic part / system with undiagnosed problem may cause electromagnetic interference.
Electromagnetic interference condition may have poor radio reception. To test for presence of
electromagnetic interference in part / system, perform the following procedures.
1. Turn ignition switch to OFF.
2. Systematically disconnect the electronic part / system connector(s) one at a time.
3. Turn ignition switch to ON.
4. Check any improvement in radio reception.
CD PlayerCondition Possible cause Correction / Reference Item
Poor radio receptionOut of service area (Poor location)—
Antenna faultyReplace antenna.
Electrical part / system faultyRepair or replace electrical part / system
referring to after-mentioned NOTE.
Wiring or grounding faultyRepair circuit.
Radio assembly faultyReplace radio assembly.
Radio does not operate
and speaker does not
soundCircuit fuse(s) blownReplace fuse(s) and check for short circuit.
Wiring or grounding faultyRepair circuit.
Radio assembly faultyReplace radio assembly.
Radio does not operate,
but speaker soundWiring or grounding faultyRepair circuit.
Radio assembly faultyReplace radio assembly.
Radio is operative, but all
speakers does not soundWiring or grounding faultyRepair circuit.
Radio assembly faultyReplace radio assembly.
Individual speaker is
noisy or inoperativeWiring or grounding faultyRepair circuit.
Speaker faultyReplace speaker.
Radio assembly faultyReplace radio assembly.
Sound quality is poorOut of service area (Poor location)—
Speaker installed incorrectlyInstall correctly.
Wiring or grounding faultyRepair circuit.
Speaker faultyReplace speaker.
Radio assembly faultyReplace radio assembly.
Condition Possible cause Correction / Reference Item
CD-ROM does not insertAnother CD-ROM already insertedEject CD-ROM.
Circuit fuse blownReplace fuse and check for short circuit.
Wiring or grounding faultyRepair circuit.
Extraneous material come to be mixed
CD playerClear extraneous material from CD player or
replace radio assembly.
Radio assembly faultyReplace radio assembly.
CD-ROM does not ejectCircuit fuse blownReplace fuse and check for short circuit.
Wiring or grounding faultyRepair circuit.
Extraneous material come to be mixed
in CD playerClear extraneous material from CD player or
replace radio assembly.
Radio assembly faultyReplace radio assembly.
CD player does not load
CD-ROMCD-ROM faulty—
CD-ROM inserted with incorrect side upInsert correctly.
Temperature in cabin is too hot—
Water droplets form on internal lensDry about 1 hour with power on.
Radio assembly faultyReplace radio assembly.
Sound skips or is noisyCD-ROM faulty—
Driving vibration—
Water droplets form on internal lensDry about 1 hour with power on.
Radio assembly installed incorrectlyInstall correctly.
Radio assembly faultyReplace radio assembly.
Page 1369 of 1556
Downloaded from www.Manualslib.com manuals search engine Instrumentation / Driver Info. / Horn: 9C-17
Outside Air Temperature Sensor Removal and
Installation (If Equipped)
S6RW0D9306013
Removal
1) Disconnect negative (–) cable at battery.
2) Remove front bumper referring to “Front Bumper
and Rear Bumper Components in Section 9K”.
3) Disconnect connector from outside air temperature
sensor.
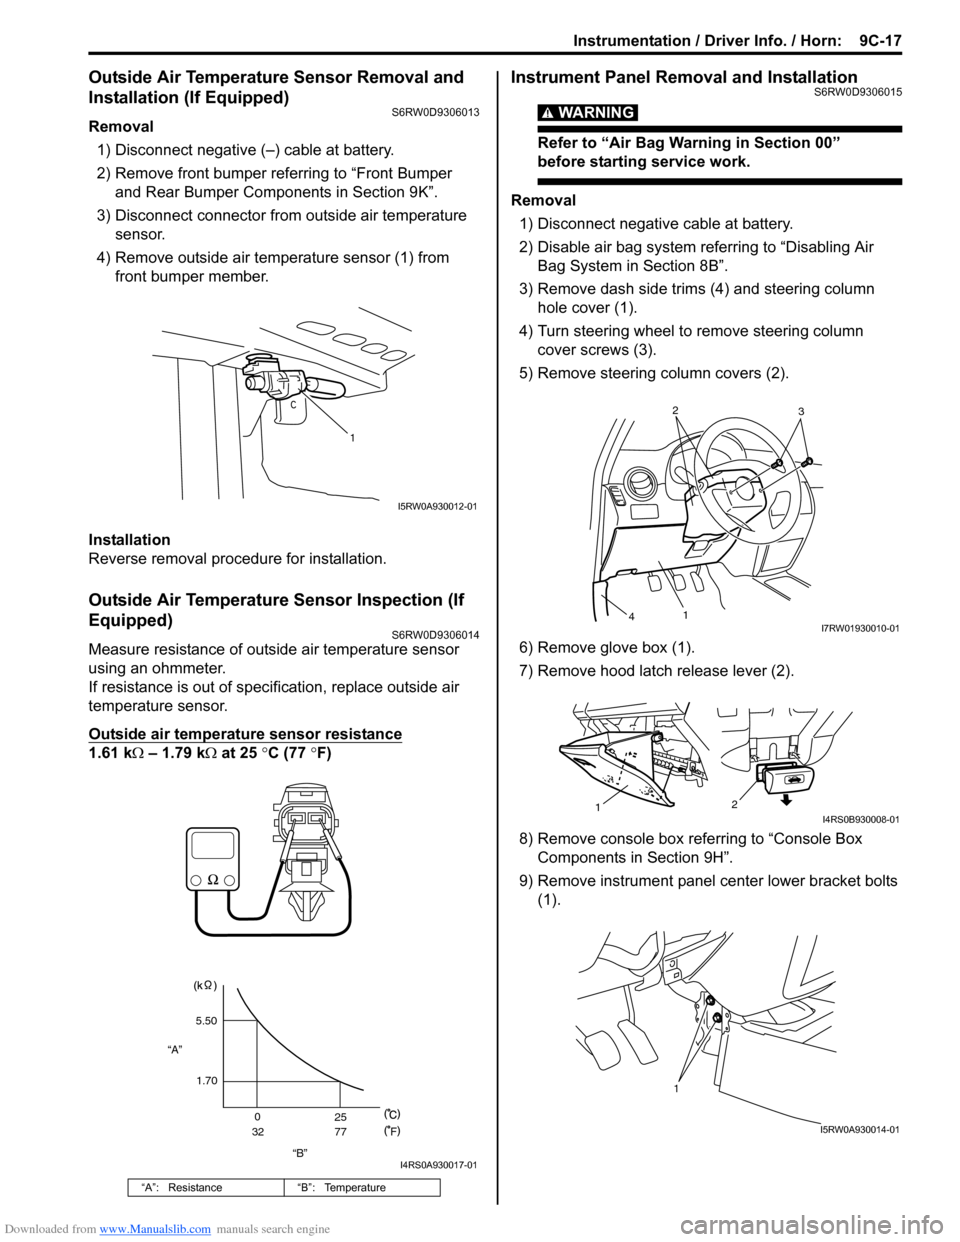
4) Remove outside air temperature sensor (1) from
front bumper member.
Installation
Reverse removal procedure for installation.
Outside Air Temperature Sensor Inspection (If
Equipped)
S6RW0D9306014
Measure resistance of outside air temperature sensor
using an ohmmeter.
If resistance is out of specification, replace outside air
temperature sensor.
Outside air temperature sensor resistance
1.61 kΩ – 1.79 kΩ at 25 °C (77 °F)
Instrument Panel Removal and InstallationS6RW0D9306015
WARNING!
Refer to “Air Bag Warning in Section 00”
before starting service work.
Removal
1) Disconnect negative cable at battery.
2) Disable air bag system referring to “Disabling Air
Bag System in Section 8B”.
3) Remove dash side trims (4) and steering column
hole cover (1).
4) Turn steering wheel to remove steering column
cover screws (3).
5) Remove steering column covers (2).
6) Remove glove box (1).
7) Remove hood latch release lever (2).
8) Remove console box referring to “Console Box
Components in Section 9H”.
9) Remove instrument panel center lower bracket bolts
(1).
“A”: Resistance “B”: Temperature
1
I5RW0A930012-01
“B” “A”5.50
1.70
0
3225
77
F
I4RS0A930017-01
2
3
1
4I7RW01930010-01
2
1I4RS0B930008-01
1
I5RW0A930014-01