2006 SUZUKI SX4 head
[x] Cancel search: headPage 1357 of 1556
Downloaded from www.Manualslib.com manuals search engine Instrumentation / Driver Info. / Horn: 9C-5
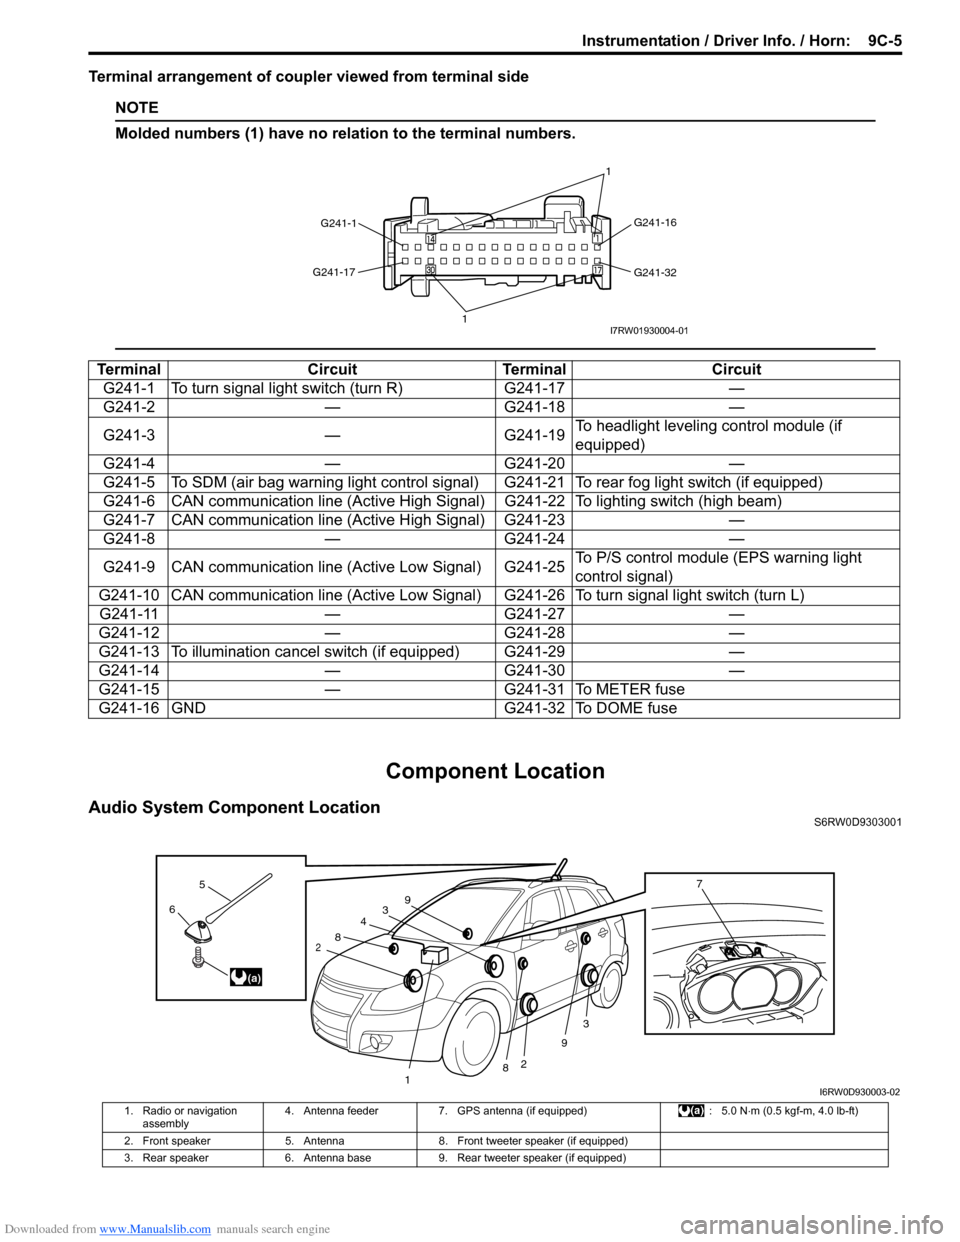
Terminal arrangement of coupler viewed from terminal side
NOTE
Molded numbers (1) have no relation to the terminal numbers.
Component Location
Audio System Component LocationS6RW0D9303001
Terminal Circuit Terminal Circuit
G241-1 To turn signal light switch (turn R) G241-17 —
G241-2 — G241-18 —
G241-3 — G241-19To headlight leveling control module (if
equipped)
G241-4 — G241-20 —
G241-5 To SDM (air bag warning light control signal) G241-21 To rear fog light switch (if equipped)
G241-6 CAN communication line (Active High Signal) G241-22 To lighting switch (high beam)
G241-7 CAN communication line (Active High Signal) G241-23 —
G241-8 — G241-24 —
G241-9 CAN communication line (Active Low Signal) G241-25To P/S control module (EPS warning light
control signal)
G241-10 CAN communication line (Active Low Signal) G241-26 To turn signal light switch (turn L)
G241-11 — G241-27 —
G241-12 — G241-28 —
G241-13 To illumination cancel switch (if equipped) G241-29 —
G241-14 — G241-30 —
G241-15 — G241-31 To METER fuse
G241-16 GND G241-32 To DOME fuse
G241-1G241-16
G241-32 G241-17
11I7RW01930004-01
3
2
3
2
1
4
8
8
9
96
5
(a)
7
I6RW0D930003-02
1. Radio or navigation
assembly4. Antenna feeder 7. GPS antenna (if equipped) : 5.0 N⋅m (0.5 kgf-m, 4.0 lb-ft)
2. Front speaker 5. Antenna 8. Front tweeter speaker (if equipped)
3. Rear speaker 6. Antenna base 9. Rear tweeter speaker (if equipped)
Page 1361 of 1556
Downloaded from www.Manualslib.com manuals search engine Instrumentation / Driver Info. / Horn: 9C-9
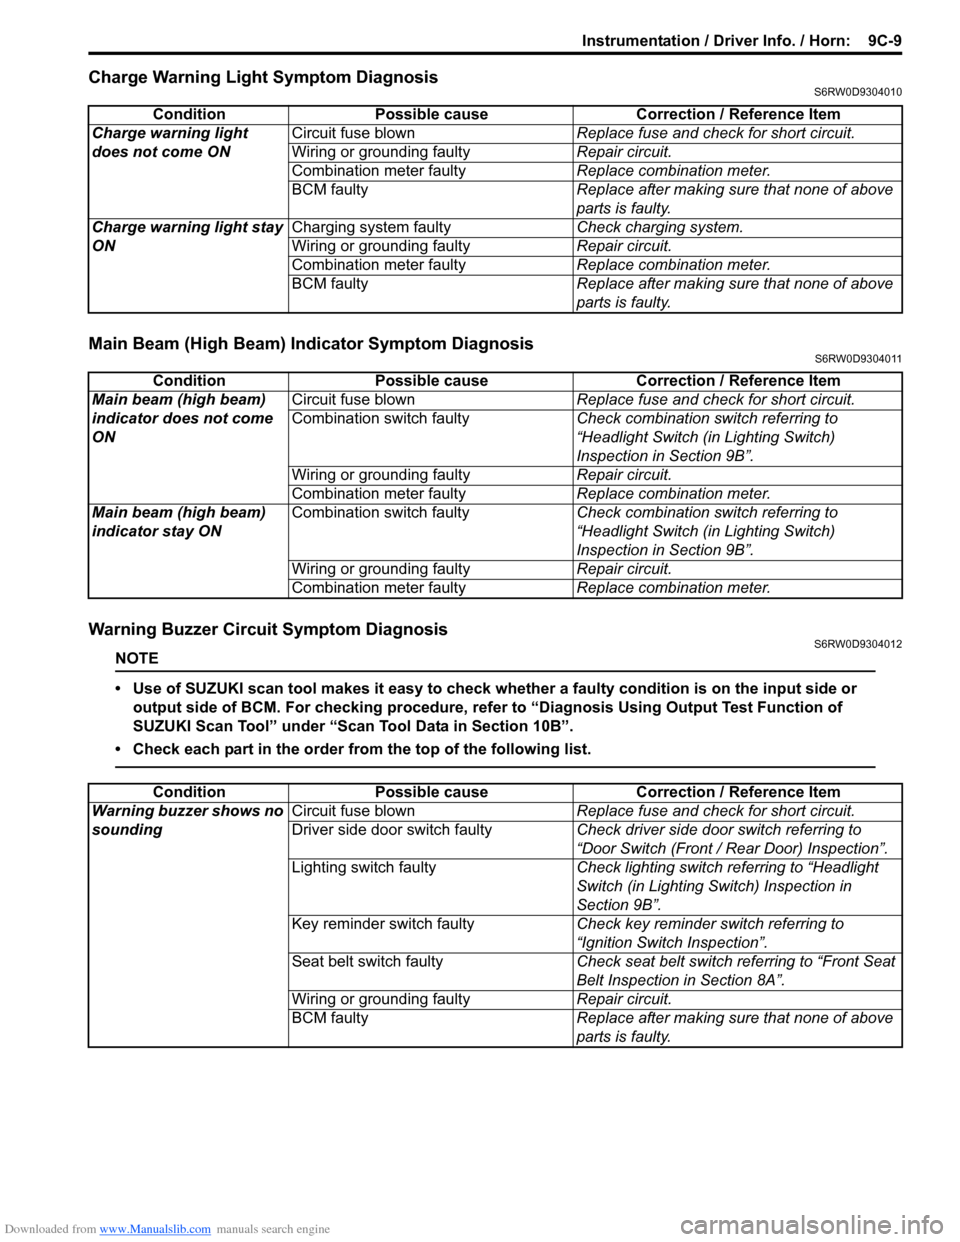
Charge Warning Light Symptom DiagnosisS6RW0D9304010
Main Beam (High Beam) Indicator Symptom DiagnosisS6RW0D9304011
Warning Buzzer Circuit Symptom DiagnosisS6RW0D9304012
NOTE
• Use of SUZUKI scan tool makes it easy to check whether a faulty condition is on the input side or
output side of BCM. For checking procedure, refer to “Diagnosis Using Output Test Function of
SUZUKI Scan Tool” under “Scan Tool Data in Section 10B”.
• Check each part in the order from the top of the following list.
Condition Possible cause Correction / Reference Item
Charge warning light
does not come ONCircuit fuse blownReplace fuse and check for short circuit.
Wiring or grounding faultyRepair circuit.
Combination meter faultyReplace combination meter.
BCM faulty Replace after making sure that none of above
parts is faulty.
Charge warning light stay
ONCharging system faultyCheck charging system.
Wiring or grounding faultyRepair circuit.
Combination meter faultyReplace combination meter.
BCM faulty Replace after making sure that none of above
parts is faulty.
Condition Possible cause Correction / Reference Item
Main beam (high beam)
indicator does not come
ONCircuit fuse blownReplace fuse and check for short circuit.
Combination switch faultyCheck combination switch referring to
“Headlight Switch (in Lighting Switch)
Inspection in Section 9B”.
Wiring or grounding faultyRepair circuit.
Combination meter faultyReplace combination meter.
Main beam (high beam)
indicator stay ONCombination switch faultyCheck combination switch referring to
“Headlight Switch (in Lighting Switch)
Inspection in Section 9B”.
Wiring or grounding faultyRepair circuit.
Combination meter faultyReplace combination meter.
Condition Possible cause Correction / Reference Item
Warning buzzer shows no
soundingCircuit fuse blownReplace fuse and check for short circuit.
Driver side door switch faultyCheck driver side door switch referring to
“Door Switch (Front / Rear Door) Inspection”.
Lighting switch faultyCheck lighting switch referring to “Headlight
Switch (in Lighting Switch) Inspection in
Section 9B”.
Key reminder switch faultyCheck key reminder switch referring to
“Ignition Switch Inspection”.
Seat belt switch faultyCheck seat belt switch referring to “Front Seat
Belt Inspection in Section 8A”.
Wiring or grounding faultyRepair circuit.
BCM faultyReplace after making sure that none of above
parts is faulty.
Page 1373 of 1556
Downloaded from www.Manualslib.com manuals search engine Instrumentation / Driver Info. / Horn: 9C-21
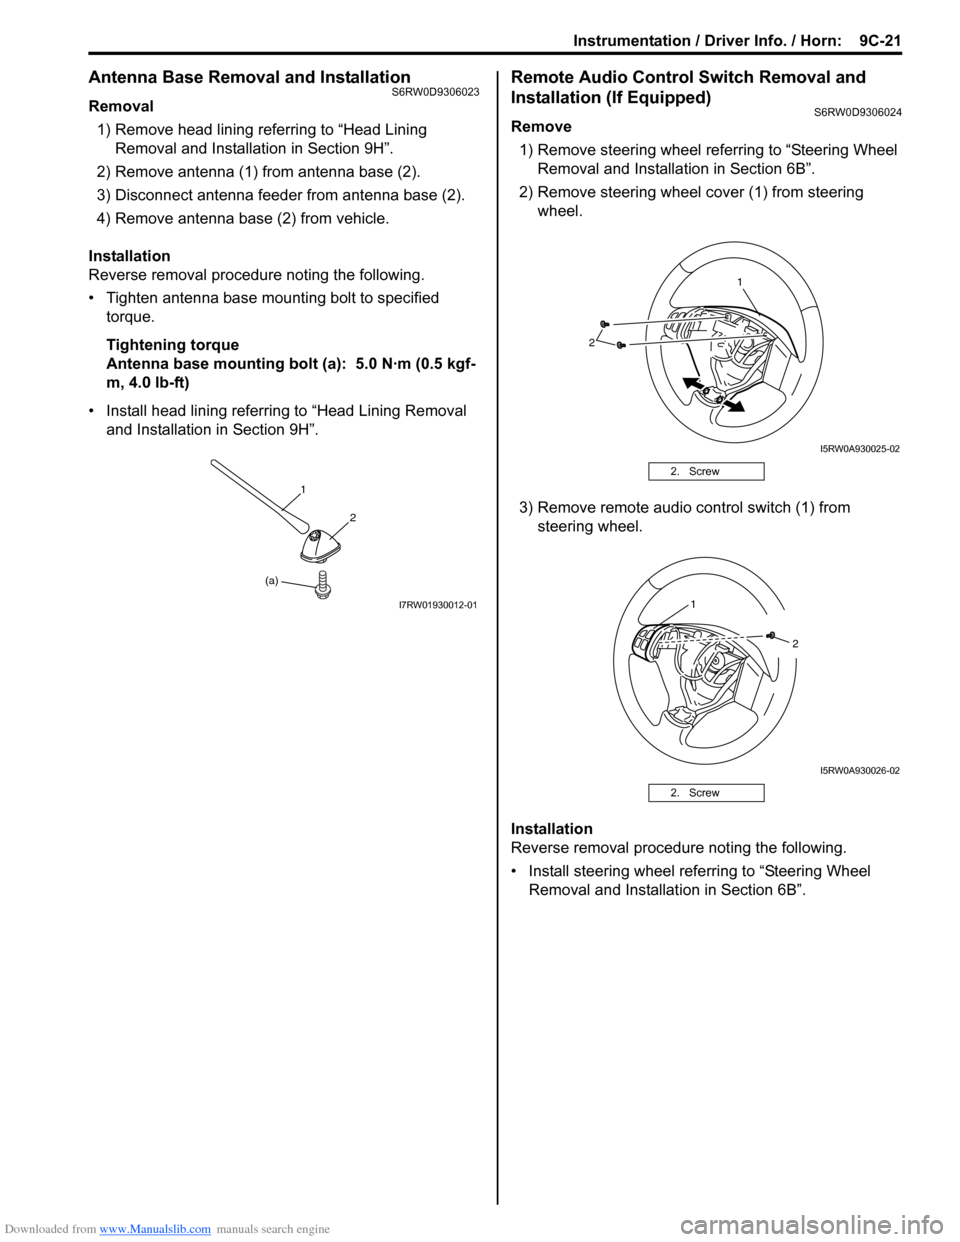
Antenna Base Removal and InstallationS6RW0D9306023
Removal
1) Remove head lining referring to “Head Lining
Removal and Installation in Section 9H”.
2) Remove antenna (1) from antenna base (2).
3) Disconnect antenna feeder from antenna base (2).
4) Remove antenna base (2) from vehicle.
Installation
Reverse removal procedure noting the following.
• Tighten antenna base mounting bolt to specified
torque.
Tightening torque
Antenna base mounting bolt (a): 5.0 N·m (0.5 kgf-
m, 4.0 lb-ft)
• Install head lining referring to “Head Lining Removal
and Installation in Section 9H”.
Remote Audio Control Switch Removal and
Installation (If Equipped)
S6RW0D9306024
Remove
1) Remove steering wheel referring to “Steering Wheel
Removal and Installation in Section 6B”.
2) Remove steering wheel cover (1) from steering
wheel.
3) Remove remote audio control switch (1) from
steering wheel.
Installation
Reverse removal procedure noting the following.
• Install steering wheel referring to “Steering Wheel
Removal and Installation in Section 6B”.
(a)1
2
I7RW01930012-01
2. Screw
2. Screw
2
1
I5RW0A930025-02
1
2
I5RW0A930026-02
Page 1377 of 1556
Downloaded from www.Manualslib.com manuals search engine Wipers / Washers: 9D-3
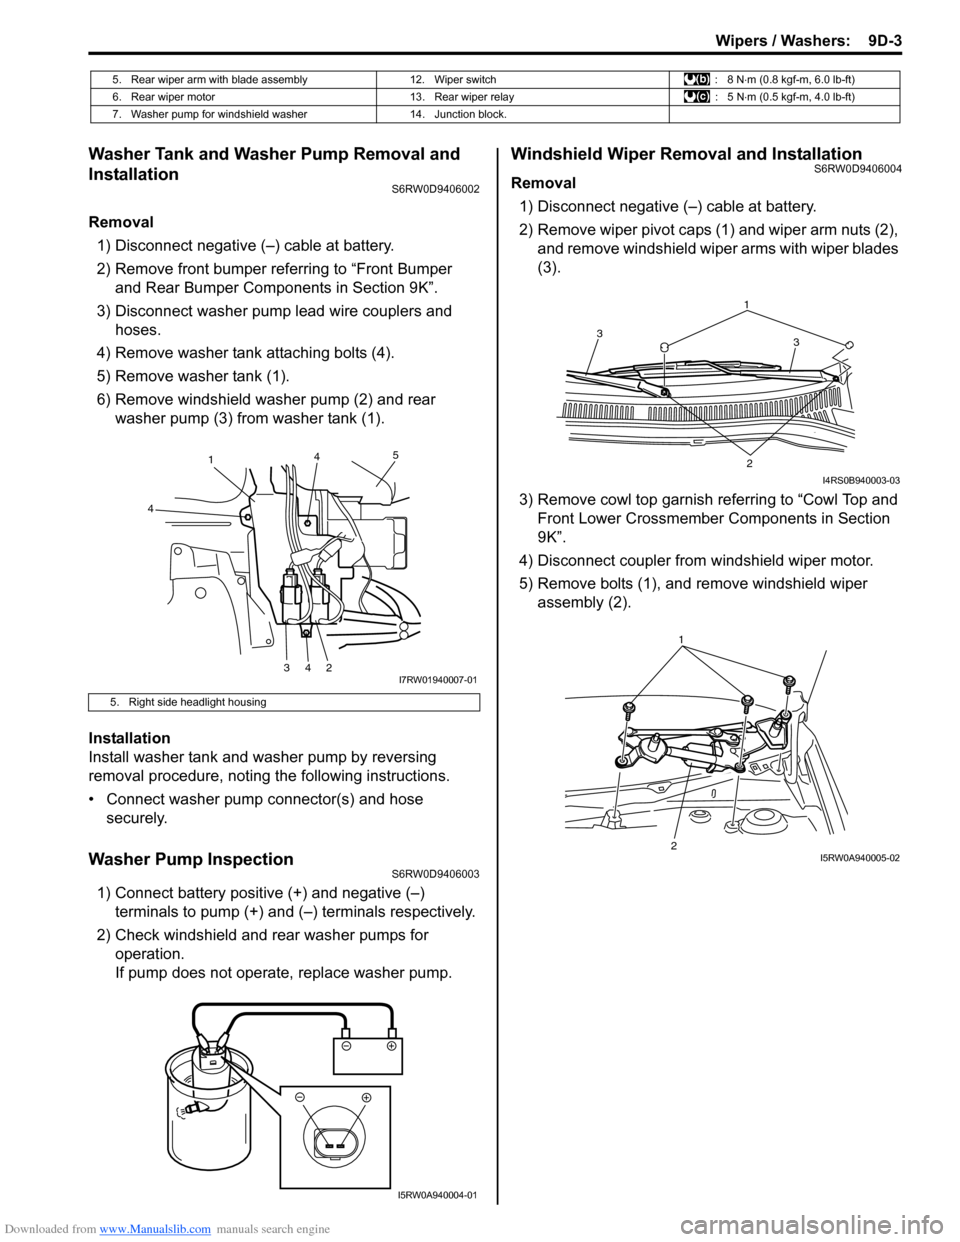
Washer Tank and Washer Pump Removal and
Installation
S6RW0D9406002
Removal
1) Disconnect negative (–) cable at battery.
2) Remove front bumper referring to “Front Bumper
and Rear Bumper Components in Section 9K”.
3) Disconnect washer pump lead wire couplers and
hoses.
4) Remove washer tank attaching bolts (4).
5) Remove washer tank (1).
6) Remove windshield washer pump (2) and rear
washer pump (3) from washer tank (1).
Installation
Install washer tank and washer pump by reversing
removal procedure, noting the following instructions.
• Connect washer pump connector(s) and hose
securely.
Washer Pump InspectionS6RW0D9406003
1) Connect battery positive (+) and negative (–)
terminals to pump (+) and (–) terminals respectively.
2) Check windshield and rear washer pumps for
operation.
If pump does not operate, replace washer pump.
Windshield Wiper Removal and InstallationS6RW0D9406004
Removal
1) Disconnect negative (–) cable at battery.
2) Remove wiper pivot caps (1) and wiper arm nuts (2),
and remove windshield wiper arms with wiper blades
(3).
3) Remove cowl top garnish referring to “Cowl Top and
Front Lower Crossmember Components in Section
9K”.
4) Disconnect coupler from windshield wiper motor.
5) Remove bolts (1), and remove windshield wiper
assembly (2).
5. Rear wiper arm with blade assembly 12. Wiper switch : 8 N⋅m (0.8 kgf-m, 6.0 lb-ft)
6. Rear wiper motor 13. Rear wiper relay : 5 N⋅m (0.5 kgf-m, 4.0 lb-ft)
7. Washer pump for windshield washer 14. Junction block.
5. Right side headlight housing
1
4
34245
I7RW01940007-01
I5RW0A940004-01
1
3 3
2
I4RS0B940003-03
21I5RW0A940005-02
Page 1391 of 1556
Downloaded from www.Manualslib.com manuals search engine Glass / Windows / Mirrors: 9E-6
Windshield Removal and InstallationS6RW0D9506002
Preparation
The windshield is installed by using a special type of
adhesive (that is, one component urethane adhesive
used with primer). For the windshield replacement, it is
important to use an adhesive which provides sufficient
adhesion strength and follow the proper procedure.
CAUTION!
• Described is the glass replacement by
using 3 types of primers and 1 type of
adhesive made by YOKOHAMA (one
component urethane adhesive to be used
with primer in combination). When using
primer and adhesive made by other
manufacturers, be sure to refer to handling
instructions supplied with them.
Negligence in following such procedure or
misuse of the adhesive in any way hinders
its inherent adhesive property. Therefore,
before the work, make sure to read
carefully the instruction and description
given by the maker of the adhesive to be
used and be sure to follow the procedure
and observe each precaution throughout
the work.
• Should coated surface be scratched or
otherwise damaged, be sure to repair
damaged part, or corrosion may start from
there.
Use the specific adhesive which has the following
property.
Glass adhesive shearing strength
40 kg/cm2 (569 lb/in2) or moreAdhesive materials and tools required for removal and
installation.
• One component urethane adhesive and primers used
in combination (For one sheet of windshield).
– Adhesive (470 g (15.7 oz.))
– Primer for glass (30 g (1.0 oz.))
– Primer for body (30 g (1.0 oz.))
– Primer for molding (30 g (1.0 oz.))
• Eyeleteer
•Piano string
• Windshield knife
• Brush for primer application (2 pcs)
•Knife
• Rubber sucker grip
• Sealant gun (for filling adhesive)
• Putty spatula (for correcting adhered parts)
Removal
1) Clean both inside and outside of glass and around it.
2) Remove wiper arms and cowl top garnish.
3) Using tape, cover body surface around glass to
prevent any damage.
4) Remove rear view mirror, sun visor and front pillar
trims (right & left).
5) If necessary, remove instrument panel. Refer to
“Instrument Panel Removal and Installation in
Section 9C”.
6) If necessary, remove head lining. Refer to “Head
Lining Removal and Installation in Section 9H”.
7) Remove (or cut) windshield molding.
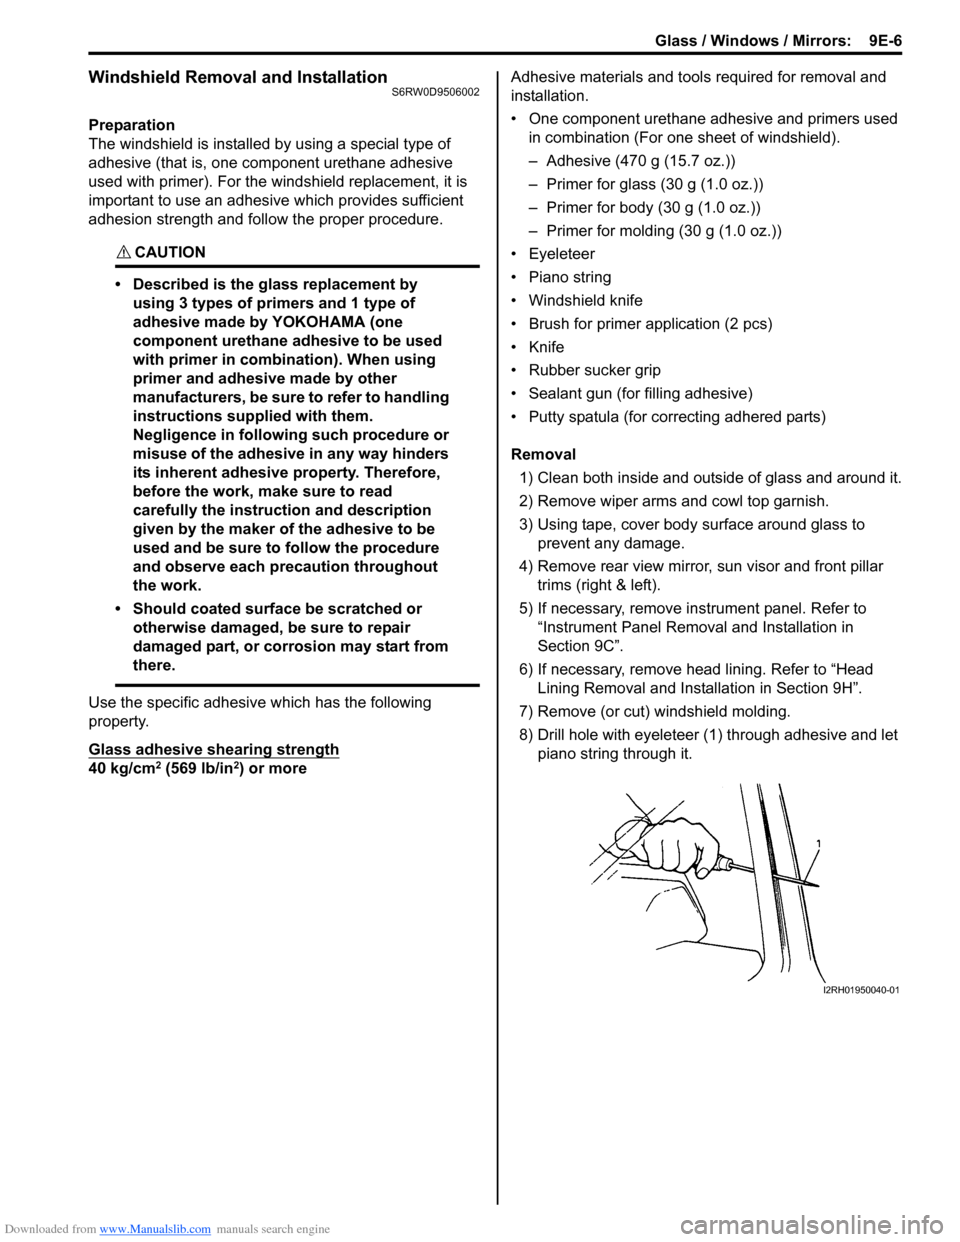
8) Drill hole with eyeleteer (1) through adhesive and let
piano string through it.
I2RH01950040-01
Page 1422 of 1556
Downloaded from www.Manualslib.com manuals search engine 9F-11 Security and Locks:
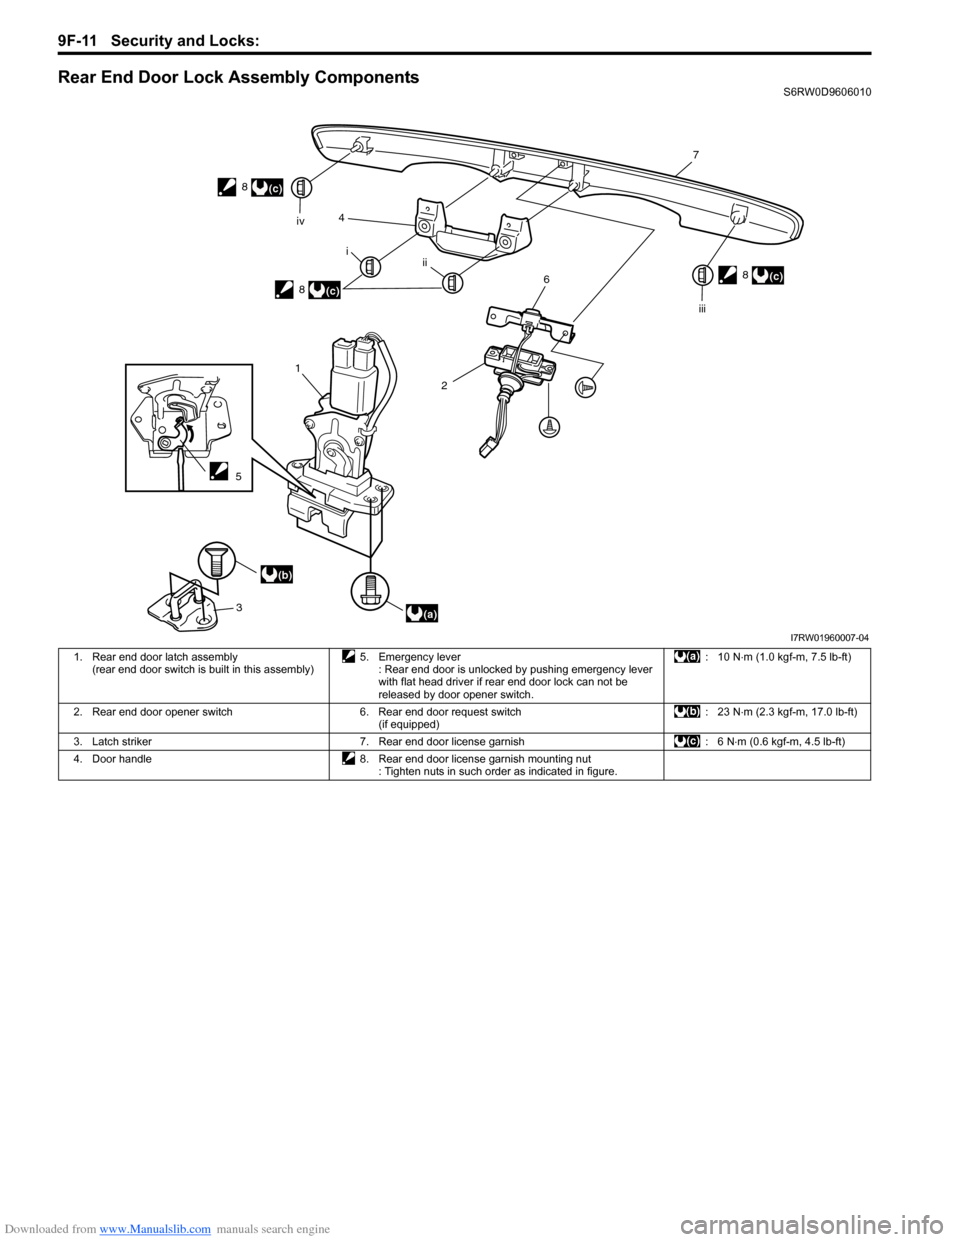
Rear End Door Lock Assembly ComponentsS6RW0D9606010
1
3
(a)
(b)4
5
2
6
7
8
i
ii iv
iii
(c)
8
(c)
8(c)
I7RW01960007-04
1. Rear end door latch assembly
(rear end door switch is built in this assembly)5. Emergency lever
: Rear end door is unlocked by pushing emergency lever
with flat head driver if rear end door lock can not be
released by door opener switch.: 10 N⋅m (1.0 kgf-m, 7.5 lb-ft)
2. Rear end door opener switch 6. Rear end door request switch
(if equipped): 23 N⋅m (2.3 kgf-m, 17.0 lb-ft)
3. Latch striker 7. Rear end door license garnish : 6 N⋅m (0.6 kgf-m, 4.5 lb-ft)
4. Door handle 8. Rear end door license garnish mounting nut
: Tighten nuts in such order as indicated in figure.
Page 1429 of 1556
Downloaded from www.Manualslib.com manuals search engine Seats: 9G-2
Repair Instructions
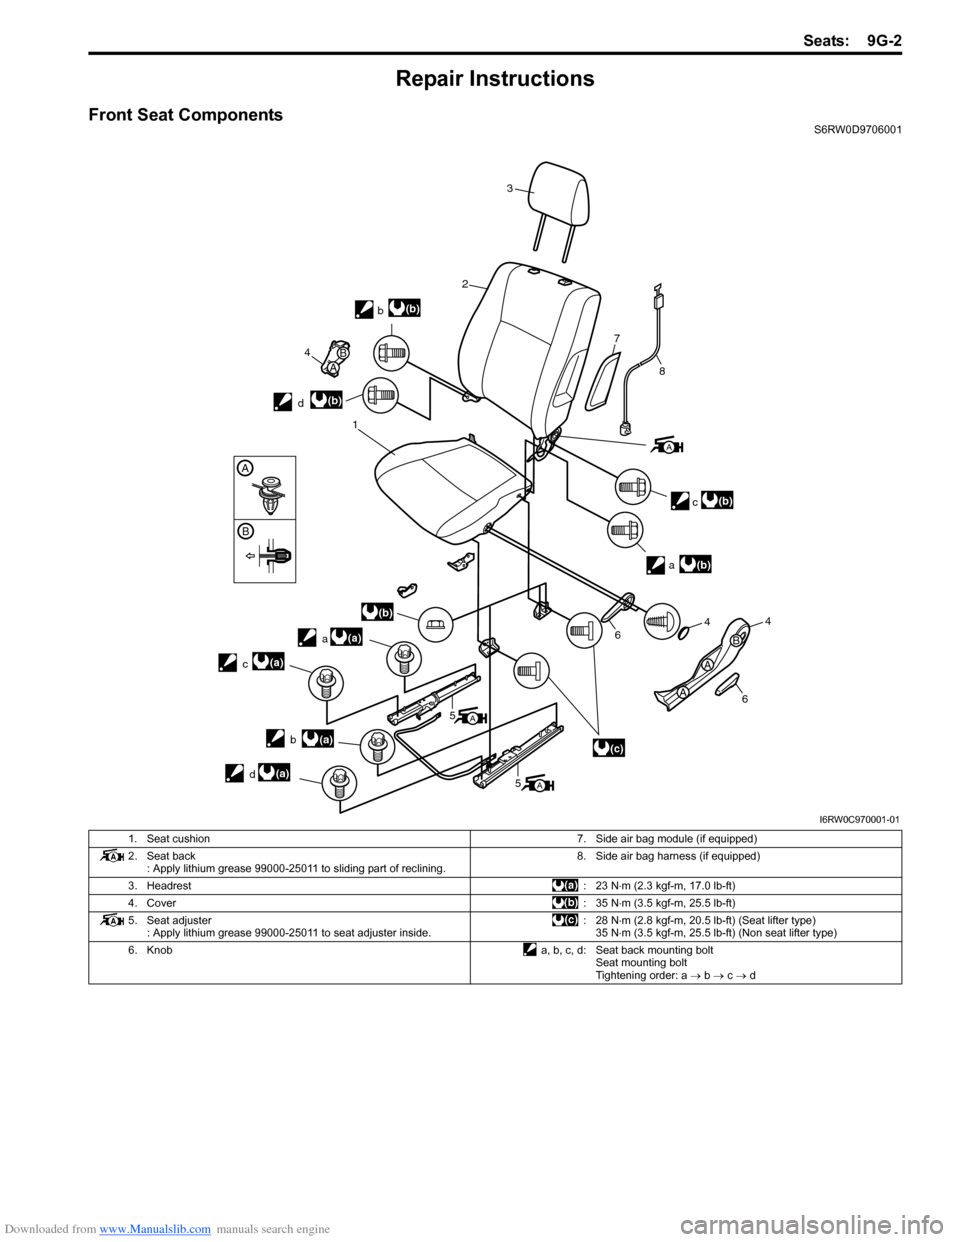
Front Seat ComponentsS6RW0D9706001
3
2
8
7
a
c
4
d
b
1
5
5
4
6
64
a
b
c
d
(b)
(b)
(b)
(b)
(a)
(a)
(a)
(a)
A
A
A
(b)
(c)
BA
A
A
B
A
B
I6RW0C970001-01
1. Seat cushion7. Side air bag module (if equipped)
2. Seat back
: Apply lithium grease 99000-25011 to sliding part of reclining.8. Side air bag harness (if equipped)
3. Headrest: 23 N⋅m (2.3 kgf-m, 17.0 lb-ft)
4. Cover: 35 N⋅m (3.5 kgf-m, 25.5 lb-ft)
5. Seat adjuster
: Apply lithium grease 99000-25011 to seat adjuster inside.: 28 N⋅m (2.8 kgf-m, 20.5 lb-ft) (Seat lifter type)
35 N⋅m (3.5 kgf-m, 25.5 lb-ft) (Non seat lifter type)
6. Knoba, b, c, d: Seat back mounting bolt
Seat mounting bolt
Tightening order: a → b → c → d
Page 1431 of 1556
Downloaded from www.Manualslib.com manuals search engine Seats: 9G-4
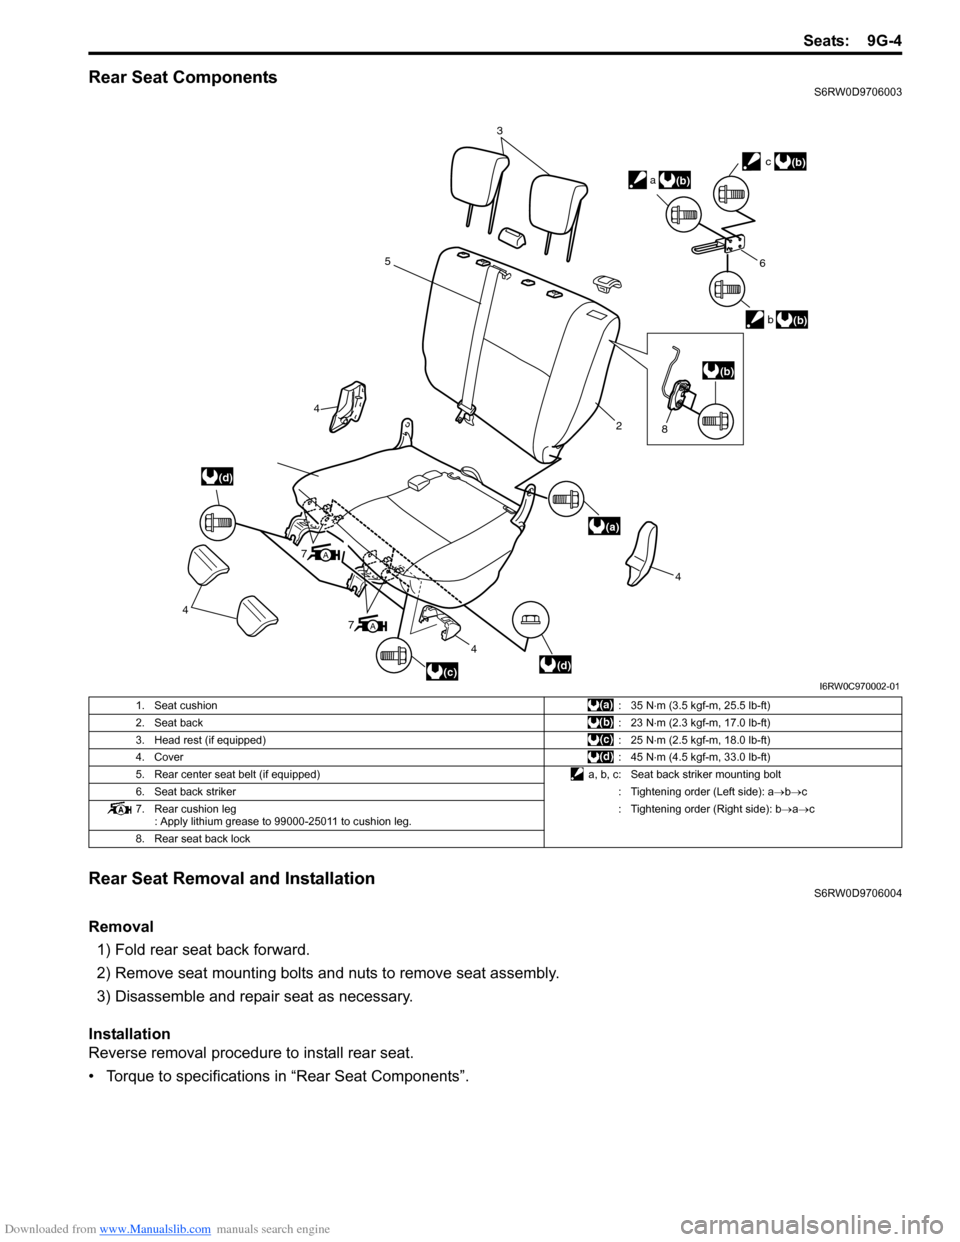
Rear Seat ComponentsS6RW0D9706003
Rear Seat Removal and InstallationS6RW0D9706004
Removal
1) Fold rear seat back forward.
2) Remove seat mounting bolts and nuts to remove seat assembly.
3) Disassemble and repair seat as necessary.
Installation
Reverse removal procedure to install rear seat.
• Torque to specifications in “Rear Seat Components”.
3
5
4
4
4
7
4
2
6
b
c
a
(d)
(a)
(d)
(b)
(b)
(b)
(c)
A
7A
(b)
8
I6RW0C970002-01
1. Seat cushion:35 N⋅m (3.5 kgf-m, 25.5 lb-ft)
2. Seat back:23 N⋅m (2.3 kgf-m, 17.0 lb-ft)
3. Head rest (if equipped):25 N⋅m (2.5 kgf-m, 18.0 lb-ft)
4. Cover:45 N⋅m (4.5 kgf-m, 33.0 lb-ft)
5. Rear center seat belt (if equipped) a, b, c: Seat back striker mounting bolt
6. Seat back striker: Tightening order (Left side): a→b→c
7. Rear cushion leg
: Apply lithium grease to 99000-25011 to cushion leg.: Tightening order (Right side): b→a→c
8. Rear seat back lock