2006 SUZUKI SX4 fuse
[x] Cancel search: fusePage 1010 of 1556
Downloaded from www.Manualslib.com manuals search engine 7B-70 Air Conditioning System: Automatic Type
DTC B1546: A/C Refrigerant Pressure MalfunctionS6RW0D7224019
DTC Detecting Condition and Trouble Area
DTC Troubleshooting
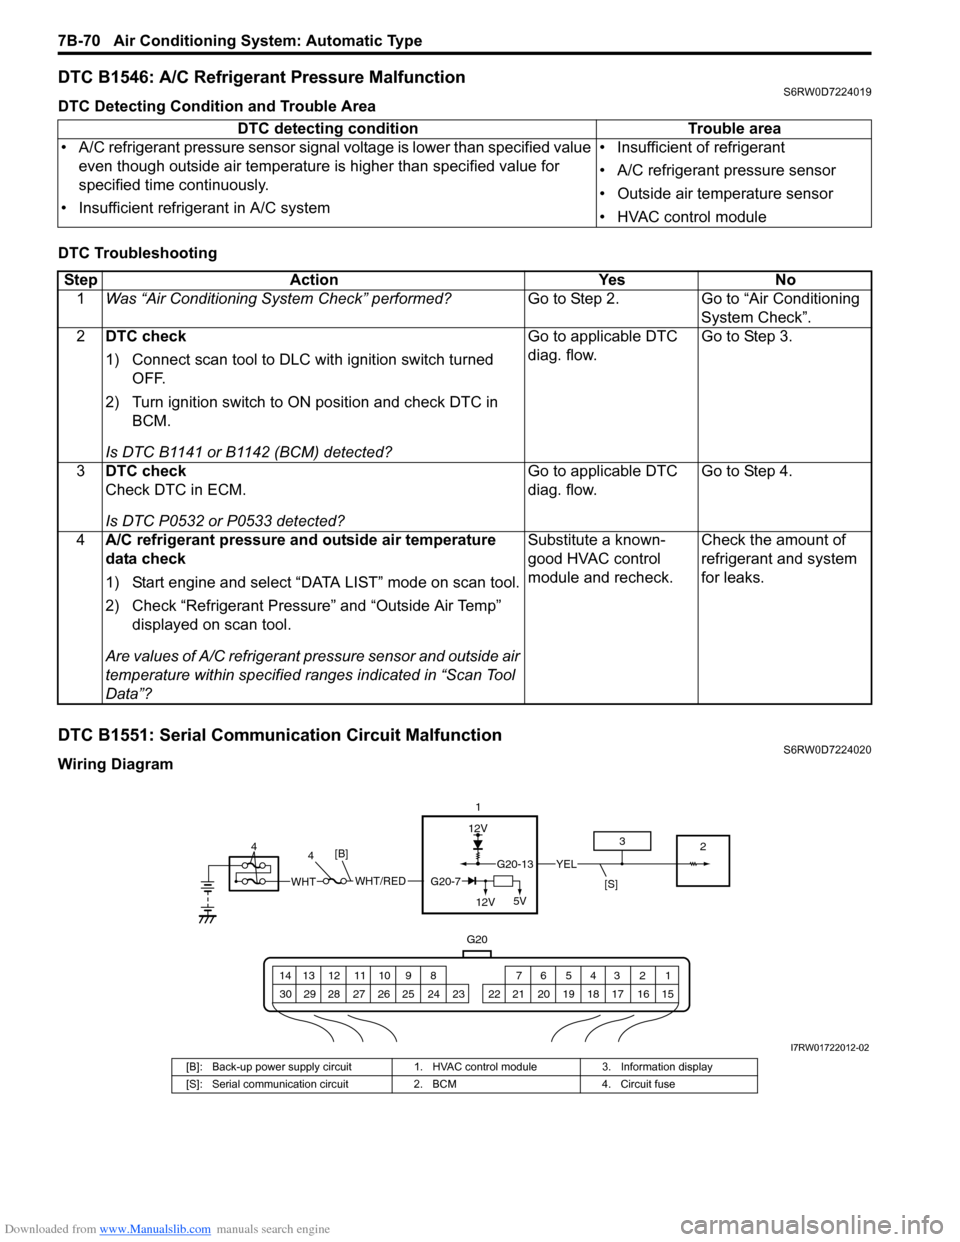
DTC B1551: Serial Communication Circuit MalfunctionS6RW0D7224020
Wiring DiagramDTC detecting condition Trouble area
• A/C refrigerant pressure sensor signal voltage is lower than specified value
even though outside air temperature is higher than specified value for
specified time continuously.
• Insufficient refrigerant in A/C system• Insufficient of refrigerant
• A/C refrigerant pressure sensor
• Outside air temperature sensor
• HVAC control module
Step Action Yes No
1Was “Air Conditioning System Check” performed?Go to Step 2. Go to “Air Conditioning
System Check”.
2DTC check
1) Connect scan tool to DLC with ignition switch turned
OFF.
2) Turn ignition switch to ON position and check DTC in
BCM.
Is DTC B1141 or B1142 (BCM) detected?Go to applicable DTC
diag. flow.Go to Step 3.
3DTC check
Check DTC in ECM.
Is DTC P0532 or P0533 detected?Go to applicable DTC
diag. flow.Go to Step 4.
4A/C refrigerant pressure and outside air temperature
data check
1) Start engine and select “DATA LIST” mode on scan tool.
2) Check “Refrigerant Pressure” and “Outside Air Temp”
displayed on scan tool.
Are values of A/C refrigerant pressure sensor and outside air
temperature within specified ranges indicated in “Scan Tool
Data”?Substitute a known-
good HVAC control
module and recheck.Check the amount of
refrigerant and system
for leaks.
12V
G20
G20-13YEL
1 2 3 4 5 6 7 8 9 10 11 12 13 14
15 16 17 18 19 20 21 24 23 22 25 26 27 28 29 30
1
2 3
[S]WHT/REDWHTG20-7
12V5V
[B]4 4
I7RW01722012-02
[B]: Back-up power supply circuit 1. HVAC control module 3. Information display
[S]: Serial communication circuit 2. BCM 4. Circuit fuse
Page 1011 of 1556
Downloaded from www.Manualslib.com manuals search engine Air Conditioning System: Automatic Type 7B-71
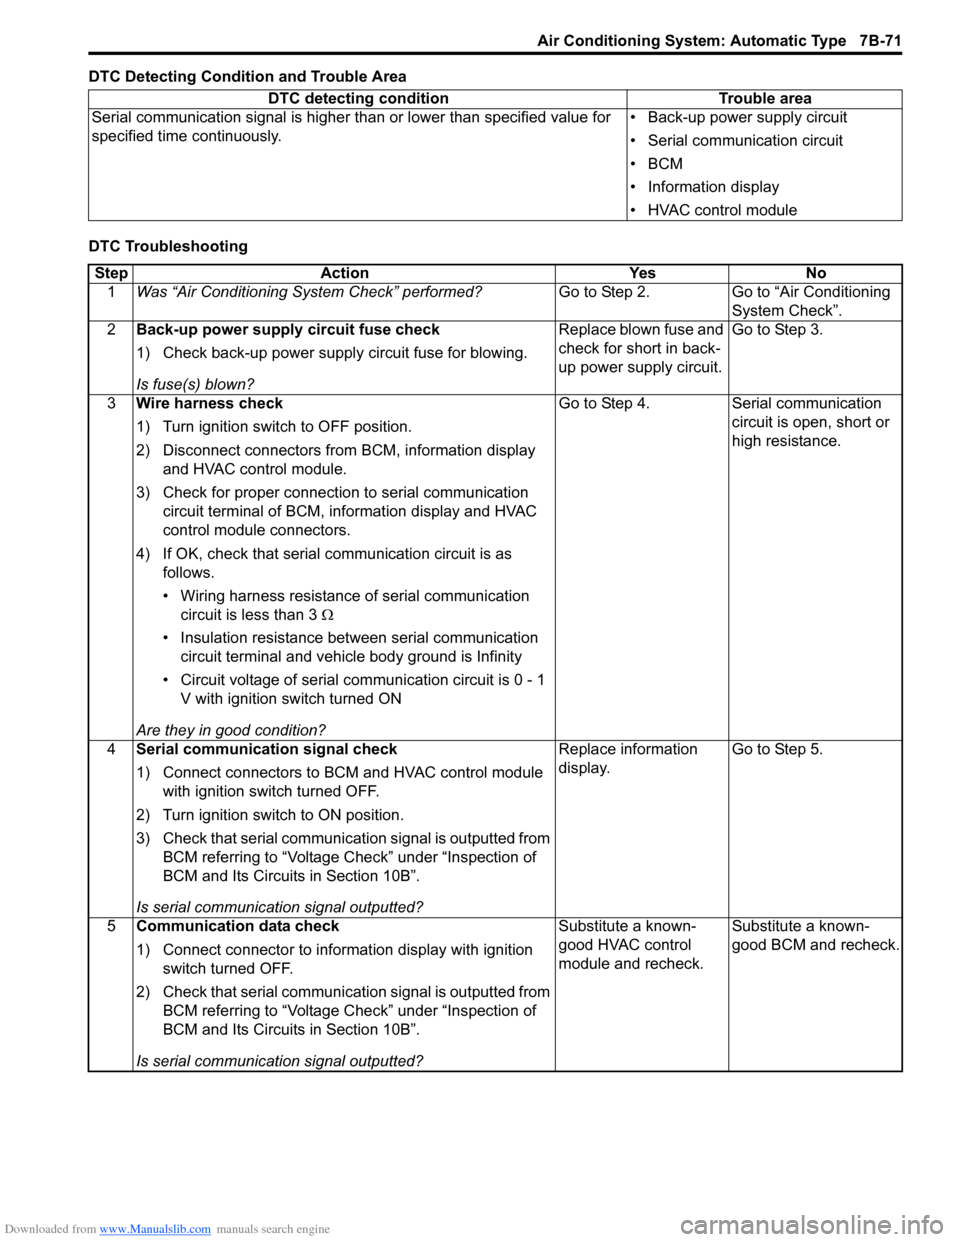
DTC Detecting Condition and Trouble Area
DTC TroubleshootingDTC detecting condition Trouble area
Serial communication signal is higher than or lower than specified value for
specified time continuously.• Back-up power supply circuit
• Serial communication circuit
•BCM
• Information display
• HVAC control module
Step Action Yes No
1Was “Air Conditioning System Check” performed?Go to Step 2. Go to “Air Conditioning
System Check”.
2Back-up power supply circuit fuse check
1) Check back-up power supply circuit fuse for blowing.
Is fuse(s) blown?Replace blown fuse and
check for short in back-
up power supply circuit.Go to Step 3.
3Wire harness check
1) Turn ignition switch to OFF position.
2) Disconnect connectors from BCM, information display
and HVAC control module.
3) Check for proper connection to serial communication
circuit terminal of BCM, information display and HVAC
control module connectors.
4) If OK, check that serial communication circuit is as
follows.
• Wiring harness resistance of serial communication
circuit is less than 3 Ω
• Insulation resistance between serial communication
circuit terminal and vehicle body ground is Infinity
• Circuit voltage of serial communication circuit is 0 - 1
V with ignition switch turned ON
Are they in good condition?Go to Step 4. Serial communication
circuit is open, short or
high resistance.
4Serial communication signal check
1) Connect connectors to BCM and HVAC control module
with ignition switch turned OFF.
2) Turn ignition switch to ON position.
3) Check that serial communication signal is outputted from
BCM referring to “Voltage Check” under “Inspection of
BCM and Its Circuits in Section 10B”.
Is serial communication signal outputted?Replace information
display.Go to Step 5.
5Communication data check
1) Connect connector to information display with ignition
switch turned OFF.
2) Check that serial communication signal is outputted from
BCM referring to “Voltage Check” under “Inspection of
BCM and Its Circuits in Section 10B”.
Is serial communication signal outputted?Substitute a known-
good HVAC control
module and recheck.Substitute a known-
good BCM and recheck.
Page 1040 of 1556
Downloaded from www.Manualslib.com manuals search engine 8B-1 Air Bag System:
Restraint
Air Bag System
Precautions
Precautions on Service and Diagnosis of Air
Bag System
S6RW0D8200004
WARNING!
• If the air bag system and another vehicle
system both need repair, SUZUKI
recommends that the air bag system be
repaired first, to help avoid unintended air
bag system activation.
• Do not modify the steering wheel,
dashboard, both front seat or any other on
or around air bag system components.
Modifications can adversely affect air bag
system performance and lead to injury.
• Be sure to follow the procedures described
in this section. Failure to follow
procedures could result in possible air bag
system activation, personal injury or
unneeded air bag system repairs.
• WARNING / CAUTION labels are attached on each
part of air bag system components (SDM, air bag
(inflator) modules and seat belt pretensioners). Be
sure to follow the instructions.
• Many of service procedures require disconnection of
“A/B” fuse and air bag (inflator) module(s) (driver
module, passenger module, side modules and curtain
modules) from initiator circuit to avoid an accidental
deployment.
• Do not apply power to the air bag system unless all
components are connected or a diagnostic flow
requests it, as this will set a DTC.
• The “Air Bag Diagnostic System Check” must be the
starting point of any air bag diagnostics. The “Air Bag
Diagnostic System Check” will verify proper “AIR
BAG” warning light operation and will lead you to the
correct flow to diagnose any air bag malfunctions.
Bypassing these procedures may result in extended
diagnostic time, incorrect diagnosis, and incorrect
parts replacements.
• Never use air bag component parts from another
vehicle.
• If the vehicle will be exposed to temperatures over 93
°C (200 °F) (for example, during a paint baking
process), remove the air bag system components
beforehand to avoid component damage or
unintended system activation.• When handling the air bag (inflator) modules (driver
module, passenger module, side modules and curtain
modules), seat belt pretensioners (driver module and
passenger module), SDM, forward impact-sensor or
side impact-sensor be careful not to drop it or apply
an impact to it. If an excessive impact was applied
(e.g., SDM, forward impact-sensor are dropped, air
bag (inflator) module is dropped from a height of 90
cm (3 ft) or more, seat belt pretensioner (retractor
assembly) is dropped from a height of 30 cm (1 ft) or
more), never attempt disassembly or repair but
replace it with a new one.
• When using electric welding, be sure to disconnect air
bag (inflator) module connectors (driver module,
passenger module, side modules and curtain
modules) and seat belt pretensioner connectors
(driver module and passenger module) respectively.
• When applying paint around the air bag system
related parts, use care so that the harness or
connector will not be exposed to the paint mist.
• Never expose air bag system component parts
directly to hot air (drying or baking the vehicle after
painting) or flames.
WARNING!
When performing service on or around air
bag system components or air bag wiring,
follow the procedures listed in “Disabling Air
Bag System” to temporarily disable the air
bag system.
Failure to follow procedures could result in
possible air bag system activation, personal
injury or unneeded air bag system repairs.
Precautions on Handling and Storage of Air Bag
System Components
S6RW0D8200002
SDM
WARNING!
Never power up air bag system when SDM is
not rigidly attached to the vehicle. Otherwise,
personal injury may result.
CAUTION!
After detecting one time of such collision as
to meet deployment conditions, SDM must
not be used. Refer to “Air Bag Diagnostic
System Check” when checking SDM.
Page 1044 of 1556
Downloaded from www.Manualslib.com manuals search engine 8B-5 Air Bag System:
Precautions on Disposal of Air Bag and Seat
Belt Pretensioner
S6RW0D8200003
Do not dispose of the live (undeployed) air bag (inflator)
modules and the live (inactivated) seat belt
pretensioners.
When disposal is necessary, be sure to deploy / activate
the air bag and seat belt pretensioner according to
deployment / activation procedure described in “Air Bag
(Inflator) Module and Seat Belt Pretensioner Disposal”.
WARNING!
Failure to follow proper air bag (inflator)
module and seat belt pretensioner disposal
procedures can result in air bag deployment
and pretensioner activation which could
cause personal injury. Undeployed air bag
(inflator) module and inactivated seat belt
pretensioner must not be disposed of
through normal refuse channels.
The undeployed air bag (inflator) module and
inactivated seat belt pretensioner contain
substances that can cause severe illness or
personal injury if the sealed container is
damaged during disposal.
General Description
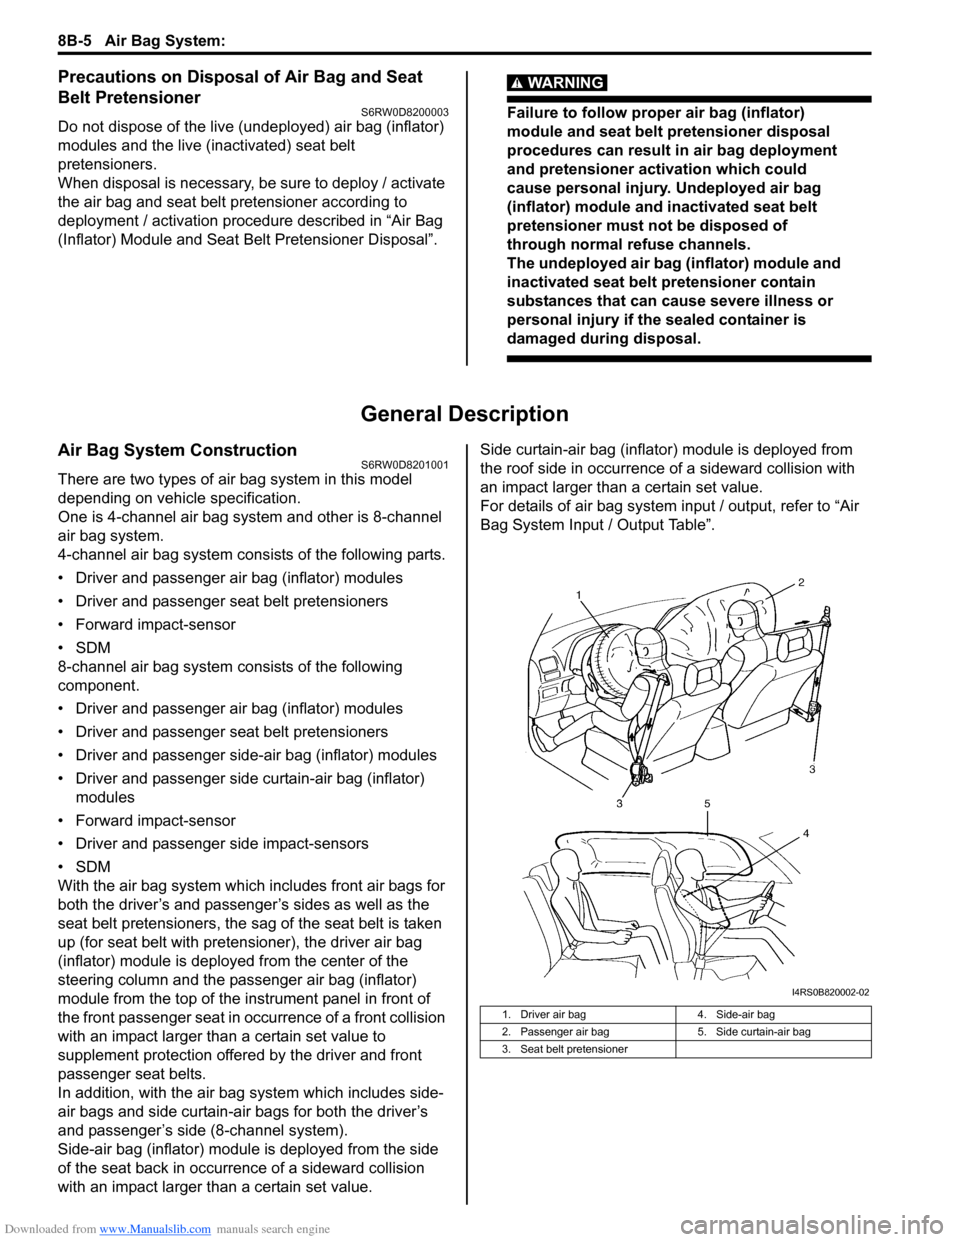
Air Bag System ConstructionS6RW0D8201001
There are two types of air bag system in this model
depending on vehicle specification.
One is 4-channel air bag system and other is 8-channel
air bag system.
4-channel air bag system consists of the following parts.
• Driver and passenger air bag (inflator) modules
• Driver and passenger seat belt pretensioners
• Forward impact-sensor
•SDM
8-channel air bag system consists of the following
component.
• Driver and passenger air bag (inflator) modules
• Driver and passenger seat belt pretensioners
• Driver and passenger side-air bag (inflator) modules
• Driver and passenger side curtain-air bag (inflator)
modules
• Forward impact-sensor
• Driver and passenger side impact-sensors
•SDM
With the air bag system which includes front air bags for
both the driver’s and passenger’s sides as well as the
seat belt pretensioners, the sag of the seat belt is taken
up (for seat belt with pretensioner), the driver air bag
(inflator) module is deployed from the center of the
steering column and the passenger air bag (inflator)
module from the top of the instrument panel in front of
the front passenger seat in occurrence of a front collision
with an impact larger than a certain set value to
supplement protection offered by the driver and front
passenger seat belts.
In addition, with the air bag system which includes side-
air bags and side curtain-air bags for both the driver’s
and passenger’s side (8-channel system).
Side-air bag (inflator) module is deployed from the side
of the seat back in occurrence of a sideward collision
with an impact larger than a certain set value.Side curtain-air bag (inflator) module is deployed from
the roof side in occurrence of a sideward collision with
an impact larger than a certain set value.
For details of air bag system input / output, refer to “Air
Bag System Input / Output Table”.
1. Driver air bag 4. Side-air bag
2. Passenger air bag 5. Side curtain-air bag
3. Seat belt pretensioner
I4RS0B820002-02
Page 1048 of 1556
![SUZUKI SX4 2006 1.G Service Workshop Manual Downloaded from www.Manualslib.com manuals search engine 8B-9 Air Bag System:
Terminal arrangement of SDM (viewed from harness side)
[A]: Shorting bar 11. BCM 25. Driver seat belt pretensioner
[B]: C SUZUKI SX4 2006 1.G Service Workshop Manual Downloaded from www.Manualslib.com manuals search engine 8B-9 Air Bag System:
Terminal arrangement of SDM (viewed from harness side)
[A]: Shorting bar 11. BCM 25. Driver seat belt pretensioner
[B]: C](/manual-img/20/7612/w960_7612-1047.png)
Downloaded from www.Manualslib.com manuals search engine 8B-9 Air Bag System:
Terminal arrangement of SDM (viewed from harness side)
[A]: Shorting bar 11. BCM 25. Driver seat belt pretensioner
[B]: Connector 12. Combination meter 26. Passenger seat belt pretensioner
[C]: Junction block with BCM model 13. “AIR BAG” warning light27. Driver side-air bag (inflator) module (8-channel system)
[D]: Junction block without BCM model 14. Light driver 28. Passenger side-air bag (inflator) module (8-channel system)
1. Battery 15. SDM 29. Driver side curtain-air bag (inflator) module (8-channel
system)
2. Main fuse 16. To HVAC control module (auto A/C model) 30. Passenger side curtain-air bag (inflator) module (8-channel
system)
3. Fuse 17. Data link connector (DLC) 31. Safing power driver
4. Individual circuit fuse box No.1 18. Forward impact-sensor 32. X-Y-G (longitudinal / lateral acceleration)
5. “IGN” fuse 19. Driver side impact-sensor (8-channel
system)33. DC / DC converter
6. Ignition switch 20. Passenger side impact-sensor (8-channel
system)34. Mechanical longitudinal G sensor (switch)
7. Junction block assembly 21. Ground for air bag system 35. Back up capacitor
8. “DOME” fuse 22. Contact coil assembly
9. “METER” fuse 23. Driver air bag (inflator) module
10. “A/B” fuse 24. Passenger air bag (inflator) module
1
2 3 4 5 6 7 8 9 10 11 12 13 14 15 16 17 18 19 20 21 22 23 24 25 26
27 28 29 30 31 32 33 34 35 36 37 38 39 40 41 42 43 44 45 46 47 48 49 50 51
1
I7RW01822003-02
1. SDM Connector “L04”
Page 1051 of 1556
Downloaded from www.Manualslib.com manuals search engine Air Bag System: 8B-12
Diagnostic Information and Procedures
Air Bag Diagnostic System CheckS6RW0D8204001
WARNING!
To avoid deployment when troubleshooting
the air bag system, do not use electrical test
equipment such as a battery powered or AC
powered voltmeter, ohmmeter, etc., or any
type of electrical equipment other than that
specified in this manual. Do not use a non-
powered probe type tester.
Instructions in this manual must be followed
carefully, otherwise personal injury may
result.
CAUTION!
• The order in which DTCs are diagnosed is
very important. Failure to diagnose the
DTCs in the order specified may result in
extended diagnostic time, incorrect
diagnosis and incorrect parts replacement.
• When measurement of resistance or
voltage is required in the flow, use a tester
along with a correct terminal adapter from
special tool (Connector test adapter kit).
• When a check for proper connection is
required, refer to “Inspection of
Intermittent and Poor Connections”.
• If an open circuit in the air bag wire
harness damaged, connector or terminal is
found, replace the wire harness,
connectors and terminals as an assembly.
The diagnostic procedures used are designed to find
and repair air bag system malfunctions.
To get the best results, it is important to use the
diagnostic flow and follow the sequence in the following.
1) Perform the “Air Bag Diagnostic System Check
Flow”.
(The “Air Bag Diagnostic System Check Flow” must
be the starting point of any air bag system diagnosis.
The “Air Bag Diagnostic System Check Flow” checks
for proper “AIR BAG” warning light operation through
“AIR BAG” warning light and whether air bag DTCs
exist.)
2) Refer to the proper diagnostic flow as directed by the
“Air Bag Diagnostic System Check Flow”.
(The “Air Bag Diagnostic System Check Flow” will
lead you to the correct flow to diagnose any air bag
system malfunctions. Bypassing these procedures
may result in extended diagnostic time, incorrect
diagnosis and incorrect parts replacement.)
3) Repeat the “Air Bag Diagnostic System Check Flow”
after any repair or diagnostic procedures have been
performed.
(Performing the “Air Bag Diagnostic System Check
Flow” after all repair or diagnostic procedures will
ensure that the repair has been made correctly and
that no other malfunctions exist.)
A: Combination meter 6. Side curtain-air bag (inflator) module (8-
channel system)14. “A/B” fuse in junction block assembly
B: Steering wheel 7. Contact coil assembly 15. Air bag harness in main harness
C: Seat 8. Forward impact-sensor 16. Air bag harness in instrument panel harness
1. “AIR BAG” warning light 9. Apron-side-member (driver side) 17. Air bag harness in floor harness
2. Driver air bag (inflator) module 10. Side impact-sensor (8-channel system) 18. Side-air bag harness (8-channel system)
3. Passenger air bag facing cover 11. Side sill inner panel 19. Side curtain-air bag harness (8-channel
system)
4. Passenger air bag (inflator) module 12. SDM 20. Ground for air bag system
5. Side-air bag (inflator) module (8-channel
system)13. Seat belt pretensioner
Page 1058 of 1556
Downloaded from www.Manualslib.com manuals search engine 8B-19 Air Bag System:
Scan Tool Data Definition
Buck Up Volt (V)
This parameter indicates the capacity of the backup
capacitor installed to maintain the ignition current (as
much as possible) even when the power supply to SDM
that ignites the inflator is shut off.
Battery Voltage (V)
Battery voltage is an analog input signal read by SDM.
Dirv Air Bag Ini Res (Driver air bag initiator
resistance) (ohm)
This parameter indicates the resistance of the driver air
bag initiator circuit.
Pass Air Bag Ini Res (Passenger air bag initiator
resistance) (ohm)
This parameter indicates the resistance of the passenger
air bag initiator circuit.
Driv Preten Ini Res (Driver pretensioner initiator
resistance) (ohm)
This parameter indicates the resistance of the driver seat
belt pretensioner initiator circuit.Pass Preten Ini Res (Passenger pretensioner
initiator resistance) (ohm)
This parameter indicates the resistance of the passenger
seat belt pretensioner initiator circuit.
Driv Sidebag Ini Res (Driver side-air bag initiator
resistance) (ohm)
This parameter indicates the resistance of the driver
side-air bag initiator circuit.
Pass Sidebag Ini Res (Passenger side-air bag
initiator resistance) (ohm)
This parameter indicates the resistance of the passenger
side-air bag initiator circuit.
Driv curtain Ini RES (Driver side curtain-air bag
initiator resistance) (ohm)
This parameter indicates the resistance of the driver side
curtain-air bag initiator circuit.
Pass curtain Ini RES (Passenger side curtain-air bag
initiator resistance) (ohm)
This parameter indicates the resistance of the passenger
side curtain-air bag initiator circuit.
System ID (4ch/8ch)
This parameter indicates the number of initiator circuits.
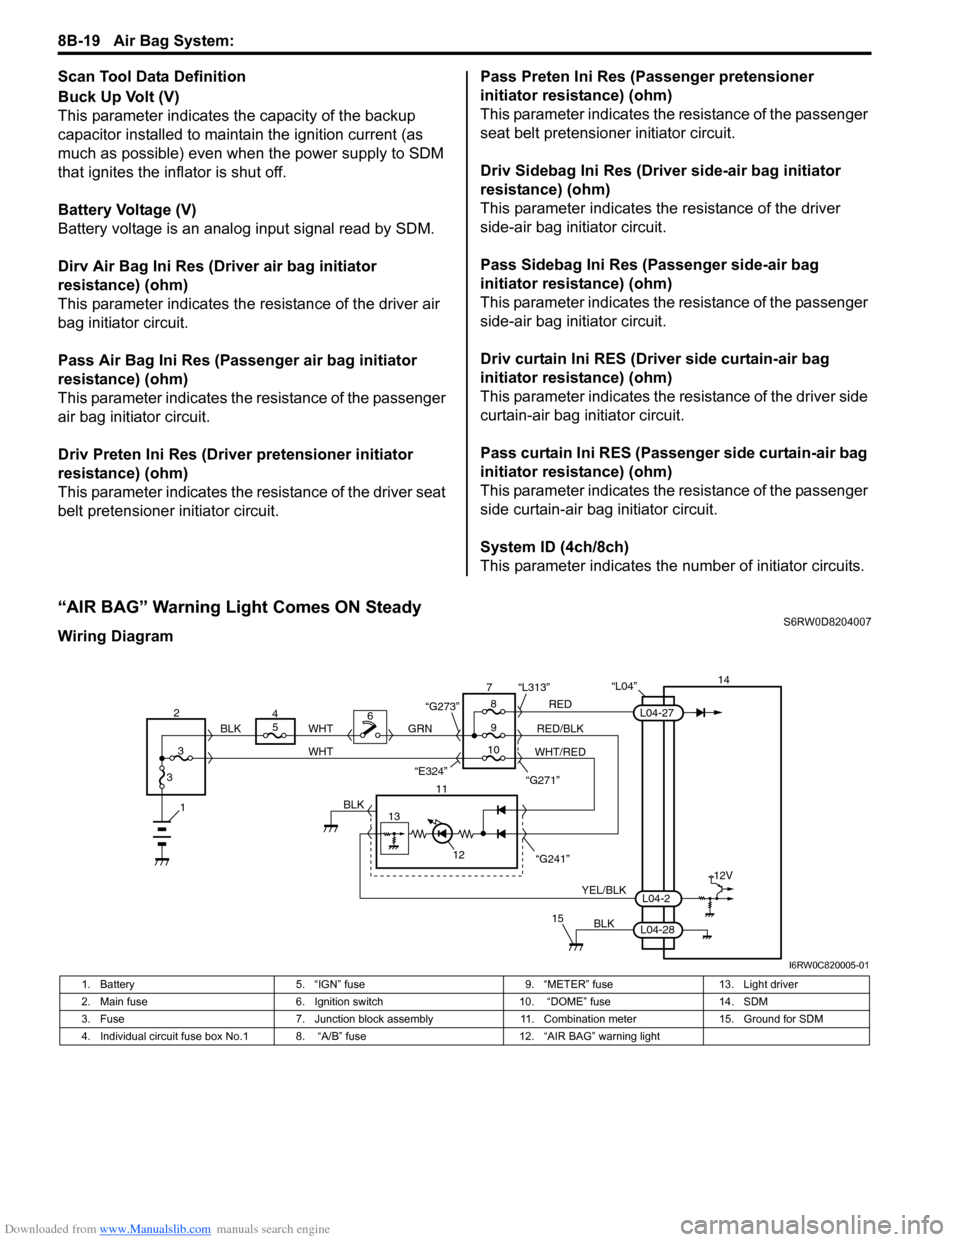
“AIR BAG” Warning Light Comes ON SteadyS6RW0D8204007
Wiring Diagram
“L04”14
5
9RED
RED/BLK GRN
YEL/BLK
BLK
8 7
11
12
15
L04-2
L04-28
L04-27
“G241” “G271” “L313”
13
12V
6
1BLK
WHT WHT
WHT/RED 2
34
310 BLK
“G273”
“E324”
I6RW0C820005-01
1. Battery 5. “IGN” fuse 9. “METER” fuse 13. Light driver
2. Main fuse 6. Ignition switch 10. “DOME” fuse 14. SDM
3. Fuse 7. Junction block assembly 11. Combination meter 15. Ground for SDM
4. Individual circuit fuse box No.1 8. “A/B” fuse 12. “AIR BAG” warning light
Page 1062 of 1556
Downloaded from www.Manualslib.com manuals search engine 8B-23 Air Bag System:
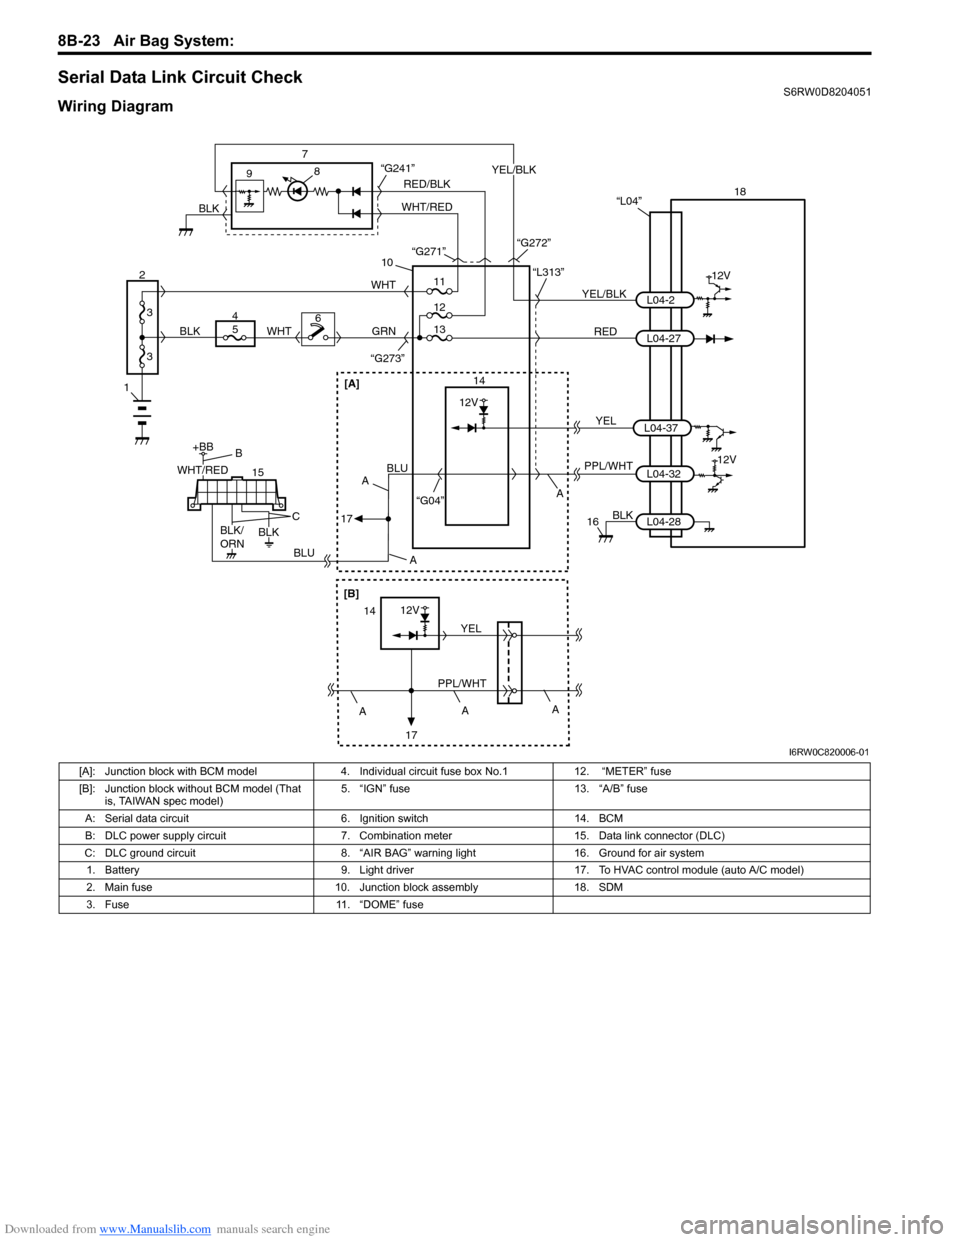
Serial Data Link Circuit CheckS6RW0D8204051
Wiring Diagram
1
2
3
3
18
12V
RED 7
14 9
10
“L313”
“G273”
YEL/BLKL04-2
L04-27 “L04”
PPL/WHT
“G04”L04-3212V
8
GRN
15
+BB
56WHTWHT
4
BLUBLU
BLK
16
11
12
“G241”
13
BLK
L04-28
RED/BLK
WHT/REDYEL/BLK
BLK“G271”
“G272”
WHT/RED
BLK/
ORNBLK
B
C
A A
A
17
[A]
A
[B]
12V
PPL/WHTYEL14
17A
A
YELL04-37
12V
I6RW0C820006-01
[A]: Junction block with BCM model 4. Individual circuit fuse box No.1 12. “METER” fuse
[B]: Junction block without BCM model (That
is, TAIWAN spec model)5. “IGN” fuse 13. “A/B” fuse
A: Serial data circuit 6. Ignition switch 14. BCM
B: DLC power supply circuit 7. Combination meter 15. Data link connector (DLC)
C: DLC ground circuit 8. “AIR BAG” warning light 16. Ground for air system
1. Battery 9. Light driver 17. To HVAC control module (auto A/C model)
2. Main fuse 10. Junction block assembly 18. SDM
3. Fuse 11. “DOME” fuse